How to Trim a Video Easily on Windows & macOS
 Mike Rule
Updated on
Hi. I’m running Windows 11. In both photos and media player I have completely lost the ability to trim videos. Now the only thing I’m offered is to “Edit with ClipChamp,” which is absolutely not something I’m going to download to be able to perform a basic video crop. What’s the issue here and why was this feature removed? - Microsoft Community
Lost the ability to trim videos in Windows 11? Don't worry, as we delve into alternative methods and user-friendly tools to effortlessly trim your videos not only on Windows 11/10/7, but also on macOS. Whether you're a seasoned editor or just starting out, we've got you covered with 5 simple methods to trim your videos and get them looking just the way you want.
How is Trimming Different from Cutting and Splitting?
Trimming, cutting, and splitting are all basic actions in video editing. But I believe some users are confused with trimming, cutting and splitting to some degree. What are the differences among trimming, cutting and splitting? You can find out here:
- Trimming: Trimming involves adjusting the beginning or end of a video clip to shorten its duration or remove unwanted parts. It doesn't involve removing any part of the video entirely; instead, it adjusts the in and out points of the clip.
- Cutting: Cutting involves removing a section of the video entirely. When you cut a video, you delete a portion of it, creating a gap in the timeline. It's often used to remove unwanted segments, transitions, or mistakes from a video.
- Splitting: Splitting a video involves dividing it into two or more separate segments at a specific point. It doesn't remove any part of the video; instead, it divides the video into smaller clips, which can then be edited independently.
Part 1. How to Trim a Video Using Winxvideo AI?
Winxvideo AI is an innovative video processing tool that harnesses the power of artificial intelligence to streamline the video enhancing, converting, editing and recording process. Designed with simplicity and versatility in mind, Winxvideo AI offers a range of features to help users trim, enhance, and transform their videos with ease.
 Free Download
 Free Download
Winxvideo AI is for PC, while Macxvideo AI (from our MacXDVD brand) is for macOS.
Here we focus on trimming videos. Winxvideo AI is able to:
- Trim the length of the video to make it shorter or remove the unwanted parts easily.
- Cut any part of the video, deleting a portion of your video, and combining the left two parts into a new video.
- More than trimming and cutting, but also cropping, merging, splitting, subtitling, rotating & flipping etc.
- Export the edited video in MP4, H.264, HEVC, MKV, AVI, MPEG, MOV, WMV and more.
How to trim a video in Winxvideo AI
Step 1. Free download and install Winxvideo AI on your computer. Open it up, then choose Video Converter option.
Step 2. Drag and drop or click on the +Video button to import video that you want to trim. Click the scissors-shaped Cut option under the video loading information.
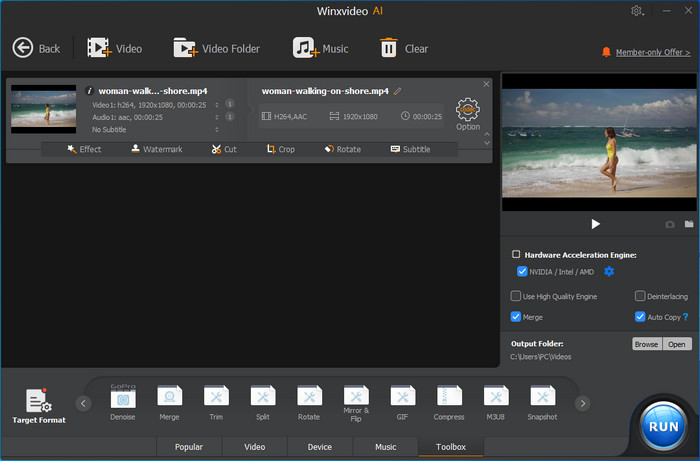
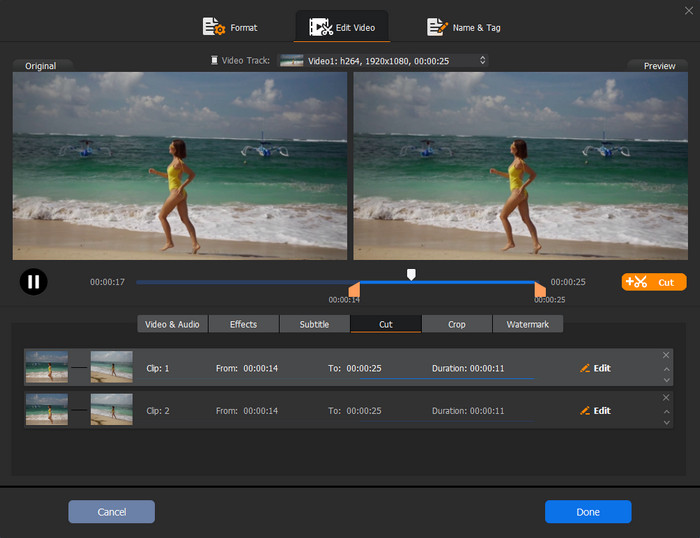
Step 3. To trim a video, Slide the slider on the timeline to set the start and end time of your video, then click on Cut option. To cut out a video, repeat the actions to cut video into two or more clips, but not include the parts that you want to remove. When you've done, click the Done option to save the changes.
Step 4. Click Browse button to choose an output folder. Tap RUN button to start trimming a video.
Hot search: How to trim a YouTube video that is not yours >>
Part 2. How to Trim a Video on Windows 11 with Clipchamp
As mentioned, many users find the option of trim in Windows Media Player is gone. Now they have to click on the 3 dots and use Clipchamp in Windows 11. As early as 2021, Microsoft acquired Clipchamp. After something of a delay, Clipchamp arrived to serve as the new default video editor in Microsoft's operating system, offering a range of beneficial features to assist users in compiling visually appealing footage, including the capability to trim videos.
Step-by-step guide to trim a video on Windows 11
Step 1. Launch Clipchamp on Windows 11. Select Create a new video to begin editing.
Step 2. Click Import media to load the videos that you want to trim in the library. Then drag and drop media onto the timeline at the bottom of the editor.
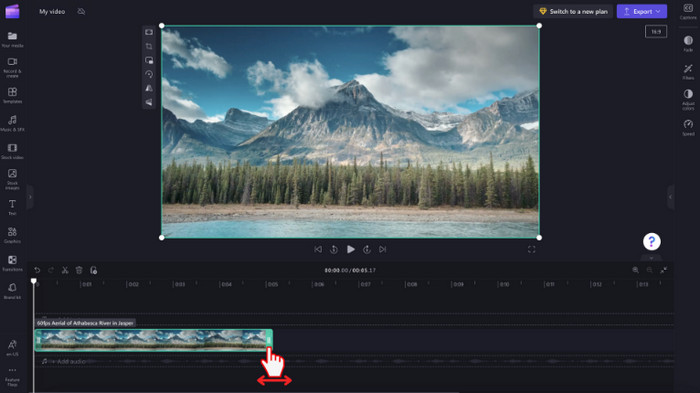
Step 3. To trim a video, select it, then click and drag the green bars back and forth. To split a video in two, select the clip, then move the seeker so it is positioned where you want to cut the clip, then click the scissor icon in the group of icons.
Step 4. Select the purple Export button at the top right corner of the editor to export your video. Also, select a video quality to save your video.
Part 3. How to Trim a Video on Windows and Mac Using VLC
VLC Media Player stands out as a convenient and accessible solution for users seeking to trim videos on Windows and macOS platforms. Its straightforward interface and compatibility across operating systems streamline the video trimming process, catering to users regardless of their preferred platform. Despite its limitations in advanced editing functionalities, VLC's strength lies in its simplicity and cross-platform accessibility, making it a valuable tool for basic video editing tasks. Trimming videos with VLC is intuitive, allowing users to define start and end points with ease.
Guide - How to Trim a Video with VLC
Step 1. Visit videolan.org to download the appropriate version for your operating system. Follow the on-screen instructions to install VLC on your Windows or macOS device.
Step 2. Launch VLC Media Player on your computer. Click on Media in the top-left corner of the VLC window and select Open File from the drop-down menu. Navigate to the location of the video file you want to trim and select it. Click Open to load the video into VLC.
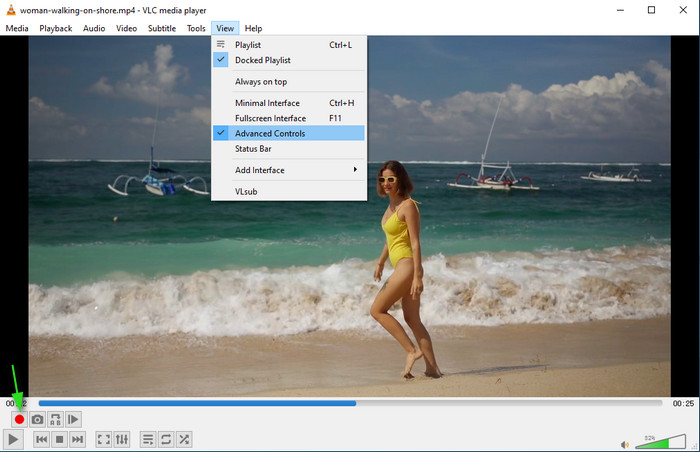
Step 3. Once the video is loaded, navigate to the menu bar at the top of the VLC window. Click on View and select Advanced Controls to enable the advanced controls toolbar.
Step 4. Play the video to identify the portion you want to trim. Pause the video at the starting point where you want the trim to begin. Click on the Record button in the advanced controls toolbar to set the start trim point. Continue playing the video until you reach the endpoint for the trim. Click on the Record button again to set the end trim point.
Step 5. Once you've set the trim points, click on Media in the menu bar and select Convert/Save from the drop-down menu. In the Convert window, specify the destination folder and filename for the trimmed video. Choose the desired output format and click Start to begin the trimming process.
Part 4. How to Trim a Video Online with Adobe Express
As trimming a video is quite a basic perform for users, people who don't want extra software downloads would like to trim video using online video cutter such as Adobe Express. Adobe Express is an innovative and user-friendly solution for trimming videos with precision and ease. It's part of the Adobe Creative Cloud suite, offering a streamlined and intuitive interface designed to empower users to edit their videos effortlessly. With Adobe Express, trimming videos becomes a seamless process, allowing users to remove unwanted sections, adjust the duration, and refine their content with professional-level precision.
Adobe Express tutorial: how to trim a video online
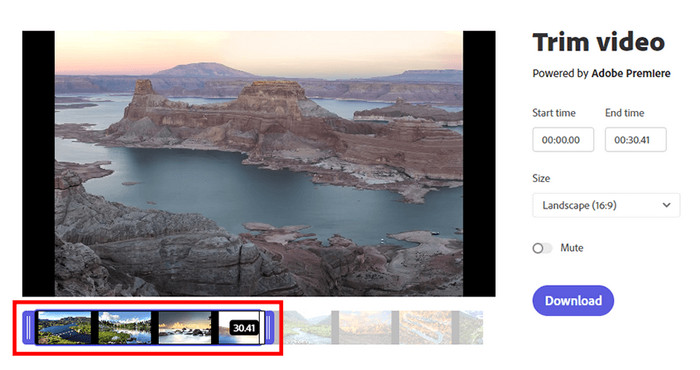
Step 1. Visit Adobe Express official site. Drag and drop the needed video or upload it via an integrated browser. It supports only MOV, MP4, and M4V. Once done, head to the main window > Try a quick action > Edit your video > Trim video.
Step 2. Define the part of the video you want to remove on the timeline. Drag the sliders to the time points within the video that you wish to retain. Alternatively, you can specify the precise value in seconds on the right-hand side.
Step 3. When you've done, now you can output your video or add it to your project in Premiere Pro. By clicking the Download button, you can save your video to your computer. The format and quality will correspond to those you’ve chosen.
Part 5. How to Trim a Video on Windows Using Photos App
Photos serves as the pre-installed video editor on Windows 10, offering a plethora of editing functionalities such as cutting, rotating videos, adding text, and applying filters. If you prefer not to download additional software, Photos is a viable option for trimming videos on Windows 10.
Photos App - How to trim videos on Windows 10
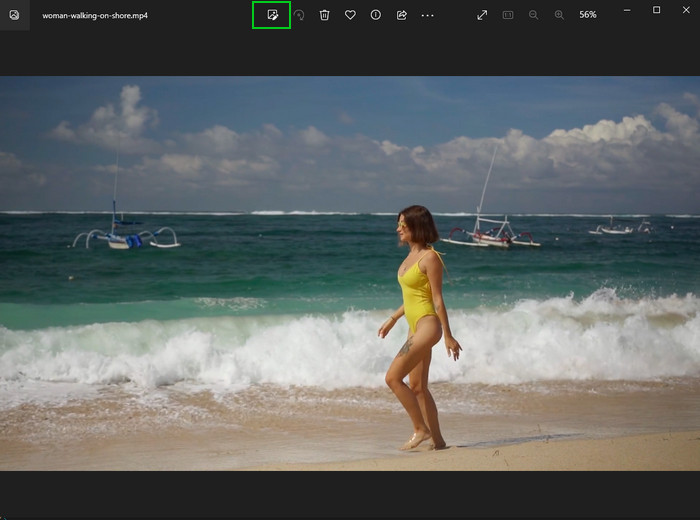
Step 1. Locate at the video you want to trim on your computer and right-click the file to open it with Photos.
Step 2. After the video has been loaded, select the video, triggering the appearance of a menu bar on your screen. From there, choose Edit & Create followed by Trim.
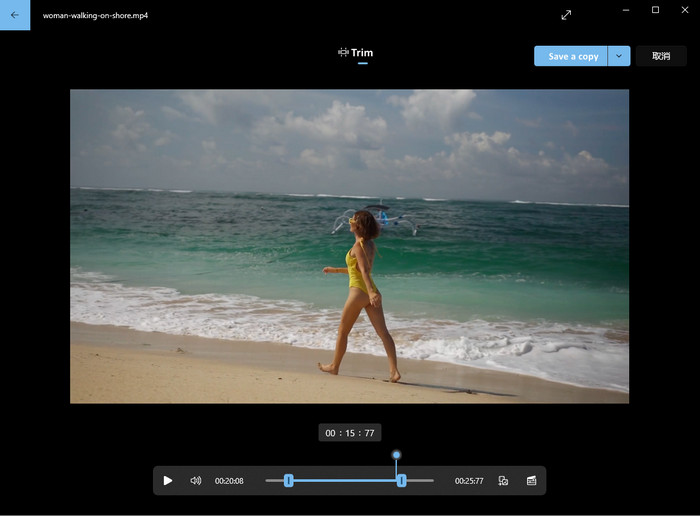
Step 3. Move the sliders on the left and right to select the portion of the video. Only the segment between the two sliders will be preserved.
Step 4. Once the trimming section is configured, select Save a copy from the top menu. The portion you designate will be stored in a new file, maintaining the original name with _Trim added to it. You can then rename it according to your preference.
Photos Legacy: Trimming a video on Windows 11
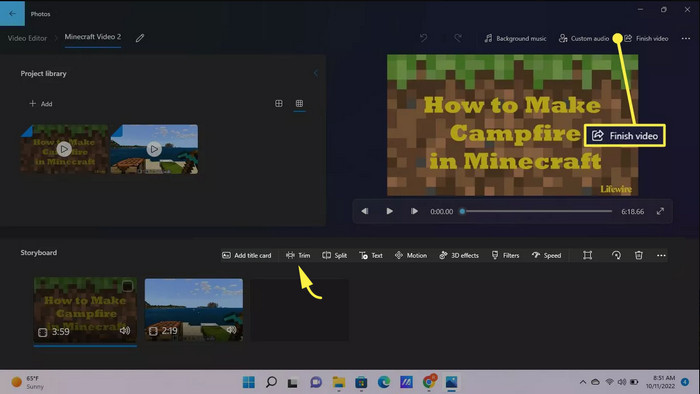
If you're using Windows 11, you may find Photos app has no option for trimming video. Never mind, the advanced version Photos Legacy also has a built-in video editor. It doesn't offer all of the same tools as Clipchamp, but it may be preferable to use for simpler projects.
What you need to do is to:
- Create a new video project.
- Import your video to Photos Legacy.
- Drag the media onto the storyboard.
- Use the toolbar under the preview window to trim the video on Windows 11.
- When you're satisfied, select Finish video in the upper-right corner.
 FAQ about Trim a Video
Using Winxvideo AI indeed. It both allows users to trim a video and cut the length of your video. To cut out part of your video:
- Drag and drop to load your video.
- Click Cut option, then slide the sliders left and right on the timeline to cut the portion of the video. Only the clips between two sliders are reserved. Then click scissors-shaped Cut icon.
- Repeat the action to retain the clips that you want to reserve, and cut out the unwanted parts.
- Click Done to save the changes.
- Tap RUN button to start cutting out part of your video immediately.
You need SolveigMM WMP Trimmer Plugin to trim video on Windows Media Player. Install it on Windows Media Player and sign up. Open your file in WMP,and click on Edit this file button to proceed to the interface for editing.Drag the sliders left amd right to set the start and end time of your video. After you've done, tap the "Save" button to export the trimmed video clip.
To trim a video on a Mac, utilize the native QuickTime Player application. Initially, launch the player, choose your video, and proceed to click Edit in the toolbar, followed by Trim. Subsequently, manipulate the yellow handles to designate the footage you wish to retain, and then click Trim to confirm your adjustments.
- Open the Photos app.
- Select the video and tap "Edit."
- Choose "Trim."
- Drag the handles to adjust the start and end points.
- Preview and tap "Done."
- Save as a new clip or trim the original.


