A Comprehensive Guide on How to Restore Old Photos
 Mike Rule
Post on
Do you happen to have any old photos that have been faded by time, creased from years of handling, or perhaps marked with scratches or tears? Don't worry too much about it. You may be able to restore these old photos.
In this guide, we will walk you through the process of restoring your old photos, both physically and digitally, so you can share your family's history with renewed clarity.
How to Restore Old Photos Digitally
By digitizing and restoring old photos, you can cherish them forever. To digitize a physical photo, you can take your photo to a professional scanning service. If you cannot find a service like that, you can take a high-resolution photograph of the original photo with your phone or camera.
Now that you have a digital copy, you can search for an old photo restoration program to perform this task. Here, we'll introduce a few for your reference.
Method 1. Restore Old Photos with Winxvideo AI
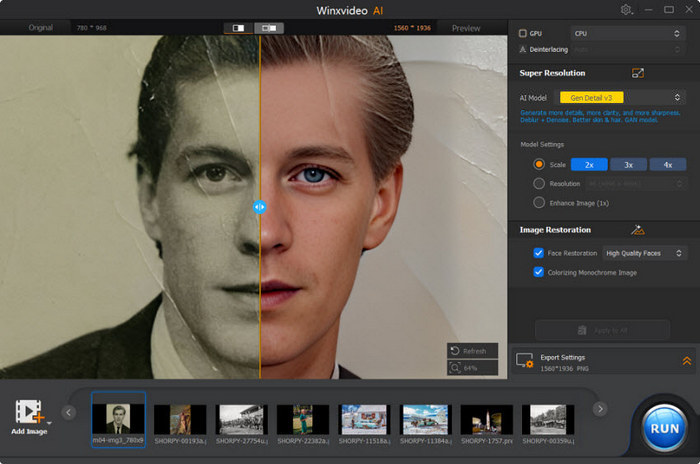
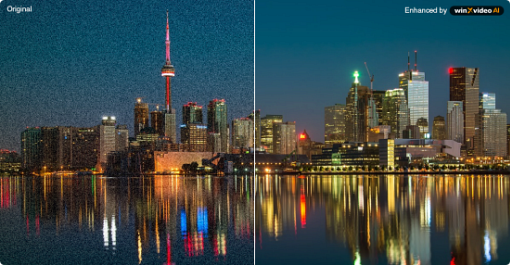
Winxvideo AI is an AI-powered image and video enhancer. With the built-in Image AI feature, it can remove the blur, noise, scratches, stains, and spots from your old photos, restore faces, and colorize black and white photos. In addition, it allows you to increase your photo resolution by 2X, 3X, and 4X, reaching up to 10K resolution.
Apart from enhancing images, it can also be used to enhance videos (such as stabilizing shaky footage and boosting FPS), convert between video file formats, reduce file size, record screen and webcam, and edit videos.
To help users evaluate its performance before purchasing, a free trial is offered to allow users to process 5 images for free. If you'd like to give it a try, simply click the download button below and follow our guide.
 Free Download
  Free Download
Winxvideo AI is for PC, while Macxvideo AI (from our MacXDVD brand) is for macOS.
Step 1. Once you've Winxvideo AI installed on your computer, simply open it and then select Image AI.

Step 2. Click the Add Image button to load the old photo(s) you want to restore.
You're allowed to load multiple images for batch processing.
Step 3. Specify Model Settings.
If you don't need to increase photo resolution, choose Enhance Image (1X). You can preview the result in the left player window.

Step 4. Enable image restoration based on your own needs.
Under Image Restoration, there are two options: Face Restoration and Colorizing Monochrome Image. If you want to restore faces in old photos, check Face Restoration. If you need to colorize your black-and-white old photos, check Colorizing Monochrome Image.
Step 5. Click RUN to export the photo that is already restored.
Method 2. Restore Old Photos in Photoshop
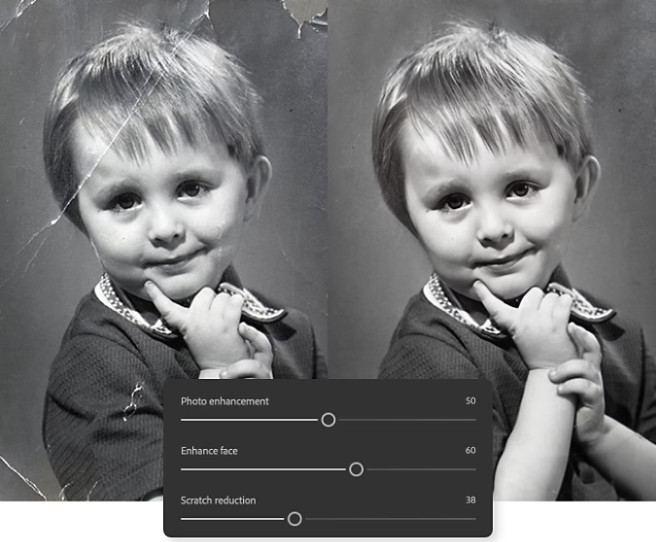
If you want to have more control over your photos, you can try Photoshop. Its Photo Restoration Neural Filter can bring your old photos back to life in one step. And it allows you to fine-tune the filter's intensity with sliders for photo enhancement, facial enhancement, and scratch reduction.
Now, let's learn how to restore old photos with Photoshop.
Step 1. Open Photoshop and import your photo. This image will become your background layer. Then, click the lock icon next to the background layer to prevent accidental edits to your original image.
Step 2. Create a new layer. This empty layer will hold all your edits, allowing you to work non-destructively.
Step 3. Go to the top menu bar and select Filter > Neural Filters > Photo Restoration to download and apply this filter to your phone. Then, check the instant improvements in your photo's clarity and use the sliders provided with the filter to adjust the level of image enhancement, facial enhancement, and scratch reduction.
Read more: How to Colorize Black and White Photos Photoshop

Step 4. Address remaining damage (optional).
Go to the top toolbar, choose "Sample All Layers" and "Content Aware", and then use the Spot Healing Brush to click or drag over dust spots and minor imperfections.
For larger unwanted marks, like tears or creases, select the Clone Stamp tool. Set the "Sample" option to "Current layers and below" to work non-destructively. Choose a clean area of your photo to "clone" from and then click and drag over the mark to cover it seamlessly.
Step 5. Colorize your photos (optional).
If you want to colorize your photo, create a new layer that merges all your previous edits. To do this, simply use the keyboard shortcut Ctrl+Alt+Shift+E (Windows) or Command+Option+Shift+E (Mac).
Then, go to Filter > Neural Filters > Colorize. Set the blending mode of the colorized layer to "Color" in the Layers panel. This allows you to refine the colorization further without affecting the original image.
Step 6. If you've finished all settings, go to File > Export to export the restored photo.
Additionally, Photoshop offers several tools to restore faded color photos. You can use them based on your own needs.
1. Auto Color (quick fix): This one-click option analyzes the existing colors in your photo and creates a balanced palette. It's a good starting point for a quick color boost, potentially restoring some lost vibrancy.
2. Hue/Saturation Adjustment Layer (targeted control): For more precise color correction, utilize the Hue/Saturation adjustment layer. This lets you adjust the overall "Hue" (color), "Saturation" (intensity), and "Lightness" of specific color ranges within your photo.
3. Levels Panel (shadow and black enhancement): The Levels panel provides precise control over the shadows, blacks, and midtones of your photo. Navigate to "Image" > "Adjustments" > "Levels", and then play with the black point slider to darken dark areas, potentially revealing hidden details lost due to fading.
4. Clarity Slider (boost sharpness): As a finishing touch, the Clarity filter can enhance sharpness and bring out fine details in your restored photo. Go to "Filter" > "Sharpen" > "Clarity", and then adjust the slider to your liking to achieve the desired level of sharpness.
Method 3. Restore Old Photo Online
If you want to restore old photos right from your browser, you can try an online solution. A popular option is VanceAI. This tool can restore faded, low-resolution, and other old photos scarred by creases, scratches, spots, and stains. And it can also colorize back and white photos.
Step 1. Open VanceAI Photo Restoration page and then click the Upload Image button to open the image you need to restore.
Step 2. Preview the automatic enhancement.
VanceAI's Old Photo Restorer will automatically analyze and enhance your photo. Once processing is complete, you'll see a preview of the restored version.
Step 3. Fine-tune the result with manual fixes.
If you're not satisfied with the automatic result, simply click the Back button for further refinement.
- Fix Scratches/Creases/Spots: Use the "Manual Fix" option to manually smoothen out any unwanted imperfections.
- Improve Quality: Adjust the denoising intensity for a cleaner look.
- Colorize Black & White Photos: Breathe vibrant color into your monochrome photos with VanceAI's AI colorization or by providing color prompts.

Step 4. Click Start to Process to apply your settings.
Step 5. Click Download Watermark-Free to download the restored photo.
Method 4. Restore Old Photos on iPhone/Android
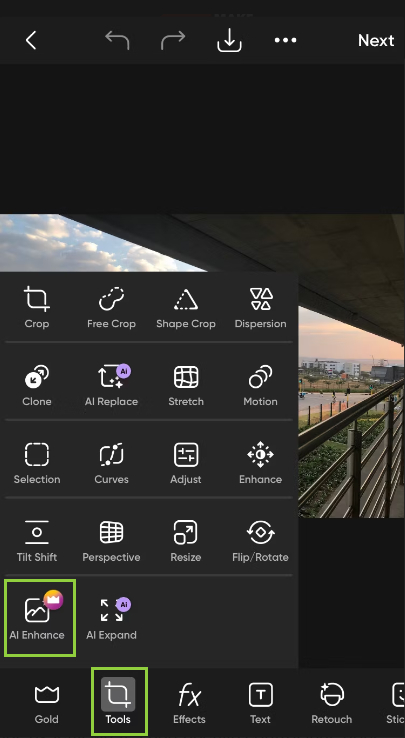
Restoring old photos is easy with the many apps available for iPhone and Android. One standout option is PicsArt, an all-in-one photo editor that offers a broad range of tools for both photo editing and graphic design. Its AI Enhance feature is particularly useful for restoring old photos, making the process straightforward for both beginners and seasoned editors.
Steps to Restore Photos Using PicsArt:
Step 1. Download PicsArt.
Download PicsArt from the App Store (iPhone) or Google Play Store (Android).
Step 2. Open the PicsArt app and upload your old photo.
Launch the app and tap the plus sign (+) to select the photo you want to restore from your library.
Step 3. Use the Enhance tool.
Navigate to the tools section, select "AI Enhance", and watch as the AI brings your memories back to life in seconds.

Step 4. Refine your photo.
If needed, use the additional editing tools to make any final adjustments.
Step 5. Download your restored photo.
Tap "Next" and then choose "Save" to download your newly restored image.
How to Restore Old Photos Physically
For those who enjoy a little project and have photos that aren't overly delicate, there are some basic restoration techniques you can try at home. However, it's important to proceed with caution.
Restore Old Photos by Yourself
Separating Stuck Photos
Separating photos that are stuck together can be risky, so make sure you proceed with caution. If they're already quite damaged beyond salvage, here's what you can try: avoid the temptation to pull them apart forcefully, as this can cause further tearing. Instead, submerging them completely in distilled water for 30 minutes can loosen the adhesive holding them together. Once softened, gently slide them apart and allow them to dry completely before proceeding with any further restoration efforts.
Dust Removal and Cleaning
The first step to restoring your photos is a gentle cleaning. Use a soft-bristle brush to carefully remove any dust, sand, or loose debris from the surface. For stubborn stains, dampen a clean cloth with warm water and dab the affected area lightly. Avoid excessive rubbing, as it can damage the delicate photo surface.
Tear Repair
When it comes to repairing tears, remember that regular tape is a big no-no! The adhesive can damage your photos over time. Instead, head to a stationery store and invest in archival-quality, acid-free tape specifically designed for photo preservation. Use small strips of this tape to carefully mend tears on the back of the photo, ensuring a secure and long-lasting repair.
Flattening Curled Photos
Curled photos can be flattened using a simple DIY humidification chamber. Here's how: pour water into a plastic bin and place a wire rack inside to elevate the photo. Make sure the photo doesn't touch the water directly. Close the lid and let the photo sit for a few hours to relax the curl. Afterwards, place the photo face down on a flat surface with a weight on top to dry flat.
Please remember that a gentle touch is key when tackling any manual restoration project.
Professional Old Photo Restoration Services
If you're dealing with valuable or heavily damaged photos, it's always best to consult a professional old photo restoration service for the best possible results. Here are a few reputable options to explore.
- Forever Studios: This service prides itself on meticulous restoration techniques, using advanced software to address scratches, tears, fading, and even missing sections. They offer a variety of restoration packages and turnaround times.
- ScanCafe: This service goes beyond just restoration. They offer high-quality photo scanning with advanced dust and scratch removal to create digital copies of your physical photos. Additionally, they provide professional restoration services, using skilled technicians to address a wide range of damage, from minor scratches to significant tears and fading.
- MemoryCherish: This service utilizes a team of skilled artists to restore photos digitally by hand. They offer flat-fee pricing and a user-friendly online upload process.
Ultimately, the best approach to restore old photos depends on your comfort level, budget, and the condition of your photos. Whether you tackle it yourself or seek professional help, there's a path to breathe new life into your cherished memories and ensure they're preserved for generations to come.


