


How to Remove JPEG Artifacts Easily [ AI & Free]
 Mike Rule
Updated on
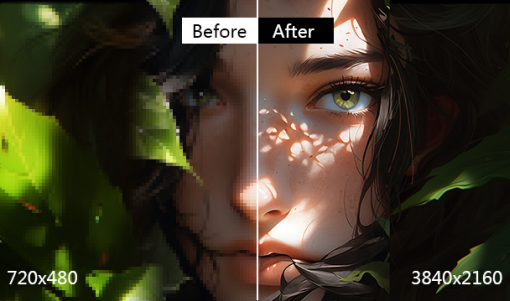
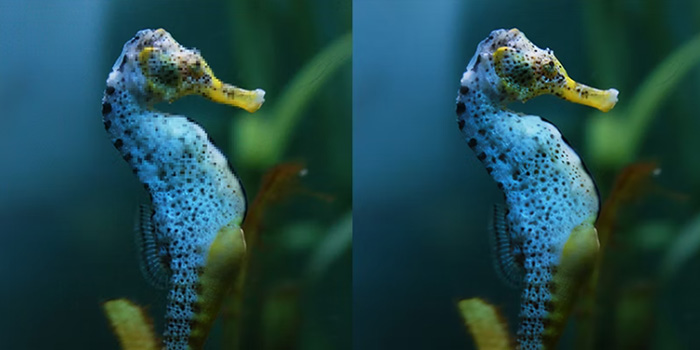
Perhaps the once crisp details appear blurry, or blocky squares mar the smooth edges. These are the telltale signs of JPEG artifacts, a common consequence of using this popular image format. These artifacts aren't permanent. This article will equip you with the knowledge and tools to banish them. You’ll learn different methods to remove JPEG artifacts, from user-friendly online tools to powerful image editing software like Photoshop, GIMP, Winxvideo AI. Additionally, some handy tips are shared here to minimize artifacts before they even appear.
How to Remove JPEG Artifacts with Software/Online
How to Repair Damaged Photo Picture Frame with Winxvideo AI
If you're looking for potentially more robust features and ease of use, Winxvideo AI presents a good choice. Winxvideo AI differentiates itself through its emphasis on artificial intelligence. By using powerful AI algorithms specifically designed for image enhancement, it promises a potentially superior level of artifact removal compared to online tools that may rely on simpler techniques. This could translate to sharper, clearer images with minimal residual distortions. It shows significantly faster processing speed, especially for large image files.
Winxvideo AI also transforms low-resolution images into 4K, 8K, or even 10K masterpieces. Its upscaling capabilities could breathe new life into your old photos, allowing you to display them on high-resolution screens with exceptional clarity. Concerned about the inherent quality limitations of JPEGs? It allows you to transform your JPEGs to PNG format. PNG offers lossless compression, potentially preserving more image detail and overall quality compared to JPEG.
 Free Download
  Free Download
Winxvideo AI is for PC, while Macxvideo AI (from our MacXDVD brand) is for macOS.
How to Remove JPEG Artifacts Using Winxvideo AI
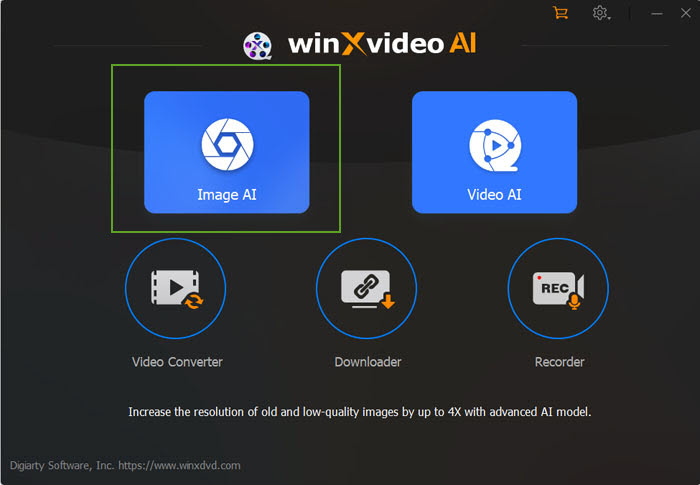
Step 1. After installing Winxvideo AI, fire it up and head over to the "Image AI" section on the main interface to get JPEG artifacts removal feature.
Step 2. Click the "Add Image" button. This opens your file explorer, allowing you to browse and select the photos you want to repair. Winxvideo AI shines for its batch processing capabilities. Simply select multiple photos at once and let the software work its wonders on all of them simultaneously, saving you valuable time.
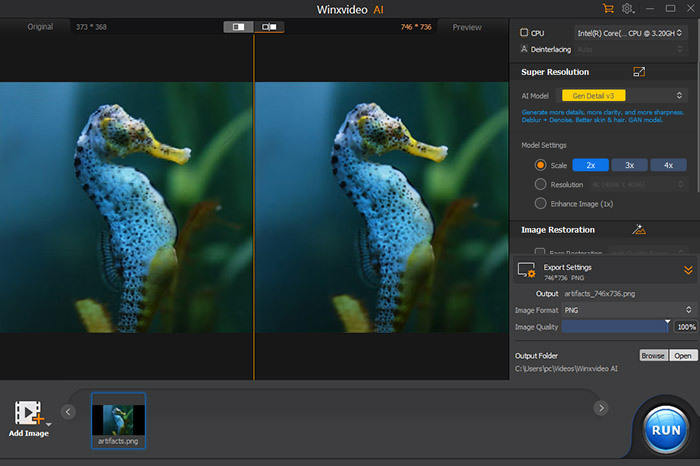
Optional: Under "Model Settings," choose the upscaling option that suits your needs – "Enlarge Image (2X)" for double the resolution, or go even further with "Enlarge Image (4X)" for stunning high-definition results.
For basic repairs: If upscaling isn't necessary, you can stick with the default "Enhance Image (1X)" setting under "Model Settings." This setting focuses on remove common imperfections like scratches, dust, and yes, those pesky JPEG artifacts. You can even preview the repaired version of your photo in the window on the left side of the interface to see the improvements in real-time.
Step 3. Once you're happy with your selections and settings, click the big "RUN" button. This initiates the process to remove JPEG artifacts. Winxvideo AI's AI algorithms will go to work, meticulously removing artifacts and restoring your photos. Once processing is complete, your repaired photos will be ready for you to save and cherish, looking better than ever before.
Step 4. Click the "RUN" button to initiate the repair process. Once finished, your restored photos will be ready for you to save and enjoy.
Read more: How to Sharpen Blurry Image (AI & Free)
How to Remove JPEG Artifacts in Photoshop
Photoshop remains a top choice in image editing, and tackling JPEG artifacts is no exception. It offers two primary methods for this task: reduce noise filter and Neural filters. Reduce noise filter analyzes the image and attempts to smooth out noise, including artifacts caused by JPEG compression. While effective for mild artifacts, it might blur some details as well. Neural Filters - JPEG Artifact Removal (new in Photoshop 2021 and later) is an AI-powered filter specifically designed to remove JPEG artifacts AI. It offers a more targeted approach compared to the Reduce Noise filter, potentially preserving details while removing artifacts.
For experienced users, Photoshop offers advanced tools like selective noise reduction for even more precise control over artifact removal in specific areas. If you're new to Photoshop, navigating the interface and tools may require some learning time.
Method 1: Using Reduce Noise Filter
Step 1. Open your JPEG image in Photoshop. Go to Filter > Noise > Reduce Noise.
Step 2. In the Reduce Noise window, you'll see options for Strength, Reduce Color Noise, and Sharpen.
Strength: Adjust this slider to control the amount of noise reduction. Start with a low value and gradually increase it while monitoring the preview to avoid excessive blurring.
Reduce Color Noise: This option primarily targets color noise but can also influence artifacts to some extent. You can experiment with this setting to see if it improves the results. Generally, keep it low or off.
Sharpen: Since some noise reduction can cause slight blurring, you can use the Sharpen slider to compensate. Be careful not to over-sharpen, which can create unwanted halos around edges.
Step 3. Once satisfied with the preview, click OK to apply the noise reduction.
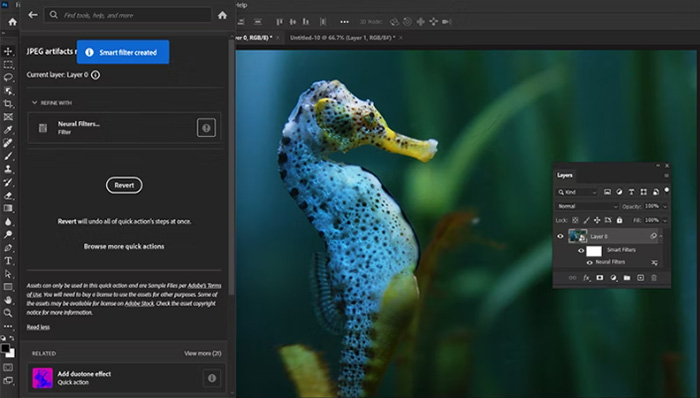
Method 2: Using Neural Filters - JPEG Artifact Removal
Step 1. Open your JPEG image in Photoshop.
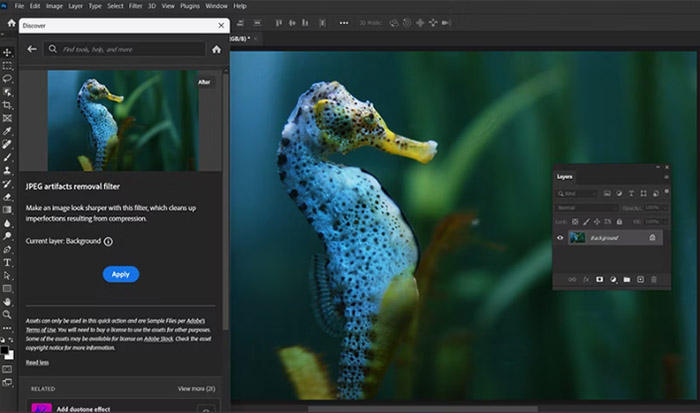
Step 2. Go to Filter > Neural Filters. In the Neural Filters panel, under the Reduce Noise category, select JPEG Artifact Removal. You'll see a preview of the image with a slider labeled Strength. This controls the intensity of the artifact removal.
- Low: Suitable for mild artifacts.
- Medium: A good starting point for most cases.
- High: Use for heavily compressed images with significant artifacts, but be aware it may introduce some softness.
Step 3. Once you're happy with the settings, click OK to apply the filter.
Read more: How to Fix Grainy Photos on iPhone, Windows, macOS, etc.
How to Remove JPEG Artifacts Free with GIMP
GIMP, the free and open-source image editor, can remove JPEG artifacts easily with its filters. Similar to Photoshop, GIMP utilizes filters to address noise and artifacts. The primary method involves selective blurring to smooth out artifacts while preserving details. GIMP allows for a high degree of customization over the filtering process.
GIMP's interface may require some familiarization compared to more user-friendly software. While powerful, GIMP's workflow for noise reduction might be less streamlined compared to dedicated tools. Here’s a detailed guide to removing jpeg artifacts in GIMP.
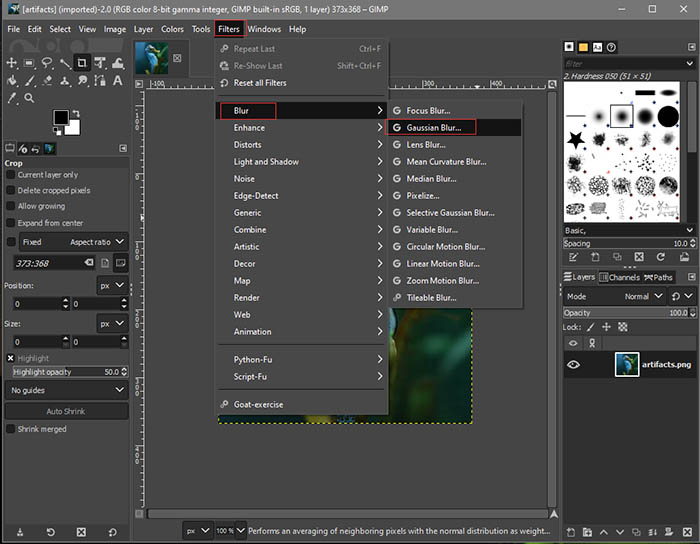
Step 1. Open your JPEG image in GIMP.
Step 2. Go to Filters > Blur > Selective Gaussian Blur.
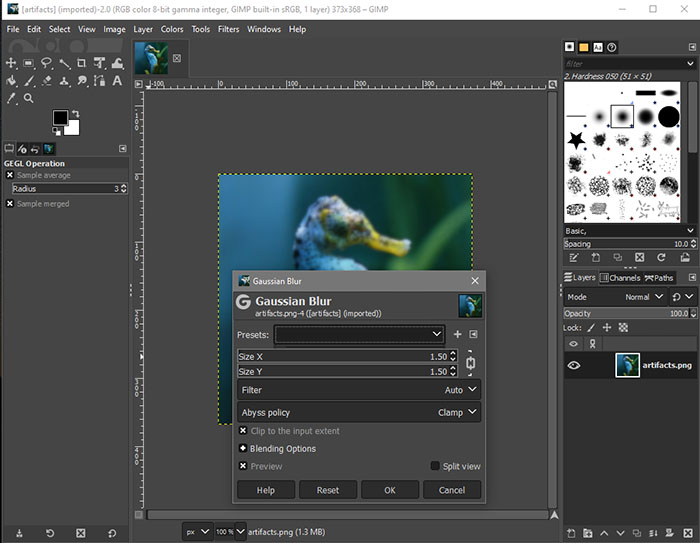
Threshold: This setting determines which image details are considered noise or artifacts. A higher Threshold value focuses on smoothing larger, more noticeable artifacts. Experiment with this setting to find the best balance.
Radius: This slider controls the strength of the blurring effect. Start with a low value and gradually increase it while monitoring the preview to avoid excessive blurring.
You can also try a two-pass approach for better results.
First Pass: Set a high Threshold (around 50-100) and a low Radius (around 0.5-1.0). This targets the most prominent artifacts.
Second Pass (Optional): Set a lower Threshold (around 10-20) and a slightly higher Radius (around 1.5-2.0) to address more subtle noise without overly blurring details.
Step 3. Click OK to apply the blur filter(s). Consider using the Sharpen filter (Filters > Enhance > Sharpen) afterwards to compensate for slight blurring introduced by noise reduction.
How to Remove JPEG Artifacts Free Online (Limited)
One of the biggest draws of online JPEG artifact removers is their accessibility. There's no need to download or install bulky software. Simply fire up your web browser, navigate to the chosen tool, and you're ready to tackle those pesky artifacts. This eliminates the need for additional storage space and allows you to access the service from any device with an internet connection.
Another perk is the availability of free online tools. Many platforms offer basic artifact removal functionality without requiring users to pay a dime. This makes it a budget-friendly option for occasional use or for those working with a limited budget.
However, there are some trade-offs to consider before uploading your images. Free versions often come with limitations. File size restrictions might prevent you from processing larger images, or the free tier might offer only basic artifact removal capabilities. More advanced features, like noise reduction or sharpening, may be reserved for paid subscriptions. The speed at which your images are processed can vary depending on the tool and your internet connection. Free tools may have slower processing times due to higher user volume, while paid options might offer faster turnaround speeds.
Step 1. Head over to VanceAI JPEG Artifact Remover using your web browser.
Step 2. Click the "Choose Image" button or drag-and-drop your JPEG file containing the artifacts. VanceAI supports various image formats, including JPG and PNG.
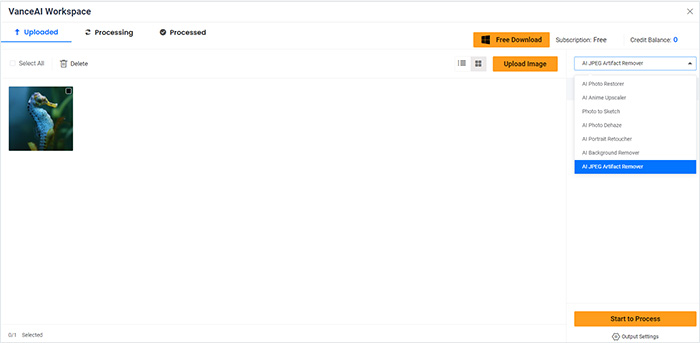
Step 3. VanceAI uses powerful AI algorithms to automatically remove the JPEG artifacts from your image. No additional settings are required – simply click the "Start Processing" button and wait.
Step 4. Once processing is complete, you can preview the improved image. If satisfied, click the "Download Image" button to save the artifact-free version to your device.
Start with a high-quality original image. The better the source image, the better the results will be. Don't expect miracles. While VanceAI can significantly improve image quality, it may not be able to completely restore heavily artifacted images.
Other Tricks to Remove JPEG Artifacts Free
While image editing software offers powerful tools for JPEG artifacts removal, there are additional methods you can use to improve image quality. These strategies may be particularly useful for quick fixes or when dealing with multiple images.
Resize the Image to Remove JPEG Artifacts
The severity of JPEG artifacts is influenced by the image's original size and the level of compression applied. Smaller images, or those heavily compressed, tend to exhibit more pronounced artifacts.
- Reduce Image Size. While this might seem counterintuitive, decreasing an image's dimensions can sometimes reduce the visibility of artifacts. By lowering the pixel count, you effectively lessen the impact of compression on image detail. However, excessive reduction can degrade overall image quality.
- Upscale the image. Increasing an image's size (upscaling) won't restore lost data. However, some image editing software employs intelligent upscaling techniques that can help mask artifacts by filling in missing information. It's essential to use these tools judiciously, as over-reliance can introduce new issues.
Convert Image Format for JPEG Artifacts Removal
JPEG, while efficient for compressing photographs, is a lossy format, meaning image data is discarded to reduce file size. This trade-off often results in visible artifacts. To mitigate this, consider alternative image formats.
- Lossless formats. PNG and TIFF are lossless formats, preserving all image data during compression. This eliminates the risk of JPEG artifacts. However, these formats typically generate larger file sizes.
- Balancing act. For scenarios demanding smaller file sizes without sacrificing image quality, WEBP is a viable option. It offers superior compression compared to JPEG while maintaining visual clarity.
Balance File Size and Quality with WEBP
WEBP offers superior compression compared to JPEG while maintaining a good balance between image quality and file size. This makes it a strong option for situations where you want to minimize file size without sacrificing too much visual detail.
- Goode balance. Consider WEBP, a format gaining traction for its impressive capabilities. Lossy WEBP compression allows for even smaller file sizes while maintaining good image quality, making it ideal for web use or sharing photos where minor quality reduction is acceptable.
- Wide browser support. Major web browsers like Chrome, Firefox, and Edge now offer native support for WEBP images. This ensures your photos will display correctly without requiring additional plugins for viewers.

Sum up
Battling JPEG artifacts doesn't have to be expensive. Free image editing software like GIMP offer basic noise reduction and sharpening tools that can help smooth out artifacts and restore some detail in your photos. Additionally, converting image formats to lossless options like PNG or TIFF eliminates artifacts altogether, although these formats come with larger file sizes.
While free solutions offer a starting point, for demanding tasks or large photo collections, paid software might be a better choice. Software like Winxvideo AI utilizes advanced AI specifically designed for image enhancement,leading to superior artifact removal and overall image restoration. Additionally, paid software often allows batch processing, saving you time when dealing with a large number of photos.
 FAQs about JPEG Artifacts Removal
The higher the compression ratio, the more information is discarded, resulting in more noticeable artifacts. Areas with high detail, strong color contrasts, and fine textures are more prone to artifacts.
JPEG artifacts are visual imperfections that occur when an image is compressed using the JPEG format. To achieve smaller file sizes, JPEG discards some of the original image data. This loss of information manifests as visible distortions or anomalies in the picture. Commonly, these artifacts appear as:
Blocky patterns: Especially noticeable in areas of solid color or sharp edges.
Blurring or smearing: Loss of detail, often around fine lines or textures.
Color banding: Abrupt color transitions or unnatural color gradients.
JPEG artifacts, caused by image compression, can be minimized by using higher quality settings, avoiding excessive compression, and working with original images. For optimal results, consider alternative formats like PNG or TIFF, or explore options like WEBP for a balance between quality and file size.
Yes, removing JPEG artifacts can introduce new issues like increased noise or loss of detail. It's important to adjust settings carefully and experiment to find the best balance.
Adobe Photoshop, GIMP, Winxvideo AI, etc. These software programs often offer tools like noise reduction, sharpening, and demosaicing, which can help mitigate the effects of JPEG artifacts.


