


How to Sharpen Blurry Image Free Online/Windows/macOS
 Mike Rule
Updated on
Image sharpening demands a nuanced approach—one that acknowledges the fine balance between enhancing visual appeal and avoiding overcorrection. Sharpening, when employed judiciously, can add a subtle yet impactful touch to already well-defined images. However, it is not a magical remedy for issues such as poor focus or motion blur. In this exploration, we will delve into cutting-edge solutions, including AI image sharpeners, free open-source tools, and online image sharpeners, each offering unique capabilities to enhance image clarity.
2026 best Image Sharpener Software to Sharp Blurry Images
#1. Best AI Image Sharpener for Windows - Winxvideo AI
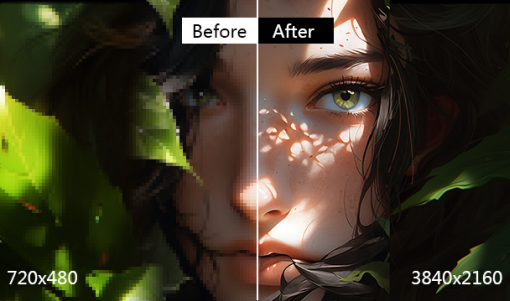
Winxvideo AI is the top recommended AI image sharper, which excels in its ability to sharpen images using advanced artificial intelligence algorithms. The tool intelligently enhances image details without introducing artifacts, overcorrection, or halos, making it suitable for various photography genres. Whether you're a portrait, animal, or landscape photographer, Winxvideo AI is designed to meet the needs of diverse users. Powered by advanced AI face enhancement technology, Winxvideo AI stands out in sharping and fixing blurry faces. It ensures a clearer, crisper, and more precise result. With deep learning algorithms, it can sharp and upscale blurry photos to 4K, 8K, and even 10K resolutions, effectively bringing faded, ripped, or stained images back to life.
One notable limitation is the lack of a Mac version. While the tool is a powerful choice for Windows users, Mac users are currently unable to benefit from its advanced image sharpening and restoration features.
 Free Download
 Free Download
Winxvideo AI is for PC, while Macxvideo AI (from our MacXDVD brand) is for macOS.
- Sharp images without introducing artifacts or halos.
- AI automatic image enhancement technology.
- Sharp and upscale old photos to 4K, 8K, and even 10K.
- Batch processing with GPU acceleration.
- No Mac version.
Step 1. Free download and install Winxvideo AI on your computer.
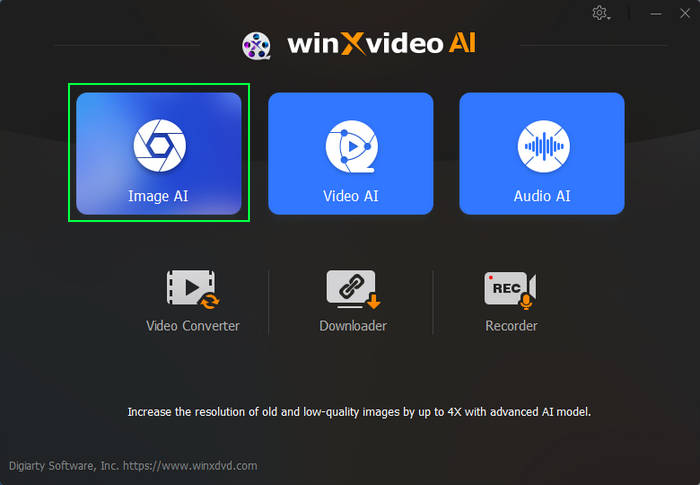
Step 2. Launch Winxvideo AI and navigate to the main screen. Click on "Image AI." Choose "Add Image" to load the image you want to sharpen.
Step 3. Specify "Type" and "Model Settings."
- Type: Select between Reality or Anime. If Anime is chosen, customize the denoise level.
- Scale: Increase the image resolution by choosing 2X, 3X, or 4X.
- Image Enhancement: Upscale image quality while preserving the original aspect ratio.
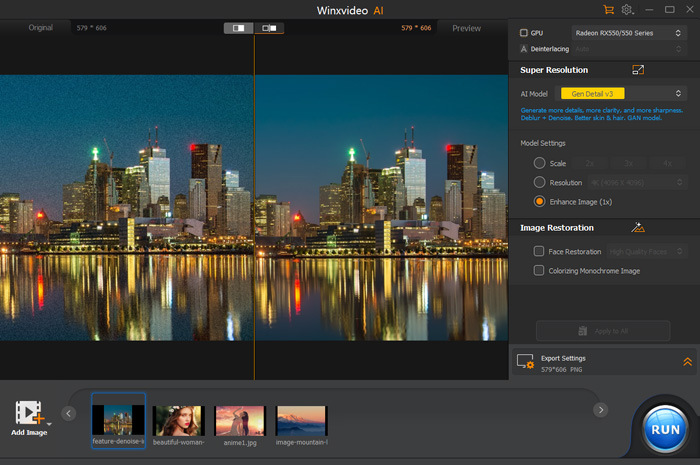
Step 4. Expand "Export Settings" and set the output format, quality, and output folder (default settings are acceptable). Click the "RUN" button to initiate the export process, generating a new image with higher resolution than the original.
#2. The Most Professional Image Sharpener – Photoshop
Adobe Photoshop is a pinnacle in image sharpener tools, reigning as the industry standard for three decades. The use of filters like Unsharp Mask and Smart Sharpen allows users to fine-tune the sharpening process and old photo restoration with precision. Unsharp Mask, a widely used sharpening filter in Photoshop, employs a traditional darkroom technique. This approach, rooted in photographic history, gives a sense of authenticity to the sharpening process. Unsharp Mask, a widely used sharpening filter in Photoshop, employs a traditional darkroom technique. This approach, rooted in photographic history, gives a sense of authenticity to the sharpening process.
For users with a sole focus on sharpening and deblurring images, the vast array of Photoshop's functionalities might be overkill. The software's richness may overshadow its primary purpose, making it less user-friendly for those with straightforward requirements.
- Offer Unsharp Mask and Smart Sharpen filters.
- Adopt a traditional darkroom technique.
- Great noise management.
- A plethora of photo editing features.
- Steep learning curve.
- Functionalities might be overkill.
- Expensive for casual users.
[User Guide] How to Sharpen Blurry Images with Photoshop
Step 1. Enhance the Image Foundation
Open your chosen photo and initiate the sharpening process by duplicating the background layer. Right-click on the background layer, opting for 'Duplicate Layer...' to create a new layer. Set the blend mode of the new layer to 'Luminosity' to prevent color fringing around edges. This innovative approach provides a solid foundation for subsequent sharpening adjustments.
Step 2. Precision Sharpening Techniques
Explore the power of Unsharp Mask and Smart Sharpen for unparalleled sharpness.
1. Unsharp Mask: Zoom in to 100%, navigate to Filter > Sharpen, and select 'Unsharp Mask...' Filter. Adjust the Amount, Radius, and Threshold sliders for optimal results. Strive for a balance between sharpening and avoiding undesirable effects.
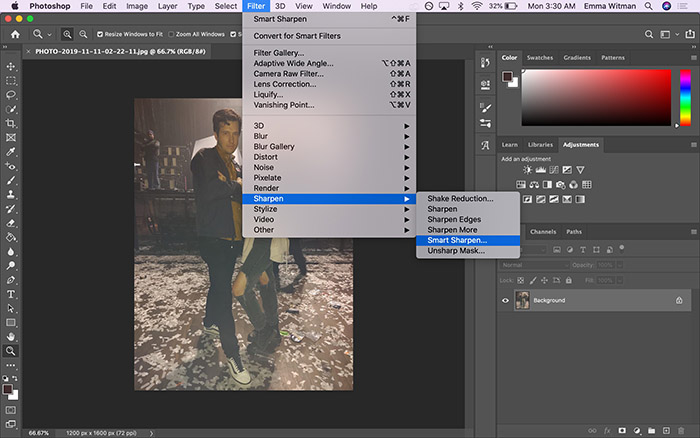
2. Smart Sharpen: On a new layer, go to Filter > Sharpen and choose 'Smart Sharpen...'. Tweak settings such as Amount, Radius, and noise reduction for a refined outcome. Experiment with different sharpening algorithms, selecting the one that complements your image best.
Step 3. For those seeking precision in sharpening specific areas:
1. Use Brush Tool for Selective Sharpening: Duplicate the background, apply sharpening, and add a layer mask. Invert the mask, making the sharpened layer invisible. Paint over desired areas with a white brush to reveal sharpening selectively.
2. Sharpen a Selection of the Picture: Draw a selection on the image layer, refine edges if necessary, and apply Unsharp Mask to the chosen area.
3. Use the Sharpen Tool for Quick Results: Select the Sharpen Tool, adjust the brush parameters, and paint over the desired areas on the top layer for swift and precise results.
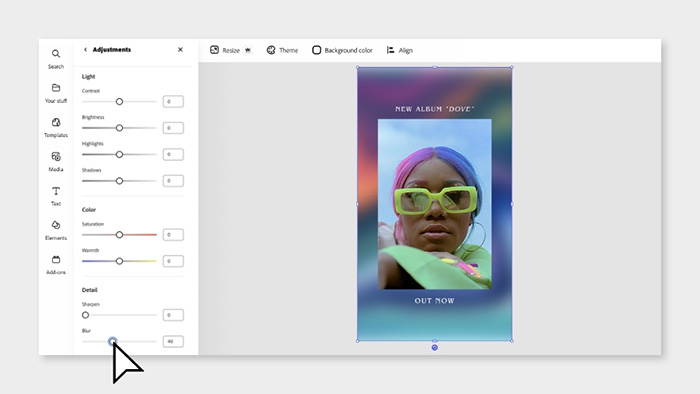
#3. The Most Popular Free Online Image Sharpener – Adobe Express
Adobe Express online image sharper is available for both desktop and mobile devices. It's ideal for quick edits without a steep learning curve. Besides the sliding scale, the ability to enter numerical values for sharpening provides users with a precise way to control the intensity of the effect. This feature is beneficial for consistency across multiple images. Adobe Express extends beyond sharpening, offering a plethora of enhancement options, including color adjustments, brightness, saturation, and contrast modifications. Users can easily develop their unique editing style.
Only subscribers to the Premium version gain access to an expanded array of templates, Adobe Stock photos, and fonts, along with premium features such as refine cutout, resize, graphic groups, and a generous 100GB of storage.
Read more: Top 10 Best AI Photo Enhancer/Upscaler Software
- Offers a straightforward sharpening process.
- Ability to enter numerical values for sharpening.
- Template library and design assets.
- Abundance of pre-made assets.
- Templates, Adobe Stock photos, and fonts are limited in free plans.
How to Sharpen Image Free Online with Adobe Express
Step 1. Begin by uploading the image you wish to sharpen, either from your personal photo library or by choosing a stock image for your design.
Step 2. Enhance sharpness. Once your photo is selected, navigate to the Adjustments menu. Utilize the Sharpen sliding scale to enhance the clarity and definition of your image.
Step 3. After sharpening, you can either instantly download your refined design to share with friends, family, and followers, or continue editing to further customize your creation.
#4. The Best Free Open Source Image Sharpener – GIMP
- Supported OS: 64-bit Windows 10 or later and macOS 11 or higher.
- Ratings: 4.6/5
GIMP, or GNU Image Manipulation Program, serves as a robust open-source image sharpener, offering a myriad of image editing tools, text manipulation features, and support for complex layer structures. While it competes with Photoshop in capabilities, it falls short in terms of interface refinement and cutting-edge features found in its commercial counterpart.
The software's performance, characterized by sluggishness and delays, poses a challenge, particularly for professionals seeking real-time responsiveness. The absence of graphics hardware acceleration contributes to this issue, making GIMP less suitable for intensive graphic operations. However, GIMP's appeal lies in its cost-free nature, aligning with the ethos of free and open-source software. Users have the option to explore other tools to sharpen image, such as Winxvideo AI, Adobe Express, each offering unique usability and design features.
- A set of tools for image editing.
- Robust layer Support.
- Open-source and free.
- Outdated and cluttered Interface.
- Sluggish performance.
- Limited raw camera file support.
How to Sharpen Image Free with GIMP on Windows 11/10
Step 1. Initiate the image sharpening process in GIMP by launching the program, available for download here. Upon launch, opt for the "Open Image" feature and duplicate the layer by navigating to Layer > Duplicate Layer. The duplicate layer will be visibly added above the original image on the bar, ensuring no permanent alterations to the original.
Step 2. Apply the Unsharp Mask for sharpening. Head to Filters > Enhance > Sharpen, which opens a dialog box with adjustable settings. Each parameter modifies the image, so monitor the changes accordingly. Utilize CTRL + Z to undo any adjustments if needed.
Step 3. Confirm the changes and proceed to save the enhanced image. Access the File tab and save the image in your local directory for future use.

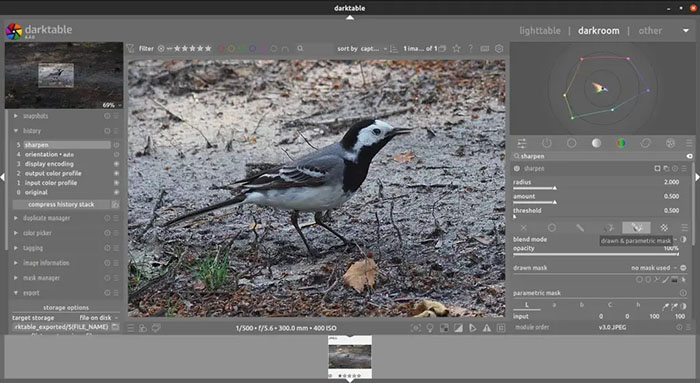
#5. The Best Free Open Source Image Sharpener – Darktable
Darktable, an open-source RAW editor competing with industry giants, offers a mix of advanced tools and features akin to both Lightroom and Photoshop. While it provides a range of creative options to sharpen images, including Liquify and Filmic RGB, the software faces challenges such as limited camera support, absence of a file manager, and reported RAW processing artifacts. The open-source image sharpener's unique strengths lie in focus peaking for rapid image culling, customizable workspaces, and a cost-free model that appeals to users on a budget.
However, the time investment required for editing, coupled with a steeper learning curve and occasional bugs, may impact its appeal for professionals with tight schedules. In certain cases, the RAW processing in Darktable may lead to unusual highlight artifacts, impacting the overall image quality. The performance of local editing features in Darktable is described as slow and clunky, presenting challenges for users requiring real-time responsiveness.
- Easy to use.
- Offer advanced tools, including Liquify.
- Film-Inspired tools like filmic RGB.
- Free and open-source.
- RAW processing artifacts.
- Slow and clunky local editing.
How to Sharpen Images in Darktable Free with Different Methods
Enhancing image sharpness in Darktable involves three distinct methods: Sharpen, Equalizer, and the High Pass filter. Each method operates differently, yet yields comparable results. The choice of which method to use depends on your preferences and the specific characteristics of the image. Familiarize yourself with all three techniques and determine the most suitable one for each unique situation.
Step 1. Begin by importing the image you want to sharpen into Darktable.
Step 2. Apply sharpening method. Darktable offers three main methods for sharpening: Sharpen, Equalizer, and the High Pass filter. Choose the method that aligns with your preferences and the characteristics of the image.
Step 3. Navigate to the Sharpen module in the right-hand side panel. Adjust the parameters within the Sharpen module to enhance the overall sharpness of the image. Experiment with the settings to achieve the desired effect.
Equalizer method: Access the Equalizer module from the right-hand side panel. Fine-tune the settings within the Equalizer module to enhance sharpness. This method provides more control over specific frequency bands.
High Pass Filter method: Employ the High Pass filter for localized sharpening. Adjust the parameters of the High Pass filter to enhance sharpness in specific areas of the image.
Step 4. Customize sharpening for output resolutions. Keep in mind that sharpening should be the final step in your workflow. Customize the sharpening settings for each intended output resolution. If you're exporting files for different purposes, such as Instagram, a website, or printing, adjust the sharpening accordingly for optimal results at each resolution.
Step 5. Once satisfied with the sharpening adjustments, proceed to export the sharpened image. Darktable provides export options that allow you to save the enhanced image for various purposes.
Conclusion
Remember that sharpening should be the final step in the editing process, and it's essential to customize the sharpening settings for each intended output resolution. By tailoring the sharpening process to the specific requirements of different platforms or purposes, such as Instagram, web display, or printing, you can ensure optimal results without overemphasizing details. And Winxvideo AI offers the easiest way to achieve this enhancement. Use Winxvideo AI's preview options to carefully assess the impact of sharpening.


