


5 Methods to Fix Blurry Photo in 2026
 Mike Rule
Updated on
Blurry images can result from various factors, such as out-of-focus, camera shake, and image compression. Sometimes we may really like a certain photo, but unfortunately, it turns out to be a bit blurry. Is it possible to fix blurry images? Yes. Nowadays, there are many online tools, desktop software, and mobile apps that can make a picture less blurry and even remove blur from image.
In this article, we'll introduce 5 ways that are widely used to unblur an image, namely Winxvideo AI, Photoshop, Lightroom, Canva, and Google Photos.
Method 1. Unblur an image with Winxvideo AI
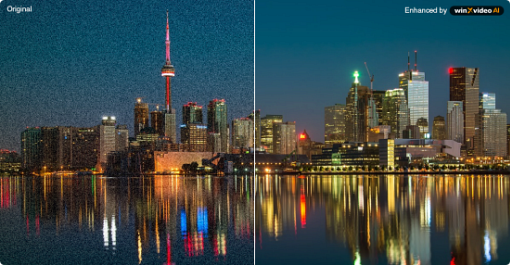
If you want to try an AI-powered tool to unblur an image, Winxvideo AI is a good choice. Winxvideo AI is an AI image enhancer that can make blurry photos clear and increase image resolution up to 10K. No matter you want to unblur reality pictures or anime pictures, you'll get a good result.
In addition to enhance images, Winxvideo AI can also improve video quality (including increasing video resolution and clarity, stabilizing shaky video, and boosting frame rates), convert, compress, edit, record, and download videos. It's really worth a try.
How to remove blur from photo with Winxvideo AI:
Step 1. Download and install Winxvideo AI on your computer. Note: The feature of fixing blurry images and other AI-powered features are not available in the Mac version, but they will come soon.
 Free Download
  Free Download
Winxvideo AI is for PC, while Macxvideo AI (from our MacXDVD brand) is for macOS.
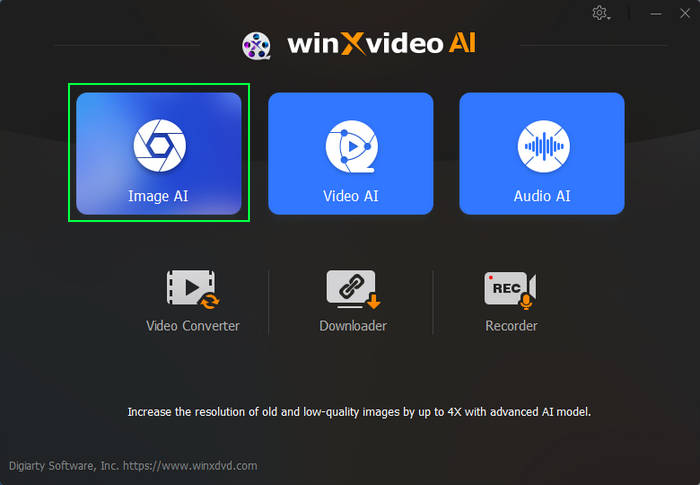
Step 2. Launch Winxvideo AI and select "Image AI" on the main screen.
Step 3. Click on "Add Image" at the bottom left corner to import the blurry image into Winxvideo AI.
Tips:
- Winxvideo AI allows you to import images in the following formats: JPG, PNG, PBM, XBM, JPEG, PGM, PPM, XPM, TIFF, WEBP, BMP.
- You can import multiple images for batch processing.
- You're allowed to process 5 images for free.
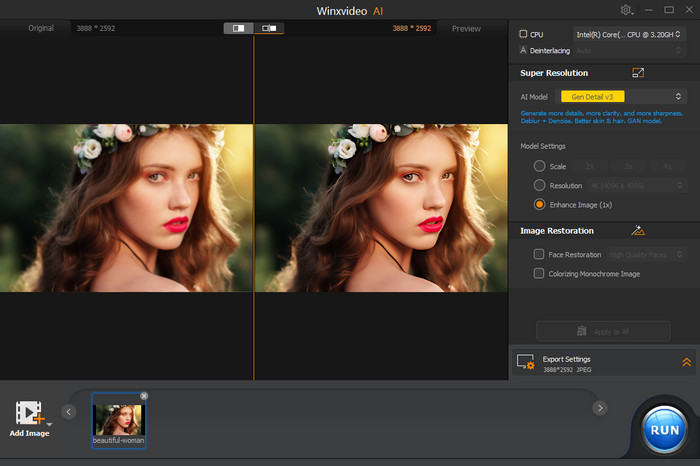
Step 4. Specify AI model and model settings for the imported image on the right side of the screen. If you don't want to upscale your image, just check "Enhance Image (1X)". After finishing settings, you can preview the result and notice obvious quality enhancement.
Step 5. Specify the Export settings, including format, quality, and output folder. Once done, click "RUN" to start the correction process.
Method 2. Fix Blurry Photos with Photoshop
Adobe Photoshop is a powerful and widely-used software for image editing. It offers several ways to unblur images, including:
- Smart Sharpen: It is a powerful filter in Photoshop that intelligently sharpens images while minimizing the risk of introducing artifacts or noise.
- Unsharp Mask: It is another sharpening filter that increases the contrast along the edges of the image.
- Shake Reduction: It helps reduce blur caused by camera shake.
- High Pass Filter: It is commonly used for sharpening specific areas of an image.
- Blur Gallery – Iris Blur: While not a traditional unblurring tool, the Blur Gallery offers the Iris Blur effect, which can simulate a shallow depth of field and emphasize the in-focus areas.
- Camera Raw Filter: If working with a raw image, the Camera Raw Filter provides advanced sharpening options.
- Content-Aware Fill: It can be used to fill in missing or blurred details intelligently.
- High Pass + Blend Mode: Combining the High Pass filter with a blending mode like Overlay or Soft Light can enhance image details.
As you can see, Photoshop is really a powerful tool to make pictures clear. However, it may be a little bit complicated for beginners. But don't worry, we'll show you step-by-step guide.
How to fix blurry images with Adobe Photoshop:
Here, we'll show you how to use Unsharp Mask and Smart Sharpen to unblur an image.
Step 1. Open the photo you wish to sharpen. Right-click on the background layer and choose "Duplicate Layer...". A new window will appear, and upon clicking "OK", the new layer will be added on top of the Background layer.
Make sure to set the blend mode of the new layer to "Luminosity" to avoid color fringing around edges.
Step 2. Apply sharpening to your image.
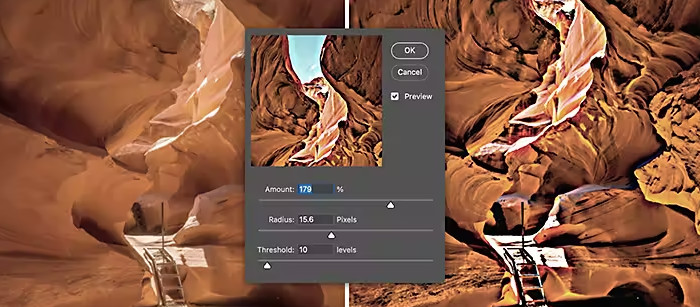
Option 1. Use the Unsharp Mask filter.
- Zoom the document window to 100% to get an accurate view of the sharpening.
- Navigate to "Filter" > "Sharpen" > "Unsharp Mask...". Ensure Preview is selected.
- Adjust the sliders of Amount (around 60% for screen viewing), Radius (1 or 2 for most images), and Threshold (usually at 0). Experiment with settings based on factors like camera type, sensor size, and print size for print sharpening.
Option 2. Use Smart Sharpen.
Note: You should use Smart Sharpen on a new layer or different image. Don't apply both filters on the same layer.
- Zoom the document window to 100%
- Go to "Filter" > "Sharpen" > "Smart Sharpen...". Ensure Preview is selected.
- Adjust the sliders of Amount, Radius, and Reduce Noise. Set Amount to around 150% initially and adjust as needed. Experiment with high values to observe their impact on the image. Every image and final medium may require different sharpening amounts.
- Choose the appropriate Remove option (Gaussian Blur, Lens Blur, or Motion Blur) based on your image.
Also learn: How to Remove JPEG Artifacts Easily.

Method 3. Fix Blurry Images with Lightroom
Adobe Lightroom is a versatile photography software that offers a range of tools for organizing, editing, and enhancing images. Like Photoshop, it provides several ways to make blurry photos clear.
- Basic Sharpening Panel: Lightroom's Develop module includes a Basic Sharpening panel with sliders to control sharpening.
- Detail Panel - Masking: The Masking slider in the Detail panel helps limit sharpening to specific areas of the image.
- Detail Panel - Noise Reduction: Addressing noise can contribute to the perception of increased sharpness in an image.
- Clarity Slider: While not traditional sharpening, the Clarity slider enhances mid-tone contrast, adding a sense of sharpness.
- Detail Panel - Sharpening Presets: Lightroom provides sharpening presets for specific output scenarios.
- Export Settings: Adjusting sharpening during export allows you to tailor the sharpening for the specific output medium.
- Local Adjustment Tools: The Adjustment Brush, Radial Filter, and Graduated Filter allow localized sharpening.
How to fix blurry photos with Lightroom:
Step 1. Open Lightroom, click the "Develop" module, and then select a photo to edit from the Filmstrip at the bottom of your window.
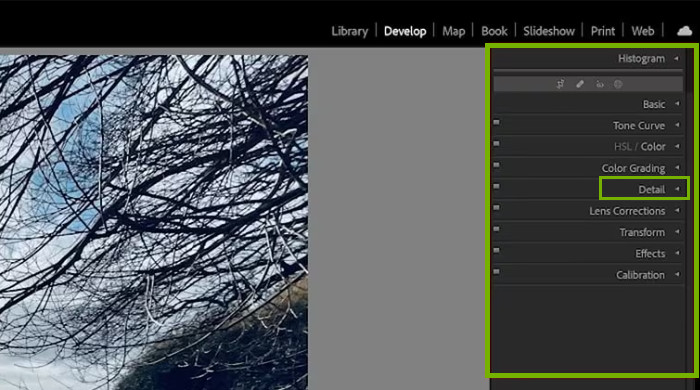
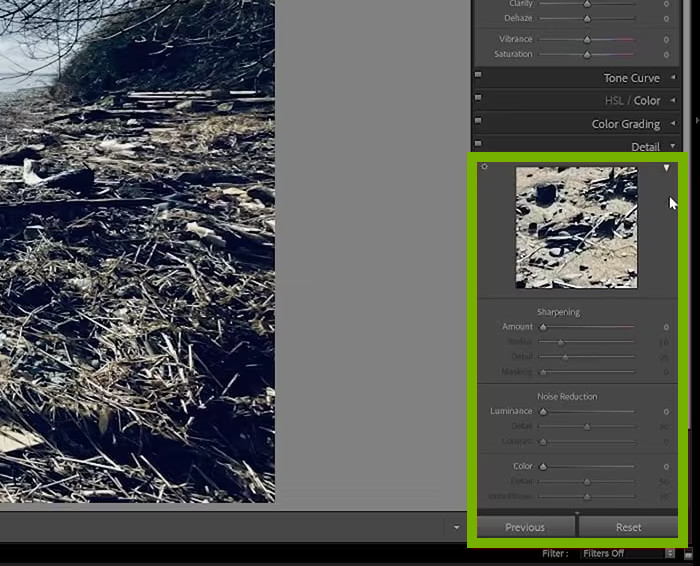
Step 2. Open the "Detail" panel located on the right side of your workspace. If the panel is not visible, click "Detail" to display it.
Step 3. Locate the "Sharpening" section within the Detail panel and adjust Amount, Radius, and Detail.
Step 4. Preview your adjustments. Once you're satisfied with the adjustments, export the photo to save the changes.
Method 4. Fix Blurry Photos with Canva
Canva stands as a versatile graphic design platform, empowering users to craft a diverse array of visual content. One of its standout features is the Enhancer tool, providing users the capability to upscale and unblur images. Going beyond mere unblurring, Canva enables users to elevate their visuals by incorporating design elements like stickers, frames, or filters. Additionally, users have the flexibility to fine-tune aspects such as clarity, brightness, contrast, and more.
Accessible primarily through web browsers like Google Chrome, Mozilla Firefox, Safari, and Microsoft Edge, Canva offers a seamless online experience. Users can effortlessly log in to their Canva accounts and engage in design creation directly through the website. Complementing its web presence, Canva extends its accessibility to mobile platforms, with dedicated applications available for both iOS and Android devices. Whether on a computer or a mobile device, Canva provides a user-friendly and feature-rich environment for creative design endeavors.
How to fix blurry images with Canva:
Step 1. Open your web browser and navigate to the Canva website. Log in to your Canva account or sign up if you don't have one.
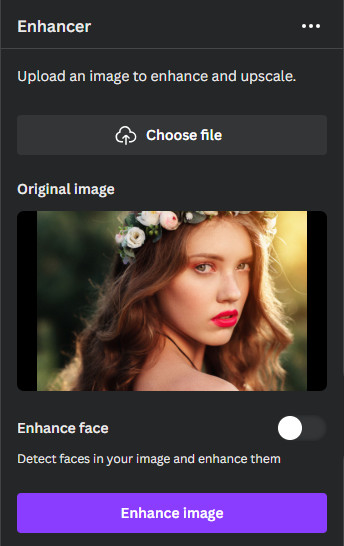
Step 2. Once logged in, create a new design or open an existing one. Upload the image you want to unblur by clicking on the "Choose File" tab on the left sidebar and selecting your image.
Step 3. Click the "Enhance Image" button.
Step 4. Preview the result and click "Add to design".
Step 5. Click "Edit Photo" to add effects or make adjustments.
Step 6. Click "Share" button to download or share your image.
Method 5. Fix Blurry Images with Google Photos
Google Photos is more than a platform for storing, organizing, and sharing photos. It also offers some basic editing features. In October 2022, Photo Unblur feature was announced alongside the Pixel 7 and Pixel 7 Pro, allowing these users to fix blurry photo that is stored in the Google Photos app.
Although Photo Unblur is Pixel-exclusive, non-Pixel users can achieve comparable results using Sharpen and Denoise tools. Google Photos caters to both Pixel and non-Pixel users, ensuring everyone can refine their photos with ease.
How to unblur images with Google Photos:
For Pixel 7, Pixel 7a, or Pixel 7 Pro users:
Step 1. Open the Google Photos app and choose the blurry photo you want to enhance.
Step 2. Tap the photo to view it in full screen.
Step 3. Hit the "Edit" button at the bottom center of the screen.
Step 4. Scroll through the toolbar and select the "Tools" tab.
Step 5. Choose "Unblur". Allow the app to process the image.

Step 6. Adjust the Photo Unblur effect using the slider (default is 100%).
Step 7. Tap "Done" after making adjustments.
Step 8. Save the unblurred photo as a new image by pressing the blue "Save copy" button.
For other device users:
Step 1. Launch the Google Photos app on your phone and open the photo you wish to enhance.
Step 2. Tap "Edit" at the bottom bar when the photo is in full-screen mode.
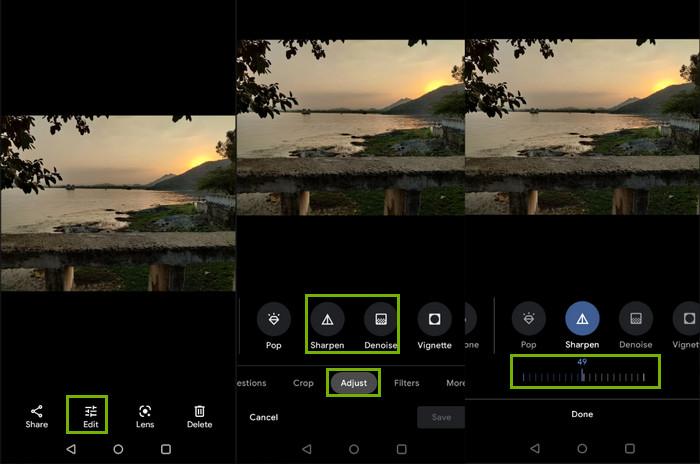
Step 3. Select "Adjust" from the editing options and scroll right to find "Sharpen" and "Denoise." Then, use "Sharpen" or "Denoise" by tapping and adjusting their sliders.
Step 4. Tap "Done" once you've edited the photo.
Step 5. Tap "Save copy" at the bottom-right corner to save your edited photo.
Conclusion
In conclusion, there are various methods to remove blur from photos, catering to different preferences and needs. For a user-friendly AI-powered solution, Winxvideo AI stands out. If you seek professional-grade editing with extensive tools, both Photoshop and Lightroom are excellent choices. Those looking for a free online solution can explore Canva. Additionally, individuals preferring mobile applications to make picture clear can turn to Canva or Google Photos. The diverse array of options ensures that users can choose the method that best aligns with their preferences and requirements.


