


Top 12 Free Video Recording Software in 2025
 Mike Rule
Updated on
Summary: Grab the best free video recording software that lets you capture, edit, and share high-quality videos effortlessly. From Winxvideo AI to OBS Studio and VLC, explore top tools packed with professional recording features without costing a dime.
In today's digital era, video content has become an essential tool for communication, entertainment, and education. Whether you're a budding content creator, a business looking to enhance your online presence, or simply someone who wants to capture precious memories, having the right video recording software at your fingertips can make all the difference.
But who says quality has to come at a hefty price? Join us as we explore the world of top free video capture software, where you can capture, edit, and share your videos with ease, without breaking the bank. Cherry-pick the top options with professional-grade features, user-friendly interfaces, and a range of recording capabilities offered.
Top Free Video Screen Capture Software [2025]
1. Winxvideo AI
Winxvideo AI contains a reliable feature to free screen recording video on Windows 10/11 and MacBook/iMac. It offers a full set of video recording modes for you to choose from: record screen, record webcam or record both (picture-in-picture mode); record system audio, capture microphone sound or record both. The recording quality ranges from 720p, 1080p to 4K 2160p 60fps so that you can enjoy your recording files at high fidelity.
The built-in drawing feature lets you draw on screen while recording and Chroma key feature empowers you to free record screen video with virtual background on Windows 10/Mac. There are AI tools to remove noise from recorded videos, enhance captured footage to higher resolution, smooth recorded gameplay videos, etc. More features like recording file compression, conversion, parameter adjustment, AI video enhancer, etc. are also worth a try.
 Free Download
 Free Download
Winxvideo AI is for PC, while Macxvideo AI (from our MacXDVD brand) is for macOS.
- AI-powered video enhance and basic editing.
- Supports various formats and resolutions, including 4K.
- Records multiple screens simultaneously.
- Offers comprehensive editing tools.
- Completely free as a video recorder.
- Only record videos in 60FPS maximumly.
- Limited editing features.
- Features like video/image enhancement, convert require a payment.
How to free record screen videos using Winxvideo AI?
Step 1. Launch Winxvideo AI after installation and select Recorder on the main interface.
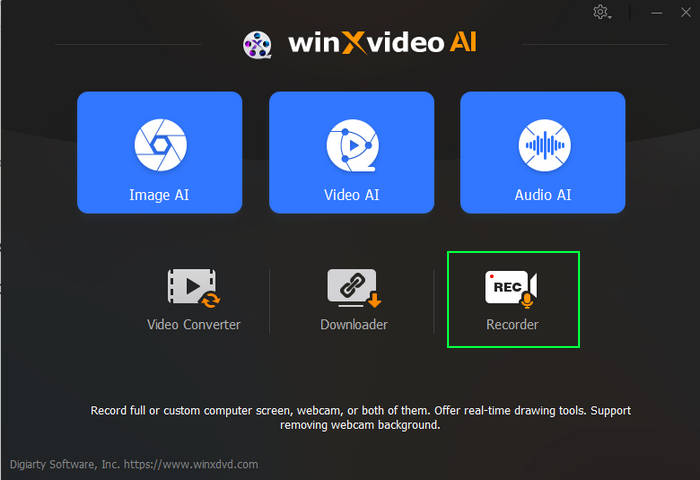
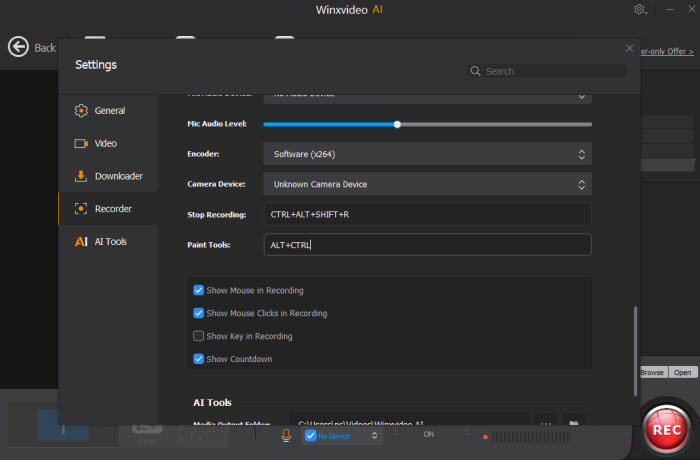
Note: tap the Setting icon on the top right corner of the UI and choose Recorder to adjust settings if needed. You're allowed to change the screen video recording quality, format, audio level/device, and know the shortcut for drawing (Ctrl+Alt+Shift+T).
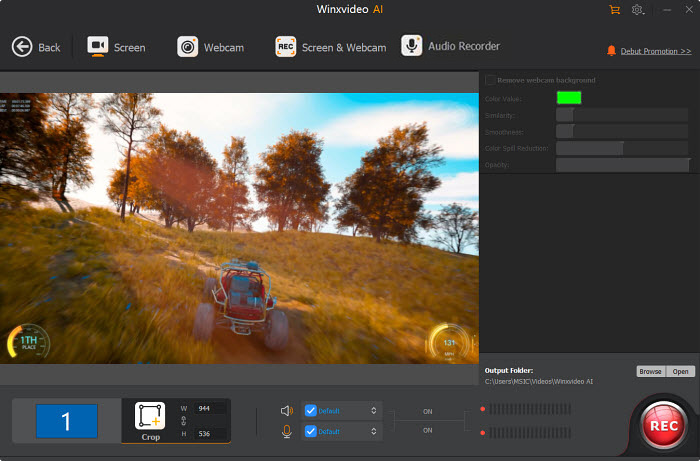
Step 2. Select a recording mode on the top. The free video recording software lets you record screen, webcam, screen & webcam, as well as audio files.
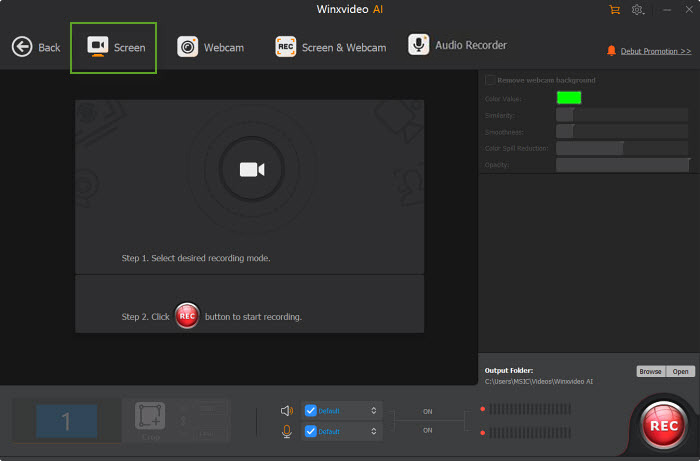
Step 3. Choose to record the entire screen or part of the screen at the lower-left corner.
Step 4. Enable audio device(s).
Step 5. Click on the REC button to start freely recording screen videos like gameplay video, meeting video or Skype video call, etc. When everything is OK, click on the Stop button to end.
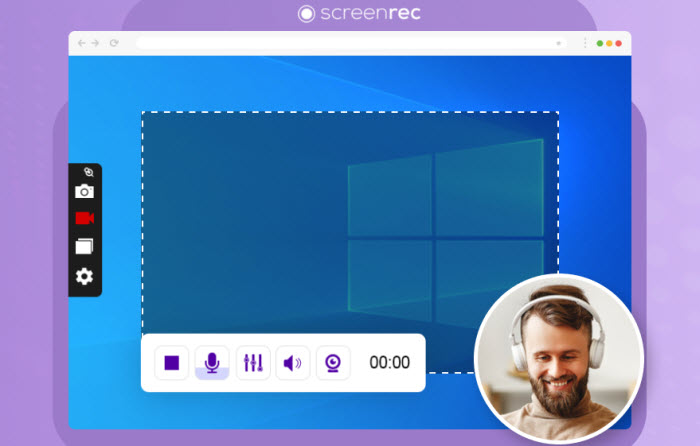
2. ScreenRec
ScreenRec is a powerful yet user-friendly free screen video recording tool that offers a seamless experience. It's completely free and allows you to capture your desktop activity without any watermarks or time restrictions. With just one click, you can start recording your screen, audio, and even your webcam. One of the standout features of ScreenRec is its lightweight design, ensuring that your computer's performance remains unaffected while recording. This means no lag or stuttering, allowing you to capture smooth and high-quality footage.
Additionally, ScreenRec utilizes cloud recording technology, making it easy to share your recordings with others. Getting started with ScreenRec is a breeze. You can be up and recording in under a minute. Whether you're creating tutorials, documenting software demonstrations, or simply capturing memorable moments, ScreenRec is the perfect tool for your screen video recording needs.
Also see: best screen recorder extensions for Chrome
- Easy to use with a simple and intuitive interface.
- Cloud-based video recording and sharing.
- No watermarks or time limits.
- Basic editing features like trimming and cropping.
- Integrates with popular productivity tools like Slack
- Limited editing features.
- Video quality limitations in free version.
- Slower uploads for large files.
How to free record screen videos using ScreenRec on PC?
Step 1. Get ScreenRec from the official website and install it on your computer.
Step 2. Press Alt + S to select the area you want to record. Then, click the Video Camera button to begin recording the screen video.
Step 3. Adjust Audio Settings:
- Computer Audio: Click the speaker icon to record audio from your computer speakers.
- Microphone: Click the microphone icon to record your voice along with the screen video.
Step 4. After recording, you'll receive a unique sharing link. Copy and paste this link to share your recording via email or on your website.
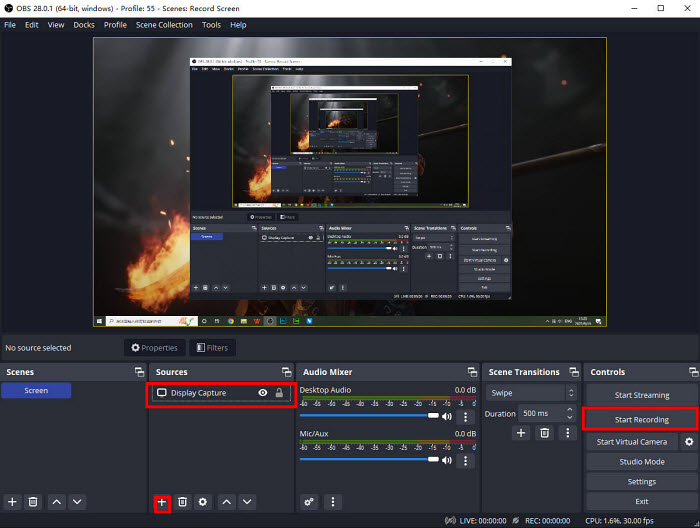
3. OBS Studio
OBS Studio is a top-tier free open source screen video recorder designed specifically for gamers. Unlike many other options that limit recording time or add watermarks, OBS Studio offers unlimited video recording and pristine output. Its ability to capture directly from your graphics card ensures smooth recording of full-screen games, setting it apart from other free video recording software.
While the interface might require a bit of learning for newcomers, the powerful features and customization options make OBS Studio well worth the effort. Once you've mastered the interface, you'll discover its incredible capabilities for creating high-quality gaming content.
- Powerful and customizable.
- Free and open-source.
- High-quality recording and streaming.
- Modular design.
- Active community and support.
- Steep learning curve. Requires technical knowledge.
- Resource-intensive, especially for high-resolution recordings or streaming
- No built-in editing features.
- Requires additional plugins for certain features.
How to free record videos using OBS Studio?
Step 1. Download and install OBS Studio for your operating system (Windows or macOS).
Step 2. Open OBS and click the + button under Scenes. Name your scene something relevant, like "Screen Recording."
Step 3. Add sources:
- Capture your entire screen: Click the + button under Sources and select Display Capture.
- Include webcam footage: Add a Video Capture Device.
Step 4. Configure the video recording settings:
- Go to Settings > Output.
- Set your Recording Path and Video File Type (e.g., MP4, MKV).
- Adjust Encoder Settings to balance quality and file size.
Learn more for the best OBS settings for high-quality recordings >>
Step 5. Click Start Recording when you're ready. To stop, click Stop Recording. The recorded video will be saved to the specified path.
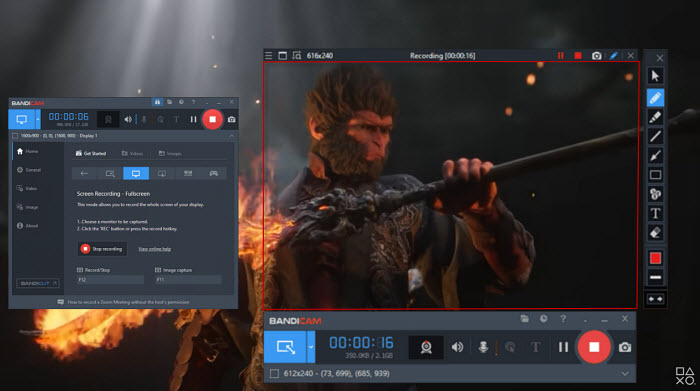
4. Bandicam
Bandicam is a user-friendly and free screen recording software that offers a wide range of features for capturing your computer screen. Whether you're creating tutorials, recording gameplay, or capturing online meetings, Bandicam provides a simple and effective solution. With Bandicam, you can easily record your screen, audio, and even your webcam. You can also add real-time drawings or annotations to your recordings, making them more engaging and informative.
Additionally, Bandicam supports scheduled recording, allowing you to set up automatic recordings at specific times, and it offers 24-hour long-term video recording for extended sessions.
- Easy to use with a simple interface.
- Various recording modes, incl. game, desktop, and webcam recording.
- High-quality recording for various types of media.
- Basic editing features like trimming and adding annotations.
- Watermarks in free recordings.
- Limited editing features.
- Performance issues with demanding content.
- Resource-intensive for high-resolution recordings.
- Expensive paid plans.
How to use Bandicam to record computer screen videos?
Step 1. Download and install the Bandicam screen recorder from the official website.
Step 2. Open Bandicam and choose Screen Recording mode to capture your desktop activity.
Step 3. Configure Audio Settings:
- Record Computer Sound: Ensure your default output device is selected for Speakers to capture audio from your computer.
- Record Microphone: If you want to include your voice, select your microphone device.
Step 4. Click the ● REC button or use the designated hotkey (F12 by default) to begin recording screen videos. To stop recording, click the same button again.
Step 5. After recording, click the video icon to play, edit, or upload your captured footage. You can also access additional features like trimming, adding annotations, and more.
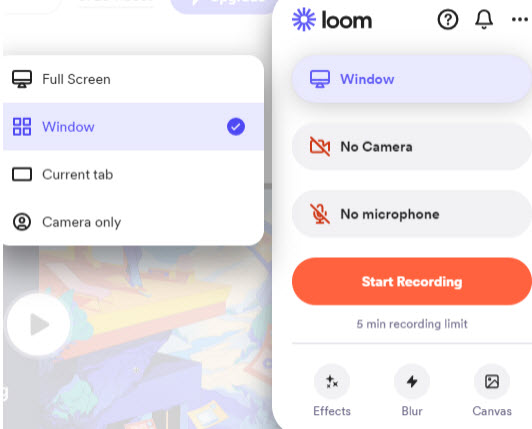
5. Loom
Loom is more than just a free screen video recorder. It's a comprehensive video communication tool that lets you create, edit, and share videos instantly. While it's ideal for short, quick explanations, Loom offers features like screen recording, webcam capture, and audio recording. The editing capabilities in Loom are basic but sufficient for most casual video sharing needs. Once you've created a video, you can easily share it via a unique link. This allows others to view, comment, and react to your content.
Loom is free to use with some limitations on video length and quantity. For unlimited videos and additional features like AI transcription, you can upgrade to a paid plan. While Loom is a convenient tool for sharing quick videos, it's not strictly necessary. You can achieve similar results by using other screen recording software and sharing the videos through other platforms. Ultimately, the usefulness of Loom depends on your specific needs and preferences.
- Simple and intuitive interface for green hands.
- Cloud-based recording and sharing.
- Slack integration.
- Trimming and adding annotations features.
- Limited editing features.
- Video quality limitations in free version.
- No offline recording or editing.
- Slower uploads.
- Expensive paid plans.
How to free record my screen video with Loom?
Step 1. Sign in to your existing Loom account or create a new one for free.
Step 2. Get the Loom app for your preferred device (PC, Mac, phone, or tablet).
Step 3. Open the Loom app and click the Record button. A recording window will appear on your screen, which you can resize and reposition as needed.
Step 4. Choose whether you want to capture your entire screen or a specific area. If you wish to include your voice, select your microphone.
Step 5. Click Start Recording to begin capturing your screen and audio.
Step 6. Once you've finished recording, click Stop Recording. Your video will automatically upload to your Loom account. To share your video, simply copy and paste the generated link.
6. ShareX
ShareX is free and open-source video recording software that lets you record any video on your screen and share it with a single press of a key. You can use it to capture a video from the entire screen, a specific region, a single window, or even scrolling web pages. Its comprehensive feature set, coupled with its user-friendly interface and extensive customization options that allows you to process and upload the recorded videos to various platforms like Imgur, Dropbox, Google Drive, and many others.
However, its complexity might be a challenge for beginners, and its lack of advanced editing tools means you might need separate software for post-production work.
- The free video recorder contains no watermark or ads.
- It's highly customizable for various needs.
- Extensive file sharing options available.
- Advanced features like OCR.
- It can't record webcam videos.
- It can be overwhelming for beginners.
- The editing features are limited.
- It's resource-intensive.
How to free capture screen video with ShareX?
Step 1. Download and install the free video recorder on your computer.
Step 2. Launch ShareX and click on the Capture menu to choose the type of screen capture you want (full screen, window, or region).
Step 3. ShareX allows you to set custom hotkeys for starting and stopping the recording. To configure hotkeys, go to Task settings and set up your preferred keys under the Hotkey settings section.
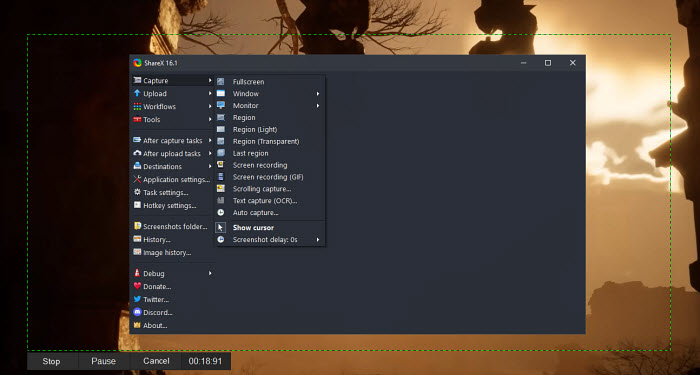
Step 4. Once your settings are configured, press the designated hotkey to begin recording or click the Record screen button in the main interface
Step 5. Then use hotkey to stop recording. You can use the built-in editor to add annotations or trim the captured screen videos, and then export the video in your chosen format. After that, use ShareX’s built-in upload feature to directly share the recorded videos to social media platforms.
7. TechSmith Capture (Formerly Called Jing Software)
You're supposed to meet Jing software once or more times when googling top free video recording software. Now it has transitioned to TechSmith Capture, still a free yet simple screen capture freeware for you to record screen videos, capture gameplay videos, record YouTube videos/meeting videos in high quality.
Another big appeal is its annotation feature, letting you highlight your information while recording and add context to further enrich your screen capture video. Go to TechSmith official website to free download this free video recording software if you feel interested in. Note to sign up before proceeding.
- Powerful and versatile.
- Wide range of features, including video editing, annotations, and screencasting.
- Integrates with Camtasia.
- High-quality recordings and exports.
- Steep learning curve.
- Requires more system resources compared to some other tools.
- No cloud-based recording or sharing.
- Video length or resolution limitations in free version.
How to free capture screen video on Mac/Windows 10 using TechSmith Capture?
Step 1. Download, install TechSmith Capture. Launch it after installation.
Step 2. Set Capture Preferences. Click on the TechSmith Capture icon in your system tray (Windows) or menu bar (macOS) to access preferences.
Here, you can configure options like video quality, audio source (microphone and system audio), hotkeys for starting and stopping recordings, and more.
Step 3. Select recording area. This classic video capture freeware allows you to choose the area of your screen that you want to record. You can select Full Screen to capture your entire screen, Region to drag and select a specific area of your screen to record, or Custom Dimensions to enter specific dimensions for your recording area.
Step 4. Start free screen recording on Windows 10 or MacBook iMac. Once you've configured your settings, click the "Record" button to begin free screen video capturing. You can also use the configured hotkeys if you've set them up. A countdown may appear to give you time to prepare before recording starts.
Step 5. End the screen recording. When you've finished recording, click the "Stop" button on the TechSmith Capture toolbar, or use the configured hotkey.
After recording, you can also leverage its basic video editing features to trim the beginning or end of your video to remove any unnecessary content, adjust recording brightness/contrast, etc.
Step 6. Save recording files as MP4 format. Choose MP4 as your preferred output format. There are other formats available like AVI GIF, and you can change resulting format based on your needs. Afterwards, you can eventually export your recording file and play or share it on any platform as you wish.
8. Debut Video Capture Software
Debut Video Capture Software is a versatile and user-friendly video recording and screen capture tool designed to help users capture and record your entire computer screen or specific regions of it. This feature is excellent for creating tutorials, demonstrations, or capturing gameplay.
You can also use your computer's built-in webcam or an external webcam to record yourself or others. This is useful for creating vlogs, video messages, or video interviews. Meanwhile, Debut grants you opportunity to highlight your mouse cursor while screen recording, making it easier for viewers to follow your actions on the screen.
After screen capture, a bounty of basic video editing features from this free video recording software are disposable, helping you free trim cut, and edit your recorded videos. One more word, your recording parameters are customizable, such as video format, frame rate, resolution, and audio quality to meet your specific needs.
- Easy to use.
- 3 modes: screen recording, webcam recording, and audio recording.
- High-quality recordings.
- Trimming and adding annotations editing features.
- Free trial.
- Limited editing features.
- Performance issues.
- Resource-intensive when recording in high-res.
- No cloud-based recording or sharing.
How to free record screen video with Debut Video Capture Software?
Step 1. Download and Install Debut Video Capture Software. Follow the on-screen instructions to install the software on your computer. Launch Debut after installation.
Step 2. Configure screen recording settings. Tap the "Options" button in the Debut interface, and choose the video and audio settings, such as format, quality, frame rate, and audio source (e.g., microphone). You can also set hotkeys for starting and stopping recording for convenience.
Step 3. Choose screen capture area. Select record your entire screen or a specific region. Click on the appropriate option to select your desired recording area.
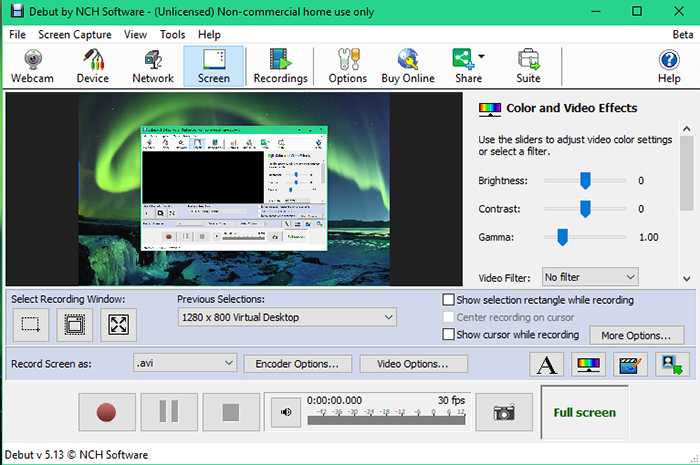
Step 4. Start free screencasts recording on Windows 10/11/macOS. Once you've configured your settings and selected the recording area, click the "Record" button in the Debut interface to begin recording streaming video, gameplay video, online meeting, production demonstration, etc. A timer or countdown may appear to give you a moment to prepare.
Step 5. Stop screen recording. When you're finished recording, click the "Stop" button in the Debut interface, or use the designated hotkey to stop the recording.
Afterwards, Debut will prompt you to save the recorded video. Choose a location on your computer to save the file and give it a name.
9. CamStudio
CamStudio is a powerful free screen recording tool for Windows that offers a wide range of applications. With CamStudio, you can capture everything happening on your screen, including video and audio content. This makes it ideal for creating tutorials, demonstrations, or documenting any on-screen activity.
CamStudio produces high-quality AVI files, which can be used for various purposes. Additionally, it includes a built-in SWF Producer that allows you to convert AVI files into smaller, more efficient SWF files, making them easier to share online or embed in websites. Whether you're a teacher creating educational videos, a software developer documenting features, or a user troubleshooting computer issues, CamStudio is a versatile tool that can help you achieve your goals.
- Free and open-source.
- Basic recording and audio capture.
- AVI and SWF exports.
- Lightweight and easy to use.
- Compatible with older systems.
- Limited features.
- No advanced editing.
- Less user-friendly compared to more modern options.
- No cloud-based recording or sharing.
How to screen record video using CamStudio
Step 1. Visit the CamStudio website and download the latest version for PCs. Install the software following the on-screen instructions.
Step 2. Launch CamStudio and click the red Record button to begin capturing your screen.
Step 3. Choose whether you want to record your entire screen or a specific region. You can adjust the selection area by dragging the borders.
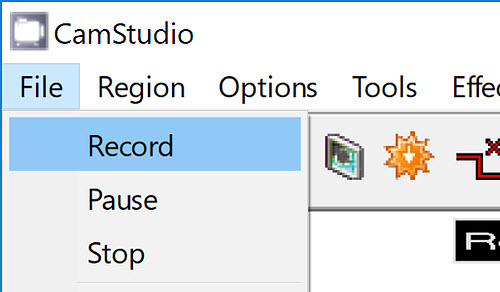
Step 4. Configure Audio Settings:
- System Sound: To record audio from your computer, ensure that the system sound is enabled.
- Microphone: If you want to include your voice, select your microphone as the audio input device.
Step 5. Click the red Record button again to start capturing your screen and audio. Click the blue Stop button or press the designated hotkey (usually F9) to end the recording.
Step 6. CamStudio will automatically save your recording as an AVI or Flash file. You can choose a different save location or customize the file name.
10. FlashBack Express
Go to FalshBack Express official webpage and you'll be surprised to find that this free video capture software is quite practical in features introduction. It uses concise words to explain its main features with no frills. FlashBack just tells you what it can do for you: record screen, capture audio, record screen video with a webcam overlay (picture-in-picture mode).
Other additional bonuses include recording with no watermarks, adding captions, arrows, images to screencasts, trimming video recording file and saving recording as MP4 format.
- Easy to use.
- Offer basic recording and audio capture.
- Can export videos in various formats.
- Can trim and add annotations after recording.
- Limited features.
- No cloud-based recording or sharing.
- High system requirements for high-resolution recordings.
- Expensive paid plans.
How to Free record screen on Windows 10/11 with FlashBack Express?
Step 1. Visit the Blueberry Software website (the developer of FlashBack Express) and download the free version of FlashBack Express. Launch FlashBack Express then.
Step 2. Choose your screen recording area after clicking the "Record" button. You'll be prompted to select the recording area from 3 options: full screen, region and Window.
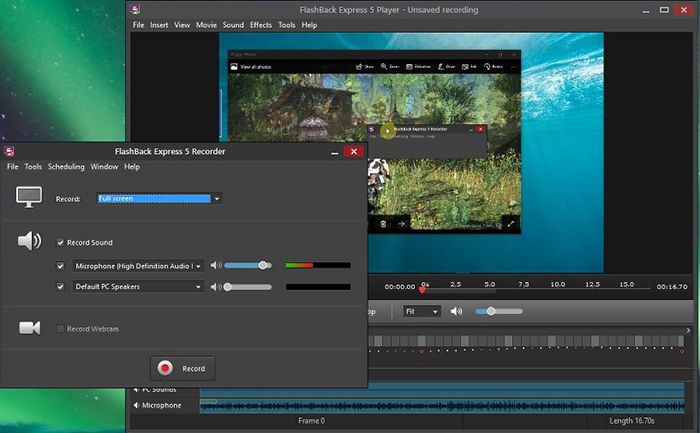
Step 3. Commence screen capturing. Hit "Record" to start capturing your Windows screen. This free watermark-free screen recorder now only has Windows version, no Mac version. Beyond, the free version only allows you to free capture screen videos up to 720p HD. Upgrade to its paid version if you need recording video at 1080p HD or 4K 2160p.
Step 4. Click the "Stop" button in the FlashBack Express interface or use the designated hotkey to stop the Windows screen recording. The recording file will be auto saved to your chosen destination folder.
FlashBack Express offers basic video editing tools. You can trim, cut, and make simple edits to your recorded video within the software.
11. VLC
VLC Media Player is widely known as one of the most versatile and reliable media players available. It supports almost every audio and video format out there. But what many users don’t realize is that VLC can also function as a free video recorder. While not as feature-rich as dedicated screen recording software like OBS, VLC provides a simple and lightweight option for those who need basic video recording capabilities without additional software installation.
VLC allows users to capture video from their desktop, record video from webcams and other connected devices. It's able to capture system audio and microphone input during video recording. This makes it a simple solution for recording voice-overs or capturing sound while recording your screen.
- Completely free with no ads, watermarks.
- Record screen, TV, webcam, and audio.
- Can export videos in various formats.
- It lacks advanced features like annotations.
- You can't record specific windows or areas of the screen.
- You can't record screen and webcam at the same time.
How to Free Record Videos with VLC?
Step 1. Install VLC if you haven't got it. Open it and navigate to the Media menu and select Open Capture Device.
Step 2. In the "Capture Device" window, under the Capture mode dropdown menu, select "Desktop" to capture your entire screen or other device like TV or webcam. For smoother recordings, you can adjust the desired frame rate. For standard quality, 30 FPS is sufficient. Aim for 60 FPS for higher quality recordings, but keep in mind that this might require a more powerful computer.

Step 3. Click the "Convert/Save" button at the bottom right corner of the window. In the "Convert" window, choose a recording profile and destination folder.
Step 4. Then click "Start" to begin recording your video.
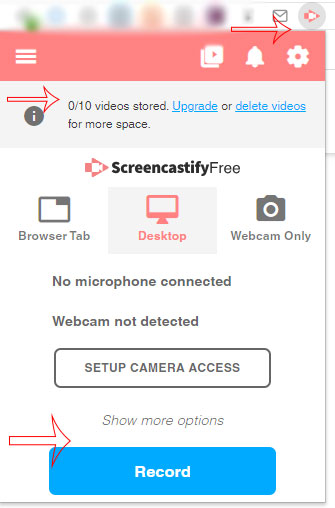
12. Screencastify
The current market is filled to brim with free video capture software, as well as browser extension, of course. Providing you're reluctant to install screen recorder desktop software, the free yet convenient video recorder extension is your second to none choice. Screencastify stands out as one of the top browser-based video recording tools available.
As a Google Chrome extension, it facilitates the swift capture of significant moments directly within your web browser environment. This extension also grants you the capability to record either your entire desktop or screen output, and it provides the option to capture video directly from your webcam. You can choose saving your recording files as MP4 GIF or MP3 format.
Furthermore, Screencastify offers an unrestricted number of recordings without imposing watermarks, making it a robust and cost-effective choice for video recording. The internal video editing features are also accessible, like trimming, adding narration to video, etc. However, it's essential to note that, with the free version, there is a limitation on recording duration, capped at a maximum of 5 minutes.
- Cloud-based recording.
- Offers a free version with basic features.
- Integrates with Google Chrome and other web browsers.
- Trimming and adding annotations
- Easy to use.
- Limited to web browser-based recording.
- Recording length or quality limitations.
- No advanced editing features.
- Requires internet connection.
- Expensive paid plans.
How to Online Record Screen Video using Screencastify Extension?
Step 1. Install Screencastify. Open the Google Chrome browser on your computer > Go to the Chrome Web Store > Search for "Screencastify" and click on the Screencastify extension > Click "Add to Chrome" to install the extension. After installation, open it in browser.
Step 2. Sign In or Create an Account.
Step 3. Select Recording Options. Click the Screencastify icon in your browser toolbar. A menu will appear with various recording options:
- Tab: Record the current browser tab.
- Desktop: Record your entire screen.
- Cam: Record from your webcam.
- Audio: Record audio only.
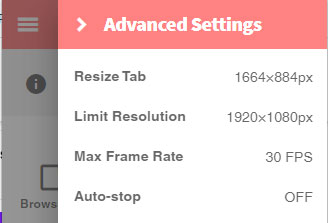
Step 4. Click on the gear icon to access screencastify settings. Configure options such as video quality, microphone, and webcam settings according to your preferences.
Step 5. Start recording online with browser extension. Click the recording option you want (e.g., Tab, Desktop, Cam) to begin recording. A countdown may appear to prepare you for the recording.
Step 6. End screen video capturing. Click the Screencastify icon in the toolbar and select "Stop Recording" to call the screencasting an end.
Step 7. Save the recorded video to your local storage or upload it to Google Drive (if you've connected your Google account). Share the video with others by sharing the link or downloading it.
How to Choose the Best Free Video Recording Software?
Selecting the right free screen recorder depends heavily on your specific needs. When selecting the best free screen recorder, you should at least consider the following key factors to ensure it fits your needs:
1. Recording features: The video recorder should be able to let you record from multiple sources, like the screen, camera, system sound, and microphone. You can customize the area you want to capture (full screen, specific window, or a custom region).
2. Real-Time Annotation Tools: It will be useful if there are real-time annotation features like cursor highlighting, captions, or drawings.
3. Resolution and Quality: The best free video recording software should offer high-quality recording without watermarks, regardless of whether you're capturing a presentation, a game, or a tutorial.
4. Editing Features: Some free video recorders include basic editing features like trimming or adding annotations, and some supports converting recordings to MP4, MOV, AVI, HEVC, etc. for sharing across platforms or devices.
5. Performance: Consider your computer's performance and the type of content you're recording. If your PC is older or underpowered, ensure the screen recorder won’t overload your system, especially when recording resource-heavy applications like games.
Conclusion
To sum up, from browser-based extensions like Screencastify to desktop applications like Winxvideo AI, there's a solution for every scenario. These tools empower you to capture your screen, record webcam footage, and narrate your content with ease.
As you explore these free video recording software options, remember to consider your specific requirements, such as recording duration, editing capabilities, and platform compatibility. Whether you're a beginner or a seasoned videographer, these tools open the door to a world of storytelling, tutorials, and sharing that's only limited by your imagination. Embrace the power of free video recording software, and start turning your ideas into captivating visual content today.
 FAQs about Free Video Recording Software
The "best" free video recorder depends on your needs. Some of the most recommended tools include:
- OBS Studio – great for gamers and streamers.
- Camtasia – ideal for detailed editing (free trial).
- Loom – best for quick screen recordings and team sharing.
- Apowersoft – handy for browser-based recording.
- Winxvideo AI – versatile for beginners and pros alike.
There are many tools available. For simplicity, try Winxvideo AI:
- Open the application.
- Select your recording mode (screen, webcam, etc.).
- Set resolution, frame rate, and audio source.
- Click the record button to start.
- Click stop when done and save your file.
OBS Studio is widely used for its flexibility, though it may be complex for beginners. Winxvideo AI is a simpler yet powerful alternative for YouTubers.
Several browser-based tools make recording videos easy without installs:
- Screencastify – Chrome extension with built-in editor.
- Loom – record, edit, and share from the cloud.
- Vidyard – business-focused recording solution.
- Kaltura – powerful education and enterprise platform.


