How to Record a Meeting with or without Permission
 Mike Rule
Updated on
In a world increasingly defined by virtual connections, video meetings have become the cornerstone of modern communication. Whether you're collaborating with colleagues, hosting webinars, or conducting remote interviews, the ability to record video meetings can be a game-changer.
In this comprehensive guide, we'll unveil the secrets to effectively recording video meetings with/without permission, no matter which platform you prefer, by the virtue of top meeting recorder software.
Part 1. How to Record a Video Meeting with Google Meet
Operating system: Windows/Mac computer
To record online meetings on Windows or Mac computer, Google Meet is a go-to platform. It can screen capture the active speaker, meeting's captions and anything presented. You can record teaching presentations for students, conferences presentations for the absentee or virtual training sessions for team mates replay later.
Meet chat recordings will be saved to the organizer's Meet Recordings folder in My Drive. And the meeting organizer and the recording person will receive an email with the recording link. Thus, you can check your recording file, which is saved as an .SBV file and can be opened by media player like VLC player.
How to Record Conversations in Google Meet
Before you record a video meeting, you need to know that you can't record an online meeting without permission. It is illegal to record a conversation without the consent of at least one party. This is known as the "one-party" consent rule. What's more, California is a "two-party" consent state, indicating that it is violating the law if you record a conversation without the consent of all parties involved.
In addition, you can't record a meet chat unless you are the meeting host, promoted to a co-host (if you're from outside the host's organization), from the host's organization and Host Management is off, or a teacher or co-teacher for meetings created through Google Classroom. You have to meet one of the above-mentioned requirements. Then, you're authorized to record a video meeting in Google Meet.
Step 1. Start or Join a meeting in Google Meet.
Step 2. At the bottom right, click Activities. Make sure all participants are aware that the meeting will be recorded and consent to it.
Step 3. Click Start recording. Click the "More options" (three dots) during the meeting and choose "Record meeting" to start recording a Google Meet.
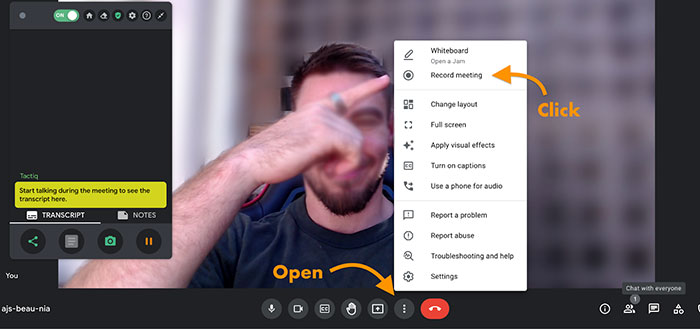
Step 4. To stop a recording, click Activities Recording. After 8 hours, the meeting will automatically stop recording. And the recording file will be auto saved to the organizer's Drive folder. You can share the recorded meeting with participants or others as needed via the link sent to your Email.
Part 2. How to Record a Meeting with Winxvideo AI
Operating system: Windows/Mac computer
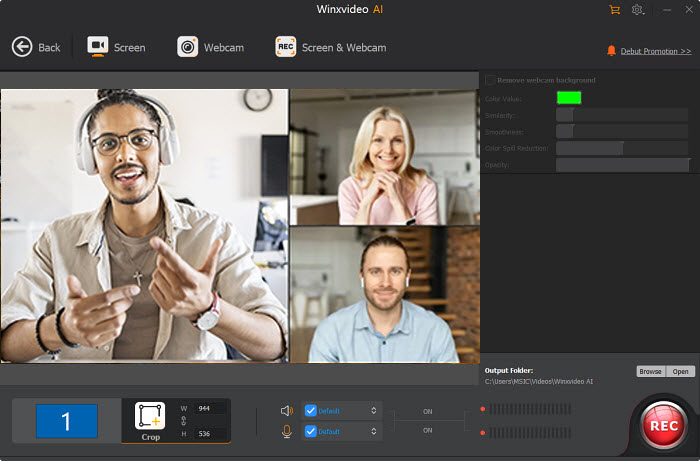
Unlike the classic online video meeting services, Winxvideo AI enables you to free screen record a conference call or a meet chat without compulsory permission. That means you can seek for consent from the meeting participants orally. If they consent, the meeting recording can instantly spring into action.
The meeting video screen recorder is exceptional at screen recording webinars, meet chats, conversions, video meetings at 1080p or even 4K 2160p high quality with both system and microphone sound recorded if needed. Meanwhile, it can capture webcam video or record screen and webcam at the same time to offer you with picture-in-picture effects.
During online meeting recording procedure, if you want to protect your privacy like your room, you can use its built-in Chroma Key feature to change your meeting recording background to virtual background.
 Free Download
 Free Download
Winxvideo AI is for PC, while Macxvideo AI (from our MacXDVD brand) is for macOS.
How to Capture Video Meetings with Winxvideo AI?
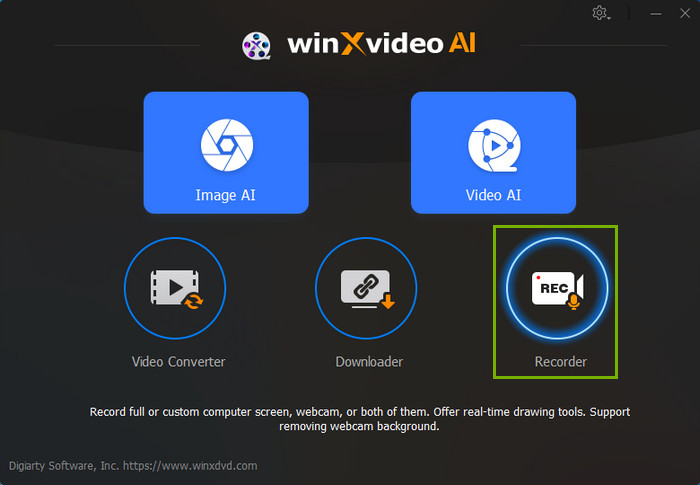
Step 1. Launch Winxvideo AI after installation and select Recorder on the main interface.
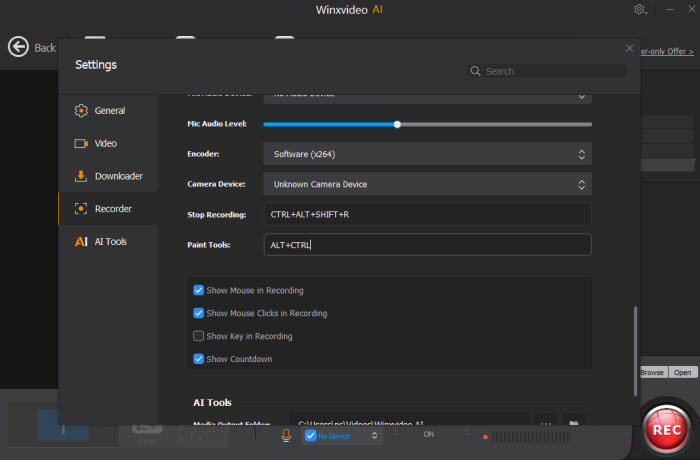
Note: tap the Setting icon on the top right corner of the UI and choose Recorder to adjust settings if needed. You're allowed to change recording quality, format, audio level/device, and know the shortcut for drawing (Ctrl+Alt+Shift+T).
Step 2. Select a recording mode on the top.
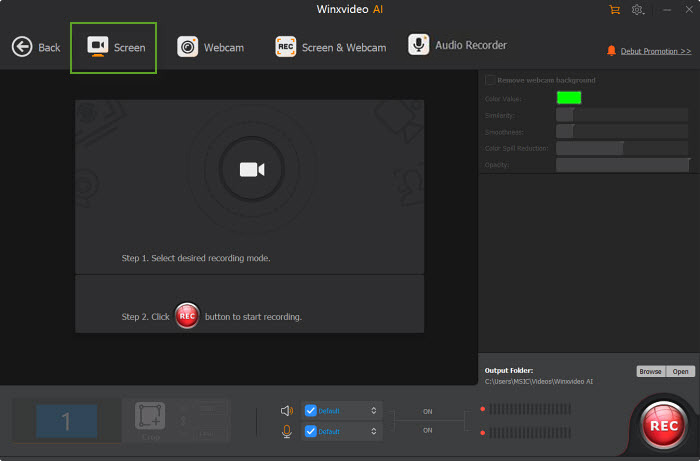
Step 3. Choose to record the entire screen or part of the screen at the lower-left corner.
Step 4. Enable audio device(s). Here you might need to record both system and microphone sound if you speak in your conference call.
Step 5. Click on the REC button to start scree recording meeting conversations. When everything is OK, click on the Stop button to end.
Part 3. How to Record Online Meetings on iPhone using Microsoft Teams
Operating system: Windows/Mac desktop & Mobile
If you mean to record a conference call or a meet chat on mobile devices, stay here and use Microsoft Teams to reach your goal. This professional video meeting recorder software excels in recording meet chats, conference calls or conversations, anything on your screen with system audio, microphone sound or both.
After meeting recording, your final recording files will be saved to OneDrive and SharePoint, not the previous Microsoft Stream. And be noted to upgrade Microsoft Teams app to the latest version if you're eager to record video meetings on your Android or iPhone iPad mobile devices.
How to Screen Record Conference Calls in Microsoft Teams Mobile App
Step 1. Run the latest version of Microsoft Teams app on your iPhone > go to the meeting controls > More options > choose Start recording to begin screen recording a Microsoft Teams meeting.
Step 2. Each participant in the meeting will be notified that recording has started.
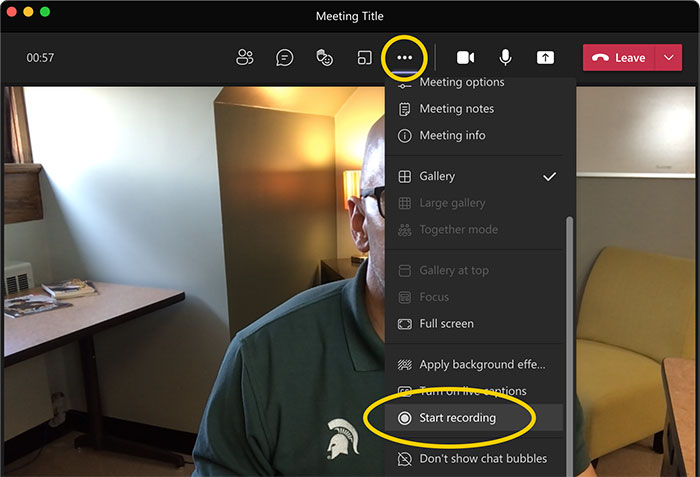
Step 3. To stop online meeting video recording, go to the meeting controls and opt for More options button > Stop recording.
The meeting video recording will be then saved to Microsoft Stream after finish, and then it will be sent to the person who started the recording. The recording will also show up in the meeting chat—or in the channel, if you're meeting in a channel.
Part 4. How to Record a Zoom Meeting on Windows 10/Mac/Mobile
Operating system: Windows/Mac & Android iOS
Zoom provides a convenient solution for effortlessly capturing online videos on Windows 10/Mac/mobile, whether you need to record interviews, conference calls, video meetings, webinar, or conversations. If you're either the event host or have been granted recording privileges, initiating the recording process is as straightforward as clicking the Record button found in the Zoom control bar.
For free Zoom users, the recordings of your Zoom events are stored locally on your device. However, if you are a paid subscriber, you have the added option of recording and saving to the Zoom cloud.
How to Record a Video Meeting within Zoom on Windows 10
Follow these steps to record as host or participant with recording permissions:
Step 1. Fire up the Zoom desktop app and log in.
Step 2. Click the Settings Gear on the Home section under your profile avatar.
Step 3. Navigate to the Recording tab > choose the folder to which you'd like to save your online meeting recordings.
Step 4. Set up and start your Zoom meeting as usual. When everything is ready, click the Record button on the control bar at the bottom of the screen. A Recording message will show up at the upper left corner of the interface.

Step 5. Find your recorded meeting files in the location you chose after recording is finished. Open and check if your video meeting recording is completed with the sound you need.
Note: you can also record a Zoom meeting without participants if needed. Go and change the Zoom screen layout. Choose one of these layouts in the Zoom settings below:
- Active Speaker (Desktop and Mobile)
- Shared Screen With Large Active Speaker Thumbnail (Desktop)
- Shared Screen with Active Speaker (Desktop and Mobile)
Certainly, if you aren't an event host or a participant with permissions, you can still record video conference calls or video meetings in Zoom. Just take advantage of your devices' built-in screen recorder or the standalone screen recorder program like Winxvideo AI mentioned above. That being said, you'd better get consents from other parties before meeting capture.
Part 5. How to Record Meeting Audio using Audio Recorder Extension
Operating system: Windows/Mac Chrome, Edge, and Firefox browser
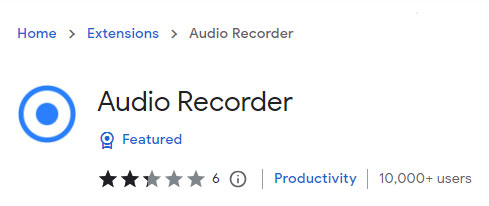
Providing you only need capturing meeting audio, a free extension call Audio Recorder (available for Chrome, Edge, Firefox) cuts the buck. No matter you're using Microsoft Teams, Google Meet or Zoom for online meeting, this free audio recorder can easily record audio on any meeting service with both your system and microphone sound.
How to Capture Meeting Audio via Audio Recorder Extension
Follow the below steps to record online meeting audio or conversation audio if needed:
Step 1. Install and add Audio Recorder extension to your Chrome browser. Open the extension from the browser add-on items. Give it permission to use your microphone and HD audio manager in case you're running on Windows 10 PC.
Step 2. Hit the blue "Record::Start" button to commence your meeting audio recording online. Both your voice and system sound can be captured eventually.
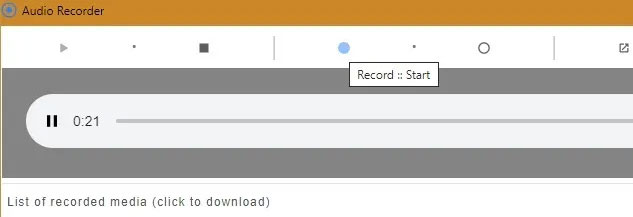
Step 3. Similarly, press the "Record::Stop" button to end the meeting audio recording. It is saved as an OGG file but can also be converted to MP3 via a menu option. Now, you can check if the audio meeting recording sounds good. If not, use extra audio editor to improve audio recording quality up to 192kbps or 320kbps.
In conclusion, recording video meetings, webinars, conference calls, interviews, conversations and events is a simple yet valuable feature that enhances your ability to capture and revisit important content. Whether you're the host or an attendee, the above mentioned meeting recorder software can easily capture video meetings on your desktop or mobile devices, catering to both free and paid users. So, just pick up one meeting video recorder based on your specific needs and budget and recommend more user-friendly meeting recorder apps if they're not mentioned here.


