


How to Record Webinars on Windows/Mac/iPhone Android
 Mike Rule
Updated on
Summary: Want to record webinars on any device without missing key moments? This guide walks you through the best tools for every platform—Camtasia and Winxvideo AI for advanced PC/Mac recording, QuickTime Player for macOS users, Mobizen for Android, and the built-in screen recorder on iPhones.
Webinars have become an invaluable tool for public offices in recent years, allowing institutions and organizations to reach and engage with a wider audience. As public offices increasingly turn to webinars to disseminate critical information, host virtual meetings, and foster transparency, the need to effectively record and archive these sessions has grown. In this article, we explore the top free ways for you to record live webinars on Windows/Mac or mobile phones with ease.
Top Free Ways to Capture Live Webinars
1. Camtasia
Operating system: Windows 10/11, macOS
Camtasia is a user-friendly screen recording and video editing tool. It's great for capturing webinars and editing them on your Windows 10/11 or MacBook iMac. To be specific, it supports you to record a webinar at full screen or selected area with system or microphone audio captured, as well.
After your live webinar recording is finished, you can also use its video editing features to split recording file into small segments (if your webinar recording is over 1 hour). After all, seldom audiences can bear or spend too much time on a long webinar video. Certainly, if needed, you can also add annotation, text, highlights, video special effects, transitions to your webinar recording to polish it.
If you want to record webinar and webcam at the same time, please jump to the 2nd product winXvideo AI, since Camtasia can't capture webinar and your face at the same time.
How to use Camtasia to record a live webinar?
Step 1. Launch Camtasia after installation. Then Choose Tools at the top menu of the interface > Record the screen > select the recording area: full screen or selected area. Drag the handles to adjust the selection or enter a specific size, type the dimensions in pixels into the Width and Height fields.
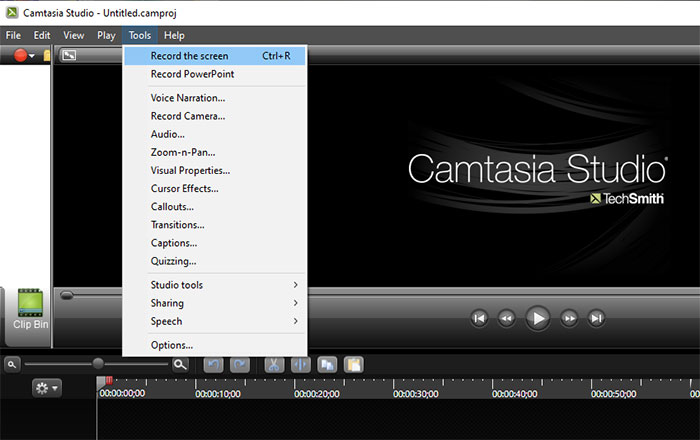
Step 2. Select audio recording options: record system audio or microphone sound.
Step 3. Tap the red Record button to begin screen recording your live webinar on Windows 10/11 or Mac. Or press F9 on the keyboard on Windows PC, or press Command +Shift+2 on the keyboard on Mac to call the webinar recording begin.
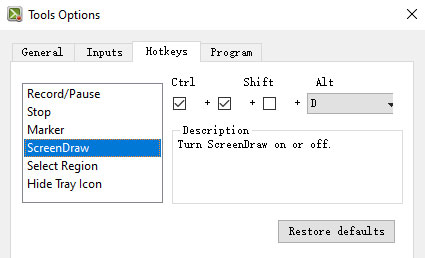
If you need to draw while recording, use hotkey "Ctrl+Shift+D" to activate its drawing feature.
Step 4. Click the Stop button on the recording toolbar or press F10 on the keyboard on Windows PC to end webinar video screen recording. For macOS, press Command+Option+2 hotkeys on the keyboard to end recording task.
Check here if you want to know more pro tips about screen recording webinars on Windows PC or Mac using the professional Camtasia.
2. Winxvideo AI
Operating system: Windows 10/11/8/7, macOS
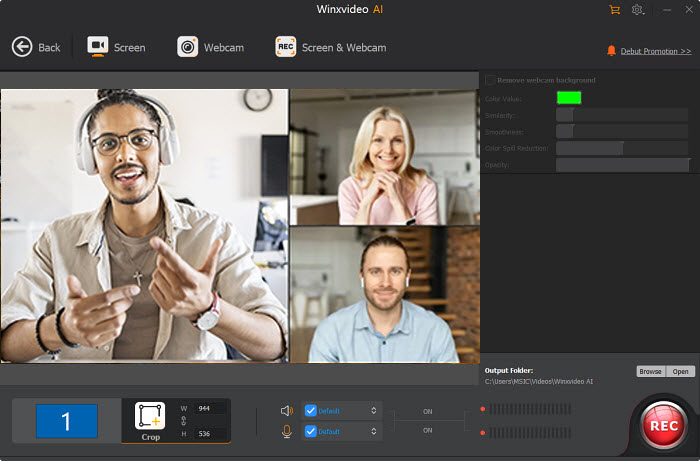
Winxvideo AI makes up for the lack of simultaneously recording webinars & webcam in Camtasia. Just opt for Record Screen & Webcam and you can record a live webinar and your face at the same time up to 4K 2160p 60fps. If this isn't what you want, Record Screen or Record Webcam is available, too. You can also only record audio of your webinar if attendees are reluctant to show up in the video.
The internal Draw feature is a nice touch when it comes to highlight your key points while recording live webinars. Meanwhile, its Chroma Key is also a must have if you're unwilling to expose your room, surroundings while recording yourself in a webinar. It will remove background and turn your recording to a virtual background to safeguard your privacy.
After webinar video capture, this feature-rich webinar video recorder software provides you with a full set of video editing features to let you split a long webinar video into segments, trim video to cut off unnecessary clips, add special effects, rotate videos, enhance webinar video quality, etc.
 Free Download
 Free Download
Winxvideo AI is for PC, while Macxvideo AI (from our MacXDVD brand) is for macOS.
How to record live webinars on Windows or Mac using winXvideo AI?
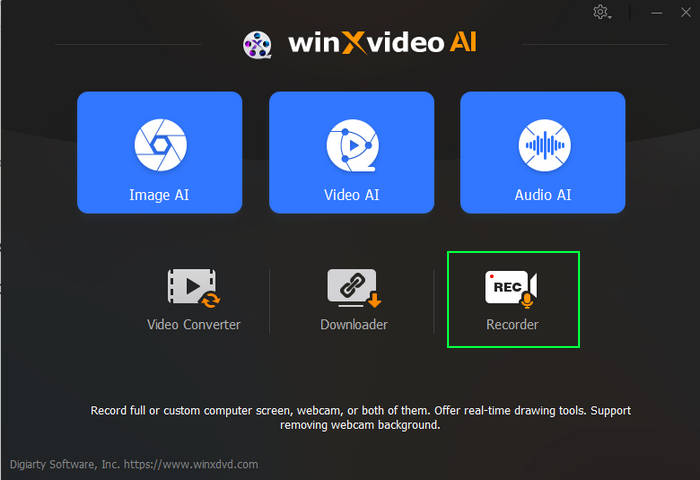
Step 1. Launch winXvideo AI after installation and select Recorder on the main interface.
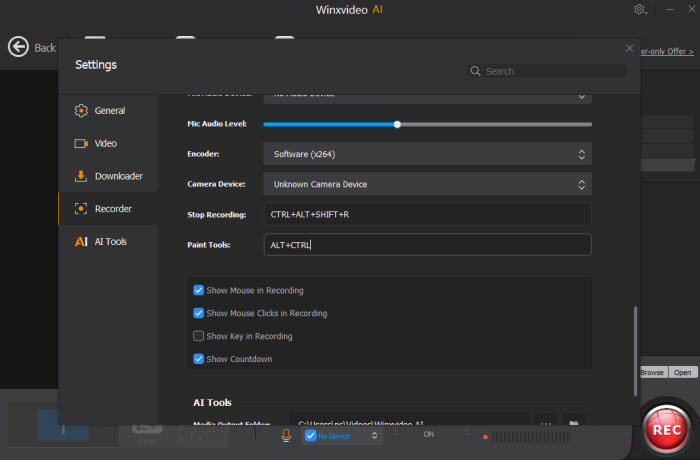
Note: tap the Setting icon on the top right corner of the UI and choose Recorder to adjust settings if needed. You're allowed to change recording quality, format, audio level/device, and know the shortcut for drawing (Ctrl+Alt+Shift+T).
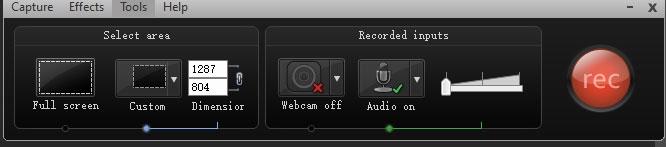
Step 2. Select a recording mode on the top.
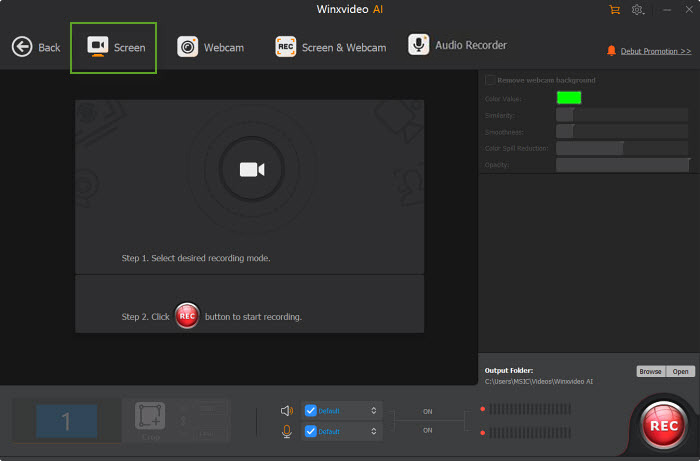
Step 3. Choose to record the entire screen or part of the screen at the lower-left corner.
Step 4. Enable audio device(s). Here you might need to record both system and microphone sound if you speak in your webinar.
Pro Tip: your lighting does matter a lot while webinar screen recording. Consider a ring light or even just making sure you've positioned yourself to make the most of the light you have available.
Step 5. Click on the REC button to start screen recording your webinar video. When everything is OK, click on the Stop button to end.
3. QuickTime Player
Operating system: macOS
Don't search high and low for the Mac webinar screen recorder. Instead, Mac itself comes along with an internal screen recorder – QuickTime player. Yes, your Mac default QuickTime player does an excellent job in media playback, as well as an impressive part in webinar screen recording.
Identically, QuickTime player captures both your webinar video and audio by default. If you want to capture microphone sound, connect your microphone device first and enable it then. After screen recording, fine tune your webinar recording file like trim the webinar clip, split video, crop video image, etc.
How to Record Webinars Video/Online Meeting on MacBook iMac
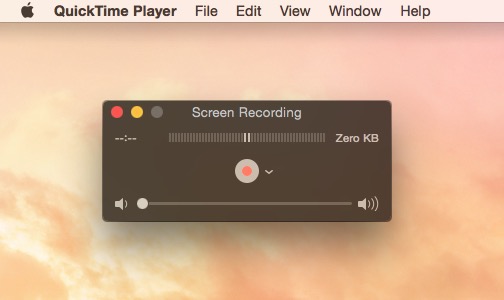
Step 1. Open QuickTime player on your MacBook or iMac and start a "New Screen Recording" or "New Movie Recording (to record your image) under "File."
Step 2. Check your settings and select the preferred microphone. Click anywhere on your screen to start recording the whole space. To partially record screen window, click and drag to select the area you want. Then click "Start Recording."
Step 3. Edit your recorded webinar videos if needed. QuickTime allows you to perform basic editing like trimming the video, splitting clips, and flipping images.
Step 4. To share your video, go to "File" and "Share" to choose how you want to export it. Directly share it to your audiences via a link or post it to your SNS platform if permitted.
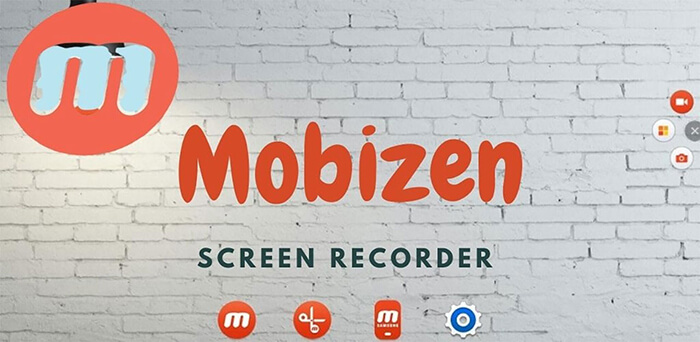
4. Mobizen Screen Recorder
Operating system: Android
Mobizen Screen Recorder is a strong performer in screen recording live webinars on Android, as well as capturing gameplay video, presentation, meeting video, video calls, live streaming video, etc. on your Android phones and tablets up to 2K resolution 60FPS at your disposal. No watermark, by the way.
After webinar screen recording, you can also utilize its editing functions to customize your webinar video, like trim, split, merge, etc. Additionally, the live webinar video recorded with the Mobizen app is not saved on the server, only on the user device, so use it with confidence, no worry about your privacy.
5. iPhone Screen Recorder
Operating system: iOS
To record webinars on iPhone iPad, you don't need any 3rd party screen recorder application indeed, cuz iPhone itself comes along with an internal screen recording feature (simple and convenient). It lets you free capture a live webinars with sound at 1080p or 4K resolution (if your iPhone supported). Suggesting you plan to record a webinar and webcam at the same, iPhone screen recorder can't satisfy you. You can separately record a live webinar and your face video, then combine these two video tracks on your Mac or Windows using a video editor like Premiere.
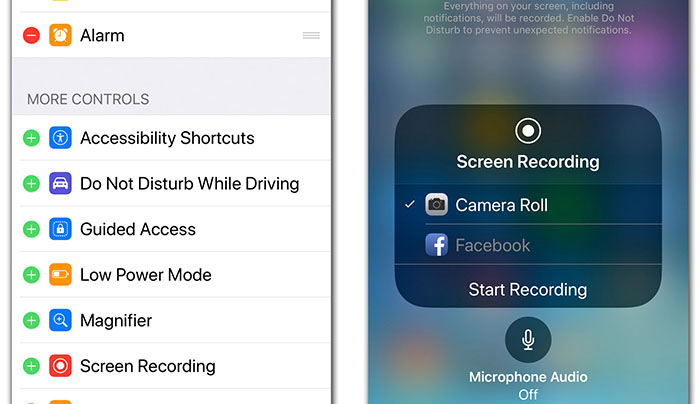
To activate this feature for webinar recording, just navigate to Control Center > select "Screen Recording." (If it's not already there, you may have to change this in your Settings.) > start recording and turn on the microphone. Stop the live webinar screen recording, and then your video will be saved in Photos in mov format. You can play it to check its quality or load to your iMovie app for further editing if needed.
Hope this article is helpful for you in your webinar screen recording. If the above-mentioned methods work for you, you can share it to your social media platforms or your friends. And you're warmly welcomed to share us your own way to capture live webinars if it isn't mentioned here. We'll keep this article updated!


