


How to Record a Zoom Meeting as Host/Participant
 Mike Rule
Updated on
Summary: New to Zoom recordings? This lighthearted guide turns the chaos of virtual meetings into a fun learning ride. With humor and practical tips, it shows you how to record Zoom calls with ease, whether you're wrangling mute buttons or dodging cat cameos.
So, you've found yourself thrust into the wild world of Zoom meetings, huh? Welcome to the virtual circus, where your colleagues' pets steal the spotlight, your boss's pixelated face becomes a modern art masterpiece, and the mute button is your best friend and worst enemy. But fear not, brave soul! Recording these digital shindigs doesn't have to be as daunting as deciphering your aunt's cryptic Facebook posts. With a sprinkle of wit, a dash of humor, and a pinch of technical know-how, you'll be capturing those unforgettable moments faster than you can say, "Is my camera on?" So, grab your virtual popcorn and let's dive into the wonderful world of Zoom recording!
Part 1. How to Record a Zoom Meeting as a Host or Participant
Capturing a Zoom meeting is fairly simple, yet your ability to do so might hinge on the permissions established by the meeting host. Below is a comprehensive guide outlining the process of recording a Zoom meeting, addressing both situations where you find yourself as the host and when you're just a participant.
If you're the host:
Step 1. Start the Meeting. Open Zoom and start your meeting as the host.
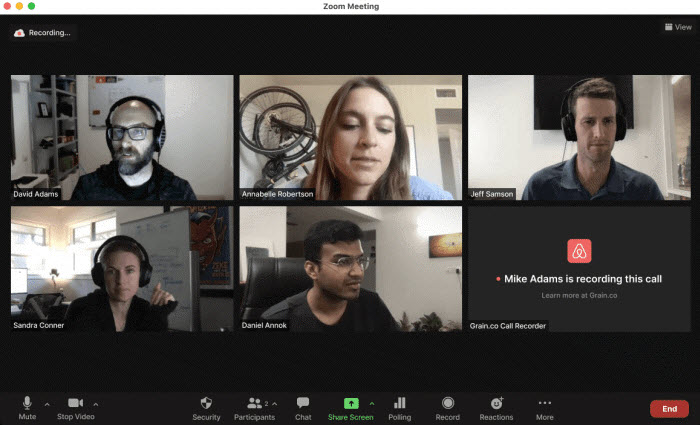
Step 2. Record the Meeting. Look for the "Record" button on the Zoom toolbar, usually located at the bottom of the Zoom window. Click on it to start recording. You might have options to record on your computer or to the cloud (if you have a paid Zoom account) with both zoom meeting video and audio sound.
- Record on this Computer: Saves the recording files locally on your device.
- Record to the Cloud: Saves the recording on Zoom's cloud storage, accessible from your Zoom account.
Note: Zoom boasts annotation tools that empower participants to draw or annotate on shared content throughout a meeting or webinar. That's to say, you can draw lines, arrows, shapes, and incorporate text while screen recording zoom meeting videos. Additionally, Zoom supports a virtual background feature, which allows you to display an image or video as their background during a meeting. This feature can be used to maintain privacy or to make the meeting environment more professional or engaging.
Step 3. Stop or Pause the Recording. You can pause or stop the recording at any time by clicking the corresponding buttons on the toolbar.
Step 4. Ending the Meeting. Once the meeting ends, if you recorded it to your computer, Zoom will convert the recording to a format you can view. You'll find the files in a folder named "Zoom" in your Documents folder.
Step 5. Accessing Cloud Recordings. If you chose to record to the cloud, you could access your recordings by signing into your Zoom account and navigating to the "Recordings" section.
If you're a participant:
Step 1. Permission Required. Only the host can grant you the permission to record the meeting. If you need to record, ask the host to give you permission by making you a co-host or by enabling the setting that allows participants to record.
Step 2. Recording the Meeting. Once you have permission, you will see the "Record" button on your toolbar. Click it to start recording a zoom meeting on your Windows PC. You will likely only have the option to record to your computer unless the host has granted you permission to record to the cloud.
Step 3. Accessing Your Recording. After the meeting ends and the recording has been processed, you'll find it in the Zoom folder in your Documents, similar to if you were the host.
Note 1: Privacy and Consent. Always inform participants before recording. It's respectful and, in many jurisdictions, legally required to notify or obtain consent from people before recording them.
Note 2: Zoom Versions. The exact steps and features available might vary slightly depending on your Zoom version and subscription level. Make sure your Zoom application is up to date to access the latest recording features.
If you're encountering issues or can't see the options mentioned, it might be due to restrictions set by your organization or the need for a software update.
Generally, you can successfully capture your zoom meeting video after following the above steps irrespective of host or participant. Certainly, on top of the host and participant difference, Zoom also treats you inequally grounded on the free or paid plan. The most notable difference lies in recording time limit. Paid accounts have allowed meeting durations up to 24 hours while free (basic) accounts are limited to 40-minute meetings for groups of three or more participants.
Thus, if you free user is meant to have an online group meeting more than 40 minutes, you're suggested to try Zoom alternatives, including Google Meet, Cisco Webex (up to 24 hours duration) or Jitsi Meet (no time limit on meeting). And if you don't want to use the alternatives' built-in recording feature (because of the annoying host's permission), you can resort to the 3rd party meeting video recorder software like Winxvideo AI to capture meeting videos in 1080p, 4K 2160p with MP4, MOV, etc. modern format, no time limit or watermark.
Part 2. How to Record a Meeting without Permission via Winxvideo AI
Operating system: Windows/Mac computer
Unlike the classic online video meeting services, Winxvideo AI enables you to free screen record a conference call or a meet chat without compulsory permission. That means you can seek for consent from the meeting participants orally. If they consent, the meeting recording can instantly spring into action.
The meeting video screen recorder is exceptional at screen recording webinars, meet chats, conversions, video meetings at 1080p or even 4K 2160p high quality with both system and microphone sound recorded if needed. Meanwhile, it supports you to draw while screen recording meetings to highlight your keypoint. Use Chroma Key feature to remove background from your webcam if needed.
 Free Download
 Free Download
Winxvideo AI is for PC, while Macxvideo AI (from our MacXDVD brand) is for macOS.
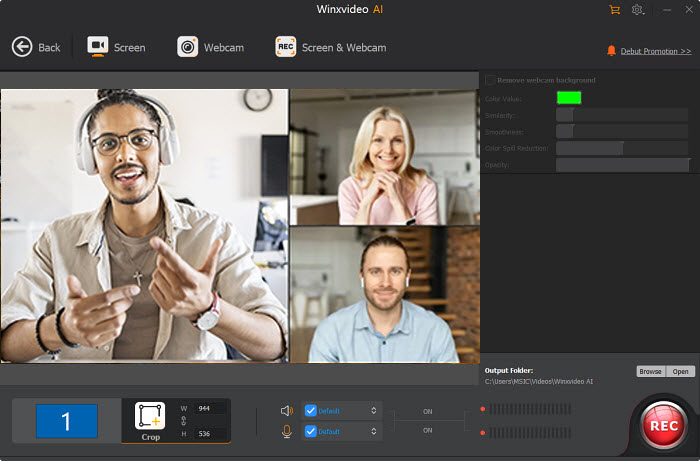
How to Capture Video Meetings with Winxvideo AI?
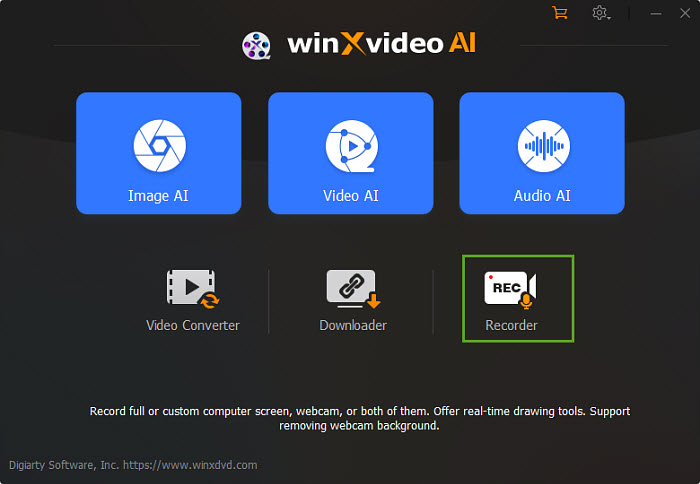
Step 1. Launch Winxvideo AI after installation and select Recorder on the main interface.
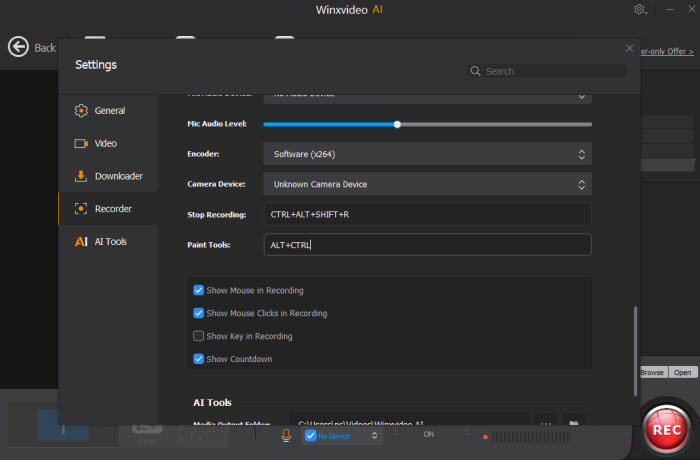
Note: tap the Setting icon on the top right corner of the UI and choose Recorder to adjust settings if needed. You're allowed to change recording quality, format, audio level/device, and know the shortcut for drawing (Ctrl+Alt+Shift+T).
Step 2. Select a recording mode on the top.
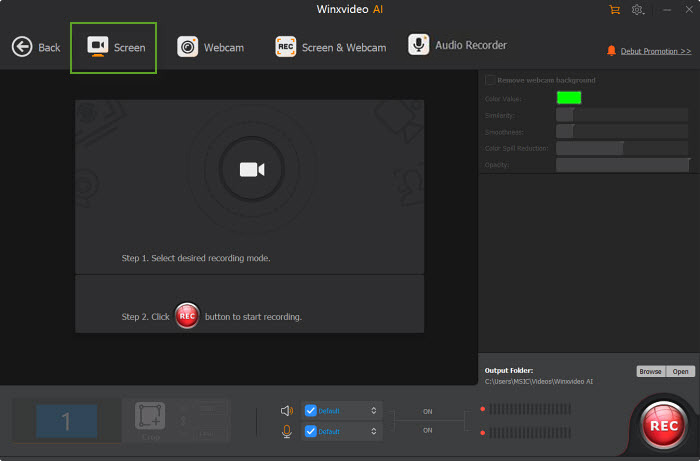
Step 3. Choose to record the entire screen or part of the screen at the lower-left corner.
Step 4. Enable audio device(s). Here you might need to record both system and microphone sound if you speak in your conference call.
Step 5. Click on the REC button to start scree recording meeting conversations from Google Meet, Webex, Microsoft Teams, Zoom, etc. When everything is OK, click on the Stop button to end.
Note: though this top meeting video recorder enables you to capture webinars, meeting conversations without time limit, nor the host's permission, it doesn't encourage any unauthorized distribution. You might record zoom meeting videos for personal usage or backup, but not for any illegal distribution. Please abide by your local law and the corresponding regulations.


