


How to Record a Presentation Video on Zoom with/without Face
 Mike Rule
Updated on
Zoom is a powerful tool for online meetings and webinars, and it also offers an easy way to create instructional or teaching videos. Whether you're preparing a lecture, sharing a presentation, or recording a meeting, Zoom's built-in screen recording feature allows you to capture everything, from your screen to your face, in high quality. This makes it a convenient choice for educators, business professionals, or anyone who needs to record a video with minimal setup.
If you're new to using Zoom for recording presentations, don't worry—it's easy! Spend just a few minutes here, and you’ll learn how to quickly record a PowerPoint presentation with or without your face on camera. This guide is perfect for users who want a simple solution for creating professional-looking presentation videos without any hassle.
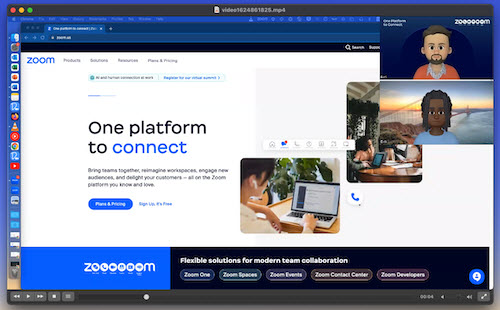
Part 1. How to Screen Record a Presentation on Zoom with Face
Capturing a Zoom meeting is fairly simple; the same also applies to capture a powerpoint presentation on Zoom. Below is a comprehensive guide outlining the process of recording a Zoom presentation slideshow video, addressing both situations whether with your face or not.
Step 1. Fire up Zoom app. Open the Zoom application on your Windows or macOS computer > hit New Meeting > select Join With Computer Audio.
Step 2. Start Video. Tap the Start Video option at the bottom of the interface. This setting is used for screen recording a video of yourself presenting a slideshow. If you want to record a presentation video on Zoom without face, just skip this step.
Note: Zoom comes jam-packed with annotation tools, letting participants to draw or annotate on shared content throughout a meeting, webinar and presentation slideshow. That's to say, you can draw lines, arrows, shapes, and incorporate text while screen recording zoom presentation videos. Better still, Zoom supports a virtual background feature, which allows you to display an image or video as a background during a presentation video. This feature can be used to maintain privacy or to make the powerpoint presentation environment more professional or engaging.
Step 3. Open presentation materials. Open the materials you plan to use in your presentation and close anything you won't use (safeguarding your privacy and guarantee the smooth of your recording). If you don't mean to use something right away, minimize its window until you're ready.
Step 4. Share Presenting Content. Hit Share Screen. Make sure the screen window size you want to capture: full or part and click Share. If you plan to bounce around from item to item, sharing your desktop is a good option.
Step 5. Capture a Presentation on Zoom now. Click More in the toolbar to expand the hidden list and choose "Record on this computer" or "Record to the Cloud" option. The only difference lies in the final recording file storage place. A blinking indicator in the top left of the session indicates when you are recording.
Step 6. Present your slideshows now. Open your presentation materials and begin to navigate through your content. Zoom will capture your presentation video with your face at the same time.
Step 7. End presentation video recording. To end your presentation video recording on Zoom, tap More again in the toolbar > choose End Meeting > select End meeting for All to finish your zoom presentation video capture.
Note 1: Privacy and Consent. Same to zoom meeting recording, capturing zoom presentation videos also requires consent. Always inform participants before recording. It's respectful and, in many jurisdictions, legally required to notify or obtain consent from people before recording them.
Note 2: Zoom Versions. You'd better upgrade Zoom to the latest version before you go, cuz the exact steps and features available might vary slightly in different Zoom versions and subscription level.
Generally, you can smoothly capture a presentation video on Zoom after following the above steps irrespective of host or participant. Yet, the presentation recording time you need to concern, as well. Paid accounts have allowed recording zoom video durations up to 24 hours while free (basic) accounts are limited to 40-minute meetings for groups of three or more participants.
Thus, if you free user is meant to present a powerpoint slideshow more than 40 minutes, you're suggested to try Zoom alternatives, including Google Meet, Cisco Webex (up to 24 hours duration) or Jitsi Meet (no time limit on meeting). And if you don't want to use the alternatives' built-in recording feature (because of the annoying host's permission), you can resort to the 3rd party presentation video recorder software like Winxvideo AI to capture a presentation video with face in 1080p, 4K 2160p with MP4, MOV, etc. modern format, no time limit or watermark.
Read More: How to Record a Lecture for Teachers and Students >>
Part 2. How to Record a Zoom Presentation Video without Time Limit via Winxvideo AI
Winxvideo AI makes your Zoom presentation video recording work a breeze. Directly use it to free screen record a Zoom presentation video, capture a Zoom meeting, webinar or video call without compulsory permission or time limit. That means you can record a powerpoint presentation video on Zoom longer than 40 minutes, even over 2 hours without permission or any plan.
Another beauty of this full-fledged screen recorder is its knack to capture webinars, online meetings, Skype calls, YouTube streaming videos, gameplay videos, educational videos at 1080p or even 4K 2160p high quality with both system and microphone sound recorded if needed. And you don't have to convert zoom recording to MP4 since it supports you to record a presentation video to MP4 format directly. Other modern formats like MOV, MKV, FLV, TS are also well supported.
 Free Download
 Free Download
Winxvideo AI is for PC, while Macxvideo AI (from our MacXDVD brand) is for macOS.
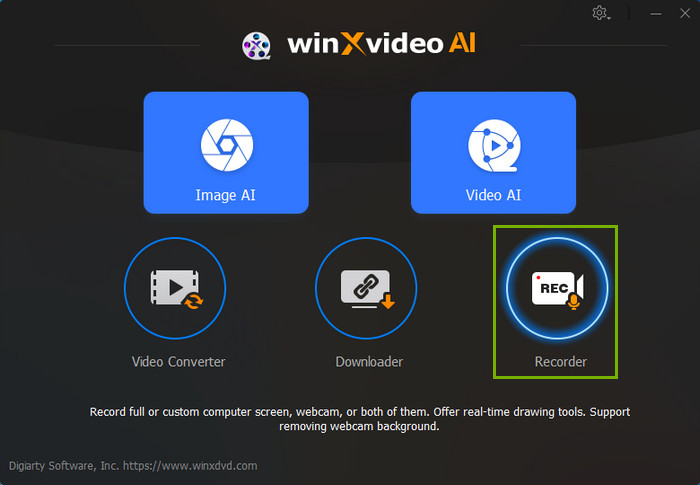
How to Capture a PowerPoint Presentation on Zoom with Winxvideo AI?
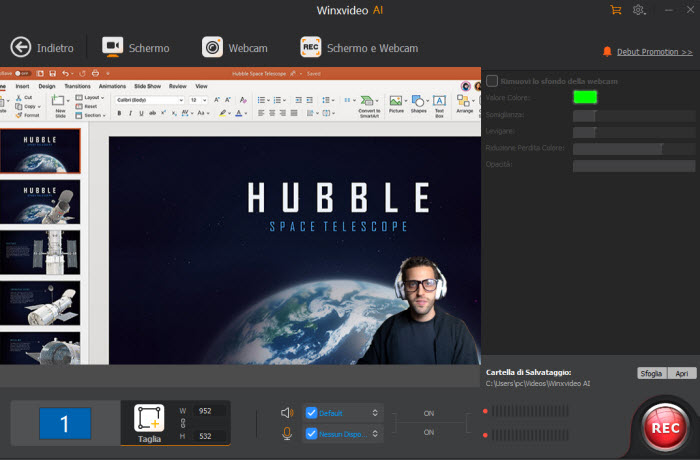
Step 1. Launch Winxvideo AI after installation and select Recorder on the main interface.
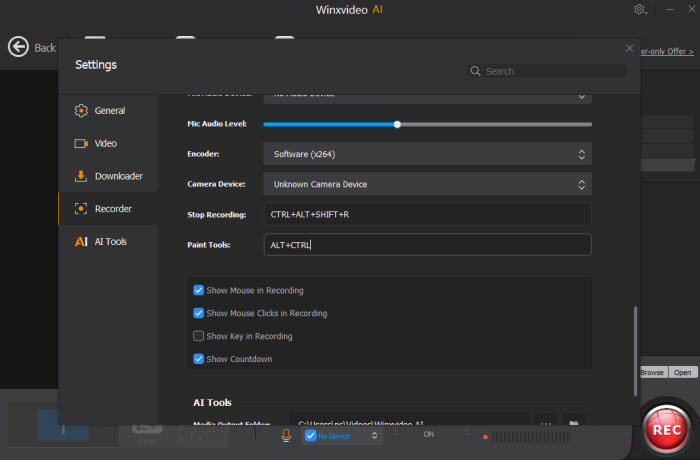
Note: tap the Setting icon on the top right corner of the UI and choose Recorder to adjust settings if needed. You're allowed to change recording quality, format, audio level/device, and know the shortcut for drawing (Ctrl+Alt+Shift+T).
Step 2. Select "Screen" to record a presentation video on Zoom without face. If you want to record a presentation video on Zoom with face, choose "Screen & Webcam".
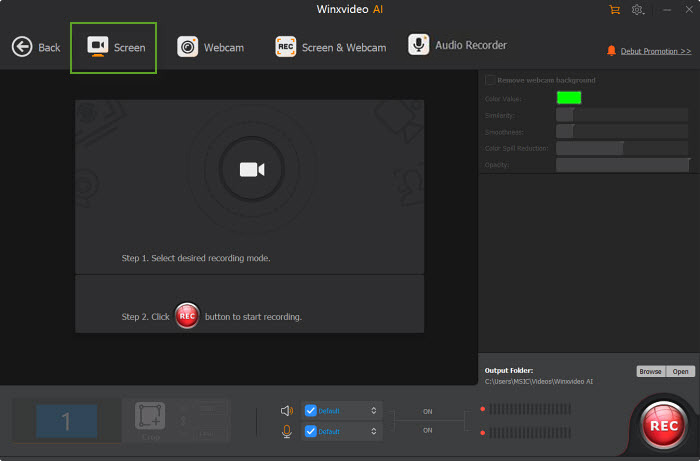
Step 3. Choose to record the entire screen or part of the screen at the lower-left corner.
Step 4. Enable audio device(s). Here you might need to record both system and microphone sound if you want to record a video on Zoom with yourself presenting a slideshow.
Step 5. Click on the REC button to start screen recording a powerpoint presentation video from Zoom without time limit or permission. When everything is OK, click on the Stop button to end.
Note: though this top screen recording software enables you to capture Zoom presentation video or webinar without time limit, nor the host's permission, it doesn't encourage any unauthorized distribution. You might record zoom presentation videos for backup or educational sharing with students, but not for any illegal distribution. Please abide by your local law and the corresponding regulations.


