


How to Fix Grainy Photos on iPhone, Windows, macOS, etc.
 Mike Rule
Updated on
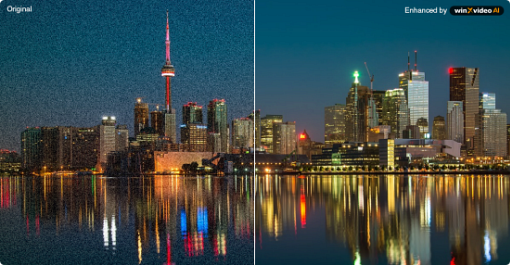
Why are my photos so grainy? Can I make this photo less grainy? Have you ever encountered those grainy distortions in photos taken under low-light conditions? That random pattern of speckles is what we refer to as grainy photo.
It often comes at the expense of sacrificing some detail in the photo because the process to remove grain involves smoothing image pixels. However, it's worthwhile. Additionally, some image tools apply fixes to the entire image, not just specific areas to fix grainy photos. Whether you opt for Photoshop or specialized denoising software, we've got you covered.
Method 1. Fix Grainy Photos on Windows with Winxvideo AI
While Photoshop and Lightroom are widely recognized as professional-grade options for fixing grainy photos, it's important to note that they're not the sole contenders in the field. There are several other image AI tools worth exploring and discussing, such as Winxvideo AI.
The software includes an automatic noise reduction feature for imported photos. This feature can sufficiently fix grainy photos and enhance the image quality up to 8K/10K.
 Free Download
  Free Download
Winxvideo AI is for PC, while Macxvideo AI (from our MacXDVD brand) is for macOS.
How to fix grainy photos with Winxvideo AI:
Step 1. Download and install Winxvideo AI on your computer. Note: The feature for fixing blurry images and other AI-powered features is currently unavailable in the Mac version but will be added soon.

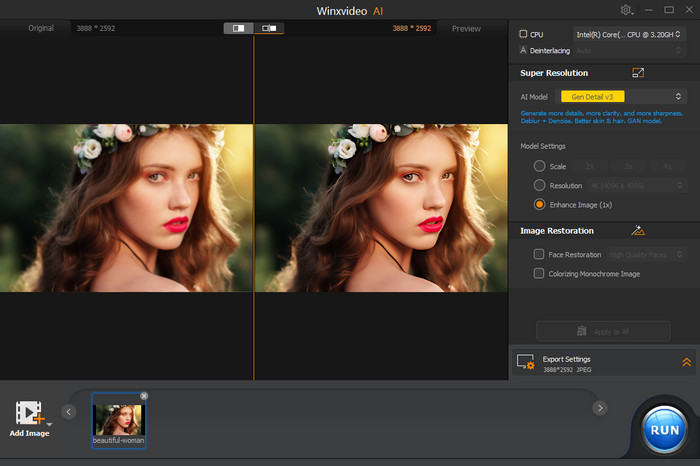
Step 2. Launch Winxvideo AI and select "Image AI" on the main screen. Click on "Add Image" at the bottom left corner to import the blurry image into Winxvideo AI.
Tips: Winxvideo AI supports image formats such as JPG, PNG, PBM, XBM, JPEG, PGM, PPM, XPM, TIFF, WEBP, BMP. You can import multiple images for batch processing. Set the type and model settings for the imported image on the right side of the screen. If you don't want to upscale your image, simply check "Enhance Image (1X)". After configuring the settings, preview the result to notice obvious quality enhancement.
Step 3. Specify the Export settings, including format, quality, and output folder. Once done, click "RUN" to start the correction process.
Method 2. Fix Blurry Images with Photoshop
If noise persists in your photos, the next step involves using software solutions. Begin by addressing grainy photos in Photoshop, renowned as one of the most prominent photo editing programs available. While Photoshop offers powerful noise reduction capabilities, mastering its features can be challenging. Additionally, its subscription model might not suit occasional users.
If you're into photography, chances are you've heard of Adobe Photoshop and its creative capabilities. Now, the real question is: how do you make photos less grainy using this program? We'll take you through the process step by step.
How to fix grainy photos with Photoshop:
Step 1. Open your photo and zoom in. Begin by opening your image in Photoshop. Click on the Magnifying Lens icon to zoom in and closely examine the details of your photo.
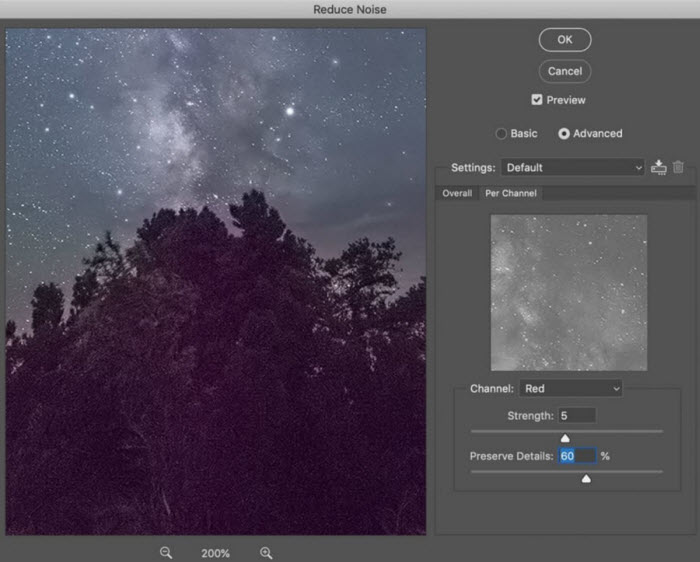
Step 2. Fix grainy photos in Photoshop. Navigate to Filter > Noise > Reduce Noise. Adjust the sliders in the pop-up window until you achieve your desired result, reducing the visible noise in your image.
Step 3. Smoothen the photo texture. If your photo still appears grainy, consider using the Blur tool. Go to Filter > Blur > Smart Blur to soften any remaining rough textures in your picture.
Tips: To remove graininess in Photoshop, you can also use its noise reduction feature. Start by importing your grainy photo and zooming in to 100% to assess the noise levels. Then, navigate to the Filter menu, select Noise, and choose Reduce Noise. Adjust the sliders for color noise reduction, detail sharpening, and preservation until you achieve your desired sharpness.
Read more: [Review] Top AI Photo Restoration Software for Windows and macOS.
Method 3. Make Pictures Less Grainy with Lightroom
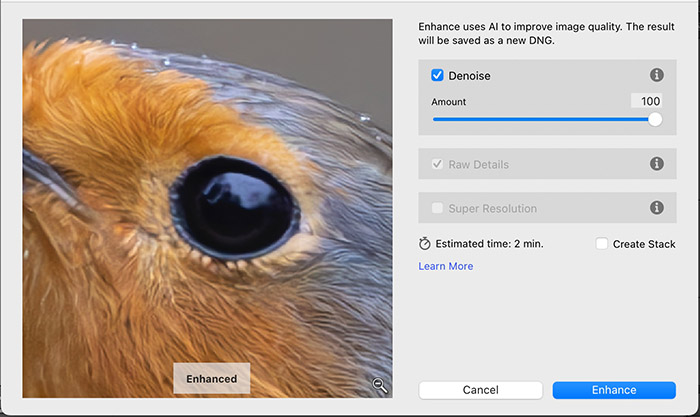
Lightroom, part of Adobe's software family, stands as Photoshop's more streamlined counterpart. While both share similarities, Lightroom offers a simplified array of image editing tools. When it comes to fixing grainy photos and cleaning up high ISO images, Lightroom offers a straightforward set of tools, making the process efficient and user-friendly. For RAW images, Lightroom automatically applies color noise reduction during import.
How to fix grainy photos with Lightroom:
Step 1. Open Lightroom and import your photo. Once the photo is open, navigate to the top right corner where you'll find several menu options. Click on "Develop."
Step 2. In the right panel, locate the Detail panel and click to expand it. Here, you'll find various slider options for photo sharpening and noise reduction.
Step 3. Adjust the sliders for Luminance, Detail, Color, and Contrast to reduce noise in your image. Be mindful that lowering these values too much can also cause loss of small visual details.
Tips: By default, the color noise reduction slider is set to 25, and all raw images have detail and smoothness settings set to 50. The luminance noise slider is set to 0, with detail set to 50.
Read more: How to Use Denoise in Lightroom Classic[Lightroom Tutorial]
Method 4. How to Fix Grainy Photos on iPhone
When you're on the go and need to fix grainy photos without access to a desktop, iPhones offer a convenient solution. Follow these steps to fix grainy photos on your iPhone without Photoshop. If you're still experiencing issues with graininess, consider resetting your iPhone, as sometimes technical glitches can affect image quality.
How to make images less grainy on iPhone:
Step 1. Launch the Photos app and select the image you want to enhance. Tap on the Edit button located in the top-right corner of the screen.
Step 2. Scroll to the right until you find the Sharpness tool, identifiable by its triangle-shaped icon. Adjust the Sharpness slider to the right to enhance the sharpness of your images.
Step 3. Locate the Definition tool, also indicated by a triangle-shaped icon with a line through the middle.
Step 4. Drag the Definition slider to the right to improve the clarity of your images.

Step 4. Preview the result and click "Add to design".
Step 5. Click "Edit Photo" to add effects or make adjustments.
Step 6. Click "Share" button to download or share your image.
Method 5. How to Fix Grainy Photos on Android
Android phones offer convenient options for upscaling images, much like iPhones. If you notice a decline in camera quality, consider restarting your Android phone to see if it improves. If the issue persists, try these steps to fix grainy photos on your Android device.
How to make photos less grainy on Android:
Step 1. Open the photo you want to edit and tap the Edit button at the bottom. Swipe left to access the Adjust option.
Step 2. Select the Sharpen option, identifiable by a triangle icon with a line in the middle.
Step 3. Drag the slider to the right to enhance the sharpness of your image. Additionally, you can choose the De-noise option under Adjust.
Step 4. Drag the slider to the right to reduce noise in your image.

Step 4. Preview the result and click "Add to design".
Step 5. Click "Edit Photo" to add effects or make adjustments.
Step 6. Click "Share" button to download or share your image.
Read more: How to Remove JPEG Artifacts Easily.
Why Are My Pictures Grainy? Possible Causes
ISO gauges the sensitivity of your camera's sensor. The higher the ISO value, the more susceptible your camera is to capturing grainy images. While increasing the ISO can be advantageous in low light or nighttime shooting scenarios, it significantly raises the likelihood of encountering grain.
If you're noticing grainy textures in your photos despite shooting in relatively well-lit conditions, it's possible that your camera features a compact sensor that struggles to capture images effectively outside of bright environments. A larger sensor typically contains more light-absorbing pixels, resulting in reduced graininess.
Another factor contributing to grainy photos could be insufficient exposure time. If the exposure duration is set too low, it may lead to grainy results. It's essential to ensure that the exposure time aligns appropriately with the composition you're aiming to capture.
Tips for How to Make Pictures Less Grainy
If you notice a significant amount of unacceptable noise in your photos, the first step is to identify its contributing factors among the three common types of noise we mentioned earlier. Once you determine the source of the noise, you can take measures to avoid it. Here are some methods to prevent excessive noise.
Control ISO to Prevent Grain
Today's technology is becoming increasingly powerful, and most cameras can capture images with minimal noticeable noise at a slightly higher ISO. However, using higher ISO settings often leads to more noise, raising concerns for many photographers. Here, it's essential to understand the concept of "base ISO," which is the lowest ISO value of the camera (usually 50 or 100).
When we raise the ISO value of the camera, we increase the gain of the signal, leading to an increase in noise associated with the signal. It's like tuning a radio to a station, where background noise is minimal due to overlapping frequencies. However, if we increase the volume, we aren't actually changing the received signal; we're just amplifying it. Consequently, background noise only becomes louder, much like our camera. Essentially, we're not making the sensor more sensitive; we're amplifying the signal recorded by the base ISO.
Address Long Exposure
Long exposures can produce dramatic images, but if the exposure time is too long, the camera's sensor begins to heat up, causing pixels to display incorrect colors and exposures. Most cameras feature a function called long exposure noise reduction. When enabled, the camera analyzes the image and identifies any incorrect pixels, which it then corrects.
However, it's important to note that this process typically requires some in-camera processing time, which increases with longer exposure times. Usually, for a 30-second exposure, the camera analyzes and corrects for several seconds. If our exposure time is 10 minutes or longer, this may become somewhat impractical.
Reduce Grain with RAW Format
Using the RAW format is a great way to achieve the best image quality. However, we don't need to shoot in RAW format all the time; we only need to switch to RAW format when the light becomes somewhat dim. This is because JPEG images already apply compression. This means that some noise, known as JPEG artifacts, already exists in the image. If you use high ISO in JPEG files, the noise will become worse. Furthermore, in post-production, using raw files offers greater flexibility than using JPEG, allowing for noise elimination and additional exposure adjustments.


