How to Compress A Video on Mac Computers (6 Ways)
How to compress a video on Mac for email, YouTube, Instagram, or other social platforms? Picking the right video compression software for Mac matters a lot. There are several options available on Mac, each with a set of features and capabilities. Some popular choices include Macxvideo AI (the Mac version of Winxvideo AI), QuickTime Player, Handbrake, Compressor, and zipping method. When reducing video file size on your Mac, it's important to balance file size with good quality. So make sure that the final tool you pick meets your needs without sacrificing too much visual clarity. Now use the programs below and follow the steps to learn how to reduce video file size on Mac without losing quality.
Table of Content
- Way 1. How to Compress A Video on Mac with Macxvideo AI
- Way 2. How to Compress A Video on Mac with Handbrake
- Way 3. How to Compress A Video on Mac with QuickTime Player
- Way 4. How to Compress A Video on Mac with iMovie
- Way 5. How to Reduce Video File Size on Mac with Compressor
- Way 6. How to Make File Size Smaller on Mac via Zipping
Way 1. How to Compress A Video on Mac with Macxvideo AI
Winxvideo AI is a video transcoder tool that comes built-in free video compressor software toolbox. It lets you reduce video file size on Mac by up to 90% with good quality. It utilizes intraframe and interframe coding algorithms, along with advanced entropy encoding to make sure you get the best compression result. It outputs the highest quality as possible with the support of high quality engine and de-interlacing engine. With a good designed interface, it's quite easy to get started.
How to Compress Videos on Mac Without Losing Quality
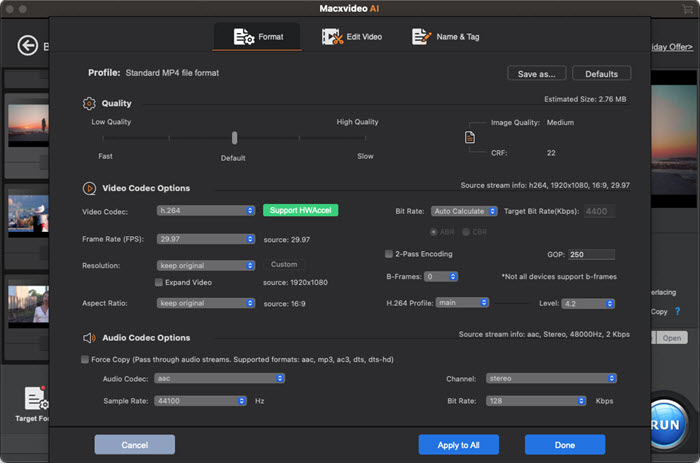
Step 1. Download and install the Mac version of Winxvideo AI - Macxvideo AI. Click the Compressor on the main interface to run the Video Compressor module. Then click on the "+ File" button in the top left corner to import the video file you want to compress on Mac.
Step 2. Move the slider to the left to shrink the file size. You will see the File Size below will be reduced automatically. You can also choose the preferred video/audio codec below.

Step 3. Go back to the main interface and click Converter module. After the video is loaded, you can choose a more efficient code format. Winxvideo AI provides various presets for different devices and platforms. You can choose a preset that suits your requirements, or you can customize the settings further. You can select a different codec (such as H.264) and adjust the quality slider to reduce the video size. Lower quality settings will result in a smaller file size but may also reduce video quality. Then click the Settings icon and modify resolution and bitrate to further reduce the file size.
Step 3. Once you have adjusted the settings, choose a destination folder for the compressed video file using the "Browse" button at the bottom.
Step 4. Finally, click on the "RUN" button in the bottom right corner to begin the compression process. The video compressor will process the video and save the compressed version to the specified destination folder.
Way 2. How to Compress A Video on Mac with Handbrake
HandBrake is a free and open-source video transcoder tool that's great for beginners. It also works as a video compressor that offers a wide range of video customization options to make video file size smaller on Mac. It supports a wide range of codec formats, so you can compress MOV, MP4, FLV, and any video file on Mac. To reduce video file size on Mac, Handbrake offers different presets with different file size, the options to adjust video bit rate, and more. Follow the steps below to learn how to compress a video on Mac using Handbrake.
Step 1. Install Handbrake on your Mac computer and launch it if you haven’t.
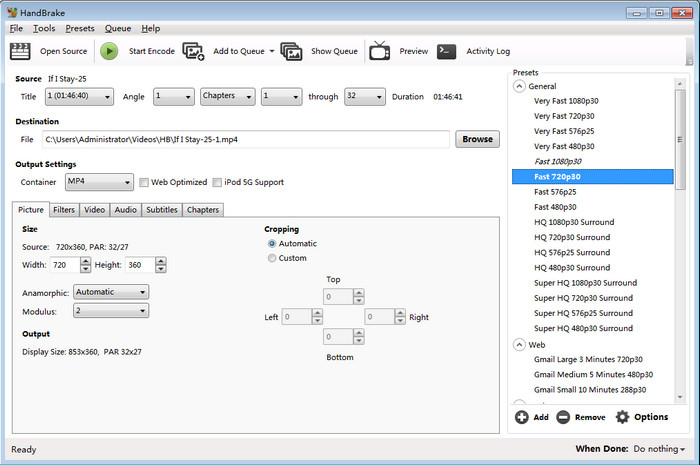
Step 2. Click File and select Open, browse, and select the video file you’d like to compress on Mac. Alternatively, drag and drop the video file into Handbrake on Mac. Batch video compression is supported.
Step 3. Select a format with a better compression ratio. You can select MP4 H.264 for a good balance between file size and quality.
Step 4. Choose your preset. For example, fast 1080p30 means 1080p resolution at 30 fps. Lower resolution results in a lower bit rate and smaller file size.
Step 5. Click the Dimensions tab to get more options. Lower the video bitrate to compress videos on Mac.
Step 6. Click the Start Encode button to start reducing video file size on Mac computers. For a more detailed guide, refer to Handbrake Tutorial: How to Compress Video without Losing Quality. This post shows more comprehensive settings for smaller video file size on Handbrake.
Way 3. How to Compress A Video on Mac with QuickTime Player
QuickTime Player is a straightforward way to compress video files on Mac. It can simply reduce the size of your video on Mac by lowering video resolution via Export settings. However, there’s no access to additional settings such as resolution and frame rate to further optimize your file size with QuickTime player. The resulting file will be smaller in size for email, sharing, or uploading online. If you want to compress a video on Mac with QuickTime Player, just use the following steps.
Step 1. Open QuickTime player on your Mac computer. Locate the video file you want to compress on Mac. Select the video file and click Open and load on QuickTime.
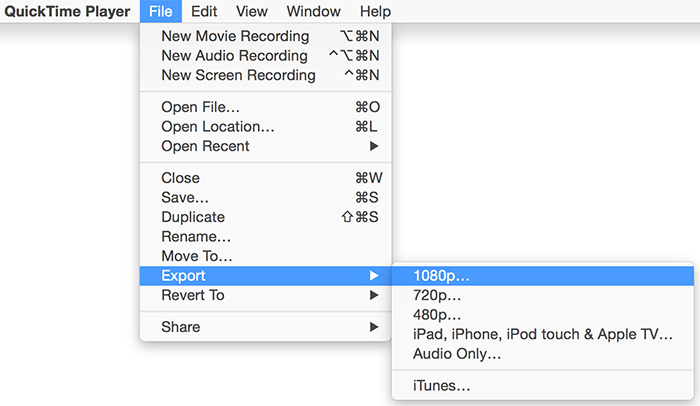
Step 2. Click the File button on the menu bar on QuickTime Player. Select Export As from the list of options.
Step 3. Select a lower resolution from the resolution options to make the video file size smaller on Mac. It offers different resolution choices, including 4K, 1080p, 720p, 480p, and Audio Only. Select one based on your needs. Audio Only will export the file as an audio file with the smallest file size, which works when you only want to get the audio track.
Step 4. Name the file in the export window, then select a folder where you want to save the compressed video file. Once you're happy with the settings, click "Save" and wait for QuickTime to compress your video. The compressed video file will be saved in QuickTime MOV file format on Mac.
See Also: QT Pro Tutorial - Compress and Resize Video with Pro Version
Way 4. How to Compress A Video on Mac with iMovie
iMovie is a great tool for basic video editing tasks, including trimming, adding music, and applying simple effects. Its intuitive interface makes it accessible to users of all skill levels. While iMovie allows you to export videos at different resolutions and quality settings, its compression capabilities are not as robust as dedicated video transcoding software like Winxvideo AI and Handbrake. While it can reduce file size on Mac, it may not always achieve the same level of compression efficiency.
For casual users who need to compress videos in iMovie for sharing online or storing on devices with limited storage, it is a suitable option. However, for more advanced users who require precise control over the compression process, a dedicated video transcoding tool is recommended.
Step 1. To begin the compression process, open iMovie on your Mac. Locate and click the "Import Media" button, typically found in the top menu bar. This action will open a file browser window. Navigate to the location of the video file you wish to compress and select it. Once selected, click the "Import Selected" button to add the video to your iMovie project.
Step 2. While not strictly necessary for compression, editing your video can help reduce its file size. After importing your video, drag and drop it onto the timeline in iMovie. By removing unnecessary parts of the video, you can significantly reduce its file size.
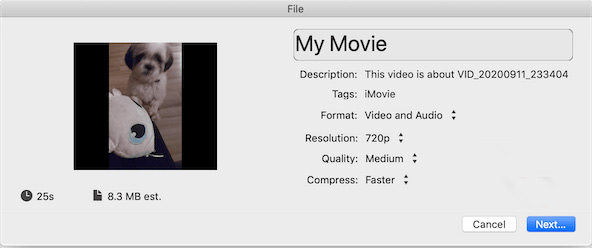
Step 3. Click the "Share" button in the top right corner of the iMovie window. From the dropdown menu, select "File." This will open the export settings window. Here, you can adjust the resolution and quality settings to achieve your desired file size. Lowering the resolution and quality will result in a smaller file size. Once you've made your adjustments, click "Next" and choose a save location for your compressed video.
Way 5. How to Reduce Video File Size on Mac with Compressor
Compressor integrates with Final Cut Pro and shows better video compression performance for the M1 Pro, M1 Max, and M1 Ultra chips on the new Mac Studio and MacBook Pro. It makes video file size smaller on Mac by customizing video encoding settings, output settings, and video conversions. The best part of the tool is its fast video compression speed on Mac. It supports HDR, HEVC, and 360-degree videos on Mac computers. For novice users, however, it is a bit difficult to get started for its complicated video settings and editing options.
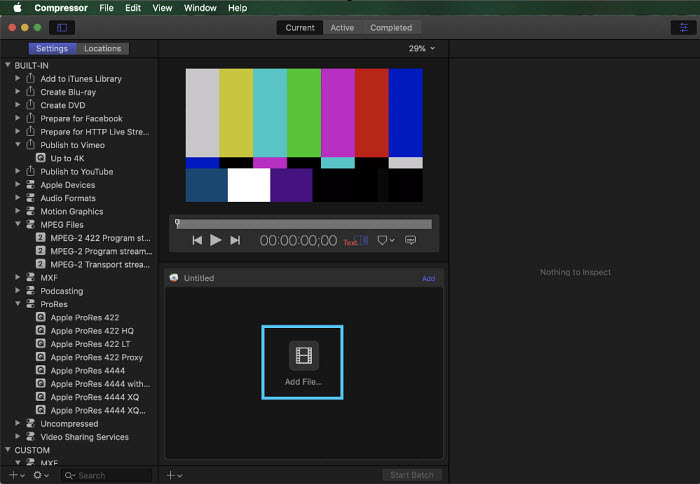
Step 1. Open Final Cut Pro Compressor on your Mac computer. Click the plus sign in the lower left and select New Settings from the options. Set the format to MPEG-4 and click OK to save the settings. On the right-hand side, click on the Video tab, and set the video codec to H.264.
Step 2. Change the Average Data Rate. Drag the slider and enter the data rate with the resolution and framerate you want. You can keep the default audio settings for the audio file doesn’t take too much file size.
Step 3. Back to Final Cut Pro, click on the share button, and select Add Destination.
Step 4. Drag and drop Compressor settings to the Destinations list. Now, start compressing your video file on Mac with Final Cut Pro Compressor.
Way 6. How to Make File Size Smaller on Mac via Zipping
You can simply reduce video file size on Mac by zipping. The zipping method works when you want to compress video on Mac for email or sharing. If the source video file is already compressed, zipping won’t decrease the file size a lot. Use the steps below to learn how to compress a video on Mac via zipping. It requires no third-party help.
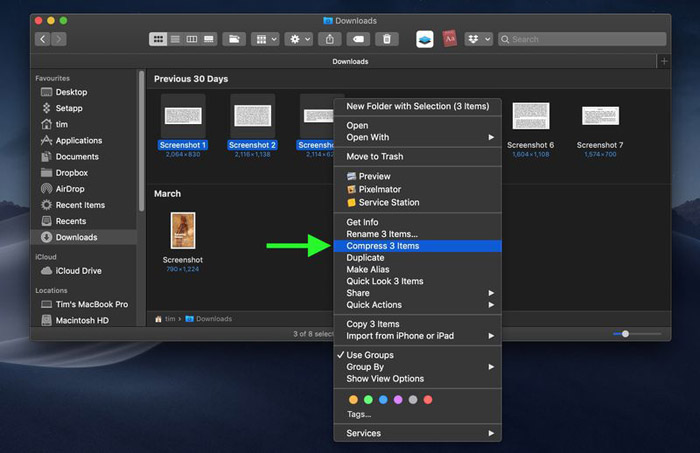
Step 1. On your Mac computer, right-click the video file or the folder you want to compress. Alternatively, tap the video file using two fingers.
Step 2. Select Compress (your video file) or Compress X Items from the drop-down shortcut menu.
A simple file takes the same name as the source file after being zipped. A folder is named Archive.zip.
FAQs. How to Compress A Video on Mac (2026 Guide)
1. What is the best video compression format for Mac?
For the best balance between file size and visual fidelity on macOS, **HEVC (H.265)** is the superior choice. It offers roughly 50% better compression than the older H.264 standard at the same quality level, which is essential for 4K and 8K footage. For maximum compatibility across older Apple devices, **MP4 (H.264)** remains the gold standard.
2. How can I compress a video on Mac without losing quality?
While all compression involves some data loss, you can achieve "visually lossless" results on Mac using three methods:
- Winxvideo AI (Recommended): The most efficient way. It uses an AI-driven High-Quality Engine to compress videos by up to 90% while simultaneously enhancing clarity and reducing noise.
- QuickTime Player: A basic built-in option. Open video > File > Export As > select a lower resolution (e.g., 720p). However, it offers no control over bitrate or file size.
- HandBrake: A free tool for power users that allows for manual adjustment of RF (Constant Quality) and encoding speeds.
3. What are the best compression settings for Mac users?
To significantly shrink your video while maintaining great quality on Mac, use these target settings:
- Codec: HEVC (H.265) for smaller files; H.264 for universal playback.
- Resolution: Downscaling from 4K to 1080p can reduce size by over 70%.
- Bitrate: For 1080p, aim for 2000-3000 kbps. For 720p, 1000-1500 kbps is usually sufficient.
- Frame Rate: Keep it at "Same as Source" or 30fps to avoid stuttering.
4. Are online video compressors safe to use on Mac?
Online tools like Clipchamp or Kapwing are convenient for small clips under 500MB. However, for large 4K files or sensitive personal videos, desktop software like Winxvideo AI is safer and faster. Online tools often have privacy risks, upload limits, and can be much slower due to internet bandwidth constraints.