How to Compress Video with QuickTime Player No Quality Loss
QuickTime player is always used to playback videos on macOS or Windows. One practical feature is underestimated. That is video compression! Yes, your quicktime player can be also applied to compress and reduce (4K) video size on both macOS and Windows PC. And it gives you an resulting file with visually no quality losing. Check the below detailed guide if you have no idea on how to use QT to make video smaller:
Table of Content:
Part 1. QuickTime Tutorial: Shrink Video Size with QT Player
QuickTime player is the default media player for macOS operating system. Hence, here we adopt QuickTime player for Mac computers to show you how to make video smaller on macOS. The operating steps are much of a muchnes on Windows. Take the following steps for reference if you're running on Windows PC. Ok, let's cut to the chase.
Step 1. Open QT player from your Applications folder > click "File" > choose "Open File" to import your iPhone recorded MOV file or other video.
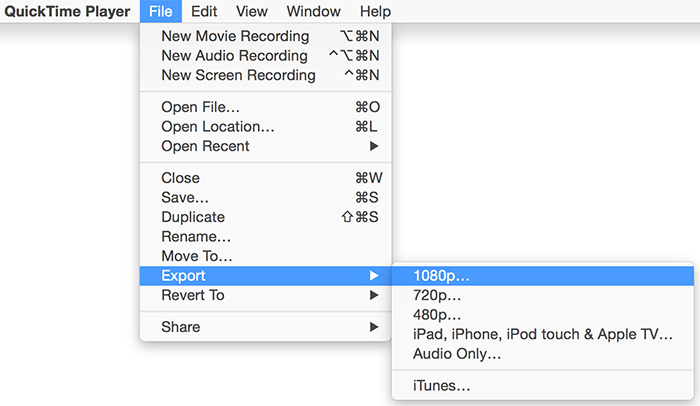
Step 2. Tap "File" > select "Export As". There are several ouput resolution options available, including 4K (if applicable), 1080p, 720p, 480p, Audio Only. Downscale video resolution to make video size smaller.
Note: free QuickTime player only provides you with this effective way to make video smaller. If you need to further downsize video, resize video by cropping video image by dint of Apple's Compressor app (latest version Compressor 4.5.3). It lets you adjust video dimensions and tweak video length & height. Thus, your output video aspect ratio would be changed and file size will be reduced to certain degree, as well.
Certainly, if you're tired of using multiple tools for video compression, you can upgrade to QuickTime player Pro version to compress and resize 4K/2K videos within one tool.
Related: How to Compress Video Media File Size in PowerPoint
Part 2. QT Pro Tutorial: Compress and Resize Video with Pro Version
With QuickTime player Pro version, you can shrink (4K) video by lowering resolution, as well as resizing video dimensions, reducing frame rate & bit rate. The whole operation is not a rocket science. Check the below step-by-step guide if you've never used Pro before.
Step 1. Upgrade to QuickTime player Pro
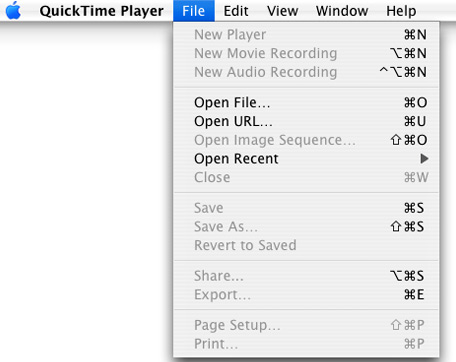
Upgrade your QuickTime player to Pro version first. Afterwards, tap "File" at the upper left corner of the menu > choose "Open File".
Step 2. Add your Video File
Find your video on your macOS or Windows PC and load it to Pro via "Open" button.
Step 3. Check if Video and Audio are Synchromized
Before you go, you'd better check if your video has problem of video audio desync issue. Play your (4K 2160p) video footage to test.
Step 4. Tap "File" and click "Export".
Step 5. Choose Export Format
Under "Export" section, click the hide option to choose "Movie to Quick Time Movie" and then tap "Option" button. Opt for H264 or HEVC for compression type under "Settings" in "Video" zone.
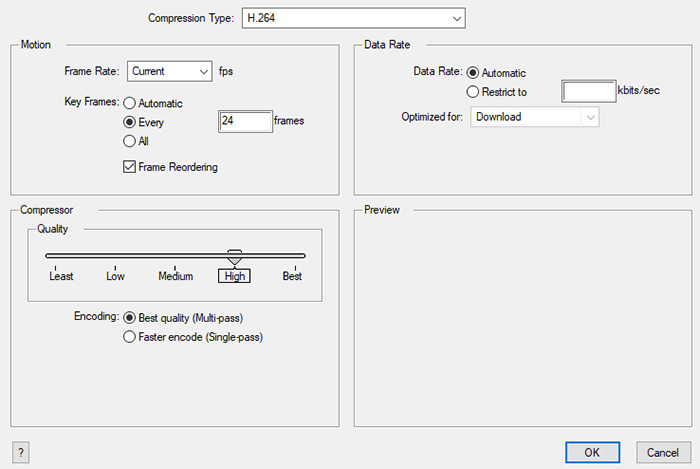
Step 6. Resize Video Dimensions and Change Video Frame Rate & Bit Rate
- Move to "Motion" section, where you can lower down frame rate and change key frames to further compress 4K/2K/1080p video.
- Then locate to "Data Rate" section to properly reduce bit rate at your willing. Tap "OK".
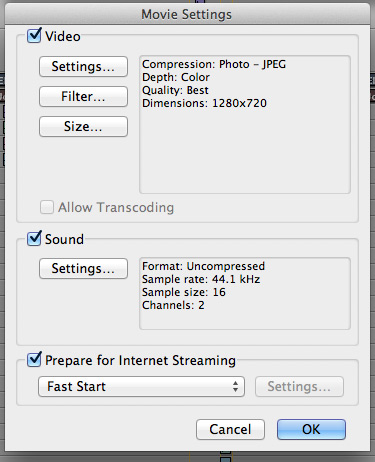
- Go back to "Movie Settings" window, where you tap "Size" button to enter video dimension (crop) section. Crop your video to remove unwanted bars from video picture to resize video. Tap "OK" to exit from the settings interface.
Step 7. Hit "Save" button to begin compressing videos on QuickTime player pro.
Optional: "Trim" feature under "Edit" category can also be applied to cut off unnecessary clips from your video to shorten video length and make (4K Ultra HD) video smaller.
Click for more reliable free video compressor software >>
Part 3. Best QuickTime Alternative to Compress Video without Losing Quality
QuickTime will damage your output video quality to certain degree since it downscales 4K to 1080p, 1080p to 720 resolution. To get an resulting video with higher quality, resort to Macxvideo AI, a Mac version of Winxvideo AI, with 98% quality kept and up to 90% size off!
- 90% compression ratio thanks to intraframe and interframe coding algorithms and entropy encoding.
- Advanced High Quality Engine and de-interlacing engine guarantee you an output video, up to 98% quality reserved!
- Reduce 8K/5K/4K/2K video with 50% size off and ZERO quality loss if you decode video from H264 to H265 (HEVC) codec.
- Trim to shorten video duration, crop to resize video dimensions, lower resolution/frame rate/bit rate, etc. to further compress video.
[Tutorial] How to Shrink Videos with Highest Possible Quality
Step 1. Free download this video compressor and install it on your macOS or Windows. Click the Compressor on the main interface to run the Video Compressor module. Then click on the "+ File" button in the top left corner to import the video file you want to compress. Batch compression is also available.
Step 2. Move the slider to the left to shrink the file size. You will see the File Sizeon the left side will be reduced automatically. You can also choose the preferred video/audio codec or resolution below.

Optionally, if you want more control over the video settings, you can follow the steps below.
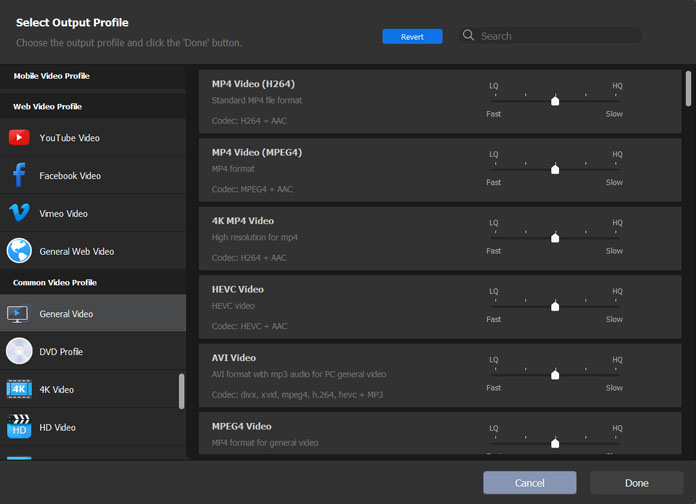
Step 3. Go back to the main interface and click Converter module. Hit "+Video" button at the upper left corner of the home screen and choose video footages to load. A long page list of input formats are supported, MP4, M4V, MKV, MOV, AVI, FLV, WMV, MTS, HEVC, VP9, H.264...
Step 4. Choose a high compression codec HEVC as output codec. When the video is imported, an Output Profile window appears. Select MP4 Video (HEVC, AAC), and click OK. HEVC will compress your resulting file with at least 50% size off while keeping intact quality loss. It's a lossless compression. Of course, if your playback device or platform is feeble to handle HEVC codec (esp. at 4K 60FPS), choose H264.
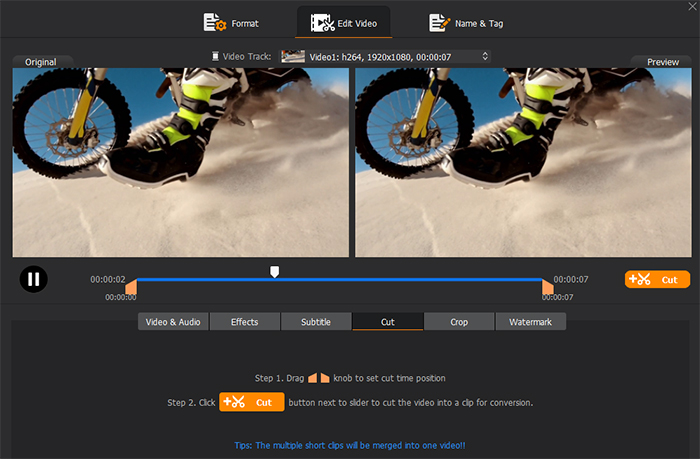
Step 5. Trim video (lossless compression, as well). Click Edit button with a scissor-shaped icon under the video info part > Enable Trim to freely set the start time and End Time to cut off clips from video, or drag the slider to the video section you desire to keep.
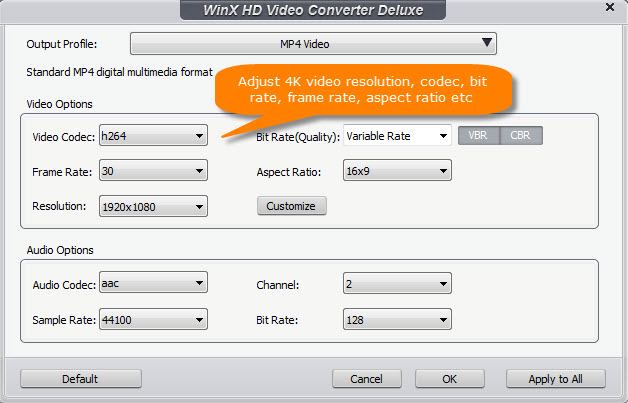
Step 6. Adjust parameters (lossy compression). On the video info window, tap the gear-shaped Settings button to lower down parameter settings, like compress 4K to 1080p, lower frame rate from 120FPS/60FPS to 30FPS, and reduce bit rate properly. These will further compress your video at high compression ratio. Please don't overdo that, cuz the lossy compression will cause negative impact on your video quality.
Step 7. Click RUN button to start reducing video even from GB to MB without noticable quality degradation (High Quality Engine support).
Warm prompt: there is no fixed way to compress video footage. And you don't have to rely on the professional video compressor for most video players like QT, VLC also enable you to simply downsize video. Share with us your workaround on video compression if you've tried any new.