How to Compress Video for Web for Faster Uploading [2026 Guide]
How fast should a webpage load? Theoretically, the sooner, the better. To be specific, the ideal webpage loading time for mobile device is 1-2 seconds and that for computer is 3-4 seconds. The case is different when there are videos on your webpage. Videos on webpage will lengthen webpage loading time, which might result in loss of traffic.
To speed up webpage loading time, you can optimize your webpage code (like remove useless JavaScript), simplify webpage structure and use new-gen picture format JPEG 2000, JPEG XR, WebP instead of PNG, JPG. More importantly, compress video size for web faster loading! How to make video smaller for web? Read on:
Table of Content

Part 1. 2026 Web Video Compression Standards
To ensure your website loads fast and maintains high Core Web Vitals (SEO) scores, your videos must be optimized for both speed and quality. Here are the recommended settings for web-ready videos:
Scenario |
Recommended Codec |
Resolution |
Target Bitrate |
Hero Background |
HEVC (H.265) / AV1 |
1080p (Full HD) |
1.5 - 2.5 Mbps |
Product Demo |
H.264 (MP4) |
720p (HD) |
1.0 - 2.0 Mbps |
Mobile View |
HEVC (H.265) |
480p / 720p |
500 - 800 kbps |
Pro Tip: Always use AV1 or HEVC for modern browsers to save up to 50% more bandwidth than H.264.
Part 1. Best Video Compressor to Reduce Video Size for Web
To make video smaller for web faster uploading, there are 3 ways to go, including convert video codec, trim video length and lower down video parameters. Winxvideo AI covers all the ways to compress your video for web uploading or streaming.
- Downsize 8K/5K/4K/2K video with at least 90% size off and ZERO quality loss once you change video codec to H265 (HEVC).
- 90% compression ratio to let GB be MB thanks to intraframe and interframe coding algorithms and entropy encoding.
- Convert any video (370+ input formats/codecs supported) to MP4 (H264/H265), WebM for web faster loading.
- Enable Trim feature to shorten your video length to compress video size without quality loss.
- Properly lower down video resolution, bit rate, frame rate, video profile level, etc. to reduce file size.
1. How to Convert Video Codec & Format to Compress Video for Web
Video codec and format decide the fundamental size of a video. Currently, MP4 and WebM are the best video formats for web. WebM is full compatible with Chrome and Firefox browsers while MP4 is accepted by all browsers. Thus, MP4 is the first choice for web.
In terms of video codec, H264 and HEVC are recommended. If your video is up to 4K Ultra HD and larger than 1GB, HEVC is the best codec.
Step 1. Free download this video compression software and install it on your macOS or Windows. It's 100% safe, clean and virus-free, no bundled 3rd party software, Trojan virus or malware.
Step 2. Click on Compressor to run the Video Compressor. Winxvideo AI supports batch compressing multiple files at a time. So you can click "+Video" button to load your videos.
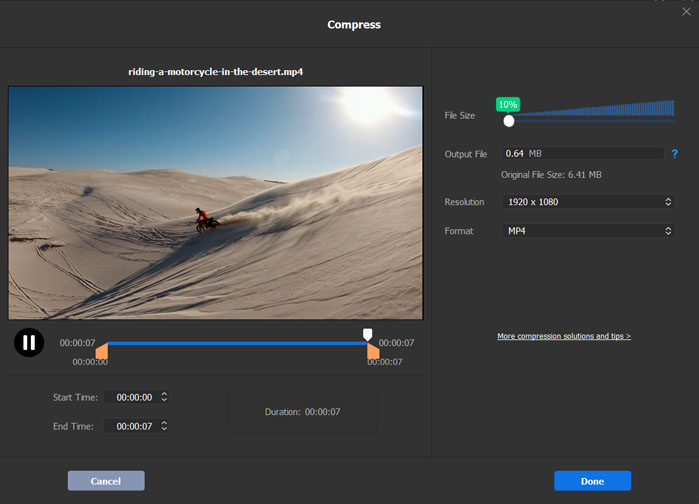
Step 3. Move the slider on the right side from 10% to 100% to get your desired size. Your file size will be reduced as you move the slider to the left side and you can see it on the top side.
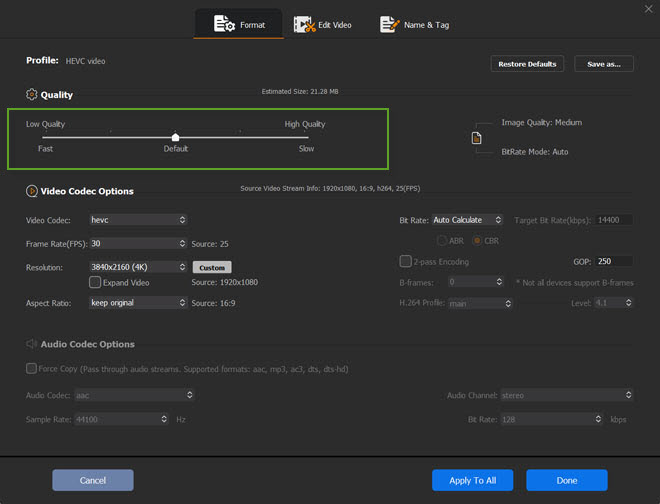
Step 4. Go back the main interface and click Converter. If you need more parameter adjustment. Once you loaded video, a full array of input formats profile is poped up, where you can see MP4, M4V, MKV, MOV, AVI, FLV, WMV, MTS, HEVC, VP8, VP9, H.264...Choose HEVC as output codec if your video size is beyond GB, for HEVC is famous of high compression efficiency. HEVC will compress your resulting file with at least 50% size off while keeping untouched quality. If your video size is within 500MB, H264 is also a nice option.
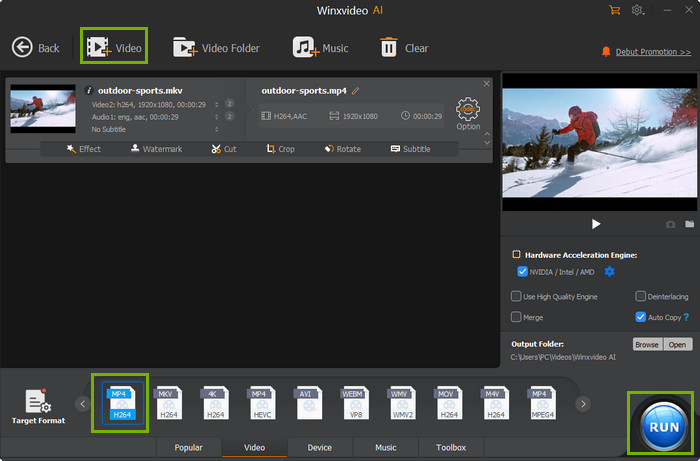
Step 4: Tap RUN to begin transcoding video to MP4 HEVC codec at GPU hardware accelerated speed. The resulting file quality will be 1:1 copied from original video, no visually difference. Check if the output file size meets your demand. If not, do as follows to further reduce video file size.
2. Trim Video Length to Reduce Video Size for Web
Winxvideo AI is also well-designed with certain video editing features to further shrink your video size. Enable Trim feature to cut unnecessary footages off video, crop video to remove black borders and disable surplus audio/subtitle track to compress video.
Trim Video: on the home screen of WinX, find "edit" icon with a scissor-shaped icon on video info bar and click it to activate it. Then, you can directly move the slide bar to lock the length you wanna keep. Or insert the specific start time and end time as it shows in the below image.
Crop Video: enable "Crop & Expand" option if you need to remove black borders or adjust video image size. The compression knack of cropping feature is narrow, no significant effect in size reduction.
Audio/Subtitle track selection: for video container formats like MP4, AVI, MKV, they're able to contain more than 1 audio or subtitle track. Head to home screen > locate at video info bar and opt for your desired audio and subtitle track. Disable superfluous tracks to compress video. Click to see detailed video resizing tutorial >>
3. Lower Down Parameter Settings to Downsize Videos for Web
Higher parameter settings bring larger video size. Winxvideo AI knows your concern and offer your way - adjust parameter settings, covering from resolution, bit rate, frame rate to aspect ratio, audio channel. Nonsense aside, tweak your settings now!
On the video info window, tap the gear-shaped Settings icon to activate the setting window. Parameters degradation will damage your quality to certain degree. Please properly adjust them and strike a good balance between size and quality. Generally speaking, , lower frame rate from 120FPS/60FPS to 30FPS, and adjust bit rate. These will further compress your video at high compression ratio. Keep in mind that do not lower down them too much. Or the small size will come at the price of poor quality.
- Resolution: compress 4K to 1080p, 720p or 2K to shrink file size.
- Bit rate: two standards for bit rate: CBR and VBR. For smaller file size and minimal reduction in quality, choose VBR.
- Frame rate: lower frame rate 120FPS to 60FPS, 60/50FPS to 30/25FPS to efficiently compress video footage.
Part 3. Other Video Compression Software for Web Video Size Reduction
More free video compressors are available if you don't want to stick with only one tool. Here we single out another solid free video compression software for you to choose from. Some are open source utilities and others are free online video compression services. Check out:
1. Handbrake
Handbrake is highly recommended by users on designernews.co. Mainly because it's a free open source program and well-renowned around the whole globe. This world-famous video transcoder enables you to compress video size by converting video codec to HEVC, as well as downsize video by lowering parameters (resolution, frame rate, bit rate...mentioned before). Therefore, you can count on it as long as you have no need to cut off your video duration. Follow the below instructions to make MP4 video smaller for web streaming/uploading:
Step 1. Install Handbrake software.
Visit Handbrake official site to download a copy according to your platform. Install it by following the wizards.
Step 2. Load your video file.
You'll be reminded to browse the oversized video you want to shrink as you first open this video compression software. You can also do this by tapping the "Open Source" button on the top, or directly drag and drop.
Step 3. Select the output format for your compressed video.
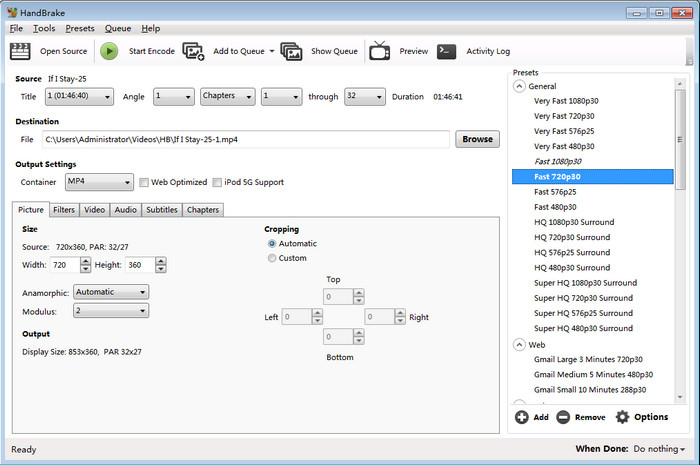
Handbrake opens videos in a wide range of video formats, but only saves video in MP4 and MKV formats. To reduce video size, you're more recommended to select MP4 HEVC x265 codec.
Step 4. Choose your preset.
Well, you can choose MP4 or MKV format in the section Output Settings. Handbrake offers more intuitive presets for novices in the right side of the window, like the most famous video sharing website YouTube, which will make configuring HandBrake a lot easier for you.
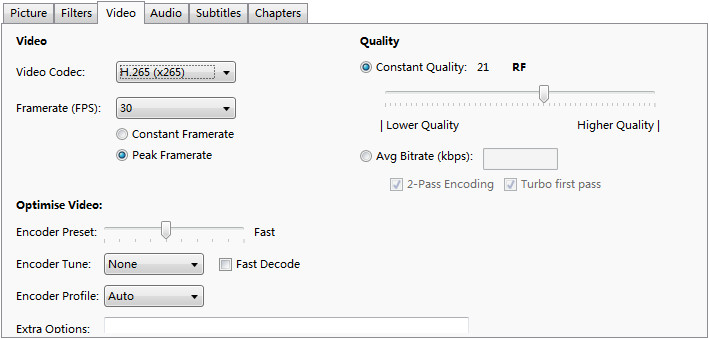
Step 5. Tweak compression settings.
Besides video format, parameters like video resolution, codec, bitrate, frame rate etc also matter a lot with video size. Follow the Handbrake compression settings below to better balance between video file size and output quality:In the Picture tab, your source video resolution is accurately figured out. If you don't expect that high resolution, you can downscale it by typing smaller pixels of width and height proportionally, for example, 4K UHD to 1080p. If your video contains black bars, you're able to crop them out both in Automatic or Custom under Cropping.
Head to Video tab, drop down the Video codec menu, where you can convert H.264 to HEVC for 50% file size reduction without quality loss.
Move the RF slider to set the constant quality you want. Bigger RF numbers mean more compression, lower image quality, and smaller final file sizes. Generally, an RF of 18-20 looks good for H.264, and 20-22 holds up well for H.265.
In this section, you're able to change the video framerate (recommeded to choose Same as source) and Avg Bitrate to compress video.
Step 6. Save your video.
Name your resulting video file and click Browse button to specify the output folder path. Then click the green Start Encode button to finish Handbrake video compression.
2. Clideo
How to compress 1GB video to 10MB? This question appears on related keywords, Q&A website, forum and social platforms at high frequency. Truth to be told, this can be realized without much efforts, even no compressor application installation needed. Online video compressor service is enough. Clideo is up to the mark.
Enjoy its totally free version if your input video is within 500MB in size and 60 seconds in duration. Certainly, one more additional precondition - you have to accept the Clideo watermark embedded into your resulting video file. Or just pay for couples of greenbacks to update to its advanced version if you need to compress 1GB video to 10MB without any extra limit. Check its how-to guide if you have a gusto on online service.
Step 1. Open Clideo website. Choose a video file from Windows PC/macOS or your mobile device. You can also upload video files from your Google Drive or Dropbox, or paste a video URL from YouTube, Facebook, Instagram, etc.
Step 2. Wait for the uploading process to complete. The uploading may be time-consuming, just be patient. The time it takes is also jointly decided by the source video file size and your network connection speed.
Step 3. Download the compressed video to Google Drive, Dropbox, or your device. When the compression process finishes, you'll be told the compression ratio and then you can upload it to website or platform.
3. Adobe Premiere Pro
On top of the professional video transcoder software and online video compression service, some video editors also cut the mustard in shrinking your video size for web faster uploading. Adobe Premiere Pro is the very one. When you export your output video file after editing, you can choose video codec and video parameters (related to video quality & file size) to decide the final video quality and file size. This is especially nice for those who happen to have Premiere Pro installed on their Windows or macOS.
Providing you have no extra demands, just compress video by dint of this all-round video editor:
Step 1. Open the export window. In Premiere Pro, click file > export > media. The Export Settings window will show up, where you can freely select export settings to resize video in Premiere Pro.
Step 2. Pick up one or more of the following ways to export your video at smaller size:
1. Choose a more efficient codec format. Here H.264 is recommended for video exports through Premiere Pro.
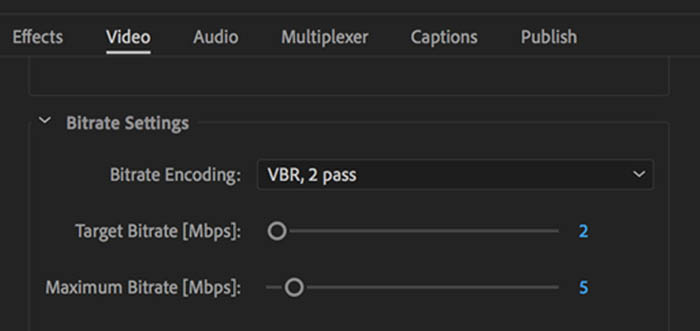
2. Set the bitrate to VBR, 2 pass. Adobe uses 1 pass VBR by default. The 2 pass VBR enables Premiere Pro to reduce video size without losing quality. The export process might take longer as a trade-off. CBR option has the fastest speed but the lowest quality, not recommended here.
3. Lower the bitrate. The lower the bitrate, the smaller the file size the video will have. Adjust the target bitrate gradually and check the estimated file size at the left bottom of the window until the file size is close to your target.
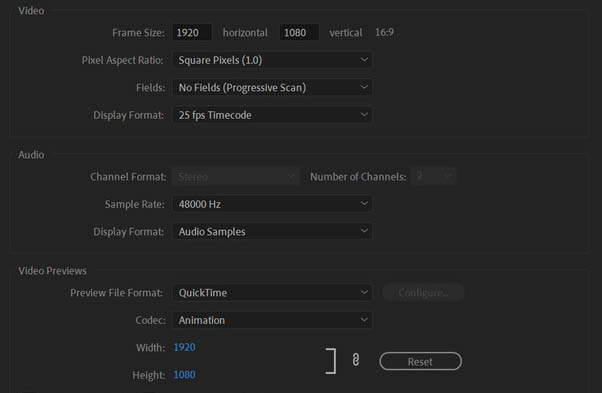
4. Reduce video resolution or change video size. Head to Sequence > sequence settings > find Frame Size under Video section > Width and Height under Video Previews. Set width and height to resize video frame size. You can crop video in Premiere Pro to cut out unwanted frames, however, it doesn't influence the video size too much.
Step 3. Export compressed video files from Premiere Pro. After you've all set, click Export. The video in a smaller file size will be created. When it's done, you can open your final video file to check its quality and file size and then further use it on web at faster speed.
After the above compression steps are done, your video (even more than 1GB) can be efficiently compressed to MB and suitable for web faster loading. If the video still slows down your webpage loading time, please write a lazy-loading js to make video loading later than text. Anyone who has better solution to speed up a webpage with video, is welcomed to share with us your idea via contact us  .
.
Why Traditional Compression Isn't Enough for Web?
Standard video compressors often leave you with a difficult choice: a small file that looks blurry, or a clear video that slows down your website's loading speed. Slow websites lead to higher bounce rates and lower Google rankings.
Winxvideo AI changes the game with its AI-driven High-Quality Engine. It doesn't just cut data; it intelligently analyzes each frame to preserve edge sharpness and textures. By utilizing Level-3 Hardware Acceleration, it can batch-compress your web assets 47x faster than online tools, reducing file sizes by over 90% while keeping the visual quality intact.
Feature |
Online Compressors |
Winxvideo AI |
Max File Size |
Usually limited to 500MB |
Unlimited (4K/8K Supported) |
Privacy |
Uploads to cloud (Risky) |
100% Local & Secure |
AI Enhancement |
No (Results in blur) |
Yes (Restores clarity) |
FAQs. Common Questions about Web Video Compression
1. What is the best video format for websites?
The best all-around format is MP4 (H.264) due to its universal compatibility. However, for modern browsers, WebM (VP9/AV1) or MP4 (HEVC) are much more efficient, offering the same quality at half the file size. Most web developers use MP4 as a fallback and WebM as the primary source.
2. How do I reduce video size for web without losing quality?
The secret is "Visual Lossless Compression." By using Winxvideo AI, you can convert videos to the HEVC codec and set a CRF (Constant Rate Factor) value. This ensures the encoder only removes data the human eye can't see, effectively shrinking the file by up to 90% while the video remains sharp on all screens.
3. Does video compression affect SEO?
Absolutely. Page speed is a critical ranking factor for Google. Large, unoptimized videos increase Largest Contentful Paint (LCP) times. Compressing your videos for the web helps your pages load faster, improving both user experience and your SEO performance.
4. What is a good bitrate for web video?
For standard 1080p web video, a bitrate between 2000 - 3000 kbps is ideal. For background hero videos where some loss is acceptable, you can go as low as 1500 kbps to ensure ultra-fast background loading.