5 Ways to Sync Audio & Video Like a Pro
 Mike Rule
Updated on
Ever poured your heart and soul into crafting a video, only to discover the audio and video are out of sync? That sinking feeling can be a real buzzkill, especially after dedicating significant time and effort. But fear not, fellow content creators! There are solutions to bring your audio and visuals back into perfect harmony.
This guide will guide you how to sync audio and video online and offline seamlessly. We'll delve into the reasons behind the audio and video out of sync issue and unveil practical methods to fix it, using popular software like Adobe Premiere Pro, VLC, Winxvideo AI, VEED online editor and OnlineConverter.
- One-click to recalculate timestamp to fix A/V out of sync
- Free video speed editor to change speed from 0.1x to 16x
- Convert, compress, record and edit video without losing quality.
- Stabilize, deinterlace, upscale video to cinema-like quality.
Part 1. Why Audio and Video Get Out of Sync
The crux of audio-video synchronization problems lies in timestamps. When audio and video fall out of sync, it essentially means that the timestamp correlation between the two has been disrupted at some point during the processing, transmission, or playback of the audiovisual content. This can stem from various factors, including:
- Network latency: Delays introduced during network transmission can cause audio and video packets to arrive at the receiver out of sync.
- Encoding and decoding delays: The encoding and decoding processes involved in video compression and playback can introduce slight discrepancies in the timing of audio and video data.
- Player processing strategies: Different video players may employ different strategies for buffering and rendering audio and video data, which can lead to synchronization issues.
- Source content problems: In some cases, the audio and video may be misaligned in the source content itself, such as when recorded with faulty equipment or edited improperly.
By understanding the underlying causes of audio and video out of sync, we can better identify the specific problem and apply the appropriate solution to sync audio and video.
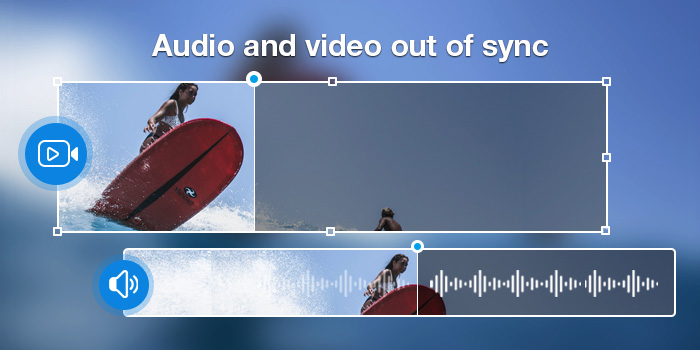
Part 2. How to Sync Audio and Video Online & Offline?
Syncing audio and video requires a strategic approach. The best method hinges on two factors: the software you have and the severity of the out of sync. For minor issues, manual adjustments within your editing software might suffice. Simply shift the audio track to visually match the corresponding video frames. However, more advanced solutions exist. Many video editing programs offer built-in automatic sync features that analyze the audio and video data (like waveforms or timecode) to automatically align the tracks. This is a time-saver for moderate problems.
For complex audio and video sync or handling numerous files, consider dedicated software or online tools. These often provide advanced functionalities like visual aids, waveform comparisons, and batch processing, making them ideal for tackling even the most stubborn sync issues. Here we'll offer 5 ways to sync audio and video easily.
1. Using Winxvideo AI
Winxvideo AI steps in as an effective solution to fix audio and video out of sync issue. It is a video editor without watermark, and it can sync, split, cut, merge, overlap, and crop a video Windows 11/10 and macOS. After editing, you can export the video in any format this audio-video sync software supports, like MP4, MOV, MKV, AVI, HEVC, H.264 etc.
 Free Download
 Free Download
Winxvideo AI is for PC, while Macxvideo AI (from our MacXDVD brand) is for macOS.
To do sync audio and video in Winxvideo AI, follow these steps:
Step 1. Open Winxvideo AI and click "Video Converter", then drag and drop to import the video that's out of sync with audio.
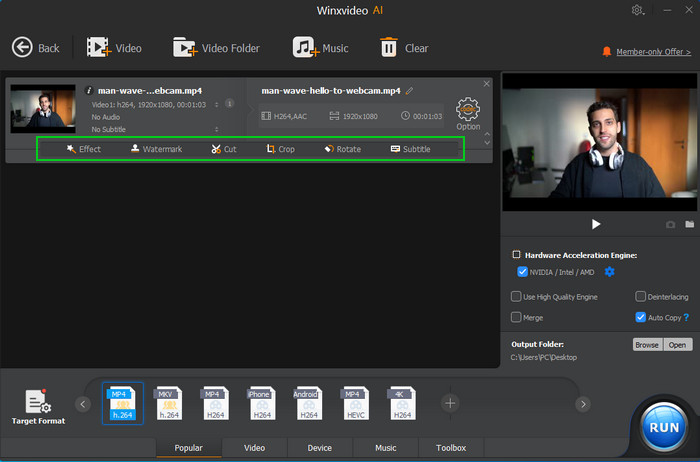
Step 2. After loaded, you can see there are some editing options below the video information. Click any one to access the video editing interface.
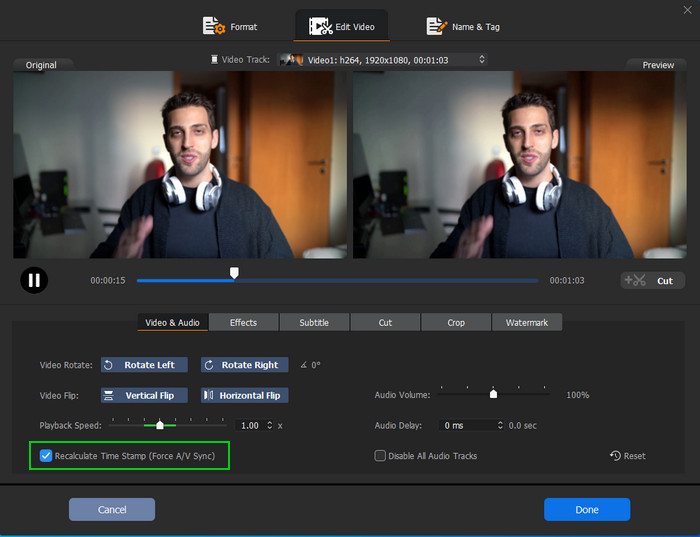
Step 3. Select the "Video & Audio" column and tick on the box of "Recalculate Time Stamp (Force A/V Sync)" option. It discards timestamps that have unknown drift and recalculates them, ensuring that the timestamps of audio and video frames match again. In one word, this will fix the audio and video out of sync issue automatically.
Step 4. Click "Browse" button to choose an output folder and tap the "RUN" button to start sync audio and video automatically now.
2. Using Adobe Premiere Pro
Adobe Premiere Pro, a professional video editing software, offers a powerful solution to how to sync audio an video. Packed with robust features, Premiere Pro provides different options for seamless audio-video synchronization, including manually or automatically (with Premiere Pro sync), ensuring a polished final product.
Here's a glimpse into how to sync audio and video with Adobe Premiere Pro
Method 1. Sync audio and video automatically using the Merge Clips feature
The Merge Clips function stands out as a swift and straightforward method for syncing video footage with on-camera sound to an external audio track. This approach proves particularly beneficial when working with projects captured on a DSLR equipped with an internal microphone. If you aim to substitute the camera's audio with the superior quality of an external boom microphone recorded simultaneously, utilizing this technique is highly recommended.
Step 1. Launch Adobe Premiere Pro, then import your audio and video media files to it.
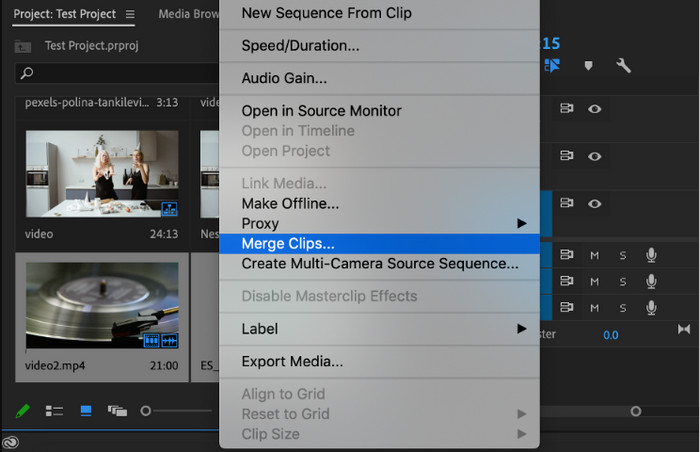
Step 2. Select both tracks in the project folder, right click, and select “Merge Clips”
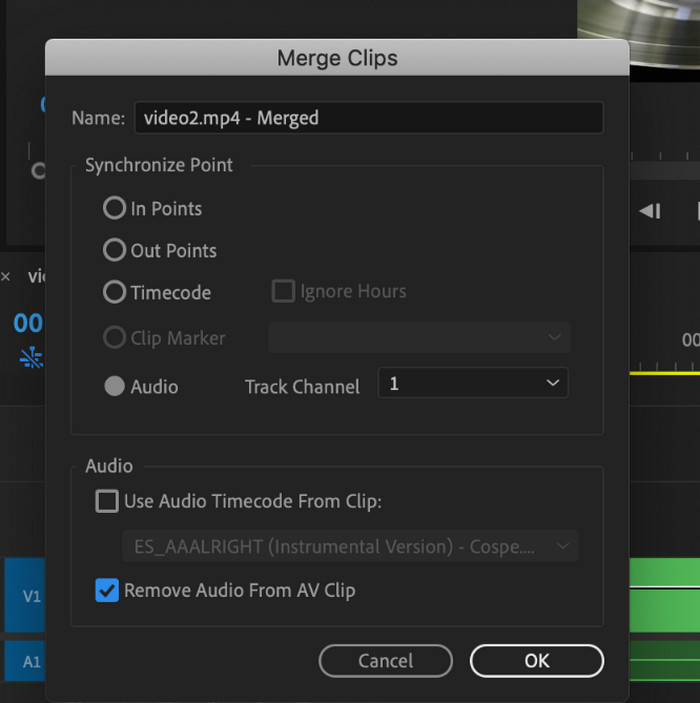
Step 3. Set the synchronization point as “Audio” and check the box that says “Remove Audio from AV Clip”
This method leverages your built-in camera microphone audio as a temporary guide. It aligns the external audio source (likely higher quality) with this internal audio, essentially using it as a reference point. Once the alignment is achieved, the internal audio is removed, leaving you with the original video synced to the desired external audio source.
Step 4. You will now have a synced audio track paired to your video track which you can now edit as a regular clip.
Method 2. Sync audio and video automatically in Premiere Pro using the “Synchronize” feature
Synchronize is another feature that can sync audio and video in Premiere Pro. It's similar to the Merge clips feature, but it doesn't create a new merged file. Instead, it adopts AI technology to sync a separate audio file to an AV file that is on your timeline without merging two files.
Step 1. Add the audio and video files to the timeline, stacked on top of each other.
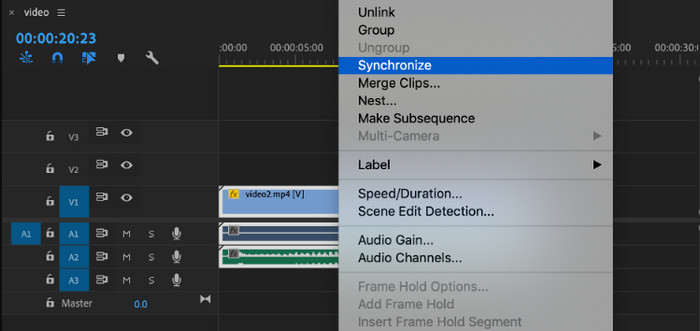
Step 2. Highlight the tracks you want to sync, right click, and select “Synchronize”.
Step 3. Select “Audio” as your synchronization point and choose which track you want to sync with.
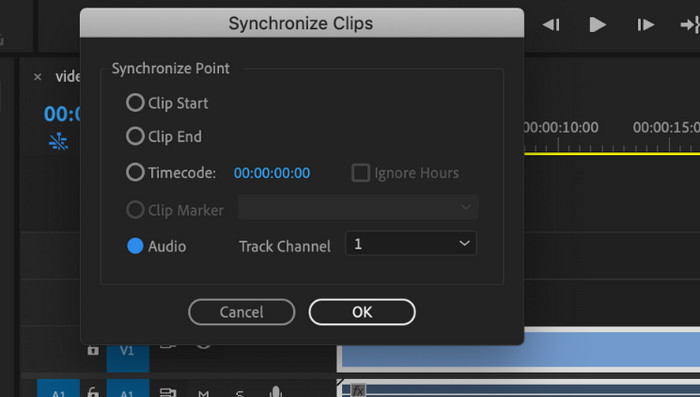
Step 4. Hit “OK” and your tracks will now be synced. You can now also choose to “link” your synced tracks together so they don’t fall out of sync. This step is highly recommended to avoid accidental audio slips.
Method 3. Sync your audio and video manually in Premiere Pro
Step 1. Place both the audio and video tracks on your timeline.
Step 2. Zoom in and find a good, clear reference point that matches in both audios.
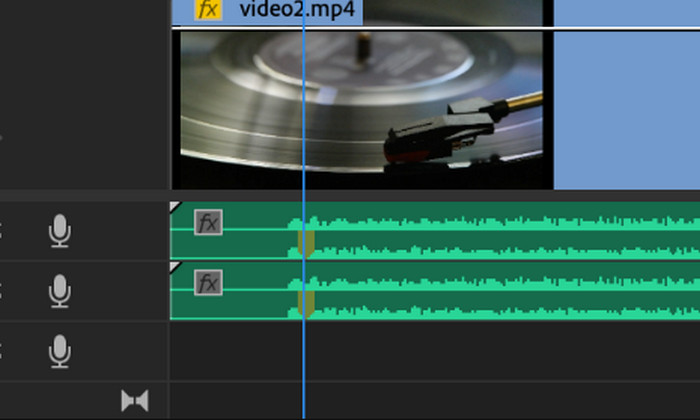
Step 3. Mark each clip at the point where you see the exact same wavelength.
Step 4. Align the clips at the markers. After you've done, you can link the clips and delete the reference track if needed.
3. Using VLC
If you want something simpler, you can use the VLC player to sync audio and video without too much video editing. It works on all types of videos, but it cannot sync audio and video permanently. VLC is not a powerful video editor but rather a player, but it offers many features to fix the audio out of sync delay error in VLC. Besides sync, you can also use it to trim videos, record videos, export videos, find codec information, and more. Anyway, let's check how to sync audio and video in VLC.
Step 1. Play the video and listen carefully to see if the audio matches the video. You can tell if there's a problem with the timing, like if the lips don't match the words.
Step 2. If you need to make the audio slower, press the "G" key on your keyboard. If you need to make it faster, press the "F" key.
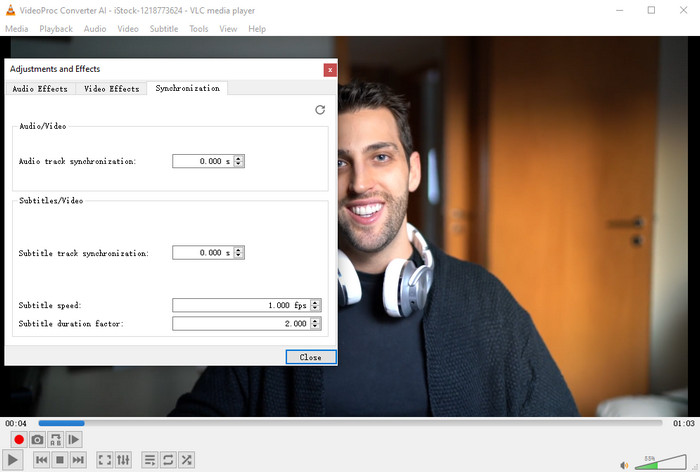
Step 3. By default, pressing the key once changes the audio by 50 milliseconds. If you need to adjust it more precisely, go to Tools > Effects and Filters, then click on the Synchronization tab. Here, you can fine-tune the audio-video delay by changing the numerical value.
4. Using Veed.io
Veed.io is an online video editing tool that can be used to sync audio and video online free. It's super simple, you don't have to download any program to make audio and video synced. By using Veed.io, you're available to fix audio and video sync issue across platforms in browsers. The only downside is that it requires a good condition Internet.
To sync audio and video online for free with Veed.io, follow these steps:
Step 1. Go to https://www.veed.io/ and create an account.
Step 2. Click on the "Create" button and select "Upload Video."
Step 3. After successfully uploading the video, you'll be able to view the sound waves on the timeline. To do this, simply click the "Show sound wave on timeline" button located on the right panel.
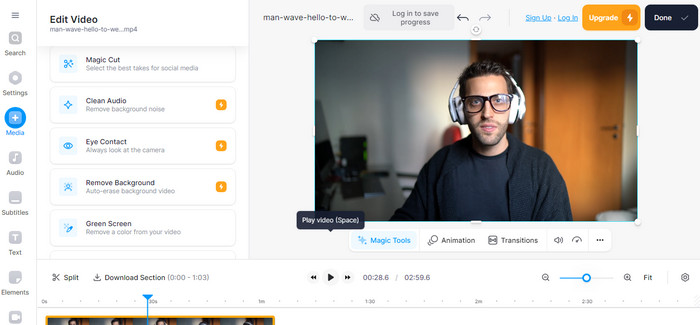
Step 4. Next, select the video on the timeline, navigate to the left panel, and scroll down to locate the "Audio" section.
Step 5. Here, you can utilize the "Clean Audio" and "Remove Silences" buttons to organize and sync the audio as needed.
5. Using OnlineConverter
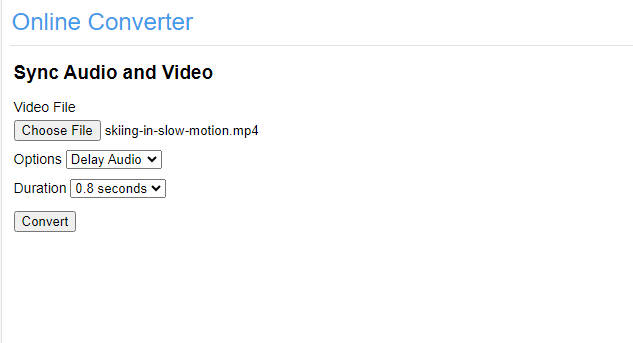
The OnlineConverter is a versatile online tool for synchronizing audio and video online for free, offering two options: "Delay Audio" to shift the entire clip, and "Delay Video" to play the sound ahead. You can fine-tune the delay time with a precision of 0.1 seconds. While effective for many audio-related issues, the platform has limitations, including a 200MB file size cap and the inability to handle encrypted videos.
To sync audio and video online free with OnlineConverter, follow these steps:
Step 1. Go to https://www.onlineconverter.com/sync-audio-and-video and create an account.
Step 2. Select the video file you want to convert from your computer.
Step 3. Set the option of "Delay Audio" or "Delay Video" based on your source video.
Step 4. Set a value of "Duration" from a range a 0.1 seconds to 5.0 seconds.
Step 5. Finally, click "Convert" to start syncing audio and video online before downloading it.
 FAQs about Audio & Video Sync
You can use iMovie, the pre-instaled free video editing software on most Macs.
- Open iMovie and create a new project.
- Import your video and audio files into the project library.
- Drag the video clip to the timeline.
- Drag the audio clip below the video clip on the timeline.
- Right-click on the audio clip and select "Detach Audio." This separates the audio from the video clip.
- Drag the detached audio clip to visually align it with the corresponding moments in the video. You can use audio cues or visual references to achieve this.
- Once the audio and video synced, export your project as a new video file.
Here are some solutions depending on your situation:
- Check your internet connection.Always ensure you have a strong and stable internet connection to minimize this issue.
- Restart your streaming device and application. Sometimes, a simple restart can resolve temporary glitches that might be causing the audio-video desync.
- Adjust the audio delay settings (if available). Some streaming platforms and media players offer options to adjust the audio delay. This allows you to manually fine-tune the audio to match the video.
- Contact the streaming platform's support.
Yes, there are a few apps that you can use to sync audio and video on your phone. Some popular options include:
- Videolicious
- AndroVid Video Editor
- KineMaster
Here are a few online tools that can help you synchronize video and audio files without spending a dime:
- OnlineConverter: Offers options like "Delay Audio," and "Delay Video" to adjust timing.
- Clideo: Provides a user-friendly interface with options to adjust audio delay and video speed.
- Kapwing: Allows you to upload your video and audio files separately, then adjust their timing and create a synchronized version.
The best way to sync audio and video will depend on the software you're using and the severity of the sync issue. If you're only dealing with a minor sync issue, you can usually get away with using a simple method, using Winxvideo AI or VLC to adjust the audio delay. However, if the sync issue is more severe, you may need to use a more complex method like manually syncing the audio and video in Premiere Pro.


