


How to Use VLC to Compress/Reduce Video Size without Losing Quality
VLC Media Player also has a stunning video compression feature. Learn how to compress/reduce large MP4/MKV/MOV 4K HD videos with VLC without losing quality by changing crucial factors that determine the file size of a video. Note that if you want to use VLC to compress videos from 1GB to MB, you should sacrifice video quality. Use the step-by-step guide below to get to know how to reduce video file size with VLC.
Read more: how to reduce video size without losing quality.
5 Ways to Compress Video with VLC
- Way 1. Downscale Video Resolution to Reduce Video with VLC
- Way 2. Reduce Video Bitrate/frame rate in VLC Settings
- Way 3. Compress Video Size by Downsizing Audio in VLC
- Way 4. Reduce Video Size by Recording a Portion of Video in VLC
- Way 5. Compress Video in VLC by Changing Video Codecs
- Video Tutorial - How to Compress Video with VLC
- FAQs about How to Reduce Video Size with VLC
Way 1. Compress Video with VLC by Downscaling Video Resolution
First off, let's make it clear what determines the file size of a video. From the formula "video size = bit rate x duration", we can draw that bit rate and video length are the key points, with several other video parameters, say video codec, resolution, frame rate affecting the final size too. VLC can work as free video compression software. So, no more other words, just check how VLC compresses the file size of the video shot by iPhone, GoPro, DJI or digital camera by adjusting the key factors above in VLC video settings.
Before you resize video with VLC compressor, please DOWNLOAD VLC and finish the setup, then follow the steps below.
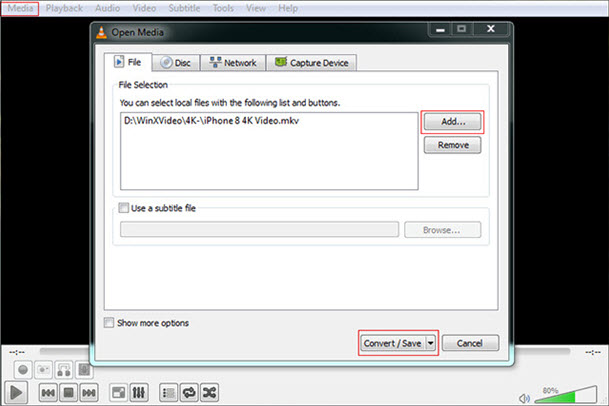
- Click "Media" -> "Convert / Save" or tap "Ctrl + R" keyboard shortcuts to pop up a smaller control;
- Add source (4K/HD) video into the file list;
- Click "Convert / Save" button to go ahead;
- Choose profile such as HD(720p) or SD(480p) or smaller file size.
- Rename output in destination folder and click "Start" to compress video in VLC at once.
Convert 4K to 1080p, 1080p to 720p, HD to SD
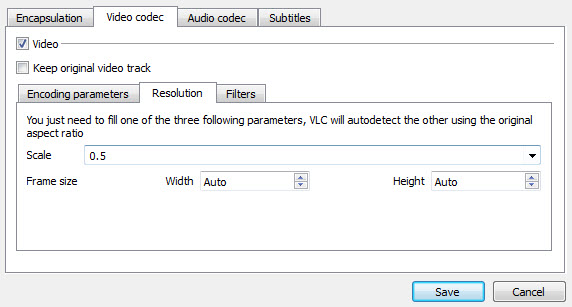
Scaling refers to changing/lowering down the resolution of video to reduce video size. In order to shrink video size in VLC, downscaling video is required. If you choose a profile with no SD or HD tag, like Video - H.264 + MP4 (TS), the resolution frame size will remain as original. So click setting icon right near profile and navigate to resolution to fill either of scale, width and height value to downscale source video. You can click 4K to 1080p/720p, or 1080p to 720p, 720p to D(480p) to compress video with VLC.
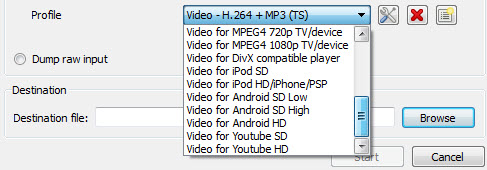
To make it easier for the novices to compress video for sharing online or watching on mobile/home TV, VLC presets 10 video profiles with resolution fixed in 1080p, 720p HD and (640x480) SD as shown in the screenshots. The difference between SD, SD Low and SD High mainly lies in video bit rate and frame rate parameters which will be specified in Way 2.
Read more: how to resize videos with VLC Media Player.
Way 2. Compress Video with VLC by Changing Video Encoding Parameters
E.g: H.264 MP4 -> H.265 MP4, 120/60 fps -> 30fps, 40000kb/s -> 8000kb/s
VLC's video compression feature empowers users to customize encoding parameters for reducing video file sizes while maintaining satisfactory visual quality. These parameters include quality control for better visuals at the cost of larger files, bitrate adjustment to influence data rate, frame rate reduction for smaller files, and resolution modification to decrease dimensions.
- Open VLC and go to Media → Convert / Save, then select your video.
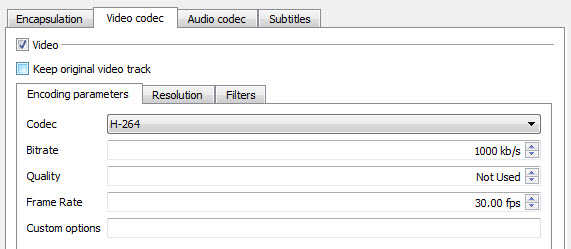
- Click Convert / Save and choose a codec (H.264 or H.265) under the profile settings.
- Adjust the video bitrate: for 1080p, try 5000–10000 kbps; 720p, 2500–6000 kbps; 480p, ~2500 kbps.
- Set the frame rate: reduce high-fps videos to 30 fps unless slow-motion effects are needed.
- Optionally, change resolution or aspect ratio to reduce file size further (16:9 or 4:3 based on original content).
- Click Start to export the compressed video.
Since 30 frames per second is enough for human eyes, it's available to compress high-fps video by lowering the fps directly to 30. Note that if the high-fps video is taken for slow motion, take care to decrease the fps before you post producing a favored slow motion video.
Video file size depends on its length and bitrate. Lowering the bitrate makes the file smaller without changing the video length. Generally, 4K video looks clear and smooth when streaming at 35Mbps or higher, 1080p at 8000kbps, 720p at 5000kbps, 480p at 2500kbps, 360p at 1000kbps...
Way 3. Compress Video Size in VLC by Altering Audio Encoding Parameters
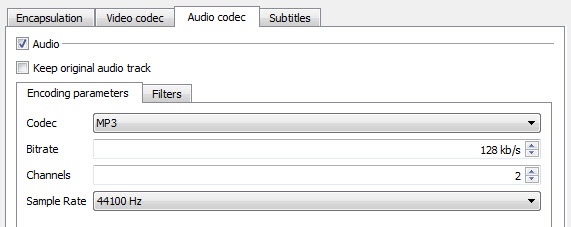
VLC also enables user to reduce video file size without losing video quality by resetting audio codec, bit rate (to 128 kb/s), sample rate and channels in VLC video and audio settings. The audio settings are available under the Audio Codec tab.
- Open VLC and go to Media > Convert/Save.
- Select your video and click Convert/Save.
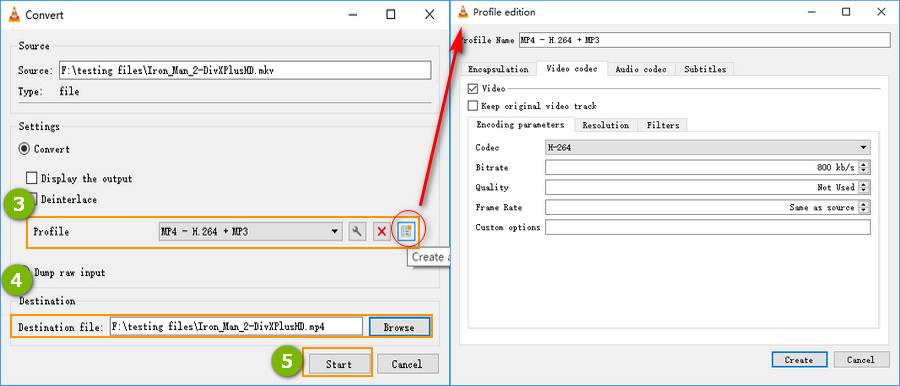
- Under Profile, click the Edit selected profile button.
- Go to the Audio codec tab and enable audio settings.
- Adjust parameters like codec type, bitrate (e.g., 128 kb/s), sample rate, and channels.
- Save changes and start conversion to create a smaller video file.
Note that audio doesn't have much influence on the total video size. If you don't want to set audio parameters, leave it alone. When you only need the audio file, it's a good way to extract the audio from your video for much shrinked file size.
Way 4. Compress Videos in VLC without Losing Quality by Trimming/Cutting
VLC does not support cutting or trimming video for removing unwanted video part off. Therefore, you can alternatively "cut" video content by recording the important or necessary clips only with "Record" feature under playback. In this way, you can compress video size with VLC without losing quality.
- Open your video in VLC and drag to the point where you want to start keeping content.
- Click the red Record button to begin capturing.
- Play the video until the end of the section you want to keep.
- Click the Record button again to stop recording.
- The recorded clip will be saved as a new video, effectively reducing file size without losing quality.
Way 5. Compress Videos in VLC by Converting Video Format
Embracing all media formats supported by FFmpeg libavcodec and libavformat libraries, VLC is able to recognize and transcode a variety of videos to H.264/HEVC MP4/MKV, VP8 Webm, WMV, AVI, FLV, ASF, MP3, MPEG etc. (Check VLC Format Support from Wiki).
Generally H.264 MP4 is the go-to pick for its wider compatibility and better balance between file size and quality. But sometimes if the end player or social site supports HEVC, or you just shrink video for saving space, it's more recommended to downsize large video to H.265 MP4, because the High Efficiency Video Codec / H.265 codec achieves the same quality as H.264 with only half the size. If you can accept HEVC compatibility, you can choose to convert H.264 to HEVC for higher data compression ratio.
- Open VLC and go to Media → Convert / Save.
- Add the video file you want to compress and click Convert / Save.
- Choose H.264 MP4 for general compatibility and good quality-to-size balance.
- If you want smaller files and your device or platform supports it, select H.265 (HEVC) MP4 to cut file size roughly in half without losing quality.
- Click Start to convert the video, generating a compressed version in the selected format.
The Hidden Drawbacks of Using VLC for Video Compression
VLC is renowned as a versatile media player, but when utilized for video compression, it presents several key limitations that become significant pain points for users seeking quality and control:
Lack of Precise Control over Bitrate and Quality: VLC offers limited granular control over encoding parameters. Users are typically restricted to predefined profiles, which is a major drawback. You cannot easily adjust the specific bitrate (the primary factor controlling file size and quality) or use advanced features like two-pass encoding for optimal compression efficiency. This often results in output files that are either unnecessarily large or suffer from noticeable quality degradation.
Subpar Encoding Speed and Stability: VLC relies on software-based encoding, which is significantly slower than dedicated compression tools that leverage modern GPU hardware acceleration (like NVIDIA NVENC or Intel QSV). Furthermore, VLC is prone to instability, often crashing or failing the conversion process when handling large or complex high-resolution files.
Limited Format and Codec Customization: While VLC supports a wide array of codecs, the "Convert" interface can be confusing or restrictive. It lacks the advanced, easily accessible settings for emerging high-efficiency codecs like AV1, forcing users to stick with older, less efficient standards for simpler workflows.
Unreliable Quality Monitoring: The lack of accurate visual previews during the compression setup makes it difficult for users to predict the final video quality, leading to trial-and-error processes just to find an acceptable balance between size and quality.
In summary, while VLC is excellent for playback, its compression capabilities are hampered by sluggish performance and a fundamental lack of fine-tuned control necessary for efficient, high-quality media management.
Try A Better VLC Compressor Alternative - Compress Video 90% Off, No Quality Loss
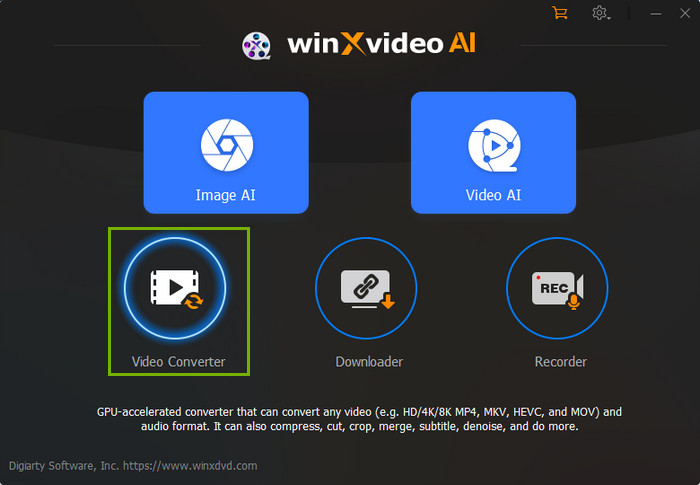
For efficient, high-quality video compression that VLC simply cannot deliver, a dedicated software solution is essential. Winxvideo AI is here, utilizing full hardware acceleration and supporting advanced codecs like HEVC and AV1 to ensure dramatically faster processing and superior quality retention.
The program is skilled in compressing huge (8K/4K/HD/360 degree) video by converting H264 to HEVC, downscaling 4K to 1080p, 1080p to 720p, lowering 60FPS to 30FPS, trimming, and cropping at GPU hardware accelerated speed, making it possible to obtain 90% file size reduction with pixel-level quality difference. It also offers a simple way to reduce video file size by dragging the file size slider (drag to 10% to get 10% output size of original file size, e.g., 1GB input, 102.4MB output).
- Cut video size up to 90% by dragging a slider, unlike VLC where compression can be slow and cumbersome.
- No noticeable quality loss after compression, addressing VLC’s common issue of slight detail degradation.
- Multiple ways to reduce size—trim, lower resolution/frame rate/bitrate—avoiding VLC’s need for manual parameter tweaks.
- Level-3 GPU acceleration compresses 8K/4K/1080p videos quickly, solving VLC’s slow processing on high-res files.
Steps of Cutting Large Video with Winxvideo AI:
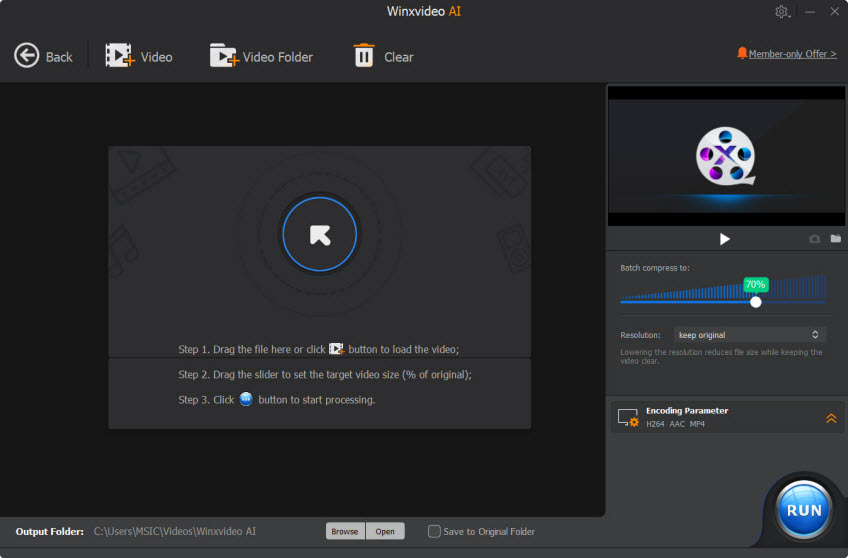
Step 1: Open Winxvideo AI, click "Compressor" to open the Video Compressor window.
Step 2: Add source big video through "+Video" button. You can also add a video folder.
Step 3: Drag the File Size Slider to get the ideal file size on the "Compress" window.The video size will be reduced and shown on the left side.
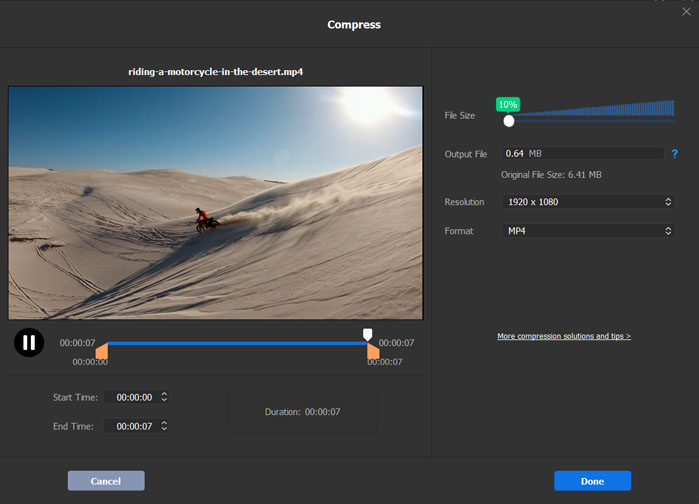
Step 4: Click the video resolution and encoding parameter to adjust video codec format, resolution, format and more. Drag the Quality slider to set the final quality. Lower quality means smaller file size.

Step 5: Hit "RUN" to have hardware finish the compressing work at up to 47x real-time faster. Better than VLC converter, Winxvideo AI outputs playable video even when you stop the conversion half way.
Read more: how to reduce video file size to 90% smaller.
Video Tutorial - How to Compress Video with VLC Player
For visual learners who don't want to get involved in complicated steps, here's a video tutorial showing how to reduce video file size with VLC Media Player. In the video tutorial, you will learn how to compress video size using VLC Media Player by converting video formats, cutting, adjusting video audio parameters.
FAQs about How to Reduce Video Size with VLC Media Player
1. Does VLC have a compressor?
VLC doesn’t include a dedicated video compressor. Still, you can shrink video file size by lowering resolution, converting to H.265, or trimming unnecessary parts using the "Record" feature while playing the video.
2. How do I reduce the size of a video in VLC?
VLC offers multiple ways to shrink a video file. You can downscale resolution (e.g., 4K → 1080p, 1080p → 720p), reduce bit rate or frame rate, adjust audio formats, or shorten the video by recording only the sections you need.
3. How to compress video without losing quality using VLC?
The best approach is to trim unwanted sections with the "Record" feature. Adjusting the bit rate or converting formats can also reduce file size, but trimming helps preserve the original quality as much as possible.
4. How do I convert VLC 720p to 480p?
Follow these steps:
- Open VLC and go to Media → Convert/Save.
- Click Add, select your 720p video, then press Convert/Save.
- From the Profile dropdown, pick a standard-definition profile (e.g., Video for Android SD, YouTube SD).
- Click Start to convert 720p video to 480p.
5. How to resize video in VLC Media Player?
VLC allows resizing through profile editing:
- Open VLC → Media → Convert/Save.
- Click Add and select your video.
- Choose a Profile and click the Edit selected profile icon.
- Go to the Video codec tab → Resolution.
- Adjust Scale mode (Auto keeps original aspect ratio).
- Set Width and Height as needed, then click Save.

