Adobe Video Compressor: How to Compress Video in Media Encoder
Adobe Media Encoder can export larger file size with higher video bitrate, making it too large to upload online or slowing down workflow. You can reduce video file size when exporting MP4 and other videos in Media Encoder. Presets and Export Settings are simple tricks to compress videos with Adobe Media Encoder. Use the following steps to make the job done.
Table of Content
- Part 1. Best Adobe Media Encoder Settings for Minimum Size
- Part 2. How to Compress Video in Adobe Media Encoder
- Part 3. Video Tutorial - How to Reduce Video in Media Encoder
- Part 4. Streamlining Your Workflow: A Faster Alternative for Batch Resizing
- Part 5. FAQs about Compressing Video in Media Encoder
Part 1. How to Compress Video in Adobe Media Encoder
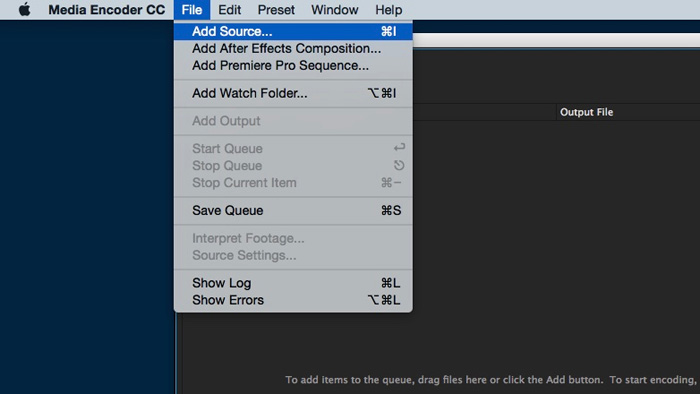
1. Import the Video to Media Encoder
Open Adobe Media Encoder on your computer. Click the File button at the top menu bar and then select Add Source option. Browse and select the video file you'd like to compress with Adobe Media Encoder. Alternatively, you can drag and drop the video file into the left-hand window and add items to the queue.
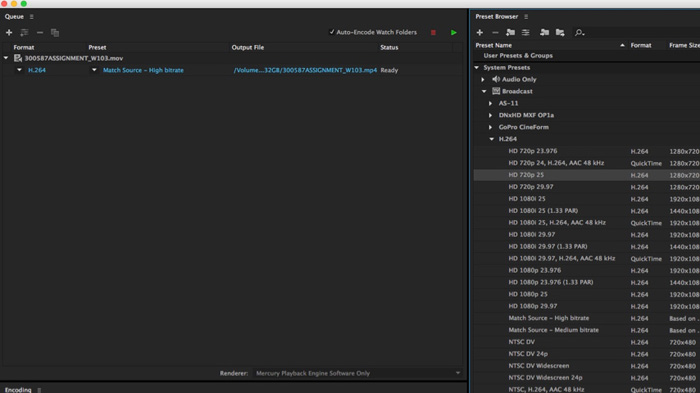
2. Choose a Preset for Smaller File Size
On the left pane, there are lots of preset options. Click the Preset menu, and select a lower resolution to reduce video file size in Adobe Media Encoder. H.264 HD 720p 25 is recommended for the web and keeps a good balance between file size and quality. You can also compress 4K to 1080p to make your video size smaller. Higher resolution here means a larger file size but better video quality.
Tips: Compress Videos for the Web in Media Encoder
Adobe Media Encoder offers preset for the web. Under the Preset Name, there's a Web Video Preset, offering presets for Facebook, Twitter, Vimeo, and YouTube, with different resolutions. If you want to compress videos for the web using Media Encoder, select the Web Video Preset. For example, to upload videos to YouTube in smaller file size, you can select YouTube 480p SD, YouTube 720p HD, and YouTube 1080p HD. It includes YouTube 2160p 4K as well. Normally, we recommend YouTube 720p HD or YouTube 1080p HD.
See also: Compress Videos in Google Photos with Quality Settings
3. Save the Video and Location
Click the video file and save the video file. You can rename the video file, select the location where it is saved, then click the Save button to close the window.
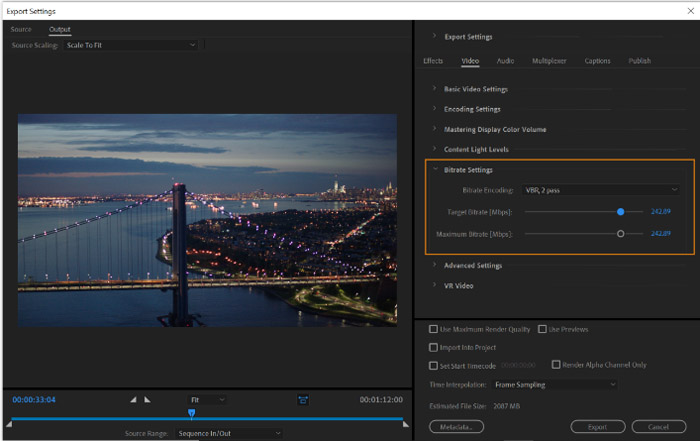
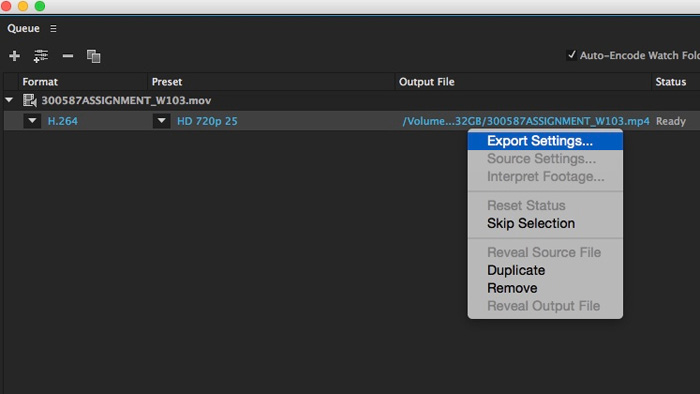
4. Change Export Settings to Reduce Size in Media Encoder
Click the file name and select Export Settings to get more export options. On the settings window, you can set bitrate, render quality, estimated file size, etc. Lowering down bitrate can reduce video file size in Adobe Media Encoder. Then check the estimated file size to see if it is the video size you want to get. Click the OK button to save the export settings and close the window. If you want to do more with the export settings, check the video compression settings tips below.
5. Start Compressing Video in Media Encoder
Click the small green triangle at the top and the video will begin compressing in Media Encoder. You can pause the video compression at any time. It also shows the processing bar and estimated time for the job to finish.
Related: Adobe Media Encoder Failed Render/Import/Encode
Tips: Best Video Compression Settings in Adobe Media Encoder
If you compress video for the web in Media Encoder, the YouTube and other presets set the same frame rate as your original video, so you don't need to set the frame rate anymore. If your videos are at 60 or 30fps, the 29.97 preset can keep the video consistent. Videos at 24fps can apply to the 23.976 settings.
The bitrate slider can change the video size. The YouTube HD preset set the Target Bitrate and Maximum Bitrate to 16. The H.264 1080p preset uses 32 and 40. Adjusting the VRB from 1-pass to 2-pass doesn't help reduce video size in Adobe Media Encoder but makes sure better compression performance.
For your reference: video export settings reference for Media Encoder
Part 2. Video Tutorial: How to Compress Video in Adobe Media Encoder
It's the most viewed video tutorial on YouTube about reducing video file size with Adobe Media Encoder. Follow the tutorial to compress (MP4) video files for the web without noticeable quality loss. The version used here is Adobe Media Encoder CC 2018.
Also read: How to Export Video in Smaller Size in Premiere Pro
Part 3. Best Adobe Media Encoder Compression Settings for Smaller Video Size
If your exported video from Adobe Media Encoder is much larger than expected, the bitrate setting is usually the main reason. By adjusting a few export parameters, you can significantly compress video files while keeping good visual quality.
Quick Settings for Compressing Video in Adobe Media Encoder:
- Format: H.264 (most compatible for web and social media)
- Resolution: 1080p or 720p depending on your needs
- Target Bitrate: 3–5 Mbps for 1080p videos
- Bitrate Encoding: VBR 1-pass for speed, VBR 2-pass for better quality
Below is a quick cheat sheet for common compression scenarios when exporting videos for web, social media, or archive purposes.
Use Case |
Codec |
Bitrate Encoding |
Target Bitrate |
Standard Web Upload |
H.264 |
VBR, 1-pass |
3 – 5 Mbps |
High Efficiency Compression |
HEVC (H.265) |
VBR, 2-pass |
2 – 3 Mbps |
4K Archive / Master File |
HEVC (H.265) |
CBR |
35 – 60 Mbps |
Pro Tip: Switching from VBR 1-pass to VBR 2-pass increases encoding time because the video is analyzed twice. However, this method distributes bitrate more efficiently, often producing better image quality at the same file size.
When Adobe Media Encoder May Not Be the Fastest Option
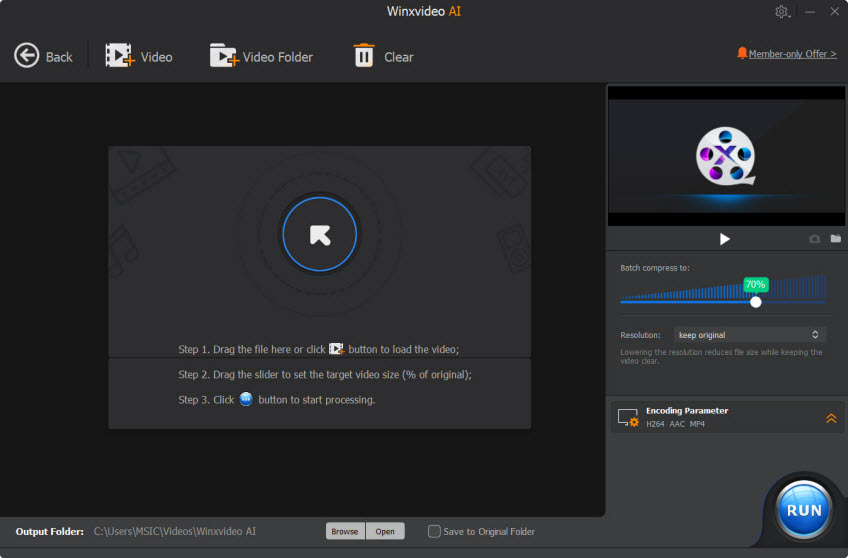
Adobe Media Encoder is widely used for professional exports and complex rendering workflows. However, if you only need to quickly compress several videos for email, Discord, or social media uploads, the software can sometimes feel slow due to its heavy project-based architecture. This is especially noticeable when batch-processing multiple files or when you simply want to reduce video file size for quick sharing.
In these situations, some users prefer lightweight video compression tools that focus on fast transcoding rather than full editing workflows. One example is Winxvideo AI, a video compressor designed for fast compression and batch processing. It uses Level-3 GPU acceleration to handle routine video compression tasks efficiently, which can reduce processing time compared to traditional rendering pipelines.
Scenario |
Adobe Media Encoder |
Winxvideo AI |
Typical Use |
Professional video exports and multi-format rendering. |
Quick video compression and batch processing. |
Processing Style |
Project-based encoding with advanced export settings. |
Dedicated transcoding optimized for speed. |
Best For |
Final project exports and professional workflows. |
Fast file size reduction and everyday video compression. |
Summary: Media Encoder remains essential for high-quality project exports and professional workflows. However, when the goal is simply to compress videos quickly or batch-reduce file sizes, lightweight transcoding tools like Winxvideo AI can sometimes offer a faster workflow for everyday tasks.
Part 5. Common Questions about Compressing Videos in Media Encoder
1. Why is my file size still so large after encoding in Adobe Media Encoder?
Adobe Media Encoder often uses high-bitrate presets by default to maintain broadcast-level quality. Even if you downscale a video from 4K to 1080p, keeping the Target Bitrate at 20–30 Mbps will still generate a large file. To reduce the size, lower the Target Bitrate to around 2–4 Mbps for typical web uploads.
2. Does Adobe Media Encoder reduce video quality during compression?
Most video compression uses lossy codecs such as H.264 or HEVC (H.265), which remove some data to shrink file size. However, using VBR 2-pass encoding in Adobe Media Encoder distributes bitrate more efficiently, so the visible quality loss is usually minimal.
3. How can I compress a video for Discord using Media Encoder?
Discord allows uploads of about 25MB for free users. To compress a video to this size in Media Encoder, choose the H.264 format, reduce the resolution to around 1280×720, and lower the Target Bitrate to roughly 1.2–1.5 Mbps. This usually produces a smaller file suitable for Discord uploads.
4. Is Adobe Media Encoder the fastest way to compress videos?
Adobe Media Encoder is designed for professional rendering workflows and multi-format exports. While it is very powerful, the software can be resource-intensive for simple compression tasks. For quick batch compression, some users prefer lightweight video transcoding tools that focus specifically on reducing file size.