How to Compress Videos to Smaller Size in Premiere Pro
Adobe Premiere Pro tends to export videos that are often too large for easy online sharing. For example, WhatsApp allows a maximum video file size of 16MB, while Instagram permits uploads of up to 650MB from mobile devices. Basic Plan members on Vimeo are restricted to 500MB per week for video uploads. If you're wondering whether Premiere Pro can resize videos, the answer is affirmative.
You can follow this guide on how to export videos with smaller file sizes in Premiere Pro for YouTube, Discord, Instagram, etc.
Suggested reading => Top 10 Free Video Compression Software better than Premiere Pro.
Table of Content
Premiere Pro File Too Large? Try a Simpler Compression Workflow
If you've ever exported a video from Adobe Premiere Pro and ended up with huge file sizes, you know the struggle: tweaking bitrate, frame size, and codec can take time, and heavy effects often slow down exports.
- Quickly reduce file size by up to 90% with a simple slider—see your input and output size instantly.
- Further shrink files by converting H.264 to H.265, trimming, or adjusting resolution and bitrate—without guessing settings.
- Maintain high visual quality thanks to the built-in High Quality engine and de-interlacing tools.
- Works smoothly even on large projects, avoiding CPU overloads or crashes common in Premiere Pro exports.
Part 1. [Tutorial] How to Compress Video in Premiere Pro without Losing Quality
Premiere Pro exports often create large files. For context: WhatsApp: 16MB max, Instagram: 650MB max (mobile), Vimeo Basic: 500MB per week. Use the steps below to compress video in Adobe Premiere Pro.
Quick Tips to Compress in Premiere Pro:
- Change Codec – Use HEVC (H.265) instead of H.264 for smaller files with similar quality.
- VBR 2-Pass Encoding – Analyzes video first to optimize bitrate distribution.
- Lower Bitrate – Adjust Target & Max Bitrate in Export Settings.
- Reduce Resolution – Downscale 4K → 1080p/720p or crop unwanted frames.
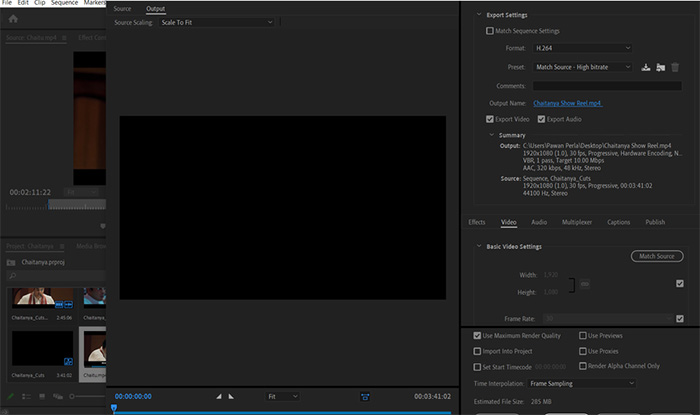
Step 1. Open the export window
In Premiere Pro, click file > export > media. The Export Settings window should appear. In the window, you can do export settings to compress video file size in Premiere Pro.
Step 2. Adjust export settings to make video size smaller in Premiere Pro
Use one or more of the following ways to export smaller file sizes in Premiere Pro.
1. Choose a more efficient codec format. If you're open to using a different codec, HEVC (H.265) generally produces smaller file sizes with similar or better quality compared to H.264. However, not all platforms or devices support HEVC natively, so double-check if your intended platform (Discord, in your case) supports it.
2. Set the bitrate to VBR, 2 pass. Adobe uses 1 pass VBR by default. VBR 2 Pass (Variable Bitrate, 2 Pass) is a great option. It analyzes the video first and then compresses it with a more optimized bitrate distribution, typically resulting in better quality and smaller file sizes. The tradeoff is that it takes longer to render, but it's worth it if you need a good balance between size and quality. If time is a concern, you can try VBR 1 Pass, which is faster but not as efficient.
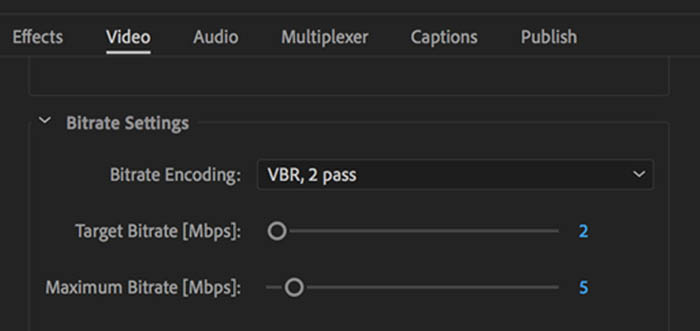
3. Lower the bitrate. The lower the bitrate, the smaller the file size the video will have. On the export settings, there's a Target Bitrate slider. For H.264 encoding, try adjusting the Target Bitrate and Maximum Bitrate to lower values. For 1080p, starting with a bitrate of 10 Mbps is usually fine. If that doesn't get the size low enough, you can go lower, but be mindful of the quality drop.
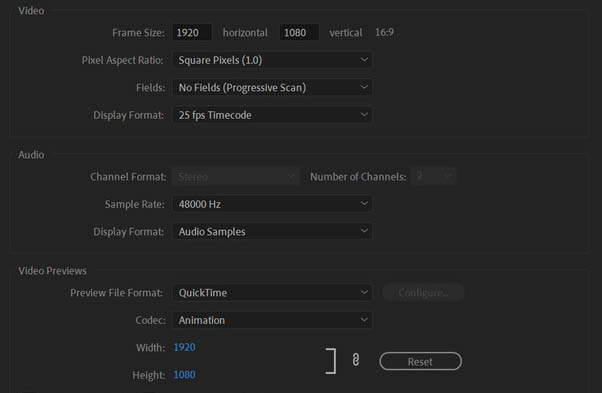
4. Reduce video resolution or change video size. Lower down the video resolution or resize the video to make video file size smaller in Premiere Pro. To do it, go to Sequence > sequence settings, select Frame Size under Video section, and Width and Height under Video Previews. Set width and height to resize video for smaller file size according to your needs. You can crop video in Premiere Pro to cut out unwanted frames, however, it doesn't influence the video size too much.
Step 3. Export compressed video files from Premiere Pro.
Once you're finished editing, click "Export" to create a smaller version of your video. This compressed video is perfect for sharing on social media. If you'd like to upload directly, choose the platform (YouTube, Vimeo, etc.) from the "Publish" tab. Add any tags or descriptions you want, and hit "Export" again. Adobe Premiere Pro will then upload your video for you.
Suggested reading => How to Change Video Size in Adobe Premiere Pro
Note: Premiere Pro has some limitations with encoding, especially if you're trying to achieve extreme file size reductions. We suggest exporting in a high-quality format (e.g., ProRes or DNxHD) and then compressing it further with Winxvideo AI.
Part 2. Compress Video Size for Whatsapp in Premiere Pro
Premiere Pro has 1080p presets for YouTube, Vimeo, Facebook, but no presets for Whatsapp. It means you can't use direct presets for Whatsapp. To compress video file size for Whatsapp in Premiere Pro, use export as Adaptive Low Bitrate preset in the export dialog box. Adaptive Low Bitrate preset will make the video smaller and more friendly for sharing to Whatsapp. Whatsapp doesn't support high-bitrate video file sharing.
There's a setting in Premiere Pro to export videos for WhatsApp. It balances video quality and file size, but it might not always be small enough for WhatsApp. For even smaller files, you'd need stronger compression software. Here's how to use the setting in Premiere Pro:
- Export as Adaptive Low Bitrate preset in the export dialog box.
- On the export settings window, click on the Preset, select Match Source - Medium Bitrate.
Suggested reading => How to Compress Video Size with VLC Media Player.

Part 3. Tips to Export Smaller Files in Premiere Pro
When you need a video under a strict size limit (for example, 150MB), careful adjustment of export settings is key. A practical approach is to downscale 4K footage to 1080p or 720p and use H.265 (HEVC) encoding with lower bitrates. Using 2-pass encoding can improve the balance between visual quality and file size, but expect longer export times. Here are techniques to reduce project and exported file sizes effectively:
1. Export Only Relevant Sequences
- Instead of exporting the full project, select only the sequence or sections you need.
- Go to File → Export → Selection as Project. This creates a smaller project file by including only necessary media.
2. Use Project Manager to Clean Up
- Premiere Pro’s Project Manager helps remove unused assets and sequences.
- Go to File → Project Manager → Collect Files and Copy to New Location. This consolidates only the media you need, making the project lighter and easier to manage.
3. Avoid Manual XML Downgrades Without Backup
You can technically edit the .prproj XML to change the project version, but this carries a high risk of corruption. Only attempt this on a backed-up project, and double-check all sequences and effects afterward.
4. Minimize Heavy Effects
Effects like Warp Stabilizer or multiple Lumetri adjustments can slow down export and increase cache sizes. To optimize file handling, render these effects first or remove unnecessary heavy effects before export.
5. Consider Productions for Large Projects
If your project has multiple sequences or edits, using Productions can separate them into individual project files. This doesn’t reduce final exported size, but it keeps projects organized and reduces processing overhead for each export.
6. Import Only Needed Sequences into New Projects
For very large projects, importing only essential sequences into a new project can reduce project file size and simplify export workflow.
7. Remove Unused Media
- Check for clips and assets not used in any sequence and delete them.
- You can do this manually or use Project Manager to consolidate and exclude unused files.
Part 4. Video Tutorial - How to Compress Video in Premiere Pro
This step-by-step video shows how to compress video in Adobe Premiere Pro without losing quality. You’ll learn how to import your video, set an optimized bitrate, and export smaller files suitable for YouTube, Instagram, Discord, and other platforms. Some users successfully reduced 500MB to 50MB or 1GB to 128MB.
Key moments in the video:
- From 00:22 – Adjust the average bitrate to reduce file size while keeping quality high.
- From 00:36 – Apply a high-bitrate preset to balance clarity and compression efficiency.
- From 00:45 – Further optimize by lowering resolution or trimming unnecessary clips.
- From 00:55 – Set the target bitrate precisely to match your file size goal.
Part 5. FAQs about Compressing Video in Premiere Pro
1. Can Premiere Pro compress video?
Yes. Premiere Pro can export videos in smaller file size for web sharing (YouTube, Instagram, Facebook, etc.) by adjusting export settings like codec, bitrate, and resolution. For extreme compression, tools like Winxvideo AI or Handbrake can further reduce size efficiently.
2. Why are my Premiere Pro videos still too big?
- High bitrate or 4K/8K resolution increases file size.
- Heavy effects like Warp Stabilizer add extra data.
- Default H.264 export presets may not be optimized for small files.
Try adjusting bitrate, downscaling resolution, or using a dedicated compression tool like Winxvideo AI.
3. How to compress video without losing quality?
Use VBR 2-pass encoding and reduce resolution carefully. Scaling down the frame size also helps. To automate high-quality compression without complex settings, Winxvideo AI is a practical choice.
4. How to compress videos for WhatsApp, Discord, or Instagram?
Premiere Pro doesn’t offer direct presets for these platforms. Use Adaptive Low Bitrate preset or adjust resolution and bitrate manually. For guaranteed size limits, dedicated tools like Winxvideo AI can compress automatically to fit WhatsApp (16MB), Discord, or Instagram limits.
5. Premiere Pro compression fails or shows "unsupported codec"
- Clear Media Cache in Premiere Pro (File > Project Settings > Media Cache).
- Check if the video codec is supported; reinstall Premiere if needed.
- Try converting the video to H.264/MP4 or H.265 before import.
6. Can I make Premiere Pro compression faster?
Premiere Pro can be slow, especially with 4K/8K and 2-pass encoding. To speed up compression, reduce resolution, lower bitrate, or offload compression to a lightweight tool like Winxvideo AI, which leverages GPU acceleration for faster processing.