How to Change Video Size or Frame Size in Adobe Premiere Pro
It's quite easy to change video size (width and height), also video frame size, video resolution/aspect ratio in Adobe Premiere Pro Sequence settings. Whether it's for YouTube, Instagram, or other platforms, you can easily customize the width, height, and aspect ratio via the Sequence settings in Premiere Pro. Please note that the steps may differ based on your Premiere Pro version, including Premiere Pro 2022, 2020, 2018, or CS6. Let's guide you through the process of changing video size (width and height) in Adobe Premiere Pro.
Easily Change Video Size/Frame Size/Resolution/Aspect Ratio
Get the video toobox Winxvideo AI to change video size, frame size, resolution, aspect ratio easily and quickly.
- Change video size, frame size, resolution to 1080p, 2160p, etc. according to your needs.
- Convert video aspect ratio to 16:9, 1:1, 4:3, etc. for YouTube, Instagram, Facebook, Whatsapp, and other platforms.
- Reduce video size up to 90% off thanks to advanced video compression algorithms and entropy encoding.
- Change video codec formats, cut/trim/crop videos, lower resolution/frame rate/bit rate, etc. to shrink video size.
- AI-powered video & image enhancer: upscale, stabilize, interpolate, denoise, etc.
Table of Content
Before You Start: Choose the Right Aspect Ratio for Social Media
Changing video size in Adobe Premiere Pro starts with knowing your target platform's requirements. Using the wrong dimensions leads to ugly black bars or cropped content. Use this 2026 updated cheat sheet to set your Sequence Settings correctly from the beginning.
Platform |
Aspect Ratio |
Best Resolution (Pixels) |
YouTube / Desktop |
16:9 (Horizontal) |
1920 x 1080 or 3840 x 2160 |
TikTok / IG Reels |
9:16 (Vertical) |
1080 x 1920 (Portrait) |
Instagram Posts |
1:1 or 4:5 |
1080 x 1080 or 1080 x 1350 |
X (Twitter) / Facebook |
16:9 or 1:1 |
1280 x 720 or 1080 x 1080 |
Note: Always prioritize 1080p for mobile platforms to ensure fast loading speeds without sacrificing mobile display quality.
Part 1. How to Change Video Size in Adobe Premiere Pro
You can change video size or frame size or resolution in Adobe Premiere Pro by clicking on Aspect Ratio in the toolbar and select the aspect ration you want or set the aspect ratio for your video. It's the same thing to change video size or frame size or video resolution. Use the following steps to change video size in Premiere Pro. In this way, you can set video aspect ratio easily, including the Frame Size (height) and horizontal (width). Note that resizing is different from cropping video in Premiere Pro.
Change Frame Size for New Videos in Premiere Pro
Step 1. Launch Adobe Premiere Pro and go to File > New > Sequence.
Step 2. In the New Sequence dialog box, head to the Settings tab. Choose Custom under Editing Mode.
Step 3. Under the Video tab, input the desired Frame Size (width and height) for your video. Confirm by clicking OK. Premiere Pro will automatically adjust the aspect ratio based on your frame size specifications.
For instance, if you're changing the video size to 1920x1080p, set the Horizontal and Vertical values to 1920 and 1080p respectively.
Step 4. Name the sequence and click OK. The video size/frame size has been set in Premiere Pro.
Change Existing Video Size or Resolution in Premiere Pro
Step 1. Go to the Editing tab and choose the Project Panel.
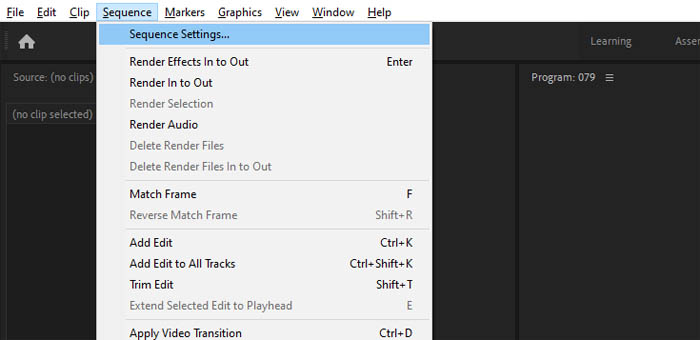
Step 2. Right-click on the sequence, then select Sequence Settings to access the Sequence Settings window.
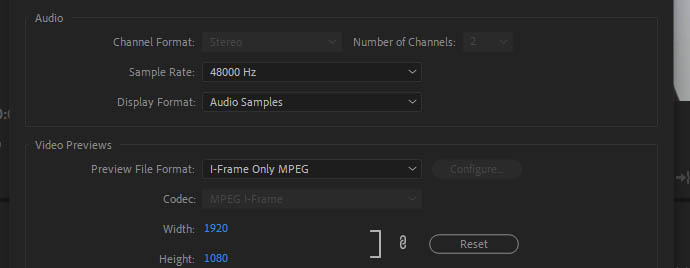
Step 3. In the Frame Size section, input the horizontal and vertical values to set the video frame size in Adobe Premiere Pro.
Step 4. Click OK to save the video size adjustments you've made in Premiere Pro.
Related: How to Compress Videos to Smaller Size in Premiere Pro
Part 2. How to Change Video Pixel Size in Premiere Pro
Adjusting the pixel size of a video in Premiere Pro can greatly impact its visual clarity and overall presentation. Whether you're looking to enhance details or optimize for specific platforms, learning how to change video pixel size makes sense. Let's learn how to change video aspect ratio/resize video in Adobe Premiere Pro.
Step 1. Right-click the video in the Project Panel.
Step 2. Select Clip > Modify > Interpret Footage. Note that this option is unavailable for the clip on the Timeline panel or Program monitor.
Step 3. Select Conform To in the Pixel Aspect Ratio and choose aspect ratio from the list. You can set the video pixel size in Adobe Premiere Pro to Anamorphic 2:1, Widescreen 16:9, Square Pixels, etc.
Part 3. How to Change Video Frame Size in Premiere Pro for YouTube, Instagram, etc.
Choosing the optimal frame size for platforms like YouTube and Instagram hinges on your video's quality. A 1080p video calls for a frame size of 1920x1080, while 4K UHD requires 3840x2160. The standard 16:9 aspect ratio suits YouTube, while Instagram benefits from the square 1:1 ratio. Follow these steps to adjust video dimensions (height and width) for tailored sizing on platforms like YouTube and Instagram.
Step 1. In Adobe Premiere Pro, find the Project panel and select the sequence. Choose "Auto Reframe Sequence."
Step 2. Alternatively, click on "Sequence" and then "Auto Reframe Sequence," or right-click on the sequence in the Project panel and select "Auto Reframe Sequence."
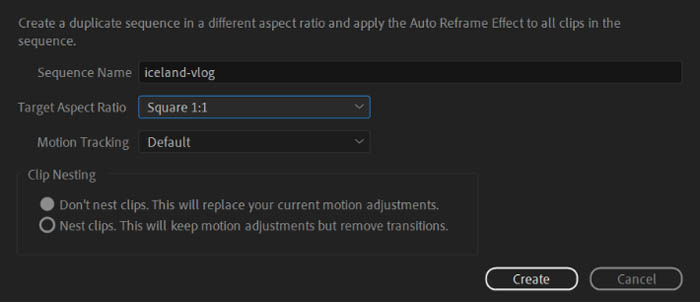
Step 3. In the popping up window, select the aspect ratio in the Target Aspect Ratio section. In this way, you can quickly change the video size to fit YouTube, Instagram etc. with the proper aspect ratio.
Part 4. Video Tutorial - How to Change Video Size in Premiere Pro
There are many Premiere Pro channels and tutorials on YouTube. They are good resources to learn Premiere Pro tricks and tips. The video tutorial below may help you quickly learn how to change video size, frame size, or resolution in Premiere Pro.
Is There a Faster Way to Resize Video? (Premiere vs. Winxvideo AI)
Adobe Premiere Pro is unmatched for creative editing, but for the simple task of resizing and compressing, it can be frustratingly slow. Premiere requires high CPU usage for rendering and often produces massive files even after lowering the resolution.
If you need to batch-resize multiple 4K videos or hit a strict file size limit (like Discord's 25MB), Winxvideo AI offers a much more efficient workflow. Unlike Premiere, it uses Level-3 Hardware Acceleration to compress and transcode videos in batch without the heavy rendering overhead.
Workflow |
Adobe Premiere Pro |
Winxvideo AI |
Steps |
Create Sequence > Import > Scale > Export > Adjust Bitrate. |
Import > Select Preset > Done. |
Speed |
Slow; relies on software rendering & CPU. |
Up to 47x Faster with GPU Acceleration. |
File Size |
Often large due to high default bitrates. |
Shrinks up to 90% via AI Engine. |
Batch Task |
Requires Adobe Media Encoder (Heavy). |
One-click Batch Resizing included. |
Our Recommendation: Stick with Premiere Pro for storytelling and complex VFX. Switch to Winxvideo AI when you need to quickly resize, upscale, or compress videos for social media sharing and storage.
Free download Winxvideo AI for batch video compressing- no tedious work.
Part 3. FAQs about Changing Video Size in Premiere Pro
1. How do I change video size in Premiere Pro without black bars?
To avoid black bars (letterboxing), your video clip must match your sequence's aspect ratio. You can right-click your clip on the timeline and select "Set to Frame Size". For a smarter solution, use the Auto Reframe effect to let Premiere automatically track the subject and adjust the crop for vertical formats.
2. Why is my exported video from Premiere still so large?
Premiere Pro defaults to high bitrates for professional quality. To reduce file size, you must lower the Target Bitrate [Mbps] in the Export settings. If you find this too complex, Winxvideo AI is a much faster alternative that shrinks 4K files by up to 90% automatically using AI-driven compression.
3. What is the fastest way to resize video without opening Premiere?
If you only need to change the resolution or aspect ratio (e.g., for social media), Winxvideo AI is significantly faster. It supports batch resizing and utilizes full GPU hardware acceleration, allowing you to process dozens of videos in the time it takes Premiere Pro to open a single project.
4. How do I change the aspect ratio from 16:9 to 9:16 in Premiere?
Go to Sequence > Sequence Settings, swap the Horizontal and Vertical values (e.g., change 1920x1080 to 1080x1920), and click OK. Then, use the Motion tab in Effect Controls to re-center your video within the new vertical frame.