


How to Speed Up Video in Premiere Pro: The Complete Guide
 Mike Rule
Updated on
Speeding up video clips is a fundamental skill for video editors looking to enhance pacing, fit content into tight timelines, or create dynamic effects. Adobe Premiere Pro offers multiple powerful tools to manipulate clip speed while maintaining professional results. In this guide, you’ll learn how to speed up video in Premiere Pro using several different methods — step by step.
Whether you're editing YouTube content, social reels, or cinematic footage, this tutorial will help you master all available techniques for increasing video speed efficiently and professionally.
Understanding Speed and Duration in Premiere Pro
Before diving into techniques, let's clarify key concepts when changing video speed in Premiere Pro:
- Clip Speed: The playback rate relative to original recording speed.
- Clip Duration: The actual runtime from In to Out points.
- Relationship: Speed and duration are inversely proportional.
- Doubling speed = Halving duration.
- Halving speed = Doubling duration.
According to the above, Premiere Pro provides 3 primary speed adjustment methods: Speed/Duration Command, Rate Stretch Tool, and Time Remapping. Now, let’s use these 3 ways to speed up a video clip on Premiere Pro step by step.
How to Speed Up a Video in Premiere Pro (3 Ways)
Method 1. Use Speed/Duration Option (Basic Speed Adjustment)
This is the most direct and beginner-friendly way to make a video clip play faster or slow down a video in Premiere Pro.
Step 1. Open Premiere Pro, create a new project, and import your video footage into the project panel.
Step 2. Drag the clip you want to make it faster to the Timeline.
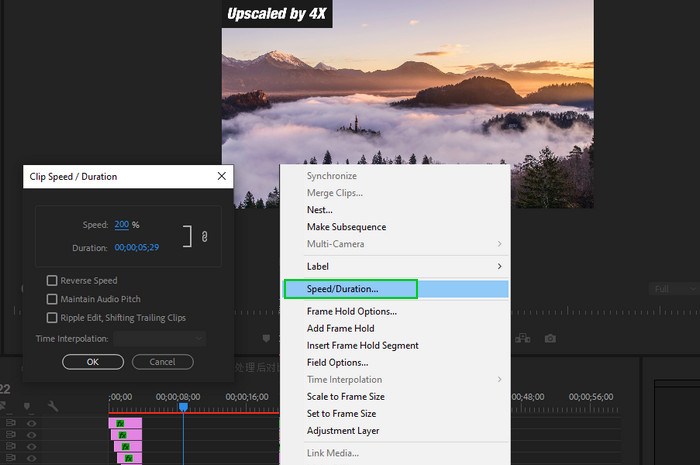
Step 3. In the Timeline, right-click on the video clip, and choose Speed/Duration from the context menu.
Step 4. Adjust speed when a new window pops up. Set the Speed to 200% (or any % you prefer). For example, 100% = original, 200% = 2x faster, 400% = 4x faster. Then, click OK.
Tips:
- To modify the duration of the selected clips without altering their speed, activate the gang button until it displays a broken link.
- The unganging feature also permits adjustments to the speed without affecting the duration.
- To reverse the playback of the clips, enable the Reverse Speed option.
- To preserve the audio pitch while adjusting the speed or duration, select the Maintain Audio Pitch option.
- To ensure that the clips remain aligned with the adjacent clips during these changes, activate the Ripple Edit function, which shifts the trailing clips accordingly.
- For smoother speed changes, time-remapping, and frame-rate conversion, you can choose Frame Sampling, Frame Blending, or Optical Flow from the drop down menu of Time Interpolation in Premiere Pro.
Method 2: Use Rate Stretch Tool (Quick and Visual Timeline Editing)
The Rate Stretch tool offers an efficient way to adjust the duration of a clip in the Timeline while concurrently modifying the clip's speed to match the desired duration. For instance, if there is a specific gap in your sequence that needs to be filled with media that has altered speed, and the exact speed of the video is not a priority, the Rate Stretch tool enables you to stretch or compress the speed to the required percentage.
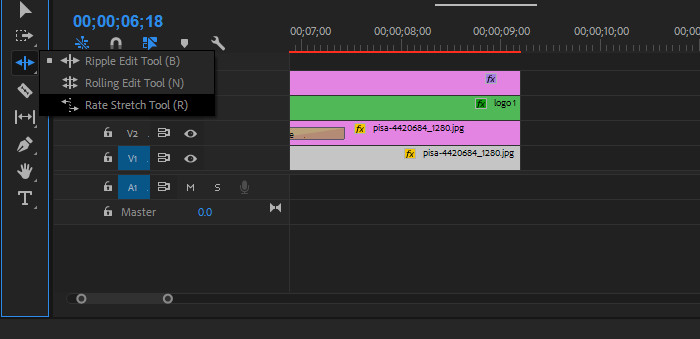
Step 1. At the left of timeline area, click on the Ripple Edit Tool and hold, then choose Rate Stretch Tool. Or, Press shortcut: R.
Step 2. Drag the edge of the video clip. Shorten the clip duration will speed it up.
FYI. Speed percentage appears on the clip, and audio pitch automatically adjusts.
Method 3: Use Time Remapping (Advanced Control)
This method allows you to speed up only parts of your video, creating dynamic speed ramps. So, it is possible to create slow motion and fast motion effects within a single clip. Also, it is ideal for reverse playback effects.
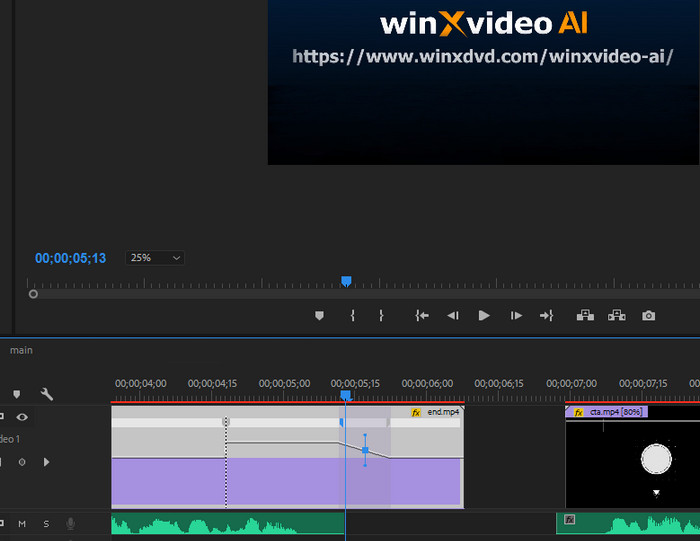
Step 1. Right-click on the video footage on the Timeline, select Show Clip Keyframes > Time Remapping > Speed.
The clip is tinted blue. A horizontal rubber band, which regulates the clip's speed, is positioned across the center of the clip. Above the clip title bar, a white speed-control track is visible in the upper section of the clip. If the clip is difficult to view, please zoom in to create sufficient space.
Step 2. Use the Track Height button to make keyframes easier to adjust.
Step 3. Hold Ctrl (Windows) or Cmd (Mac) and click on the white rubber band line to add keyframes.
Step 4. Move the line upward to speed up that section.
Advanced techniques:
- Reverse Playback: Drag keyframe below baseline.
- Freeze Frames: Create 0% speed segments.
- Easing: Drag curve handles for smooth acceleration.
Pros and Cons of Each Method to Speed Up Video in Premiere
The table below outlines the pros and cons of the most common ways to speed up video in Premiere Pro — helping you choose the method that best fits your editing needs and skill level.
| Method | Pros | Cons |
|---|---|---|
| Speed/Duration | ✅ Easy to use for beginners. ✅ Precise speed control with percentage. ✅ Works well for simple speed-up needs. |
❌ Applies to the entire clip only. ❌ Audio may distort unless adjusted. ❌ Fast motion can look choppy without frame blending. |
| Time Remapping | ✅ Ideal for creating smooth speed ramps. ✅ Allows partial clip speed changes. ✅ Offers full control with keyframes. |
❌ Steep learning curve. ❌ Requires more timeline space and attention . ❌ Doesn't adjust audio automatically. |
| Rate Stretch Tool | ✅ Fast and visual — no menus needed. ✅ Perfect for fitting clips into fixed durations. ✅ Simple and intuitive to use. |
❌ No precise control over exact speed %. ❌ Can distort motion if stretched too much. ❌ Not ideal for audio clips. |
For best results, combine methods. For example:
- Use Speed/Duration for full clip speed-ups.
- Use Time Remapping for action scenes with ramps.
- Use Rate Stretch to quickly match clip length to background music.
Now that you know how to speed up video clip in Premiere Pro, you can create more engaging and dynamic content. Whether you're using the Speed/Duration panel, Rate Stretch Tool, or advanced time remapping, Premiere Pro offers flexible options for every editor.
Winxvideo AI – An Easier, Faster Way to Speed Up Videos
While Premiere Pro offers several ways to speed up video footage, each method comes with its own drawbacks — from complex workflows and audio distortion to limited control or beginner-unfriendly tools. If you're looking for a faster, easier, and more efficient way to speed up your videos, Winxvideo AI is a great choice.
With Winxvideo AI, you can boost playback speed (2x, 3x, 4x, 5x, 6x, 7x, 8x..., and up to 16x) in just a few clicks — no need for keyframes, nesting, or complicated remapping. It’s perfect for users who want quick results without compromising on video quality.
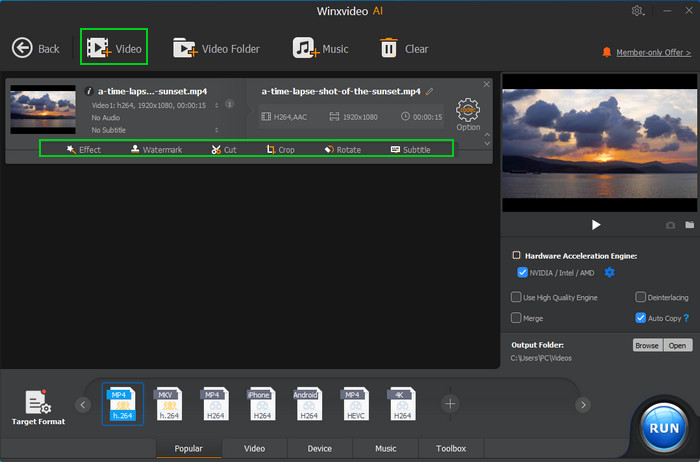
Step 1. Free download and install Winxvideo AI on your computer. Open it up, then choose Video Converter option.
Step 2. Drag and drop or click on the +Video button to load the video that you want to change the speed.
Step 3. Click any of the edit options under the video loading information, such as Effects or whatever.
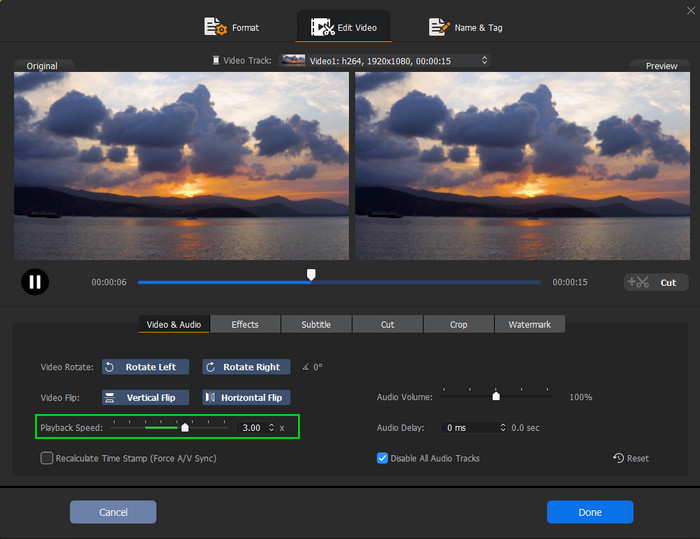
Step 4. Select Video & Audio column, you can see the Playback Speed option. Slide it to right as you need, you can speed up videos more than 2x, maximumly by up to 16x. Tick Done when you finished.
Step 5. Click Browse button to determine where to save your accelerated video. Then tap RUN button to start boosting the speed of your video.
 Free Download
 Free Download
Winxvideo AI is for PC, while Macxvideo AI (from our MacXDVD brand) is for macOS.
 FAQs
FAQs
Yes! Use Time Remapping to keyframe the clip’s speed. This allows you to speed up or slow down just a section of your video, creating smooth speed transitions.
You can use the Speed/Duration option in Premiere Pro to do 2x speed. Simply set the speed to 200% for 2x speed.
After setting a speed using the Speed/Duration option in Premiere Pro, check the box labeled "Maintain Audio Pitch" without changing pitch.
No. Speeding up video doesn't affect resolution. However, motion can look choppy if not smoothed using Frame Blending.
Yes, but the pitch will change. Use Audio Pitch Shifter effect to adjust pitch if needed.
Yes! Just check the Reverse Speed option in the Speed/Duration window, then set your desired speed.


