


How to Slow Down a Video in Premiere Pro (Step-by-Step Guide for Beginners)
 Mike Rule
Updated on
Whether you're editing cinematic footage, making a slow-motion sports highlight, or just want to enhance emotional impact — knowing how to slow down videos in Premiere Pro is a must-have skill. In this guide, we’ll break down every method to slow your footage down effectively, plus cover hidden tips, limitations, and an easier solution when Premiere Pro falls short.
Spoiler: You don’t need to be a pro to create jaw-dropping slow-motion effects in Premiere Pro — but knowing the right tools helps.
Why Slow Down a Video in Premiere Pro?
Slowing down videos isn't just for dramatic effect. Creators slow footage for various reasons:
- To emphasize a critical moment (explosions, expressions, reactions).
- For aesthetic storytelling (wedding reels, cinematic b-roll).
- To analyze motion (sports, tutorials, tech reviews).
And Premiere Pro offers 3 powerful tools for slow-motion editing:
- Speed/Duration.
- Rate Stretch Tool.
- Time Remapping.
Each one suits different needs, and we’ll explore them in depth below. Get ready, let's start!
How to Slow Down a Video in Premiere Pro (3 Ways)
Method 1: Slow Down with Speed/Duration (The Beginner-Friendly Way)
This is the easiest way to slow down or speed up a video in Premiere Pro — fast, simple, and effective.
Step 1. Import your video clip into the Premiere Pro project panel.
Step 2. Drag it to the timeline.
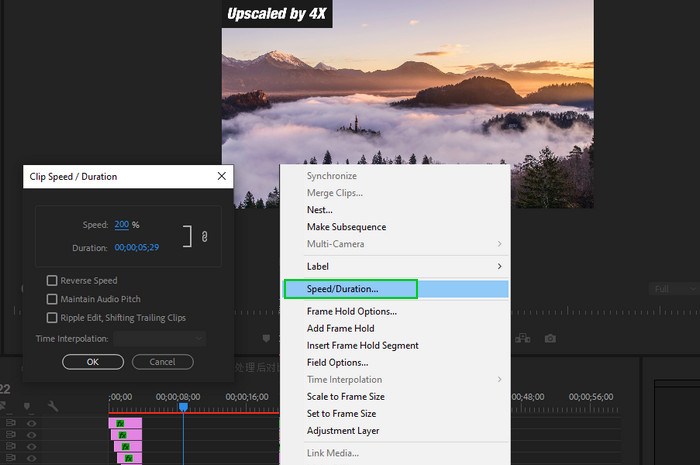
Step 3. Right-click the clip, and select Speed/Duration.
Step 4. In the pop-up box, reduce the speed to 50% for 2x slow motion. Of course, you can reduce more.
Step 5. Optionally, check "Maintain Audio Pitch" to avoid chipmunk voice distortion.
Step 6. Click OK to complete the process.
Pro tip: If you’re working with 60fps or 120fps footage, slowing it to 50% or 25% still keeps playback smooth — perfect for cinematic shots.
Method 2: Use Rate Stretch Tool (Fast Timeline-Based Editing)
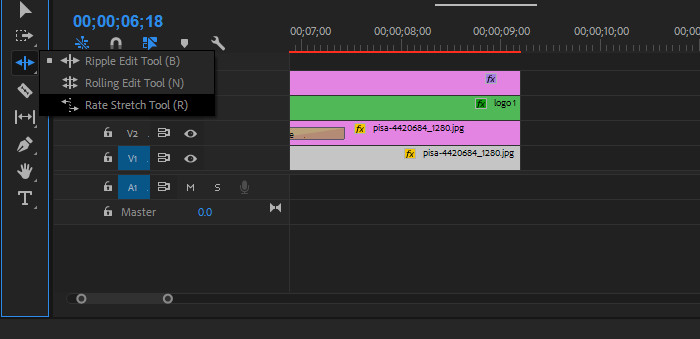
The Rate Stretch Tool lets you slow down a clip by extending its duration visually.
Step 1. On the left toolbar, click and hold the Ripple Edit Tool, then select Rate Stretch Tool (Shortcut: R).
Step 2. Grab the end of the clip in the timeline and drag it outward to extend.
Step 3. This will automatically reduce playback speed to fit the new length.
Step 4. Preview the timeline to ensure smooth results.
Pro tip: You won’t see a speed % like in Method 1, but this tool is great for fitting clips to specific time gaps (e.g., syncing to music).
Method 3: Time Remapping (Advanced Slow-Mo with Speed Ramping)
Time Remapping gives you pinpoint control to slow down only certain parts of a clip. It’s perfect for smooth speed ramps (e.g., car drifting, dancer spin, parkour flips).
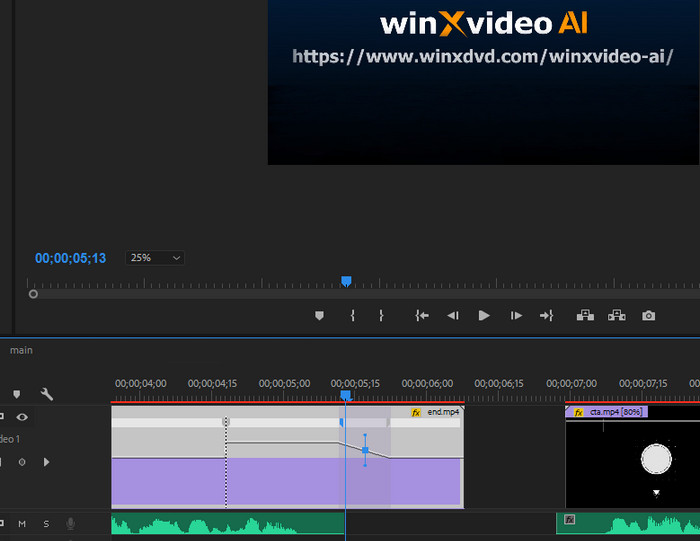
Step 1. Right-click the clip in the timeline, go to Show Clip Keyframes > Time Remapping > Speed.
Step 2. You’ll see a white rubber band across your clip.
Step 3. Use Ctrl (Windows) / Cmd (Mac) + Click on the line to add keyframes.
Step 4. Drag the rubber band down between the keyframes to slow down just that section.
Step 5. Use handles to smooth the transition (ease in/out for cinematic flow).
Pro tip:
- Dragging below the baseline = reverse playback.
- Create 0% speed = freeze frame effect.
Comparison Table of Premiere Pro's Ways to Slow Down
Here’s a quick comparison of the three main methods to slow down videos in Premiere Pro, so you can choose the one that best fits your editing needs, skill level, and project goals. Whether you're aiming for a simple effect or a cinematic speed ramp, this table breaks down the pros and cons at a glance.
| Method | Best for | Pros | Cons |
|---|---|---|---|
| Speed/Duration | Entire clip slowdown | Easy, precise %, audio options | Whole clip only, choppy w/ low FPS footage |
| Rate Stretch Tool | Timeline fit adjustments | Quick drag, no menus needed | No precise % control, distorts audio |
| Time Remapping | Dynamic slow-mo (speed ramping) | Frame-by-frame control, professional effect | Steep learning curve, more editing effort |
Now that you’ve learned how to slow down a video clip in Premiere Pro, you’re ready to add more depth and emotion to your content. Whether you prefer the simplicity of Speed/Duration, the quick drag-and-drop ease of the Rate Stretch Tool, or the advanced control of Time Remapping, Premiere Pro gives you versatile tools to match your creative vision.
Besides that, there is something you also need to know. While Premiere is robust, slowing down videos in it has some notable downsides:
- Choppy playback if original footage is under 60fps.
- Audio distortion unless corrected manually.
- Steep learning curve for Time Remapping.
- Inconsistent quality if you lack GPU power.
If needed, you can turn to an easier and quicker way like Winxvideo AI to slow down a video.
Use Winxvideo AI for Effortless Slow-Mo (Up to 0.125x!)
If you’re frustrated with Premiere’s limitations — or just want easier slow-motion editing — try Winxvideo AI.
Why choose Winxvideo AI? It lets you slow down videos to an ultra-smooth 0.125x speed and speed up videos without any lag or stutter, thanks to its AI-powered frame interpolation. You don’t need to deal with manual keyframes or complicated settings — just a few clicks and you're done. It supports a wide range of formats including MP4, MOV, MKV, and even 4K videos. Plus, with batch processing, you can save tons of time by editing multiple videos at once.
Step 1. Free download and install Winxvideo AI on your computer. Open it up, then choose Video Converter option.
Step 2. Drag and drop or click on the +Video button to load the video that you want to change the speed.
Step 3. Click any of the edit options under the video loading information, such as Effects or whatever.
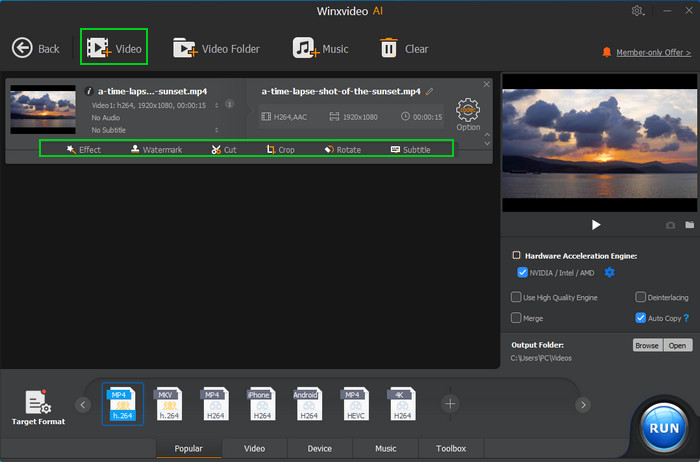
Step 4. Select Video & Audio column, you can see the Playback Speed option. Drag the Playback Speed slider left to slow (e.g., 0.5x, 0.25x, 0.125x).
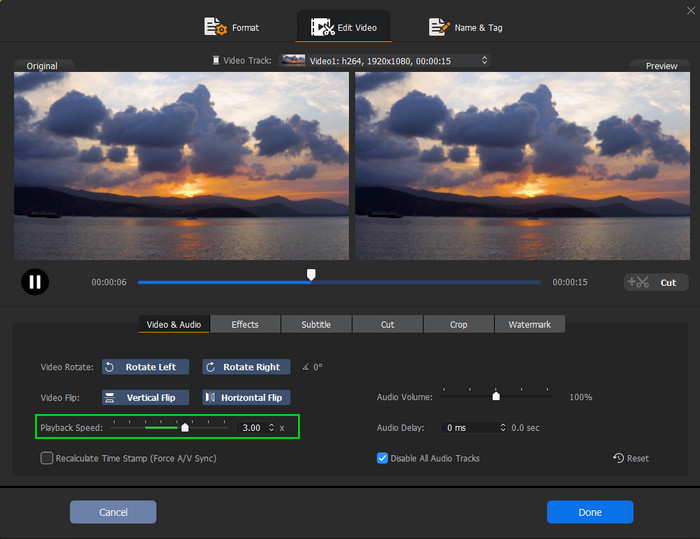
Step 5. Click Browse button to determine where to save your accelerated video. Click Done, choose output location, hit Run to start slowing down a video with Winxvideo AI.
 Free Download
 Free Download
Winxvideo AI is for PC, while Macxvideo AI (from our MacXDVD brand) is for macOS.
Unlike Premiere Pro, Winxvideo AI doesn’t rely on high-frame-rate footage — its powerful AI automatically generates extra frames to deliver ultra-smooth slow motion. Not sure which tool is right for your project? Let’s break down when to use Premiere Pro versus Winxvideo AI for slowing down your videos:
| Scenario | Recommended Tool | Why |
|---|---|---|
| Slowing vlog b-roll to half speed | Premiere Pro (Speed/Duration) | Quick and easy |
| Creating 10% speed matrix effect | Winxvideo AI | Frame interpolation |
| Making sports replay in ramp style | Premiere Pro (Time Remapping) | Fine control |
| Slowing mobile footage (30fps) | Winxvideo AI | Prevents choppiness |
| Editing TikTok dance transitions | Premiere Pro or Winxvideo AI | Both great |
Final Thoughs:
Whether you need precise control or quick results, the best method to slow down video depends on your workflow. Premiere Pro is ideal for professionals who want advanced speed ramping and full creative flexibility—especially when working with high-frame-rate footage using Optical Flow. But if you want a faster, smoother solution without the manual hassle, Winxvideo AI is a smarter choice. It slows footage to 0.125x with AI-powered interpolation, supports formats like MP4, MOV, 4K, and handles batch processing to save you time. For storytellers at any level, both tools offer powerful ways to capture the perfect slow-motion moment.
 FAQs
FAQs
Yes! Use Time Remapping and place keyframes on only the section you want to slow.
At least 60fps is recommended. For extreme slow motion (0.25x or less), 120fps or 240fps is ideal.
You probably slowed a 30fps clip too far. Use Optical Flow or a tool like Winxvideo AI to interpolate frames.
In Speed/Duration settings, check "Maintain Audio Pitch".
Technically yes, but it will look bad unless you have high-fps footage or use Optical Flow. Better to use AI tools for this.


