


How to Add Effects in Premiere Pro: A Step-by-Step Guide for Every Editor
 Mike Rule
Updated on
Hey there! I’m Mike, a video editor with over a decade of experience. I’ve used Premiere Pro for everything from indie films to corporate ads. Today, I’ll show you how to add effects in Premiere Pro like a seasoned pro—but I’ll also share its limitations and when to use a simpler tool. Let’s dive in!
Why Add Effects in Premiere Pro?
Effects help transform raw footage into polished, professional stories. From fading between scenes and stabilizing shaky shots to adding cinematic color grading, Premiere Pro’s robust effects toolkit gives you the control to shape every frame. Before diving into advanced techniques, let’s start with the fundamentals.
Let's Get Started with Creating a New Project in Premiere Pro
I will use Premiere Pro CC (2018) to show you detailed steps of how to apply the frequently-used effects in Adobe Premiere Pro. It is important to acknowledge that the steps may differ slightly based on the version of Premiere Pro you are utilizing; however, the overall process should remain largely consistent.
Step 1. Launch your Premiere Pro, Go to File > New > Project.
Step 2. Import your clips including the video and audio.
Step 3. Drag and frop your video and audio to the timeline.
Pro tip: Renaming your sequence can enhance project organization, particularly when managing multiple sequences or collaborating on a project that may require modifications by others.
With your video, image, or sound now positioned on the timeline, you can effortlessly apply an effect to it. To proceed, select the "Effects" tab and choose an effect that meets the requirements of your current project.
Part 1. How to Add Effects in Premiere Pro
1. Add Transition Effects to Videos
Premiere Pro’s transitions are smooth, versatile, and easy to use—making them ideal for everything from films to YouTube videos. With built-in options like Cross Dissolve, Slide, and Dip to Black, you can quickly create polished scene changes. Transitions are fully customizable in length and direction, and they integrate well with other effects. Whether you’re storytelling, vlogging, or editing professionally, Premiere Pro offers the control and quality you need to keep your edits flowing seamlessly.
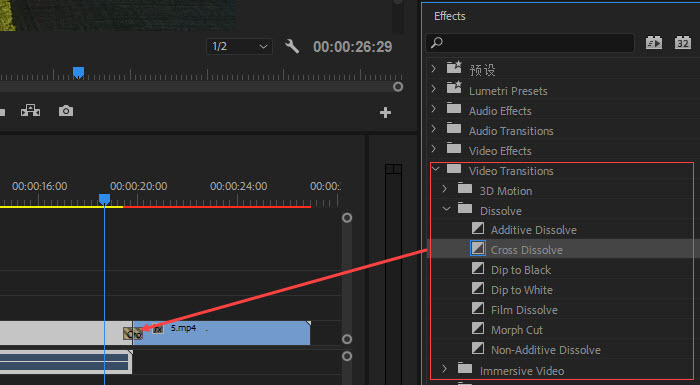
Step 1. Open the Effects Panel: Go to Window > Effects.
Step 2. Choose a Transition: Under Video Transitions, pick options like Cross Dissolve or Dip to Black.
Step 3. Add a Transition Effect: Drag & Drop the transition effect between two clips on the timeline. Also, you replace an existing transition effect by dragging a different transition effect onto it.
Step 4. Adjust Duration: Stretch or shorten the transition by dragging its edges.
Step 5. Modify the Effects: If you need some advanced adjustments, you can go to "Effect Controls" to modify the effections.
Pro tip: For a natural look, keep transitions under 1 second. Overdo it, and your video feels like a 2009 slideshow!
2. Apply Visual Effects to Videos
Visual effects (VFX) alter a clip’s appearance. Premiere Pro’s visual effects are powerful, flexible, and designed for both beginners and professionals. From color correction with Lumetri Color to stylized looks using blurs, glows, and keying effects, it offers everything needed to enhance or completely transform footage. These effects are ideal for creative projects like short films, music videos, social content, and even corporate edits. With real-time previews and precise control in the Effect Controls panel, Premiere Pro makes it easy to achieve professional-grade results without leaving the timeline.
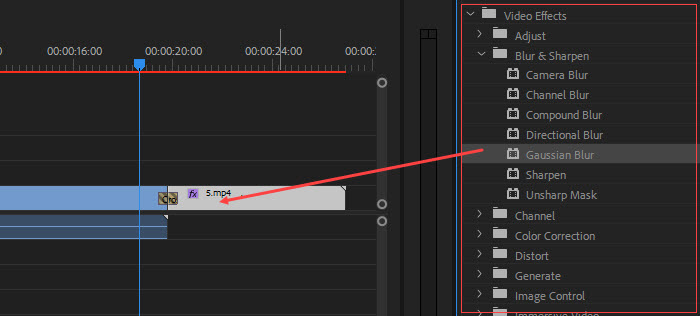
Step 1. Browse Effects: Go to Video Effects in the Effects panel, explore categories like Stylize or Distort.
Step 2. Drag Effects to Clips: Choose one and drag the effect to the clip you want to add an effect.
Step 3. Fine-Tune in Effect Controls: Adjust settings like intensity, opacity, or motion paths. Different effects have different controls and options.
Pro tip: In the Effect Controls panel, you can reset any setting using the appropriate reset button.
3. Add Stabilization Effect in Premiere Pro
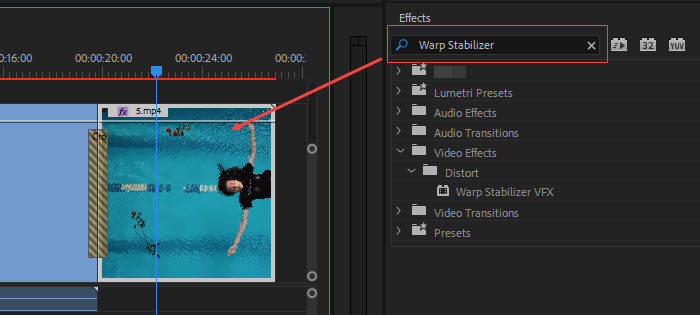
Warp Stabilizer effect in Premiere Pro is a game-changer for fixing shaky footage. With just a drag-and-drop, it analyzes your clip and smooths out unwanted camera movement—perfect for handheld shots, travel videos, action scenes, or vlog content. Its biggest strength is how seamlessly it works in the background while offering customizable options like smoothness level, cropping, and even advanced methods like "Subspace Warp" for more natural results. Whether you're shooting on a smartphone or DSLR, Warp Stabilizer helps turn unstable clips into professional-looking footage without the need for reshoots.
Step 1. Find the Effect: Search "Warp Stabilizer" in the Effects Panel.
Step 2. Apply to Clip: Drag it onto your shaky clip, and Premiere Pro will auto-analyze the footage.
Step 3. Choose Result: In the "Effect Control" section, choose Smooth Motion (keeps camera movement) or No Motion (static shot). Adjust the parameter if needed.
Pro tip: Not all footage will produce a good result. If there is a lot of camera movement in the original shot, the Warp Stabilizer effect may result in a very zoomed-in image so that it can stabilize the shot.
4. Add Audio Effects in Premiere Pro
In Adobe Premiere Pro, audio effects are available for application to any video containing an audio track on your timeline, as well as to individual audio clips. These effects can help reduce background noise, eliminate certain frequencies, and reduce audio levels in specific sections of your clip, among other functionalities. Similar to video effects, these audio effects can be adjusted through the "Effects" panel, which can be accessed by selecting your clip and then choosing "Effect Controls" located in the top-left corner of the interface.

Part 2. Tips for Adding Effects in Premiere Pro
Tip 1. Save custom presets for repetitive tasks
Premiere Pro’s ability to save custom presets is a huge time-saver for editors working on repetitive tasks. Whether it's a frequently used color grade, a specific transition setup, or a combination of audio effects, you can save your settings as a preset and apply them instantly to other clips. This feature is especially useful for content creators, social media editors, and anyone producing videos in batches—ensuring consistency across projects while streamlining the workflow. Instead of rebuilding effects from scratch, you apply your preset with one click, keeping your edits fast and professional.
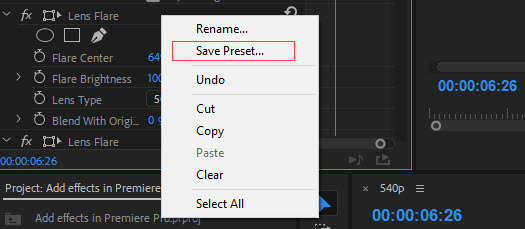
Step 1. Tweak settings of a specific effect in Effect Controls.
Step 2. Right-click the effect name > Save Preset. Give the preset a name and add a description. The preset will appear in the Presets category in the Effects panel.
Step 3. To reuse the effect, find your preset under Effects > Presets, and drag it onto a clip.
Tip 2. Advanced adjustments to your effects
Within Adobe Premiere, the "Effects Controls" panel includes a category known as "fixed effects", which encompasses Motion, Opacity, Time Remapping, and Volume. By default, these effects are automatically applied to any video added to your timeline. You can adjust their values and parameters by selecting the video and accessing the effects control panel. Once you apply a new effect, you can also adjust the effect here.
Tip 3. Copy and paste effects in Premiere Pro
An alternative method exists for duplicating and applying attributes for effects in Premiere Pro without the necessity of creating a new preset. This approach may be preferable if you have an excessive number of saved presets or if you do not find the effect significant enough to warrant saving for future projects, yet you need to apply it to multiple clips on your timeline without doing so manually, one at a time.
Step 1. Tweak settings of a specific effect in Effect Controls.
Step 2. Right-click the effect name > Copy.
Step 3. Select the video on your timeline that you wish to apply the effect to, and open the "Effects Controls" panel. Right-click an empty area and choose the "Paste" option from the menu. Alternatively, after copying the effect, you can select your clip on the timeline and enter "Ctrl + V" on your keyboard to paste the effect.
Tip 4. Frequently-used effects in Premiere Pro you should know
With so many built-in effects in Premiere Pro, it can be overwhelming to know where to start. But not all effects are created equal—some are especially powerful, versatile, and used by editors every day. Whether you're fine-tuning visuals, correcting color, or adding cinematic flair, knowing the right effects can save time and elevate your videos. Below are some of the most frequently used effects in Premiere Pro that every editor should have in their toolkit.
- Color Correction: adjust brightness, contrast, and more.
- Blur & Sharpen: adjust the focus and clarity of a video.
- Distort: funky, dramatic effects for cinematic edits.
- Noise & Grain: reduce noise and grain in a clip.
- Stylize: artistic effects like mosaics, brush strokes, and more.
- Amplitude and Compression: amplify, channel volume, single-band compressor, and more.
- Noise Reduction/Restoration: reduce or eliminate unwanted background noise.
- Reverb: control spatial audio.
- Time and Pitch: shift the pitch of an audio track.
Part 3. Winxvideo AI - A Faster Way to Add Effects
Although Premiere Pro is a robust editing software, it has specific limitations. Novice users frequently find its intricate interface challenging, especially when utilizing tools such as the Razor tool and track targeting. Additionally, handling 4K projects necessitates a minimum of 16GB of RAM, posing difficulties for lower-end systems. On less capable computers, editing high-resolution videos—particularly those in 4K or higher—can result in performance problems or system crashes.
Premiere Pro’s Limitations:
- Steep Learning Curve: Newbies struggle with nested menus.
- Heavy Resource Use: 4K editing requires 16GB+ RAM. Lag is real on older PCs.
- No Auto-Enhancement: Fixing blurry footage manually takes hours.
- Costly Subscription: At $20.99/month, it’s pricey for casual editors.
For quick edits or low-spec machines, try Winxvideo AI. It can one-click add effects/filters, stabilize clips, or remove noise in seconds.
Step 1. Free download Winxvideo AI, install and launch it.
Step 2. Click on the Video Converter button on main UI.

Step 3. Drag and drop your video to it, and click the Effect icon.
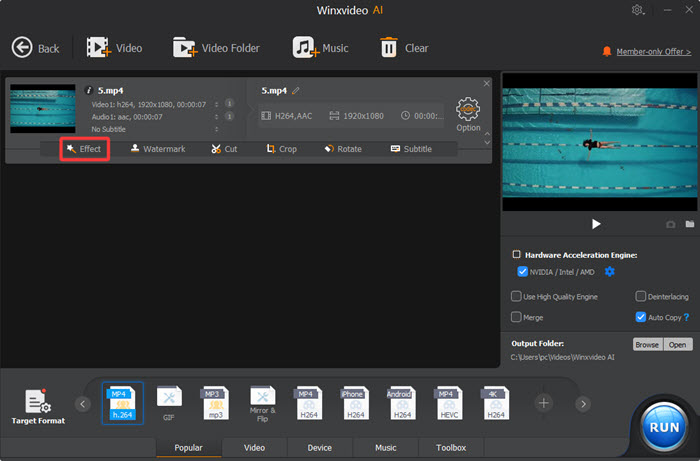
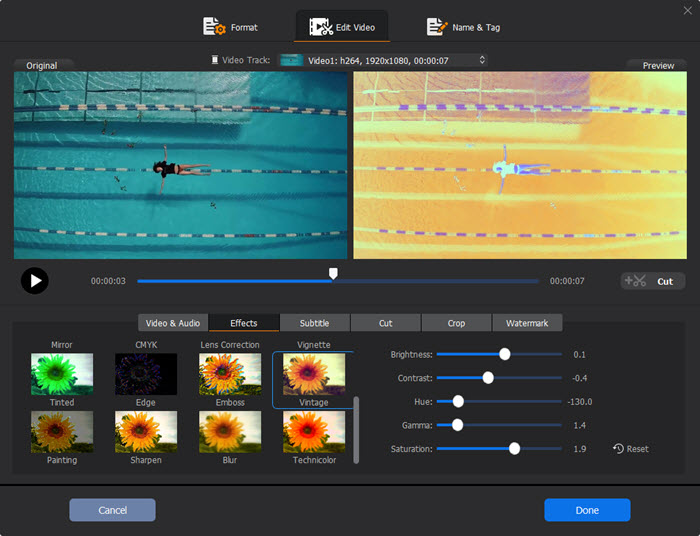
Step 4. Choose one effect you need and adjust brightness, contrast, hue, gamma, and saturation on the right in case needed. Then, click Done.
Step 5. Now, click the RUN button to export the clip.
 Free Download
 Free Download
 FAQs
FAQs
Step 1. Go to File > New > Adjustment Layer.
Step 2. In the pop-up, confirm the settings (they should match your sequence), then click OK.
Step 3. Drag the adjustment layer from the Project panel to a track above your video clips in the Timeline.
Step 4. Select the adjustment layer in the Timeline.
Step 5. Go to the Effects panel (Shift + 7), find your desired effect (e.g., Lumetri Color, Gaussian Blur), and drag it onto the adjustment layer.
Step 6. Use the Effect Controls panel to fine-tune the effect settings. The effect will apply to all clips underneath the layer.
Step 1. Go to the top menu bar, and click on Window in the top menu.
Step 2. In the dropdown menu, find and click on Effects. This will open the Effects panel, usually on the right side of the workspace.
Shortcut tip: Press Shift + 7 to quickly open the Effects panel.
Yes, you can absolutely add title effects in Adobe Premiere Pro. After creating titles, go to Effects panel, choose one effect like Fade In/Out, and drag it to your title on the timeline.
The answer is simple, you can remove effects in Premiere using the effect controls panel. Simply head over there, right-click the effect you wish to remove, and choose the "Clear" option. This will instantly remove the effect from your video, and it works for both audio and video effects.


