


How to Upscale a Video in Premiere Pro?
You can easily import a 1080p video to Premiere Pro and then output as a 4K resolution video. However, upscaling the video resolution probably is not the only thing you want. You may also want to upscale video in Premiere Pro with enhanced image quality, including visual details, improved sharpness and clarity, polished colors, etc.
As Premiere Pro is a professional video editing tool, you can use it to enlarge the video resolution, say 720p to 1080p or 1080p to 4K, and also improve the image quality. Here, this article will give a step-by-step guide to tell you how to upscale a video in Premiere Pro easily.
Table of Contents
Part 1. How to Upscale Video in Premiere Pro?
- Method 1. Change Sequence & Frame Size of Your Video
- Method 2. Use Detail-preserving Upscaling (Pr+Ae)
- Method 3. Use Super Resolution Plugin in Premiere Pro
Part 1. How to Upscale Video in Premiere Pro?
Premiere Pro is very powerful. You can use it to stretch the image of a 1080p video to match the full screen of a 4K display. You can also get the low quality video upscaled to 4K while preserving details. Even, you can increase video quality in Premiere Pro with some other help.
In the following methods, we will take upscaling 1080p to 4K as an example to show you how to upscale a video in Premiere Pro.
Method 1. Change Sequence & Frame Size of Your Video in Premiere Pro
Step 1. Launch Premiere Pro, create and open a project.
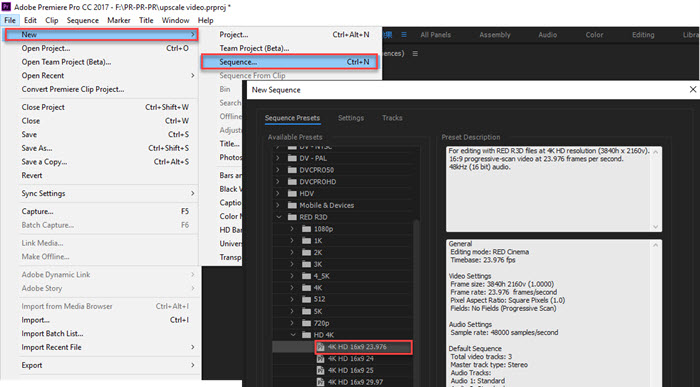
Step 2. On the main user interface, go to File on the top menu bar > New > Sequence. Then, choose presets that match the desired export resolution, such as 4K HD 16x9 23.976.
Step 3. Import a 1080p video, and drag it to the timeline. When an error message "Clip Mismatch Warning" pops up, simply choose "Keep existing settings".
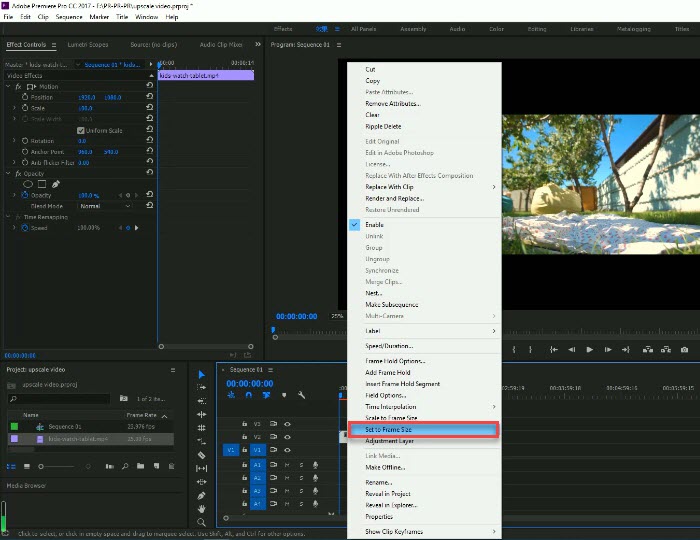
Step 4. As you can see, there are black bars around the picture. Just right-click on the video in the timeline and choose "Set to frame size" to remove the black bars.
* In some versions of Premiere Pro, you can also apply the "Set to frame size" by going to Edit > Preferences > Media > Default Media Scaling.
Step 5. If there is any artifact or noise in the video, you can consider to apply the unsharp mask effect for a sharper image.
Step 6. When everything is OK, press "Ctrl + M" on your keyboard to export the video. In the new window, you are also suggested to tick "Render at Maximum Depth" and "Use Maximum Render Quality", and set Bitrate Encoding to "VBR, 2 pass". Then, click on "Export" to export the upscaled video.
Read More: How to Remove Background Noise in Adobe Premiere Pro
Method 2. Use Detail-preserving Upscaling (Pr+Ae)
This method will use Adobe After Effects, the professional motion design software app for increasing video quality and adding effects. You can activate the AE software in Premiere Pro to help enhance the video quality.
Step 1. Launch Premiere Pro, create and open a project.
Step 2. On the main user interface, go to "File" on the top menu bar > "New" > "Sequence". Then, choose presets that match the desired export resolution, such as 4K HD 16x9 23.976.
Step 3. Import a 1080p video, and drag it to the timeline. When an error message "Clip Mismatch Warning" pops up, simply choose "Keep existing settings".
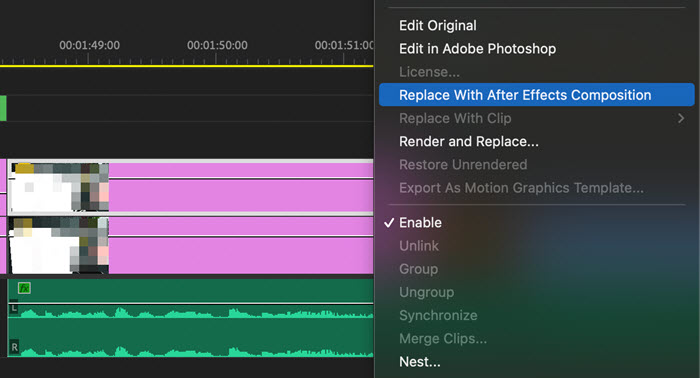
Step 4. As you can see, there are black bars around the picture. Just right-click on the video in the timeline and choose "Replace With After Effects Composition" to send the video clip to After Effects.
Step 5. After sending, there will be a prompt. Give it a name, choose a location, and then click the "Save" button to save the project.
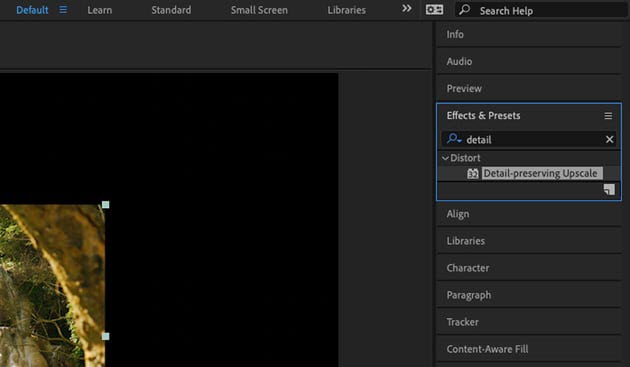
Step 6. Now, you will see your video clip on the canvas. In the "Effects & Presets" panel, search for "Detail-preserving Upscale", then double-click on it to add it to your video.
Step 7. Go to "Effect Controls" panel and click on "Fit to Comp Width" to upscale the footage to cover the width of the canvas. set scale to a larger percentage (200% for 1080p to 4K and 300% for 720p to 4K).
* You can also try out the "Detail" slider to keep more detail.
Step 8. After that, save the After Effects project. Go back to Premiere Pro, and you will see that the video clip has been updated.
Step 9. Press "Ctrl + M" on your keyboard to export the video.
Method 3. Use Super Resolution Plugin in Premiere Pro
Premiere Pro is powerful as it can work with many plugins. There are also video upscaling plugins for Premiere Pro in the market available for you to install to upscale video in Premiere Pro. Infognition SuperResolution plugin is one of them. It employs motion estimation and high frequency image data fusion, producing a clear and sharp result. With it, you can convert lower quality SD video into HD, HD to 4K, and more.
Step 1. Download the Infognition SuperResolution plugin, install it.
Step 2. Create a new project in your Premiere Pro, and create a new Sequence. Also, go to Sequence Settings from the main menu and set the 4K resolution.
Step 3. Import your low resolution video and drag it to the timeline. After that, you should see in the master window your original low-res clip surrounded by darkness of unfilled space of high-res sequence.
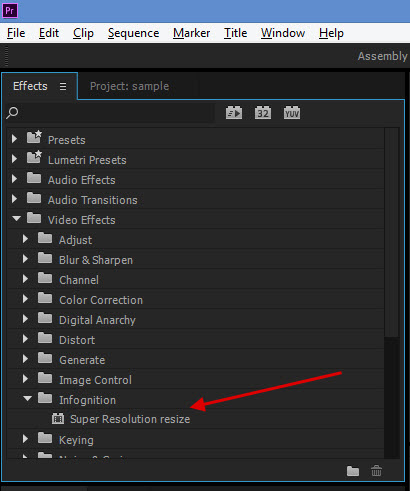
Step 4. Now, click on "Effects" tab, unfold "Video Effects" folder to find "Infognition" folder and see "Super Resolution resize" effect.
Step 5. Drag the "Super Resolution resize" effect onto your video clip on the timeline.
Step 6. Now, go to the "Effect Controls" tab and you will see the "Super Resolution resize" effect has been applied. You can set the scale factor in percent or resolution in pixels to get the desired output video resolution.
Step 7. After that, press "Ctrl + M" on your keyboard to start upscaling video in Premiere Pro and then export.
The above 3 methods are the commonest ones people use to upscale a video resolution and enhance video quality in Premiere Pro. However, it is time-consuming for novice to grasp the learning curve. Besides, upscaling a video doesn’t change the original video nor does it give any additional information to the video. That’s is to say, if you need to add more details to your video, Premiere Pro – the non-AI video upscaling software is the not perfect choice.
Part 2. Much Easier Ways to Upscale a Video
Besides traditional video editing software like Premiere Pro to upscale a video, you also have many other video upscaling software options. Thanks to the AI technology, now you can increase video resolution and video quality at the same time in a few clicks. For 1080p to 4K conversion, some 4K video converters are also ideal choices.
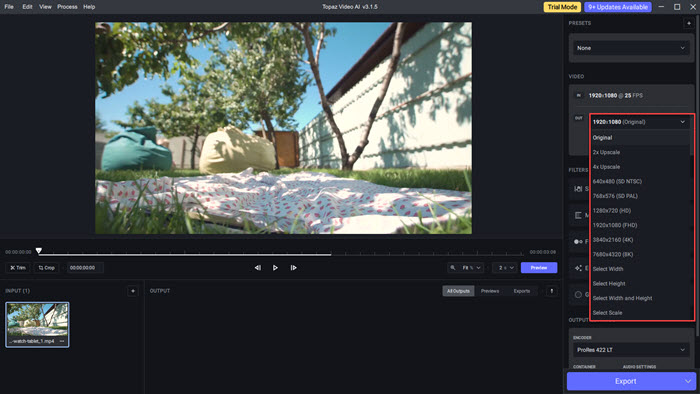
1. Topaz Video AI – AI Video Upscaling Software
This tool can be the leading AI video upscaling software that no one can compete as of now. It is a video resolution upscaler and quality enhancer that can automatically enlarge video resolution, denoise, deinterlace, stabilize, etc. at the same time to improve the video quality. The only thing you need to do is to add your video and choose the desired output resolution, and then the software will do the rest job for you.
It is a very powerful tool, but it also requires a very powerful computer. If you own a low-end computer, you may encounter software crashing or video upscaling process freezing issue. So, you can try a lighter video converter if you only need to change the video resolution from 480p to 720, 720p to 1080p, or 1080p to 4K.
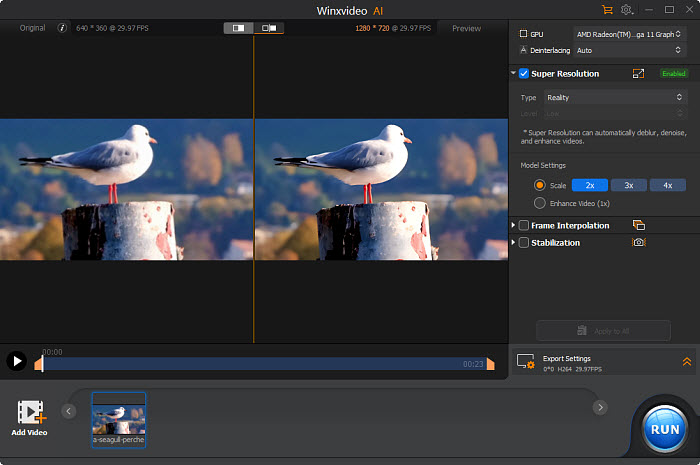
2. Winxvideo AI – A 4K Video Enhancer & Converter
You don’t really need Premiere Pro to upscale a video if you just need to change the video resolution. Winxvideo AI is what you need to upscale video from 480p to 720p, 720p to 1080p, or 1080p to 4K to get a high-quality video. You can also increase FPS to get the best result. It won’t occupy much space of your computer. Even if your video is CPU-loaded, you can activate the Hardware Acceleration technology to speed up the video upscaling process.
Part 3. FAQS about Upscaling Video in Premiere Pro
1. What is upscaling video?
Upscaling video is the process of changing the video resolution from low to high so as to make the video fit the full area of your larger screen without losing quality. Also, during the video upscaling process, it is able to add more details to make the images look sharper and clearer.
2. Can you upscale video quality in Premiere Pro?
Premiere Pro can only upscale a video from low resolution to high resolution. If you want to increase the video quality, such as adding more details, you need to open After Effects in Premiere Pro to edit your video and then send back to Premiere Pro to improve the video quality.
3. How do I upscale a video to 4K in Premiere Pro?
To upscale a video to 4K in Premiere Pro, you need to prepare a 4K sequence and set the frame size of the current video to 4K.
Step 1. Create and open a project in Premiere Pro.
Step 2. Go to "File" > "New", and choose "Sequence". Then, choose presets "4K HD 16x9 23.976".
Step 3. Now, import the video you want to upscale to 4K, and drag it to the timeline. When a message pops up, choose "Keep existing settings" to continue.
Step 4. Right-click on the video in the timeline and choose "Set to frame size" to upscale the video to 4K.
Step 5. When everything is OK, press "Ctrl + M" on your keyboard to export the video.

