


[After Effects Tutorial] How to Do Noise Reduction in After Effects
 Mike Rule
Updated on
After Effects provides several built-in audio and video effects, including denoising tools. The program also supports third-party denoising plugins, which offer more advanced and specialized noise reduction options. These plugins can provide higher-quality results for specific types of noise. If you're working on a video that needs to remove grain, After Effects is the go-to choice. Here’s a detailed guide on how to denoise in After Effects.
Denoise in a Click with Winxvideo AI
Winxvideo AI specializes in elevating video quality by intelligently removing noise, artifacts, and enhancing overall visual clarity. One standout feature is the advanced denoising technology that goes beyond conventional enhancements. Winxvideo AI employs state-of-the-art algorithms to meticulously denoise videos, ensuring a crystal-clear and professional finish in a single click.
In addition to denoising feature, Winxvideo AI offers a suite of powerful tools for comprehensive video enhancement. Whether you need to upscale low-res videos to stunning HD and 4K resolutions, stabilize shaky footage recorded on mobiles or sports cameras, or interpolate frame rates for smoother playback, Winxvideo AI has you covered.
 Free Download
 Free Download
Winxvideo AI is for PC, while Macxvideo AI (from our MacXDVD brand) is for macOS.
Part 1. How to Denoise and Remove Grain in Adobe After Effects
After Effects comes with a built-in Remove Grain effect, allowing you to remove noise and grain from videos. Use the step-by-step guide below to learn how to denoise in After Effects with the Remove Grain effect.
Step 1. Import Video Footage
Start by importing your grainy footage into Adobe After Effects. Go to File > Import and browse for the clips from your computer. Then drag the noisy clip to a new composition to start the process.Step 2. Add Remove Grain Effect
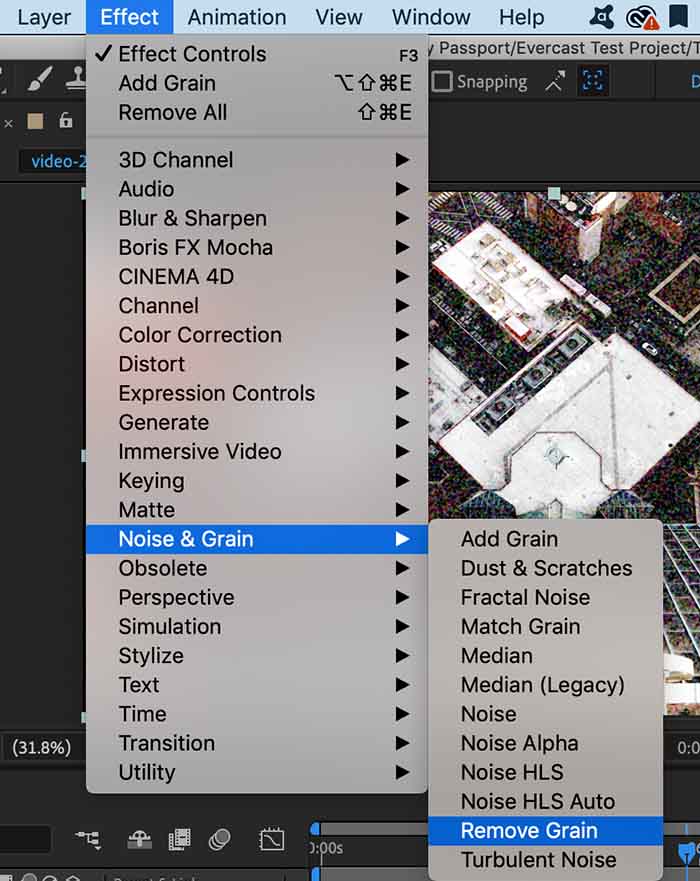
Go to Effect in the main menu at the top of the screen. Scroll down until you see Noise & Grain, and choose Remove Grain from the following menu. The effect will be added to your Effect Controls panel, where you can adjust its settings, and that's it!
You’ll find a visual preview box of how your video will look like in the square that appears on your footage. You can change the preview region size by dragging it.
Step 3. Noise Sample
The Remove Grain effect will automatically identify noise samples to correct your image, but you can also manually select the samples to target specific grains, adjust the number of samples and change the size of the noise sample.
In your Remove Grain settings, change the Viewing Mode to Noise Sample. Then scroll down to the Sampling tab and change Sample Selection from Automatic to Manual. Then in the preview window, you can move the sample points to the locations with more grain. Increase or decrease the number of samples in "Number of Samples" and their size in "Sampling Size."
After selecting all your noise samples, go back to preview in the Viewing Mode. You can also choose Final Output to look at the entire image.
Step 4. Remove Grain Effect Settings
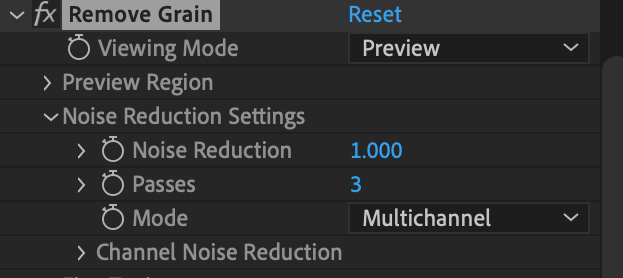
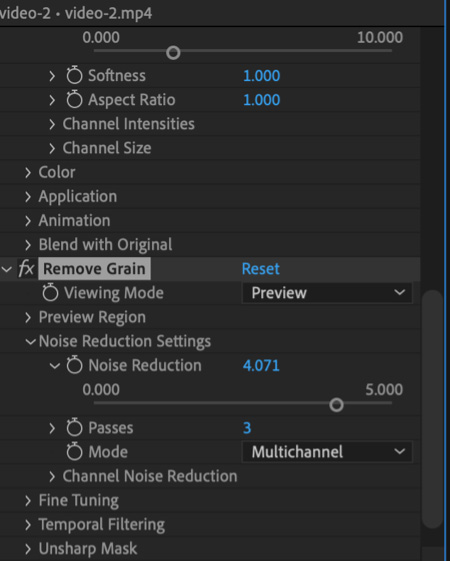
In your Effects Control panel, select the Noise Reduction Settings tab. Adjust how much reduction you want by changing the value in Noise Reduction. Observe the preview region to see how the new settings affect your image. Bear in mind that a high value will make your footage look blurry and lose details.
The Passes setting controls how much noise radius can be detected. A higher number can bring more quality, but rendering will take longer. If you have a large file, it would be better to leave the default setting so you don’t overload your computer.
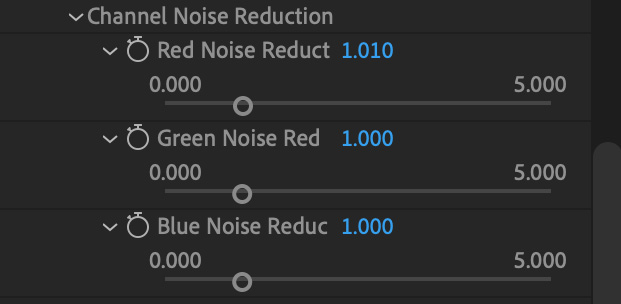
Finally, you can choose to remove grain from all channels or adjust each channel independently. Under the Channel Noise Reduction tab, you’ll see three options for the red, green, and blue channels.
You can preview each channel by changing it in the three-color icon at the bottom of the preview window. It will allow you to see which channel the noise is more prominent. Different types of noise exist on each color channel, so you can fine-adjust how much noise reduction to apply for each channel.
Step 5. Fine-tune to Retain Sharpness
Your grainy footage should be much cleaner now, but After Effects gives you even more tools to fine-tune your videos. In the Fine Tuning tab, you'll find the following settings to bring back some detail to your image.
Increasing the Chroma Suppression values can help eliminate colorful noise, but it could also take some color away.
The Texture control allows you to preserve areas with delicate textures such as wood grain. Keep a good balance between retaining the detail and reducing noise.
The Noise Size Bias targets the effect of small or larger noise. By default, all sizes will be affected equally.
The last setting is Clean Solid Areas, which controls how much the Remove Grain effect smoothens solid color areas to make them look cleaner. You’ll notice that higher values will blur the edges, losing the sharp natural look of the image.
If your image starts to get too blurry, the Unsharp Mask tab can help you maintain the sharpness lost during grain reduction.
Step 6. Temporal Filtering
You can enable Temporal Filtering to reduce noise between frames, which is caused due to Remove Grain applying the effect to each frame independently. The inter frame noise might not be evident in a still image, but it will be more visible when you play back your video. Preview the footage and adjust Motion and Amount values to reduce the buzz between frames.
Step 7. Render and Export your Video
To export your video go to File > Export > Add to Media Encoder Queue. Select your format, output settings, and save location. Click Render and wait for After Effects to export the final output without grain.
Read More: How to Remove Background Noise in Adobe Premiere Pro
Part 2. FAQs about How to Denoise in After Effects
1. How do I reduce white noise in After Effects?
To reduce white noise in After Effects, start by importing your footage with the problematic audio. Open the composition containing the audio layer and access it in the Timeline panel. Right-click on the audio layer and select "Effects > Noise & Grain > Noise Reduction/Restoration." This applies the Noise Reduction effect. Adjust parameters like Noise Reduction, Reduce By, and Smoothing in the Effects Control panel to fine-tune the noise reduction. Be cautious not to overdo it, as excessive reduction can affect overall audio quality. Utilize the RAM Preview function to hear the audio with the noise reduction effect applied, making further adjustments if necessary.
2. How do I remove grain from footage in After Effects?
In After Effects, grain removal can be achieved using the "Remove Grain" effect. Begin by importing your footage and creating a new composition. Then, locate the "Remove Grain" effect in the Effects & Presets panel and apply it to your footage layer. In the Effect Controls panel, adjust parameters like Noise Reduction, Noise Sharpness, and Temporal Noise Reduction to fine-tune the effect. Utilize the RAM Preview function to preview the footage with the grain removal effect applied, and make further adjustments as necessary.
3. What does the denoise effect do?
The denoise effect employs algorithms to analyze the image and distinguish between actual detail and undesirable noise. It then applies smoothing or filtering techniques to suppress the noise while preserving the essential elements of the image. The result is a cleaner, smoother appearance with reduced distractions and improved overall visual quality.4. Should I use Denoise before or after editing?
It is generally advisable to apply denoising after editing your image. When you edit a noisy image, you're not only adjusting the visible elements but also potentially amplifying the noise. If you denoise before editing, you may lose some of the finer details that could be enhanced or corrected during the editing process. By editing first and then applying denoising, you can retain as much detail and information as possible while still reducing noise effectively. This sequence allows you to make adjustments to color, tone, and sharpness without compromising the integrity of the image.

