How to Remove Background Noise in Adobe Premiere Pro
 Mike Rule
Updated on
Adobe Premiere Pro comes with a denoiser effect as part of its feature set to empower video editors with tools that enhance the overall quality of their projects, including audio. By offering a denoiser, Premiere Pro addresses common audio issues like background noise, hum, and hiss, simplifying the editing process and enabling editors to produce cleaner audio tracks From understanding how to denoise in Premiere Pro to exploring the best denoiser plugins for Premiere Pro, we've got you covered in this article.
Denoise in a Click with Winxvideo AI
Winxvideo AI’s denoise feature offers unparalleled control over your video's audio. It eliminate various types of noise from your entire video or specific segments, such as background noise, wind noise, hiss, hum, white noise, etc . The real-time audio monitoring allows you to hear and adjust noise removal while making edits, ensuring optimal results. With a simple click, apply high pass or denoise effects effortlessly, eradicating unwanted background disturbances. Additionally, revel in the richness of its audio editing arsenal—cut, split, and mix with precision.
 Free Download
 Free Download
Winxvideo AI is for PC, while Macxvideo AI (from our MacXDVD brand) is for macOS.
Part 1. How to Denoise in Adobe Premiere Pro
#1. Denoise in Adobe Premiere Pro with the Denoise Feature
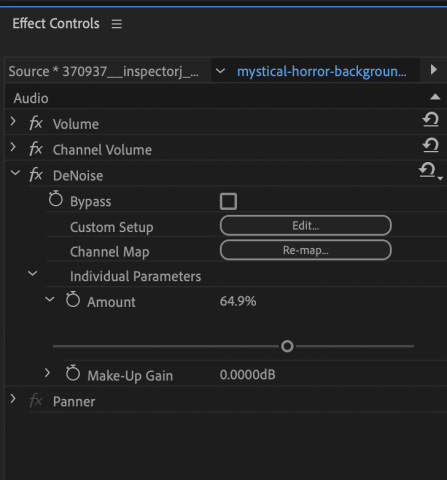
Adobe Premiere Pro offers Denoise feature under Audio Effects, with an Amount slider. You can drag the Amount slider to determine how much of the noise reduction effect you want to apply. Note that the Denoise effect may decrease the sound quality, such as voice and background music. Use the following steps to learn how to remove background noise in Adobe Premiere Pro with the Denoise feature.
Step 1. Launch Premiere Pro. Open your desired project. Start with the first one in your sequence if you have multiple clips in the project.
Step 2. Navigate to the Effects window by either locating it in the interface or heading to Window > Effects. Search for the "DeNoise" effect, or alternatively, follow this path: Audio Effects > Noise Reduction/Restoration > DeNoise. To apply the DeNoise effect, simply drag and drop it onto the audio clip you're working with.
、
Step 3. Proceed to the Effects Control panel to locate the DeNoise effect that you've applied. Click on the "Edit" option to open a new window where you can fine-tune the audio frequencies.
At the bottom of the window, there's a singular "Amount" slider. This slider dictates the intensity of the noise reduction effect applied to your audio clip. Typically positioned in the middle initially, you can listen to your audio and adjust the slider to increase or decrease the noise reduction.

#2. Denoise in Premiere Pro Under the Essential Sound Panel
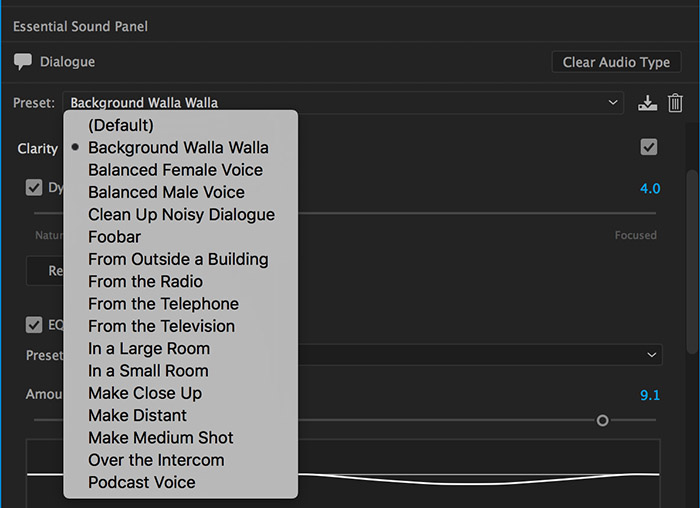
Step 1. Access the Essential Sound panel. Click on Window > Essential Sound panel and enable the Essential Sound. Handpick your audio clip and designate it as "Dialogue."
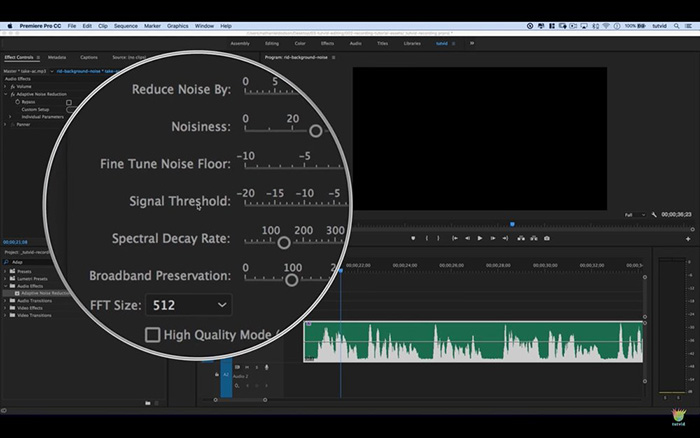
Step 2. Select "Dialogue" to open a new menu with multiple features and sliders for background noise removal. There are several different options, including Reduce Noise, Reduce Rumble, DeHum, DeEss, and Reduce Reverb.
Reduce Noise allows you to set the extent of noise reduction applied to your audio clip. 0 Means untouched, 100 delivers maximum noise reduction. Reduce Rumble: Mitigates low-frequency disturbances, plosives, and microphone-generated vibrations arising from motion, wind, or friction. DeHum counteracts hum sounds stemming from electrical interference. DeEss attenuates harsh "ess" sounds and other high-frequency disturbances. Minimizes reverb within your audio track, making it indispensable for addressing echo issues in your recordings.

Step 3. Repair sound quality through the Clarity tab. Toggle the corresponding checkbox, prompting the emergence of a supplementary menu below.
Note that overapplying effects can distort the audio quality, particularly the voice. In such instances, maintaining a trace of background noise can preserve optimal sound quality.
Part 2. Denoise Adobe Premiere Pro Plugins
Adobe Premiere Pro just provides basic audio mixing capabilities, but denoiser plugins for Premiere Pro can significantly expand your mixing toolkit. These plugins come with extensive customization options, allowing you to fine-tune settings according to specific audio characteristics. Below are top 3 denoiser plugins for Adobe Premiere Pro.
#1. Neat Video
Neat Video is a dedicated noise reduction plugin for Premiere Pro. The plugin is known for its advanced noise reduction algorithms. It's often used for professional video editing and is also available as a standalone application for noise reduction in images. You can adjust multiple parameters to fine-tune noise reduction settings according to the specific characteristics of the noise and the audio. Neat Video uses advanced algorithms that analyze noise patterns and can provide highly effective noise reduction without significant loss of detail or quality.
#2. AudioDenoise
AudioDenoise by CrumplePop is more geared toward simplicity and ease of use, making it suitable for editors who want a quick noise reduction solution. The Premiere Pro denoise plugin helps remove hiss, hum, and other noises inside Premiere Pro, as well as other programs like DaVinci Resolve, ProTools, FCP, Audacity, Logic, and more. The plugin often includes presets that can be applied to achieve noise reduction with just a few clicks, streamlining the editing process. Compared with Neat Video, AudioDenoise plugin for Premiere Pro wins for its easy presets and a simple interface.
#3. iZotope RX Denoiser
If you're looking for comprehensive audio enhancement tools with advanced capabilities, iZotope denoise plugins for Premiere Pro are worth considering. iZotope RX Denoiser Premiere Pro provides a range of professional-grade audio plugins beyond noise reduction, including audio restoration, mastering, and more. Its advanced algorithms that can handle complex audio issues with high precision. If you are working on simple audio projects, the advanced capabilities of iZotope RX Denoiser plugins for Premiere Pro might be overkill. The extensive features might not be fully utilized.
Part 3. FAQs about Denoiser in Premiere Pro
1. Is there a denoiser in Premiere Pro?
Yes. Adobe Premiere Pro has built-in denoiser feature. The denoiser effect is located within the "Effects" panel under the "Audio Effects" category, specifically under "Noise Reduction/Restoration." This tool is particularly useful for cleaning up audio tracks that have been plagued by hiss, hum, or other forms of ambient noise. You adjust parameters such as noise reduction strength to achieve the desired level of noise removal.
2. What is DeNoise Effect in Premiere Pro?
The DeNoise effect in Adobe Premiere Pro is an audio enhancement tool designed to reduce or eliminate unwanted background noise from audio recordings. It allows you to control and fine-tune the noise reduction strength. By adjusting parameters such as reduction level and frequency range, editors can achieve a cleaner and more professional audio output.
3. How do I get rid of grainy video in Premiere Pro?
Import your grainy video clip into your project. Go to the "Effects" panel and search for "Denoiser." Drag and drop the effect onto your video clip. In the "Effects Control" panel, tweak the denoiser settings. Adjust the strength of noise reduction and fine-tune other parameters until the graininess diminishes. If the denoising softens the video, apply the "Unsharp Mask" effect to restore some sharpness. Once satisfied with the adjustments, export your video with the improved quality.
4. What is the best DeNoise plugin in Premiere Pro?
One of the top DeNoise plugins for Adobe Premiere Pro is "Neat Video." Renowned for its exceptional noise reduction capabilities, Neat Video offers a comprehensive solution for tackling noise issues in your video projects. With its advanced algorithms, Neat Video can effectively reduce various types of noise, including grain, static, and digital artifacts, while preserving the essential details of your footage.


