


How to Remove Background Noise from Audio Easily
 Mike Rule
Updated on
Background noise is an intrinsic element of our environment, and it is frequently inevitable, particularly in settings outside of controlled studios. While the pristine audio quality is crucial whether you are a content creator, a musician crafting melodies, or someone seeking a calming ASMR escape. Luckily, you never lack the way to remove background noise from video and audio, be it free or paid. Here are top 10 easy methods to remove background noise from video recordings, audio, music, recordings, and other audio files easily.
#1. Winxvideo AI
Winxvideo AI has a robust Denoise feature designed to effectively diminish background noise from your videos. It’s in the Toolbox section for eliminating various distractions such as wind noise and other ambient disturbances. You can simply set the professional-grade Low-pass and High-pass filters to remove background noise from video.
It’s AI-powered, allowing you to eliminate unwanted elements like wind noise, vocal cords, footsteps, motor noises, and device disturbances with just a single click. Meantime, you can mute audio, adjust audio volume, and ensure audio-video synchronization for seamless audio experience. Better still, it comes with a complete toolbox to record, stabilize, denoise, edit, merge/cut/crop videos, and enhance videos/images in a click.
. Free Download
 Free Download
Winxvideo AI is for PC, while Macxvideo AI (from our MacXDVD brand) is for macOS.
How to Remove Background Noise from Audio with Winxvideo AI
Step 1. Open Winxvideo AI and select "Video Converter" to open the video processing window.
Step 2. Click the + Add Video button at the bottom left corner to import the video with noise which you want to remove from. You can add multiple videos for batch processing.
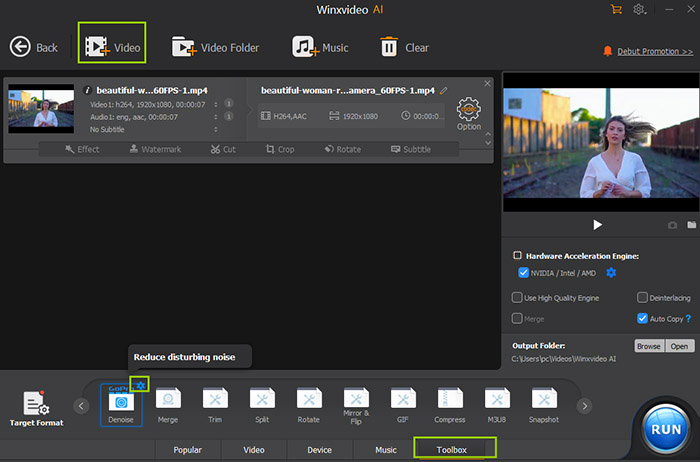
Step 3. Click the "Toolbox" option at the bottom and double-click the Denoise button or hit the gear icon on the top right corner of this button to open the Denoise window. Set the Low Pass and High Pass to remove background noise from video. Click "Done" to close the Window.
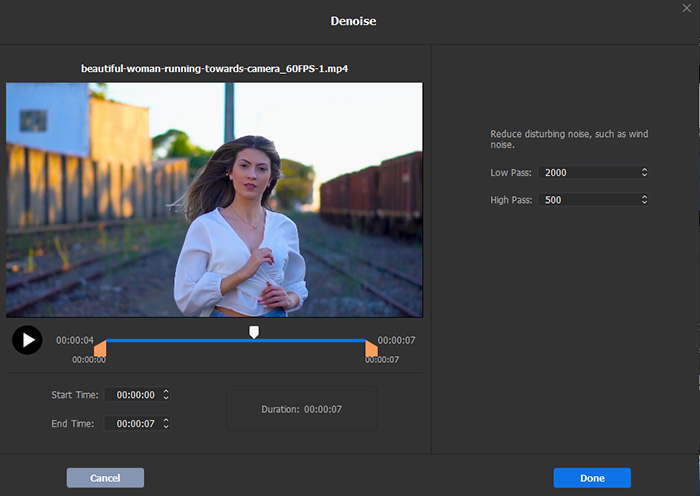
Step 4. Set the export settings based on your needs and then click the "RUN" button to output the video with noise removed.
#2. VEED.IO
Overview: VEED.IO is an online video editor that has background noise removal feature built-in. It offers one-click audio cleaning option, helping eliminating any undesirable sounds from video as well as audio files. The background remover is claimed to be AI-powered and works effectively in getting rid of noises such as traffic sounds, wind, static, humming sounds, etc. A wide range of video and audio formats are supported, including MP3, MP4, AVI, MOV, WMV, MKV, and more. Moreover, VEED is not just limited to audio cleanup feature. The online tool includes a comprehensive basic audio and video editing features. With VEED.IO, you can add text, subtitles, video/audio effects, background music, and more.
The noise removal feature requires subscription. On the free version, you’ll be asked to upgrade your workspace to enable noise removal. On the free exports, watermark is added with video resolution limited to 720p. Make sure the video from which you want to remove noise is under 10 minutes if you are using the free version. Use the following steps to remove background noise online free with VEED.IO.
How to Remove Background Noise Online Free with VEED.IO
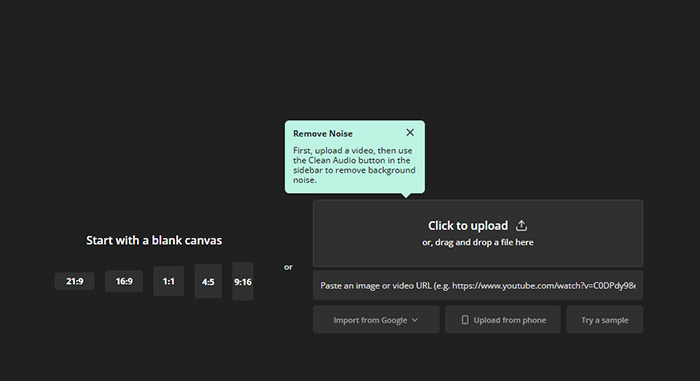
Step 1. Go to the VEED.IO website, select Tools on the top menu bar, then select Video Background Remover under AI Tools section. On the “Remove Background Noise from Audio” page, you'll notice a blue bar labeled "Clean your audio now". Click the button and pick the files you want to use for background noise removal.
Step 2. Click Settings to open the Project Settings window. Select Clean Audio under the Audio section on the Project Settings window.
Step 3. Click the Done button at the top right corner to open the Export Options. Set the quality and click the Export Video button to download the audio with background noise removed.

#3. Kapwing
Kapwing is another go-to tool to remove background noise from audio and video online. It allows you to remove unwanted sound from audio online simply with a “Clean Audio” tab. The service includes a background noise remover tool that isolates speech patterns and reduces background noise for cleaner audio. A wide array of video editing tools are available, such as trimming, compressing, resizing, adding text, overlays, and more. The built-in meme and image editing tools make it popular for social media content.
Both free and paid plans provide background noise removal feature, but with different features and export options. Free version only exports videos in 720p up to 4 minutes long. The “Clean Audio” tab is not obvious, some newbies may fail to find the option. Below is how to use Kapwing to remove background noise from audio online free.
How to Remove Background Noise from Audio with Kapwing
Step 1. Open https://www.kapwing.com/tools/remove-background/noise, click “Upload video or audio” button, and select the video or audio with the unwanted background noise that you wish to eliminate.
Step 2. Wait for the audio file to upload. Navigate to the "Edit" tab and select the "Clean Audio" option. The "Clean Audio" tab turns to be grey when the file is not uploaded successfully.
Step 3. After completing the background noise removal process, simply click on "Export Project."
#4. Media.io
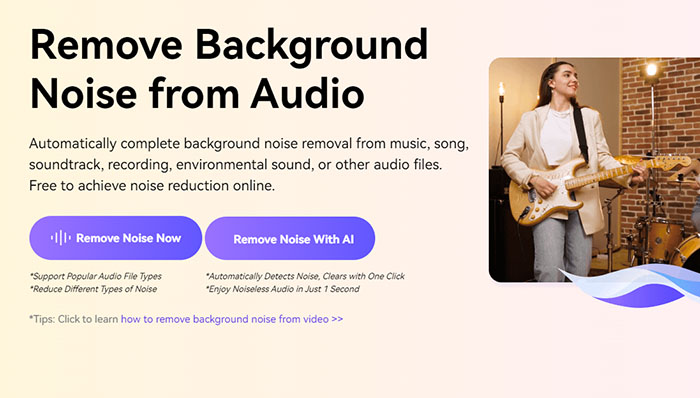
Media.io is another top rated online background noise removal tool with a good user base. It swiftly diminishes any audio noise, regardless of the audio file format you import, be it MP3, AAC, M4A, OGG, WMA, or others. Any background noise, including traffic, wind, static, hiss, fan noise, etc. can be removed easily with high sound quality. Media.io's noise reducer is tailored to fine-tune the noise decibel levels and optimize the audio noise reduction process for achieving the best possible output.
However, the online background noise removal tool lack intricate controls for professional users who are seeking highly customized noise reduction adjustments. The effectiveness of noise reduction might vary depending on the quality and complexity of the audio, potentially leading to inconsistent outcomes. The video or audio uploading process is still time-consuming. Anyway, it’s quite easy to remove background noise from audio with Media.io.
How to Do Background Noise Removal with Media.io
Step 1. Go to Media.io background noise removal page. Click the purple “Remove Noise Now” button, then on the Upload audio window, click the Upload icon and select an audio file to upload. The audio file should upload quickly.
Step 2. Select noise reduction type from the list. There are several different reduction types, including speech enhancement, denoise, wind noise, reverb noise, click noise, and hiss noise.
Step 3. Click the Separate now button to start the background noise removal process.
Step 4. A processing bar appears. Wait for the process to complete, then download the file to your device.
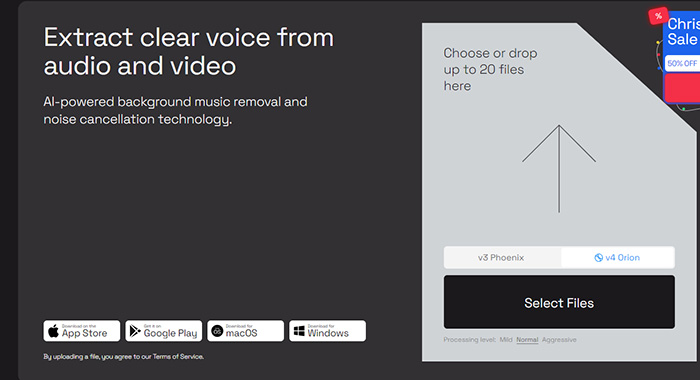
#5. LALAL.AI
LALAL.AI has a standard web-based version that allows users to remove background noise from audio free. In 2022, LALAL.AI also rolled out desktop apps for Windows, macOS, and Linux. Now, you can use LALAL.AI to remove background noise from audio on Android, iPhone, Windows, macOS, and Linux, nearly any platform. It supports MP3, OGG, WAV, FLAC, AIFF, and AAC. Video formats support is limited to AVI, MP4, and MKV. Through its distinctive algorithm, it effectively eliminates undesired sounds, resulting in tracks featuring exceptionally clear vocals.
LALAL.AI uses AI to enhance and clean up audio recordings, particularly focused on voice. If your primary requirement is to enhance vocal recordings or speech clarity, it might be a suitable choice. It’s likely to disappoint users who are looking for a broader range of audio editing features beyond noise removal. The free Starter plan is only for listening only.
How to Clean Voice Online with LALAL.AI
Step 1. Open LALAL.AI Voice Cleaner webpage. Click the Select File button at the right side to open the file upload window. Select the audio or video file you’d like to process to import. The generating previews starts.
Step 2. Select the plan you prefer, such as Pro, Plus, Lite, and Starter. The Starter plan only supports listening.
Step 3. Click the Process the Entire File button to start background noise removal.
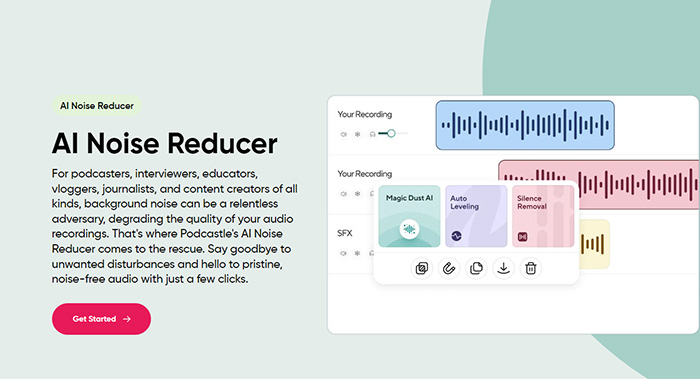
#6. Podcastle.AI
Podcastle.ai is a go-to choice for podcasters, specially designed to enhance podcast audio quality. Podcastle is optimized to improve dialogue clarity, essential for podcast episodes featuring conversations or interviews. The tool uses AI technology to automate audio editing tasks, including noise reduction, volume leveling, and audio enhancement. You can get some basic audio editin features like removing background noise, equalizing audio, and improving overall sound quality, catering to podcasting needs.
Podcastle.ai emphasizes ease of use and podcast-focused features but lacks versatile approach to audio enhancement. Only the Magic Dust feature can be used to remove background noise from audio automatically.
How to Use Magic Dust Feature in Podcastle.AI
Step 1. Open https://podcastle.ai/tools/remove-background-noise-from-audio, click Get Started. Log in with your account, or connect with your Google Account. Upload the audio file to Podcastle.
Step 2. Right-click the audio track when the audio file is uploaded. Select Magic Dust from the popping up option list. Podcastle.AI will start the background noise auto removal process.
Step 3. Save the audio track with noised removed to your device.
#7. iZotope RX
If you require professional-level noise reduction, especially for complex noise scenarios or critical audio restoration, iZotope RX is the preferred choice due to its advanced algorithms and specialized tools. iZotope RX has different modules based on several types of processors to tackle different audio problems, including Denoise processor, De-click processor, Decrackler processor, and De-clip processor. The background noise removal tool offers more control and precision over noise reduction settings, making it suitable for users who require fine-tuning and advanced adjustments.
The extensive range of features and tools in iZotope RX also means a steep learning curve for beginners or users unfamiliar with audio processing terminology. The advanced algorithms and real-time processing demands can require significant system resources, potentially leading to performance issues on less powerful computers.
How to Remove Background Noise from Audio with iZotope RX
Step 1. Open iZotope RX and import the audio file from which you want to remove background noise.
Step 2. Use the Spectrogram view to identify the sections of the audio where the background noise is most prominent. The spectrogram visually represents the audio's frequency content over time. In the Spectrogram view, select a portion of the audio that contains only the background noise.
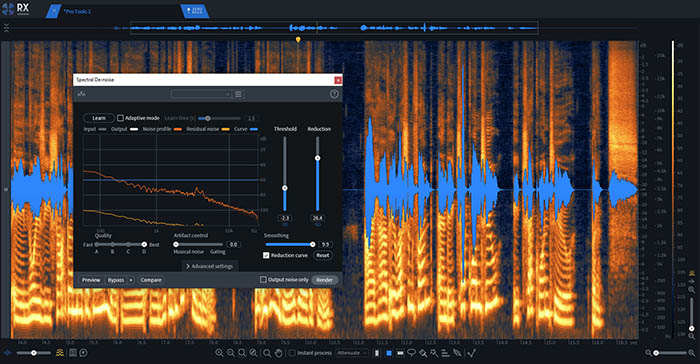
Step 3. Click the "RX Modules" menu and select the appropriate noise reduction module, such as "Voice De-noise" or "Dialogue De-noise." Apply the module to the entire audio or the sections with noise. You can adjust the noise reduction settings to fine-tune the removal process.
Step 4. Use the real-time preview to listen to the effects. If needed, you can undo the changes or adjust the settings further.
Step 5. Export the audio file in your desired format once you are satisfied with the noise reduction result.
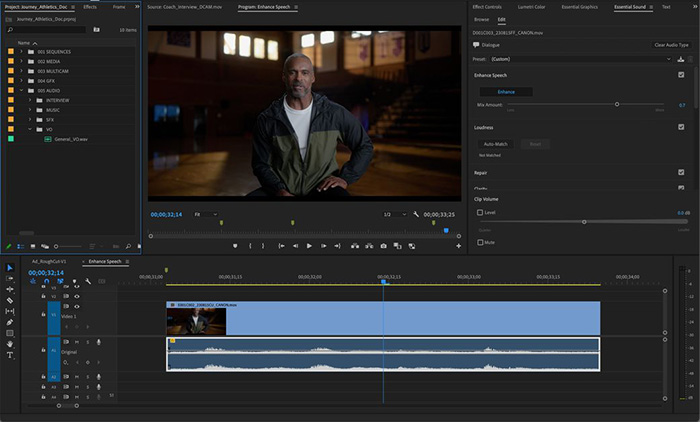
#8. Adobe Premiere Pro
Adobe Premiere Pro includes Reduce Noise and advanced options like DeNoise that can help reduce some types of background noise, such as constant hum or hiss. It offers sliders for adjusting parameters like "Noise Reduction" and "Reduce by." This can be useful for quick fixes or minor noise reduction needs. The Essential Sound panel is equipped with a comprehensive set of tools that empower you to fine-tune and elevate even the most intricate audio recordings.
Mastering Premiere Pro's noise reduction tools might require some learning if you are new to Premiere Pro. The noise reduction tool may struggle with situations where the noise level is very close to the desired audio content, making it difficult to achieve effective noise reduction without affecting the audio you want to keep.
Read More: How to Remove Background Noise in Adobe Premiere Pro
How to Denoise with Adobe Premiere Pro
Step 1. Launch Adobe Premiere Pro. Go to the menu and click on Window › Effects.
Step 2. Import the audio or video you want to work with. Double-click on Audio Effects › Noise Reduction/Restoration › DeNoise to apply the denoise effect.
Step 3. Access the Effect Controls by selecting Edit. Inside, you can manipulate the Reduction knob. For a starting point, consider shifting it until it displays a value of -10dB. Note that all clips initiate with a zero value.
Step 4. Preview the audio effect by pressing the Play button.
#9. Adobe Audition
If you need to perform detailed and complex audio restoration tasks, such as removing challenging background noise from audio recordings, Adobe Audition would be the better choice than Adobe Premiere. Its advanced spectral editing and specialized noise reduction tools are designed to handle these scenarios effectively. Audition provides advanced spectral editing tools that allow you to visualize and manipulate the audio's frequency content. This is particularly useful for pinpointing and removing specific types of background noise. Real-time preview is supported. You can preview the noise reduction effect in real-time, allowing you to adjust settings and hear the results immediately.
It might take time to fully understand and utilize its noise reduction tools effectively. Adobe Audition is a part of Adobe's Creative Cloud suite, which involves subscription-based pricing - $20.99/month. Audition's powerful tools might also require a good understanding of audio frequencies and the intricacies of audio restoration. Achieving optimal results might require careful adjustment of various parameters, which can be challenging for those without a background in audio editing.
How to Do Background Noise Removal from Audio in Audition
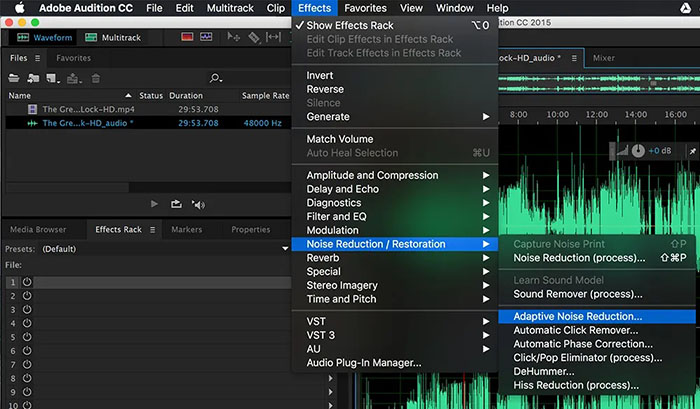
Step 1. Import your audio file to Audition. Then, navigate to Effects > Noise Reduction / Restoration > Hiss Reduction.
Step 2. Sample the audio containing the hiss, and in the dialog box, utilize the "Capture Noise Floor" function. For an isolated assessment of the hiss, activate "Output Hiss Only." Adjust the reduction parameters through the provided slider controls.
Tips: for addressing background noise, access Effects > Noise Reduction / Restoration > Noise Reduction. Proceed to select the audio segment containing the hiss, and utilize "Capture Noise Print."
Step 3. To achieve optimal outcomes, experiment with the Noise Reduction and Reduce By sliders, fine-tuning them to suit your requirements.
#10. Audacity
Audacity is a free, open-source audio editing software known for its simplicity and ease of use. It offers some basic noise reduction tools that can be effective for casual users and simple noise reduction tasks. The program is available for Windows, macOS, and Linux, allowing users across different operating systems to use the software to remove background noise from audio. The Noise Reduction feature enables you to choose how much noise you want to filtered out, such as Noise reduction (dB), sensitivity, and frequency smoothing (bands).
It lacks the fine-tuned control and advanced algorithms that specialized software like Audition offers. Aggressive noise reduction in Audacity can sometimes lead to audio quality degradation or introduce artifacts. However, even if you're new to audio editing, Audacity's straightforward interface and abundance of online tutorials and guides can help you get started quickly.
How to Do Noise Reduction with Audacity
Step 1. Open Audacity on your computer. Identify a portion of the audio where only the background noise is present, and there is no desired audio. This will be used to create a "noise profile."
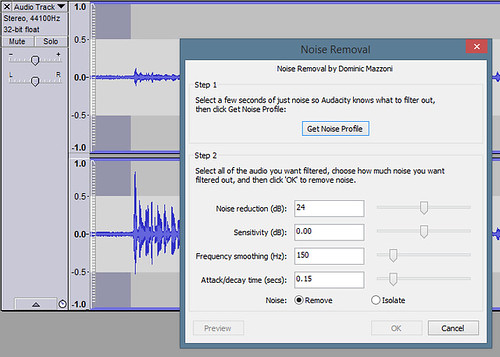
Step 2. Select Effect > Noise Removal and Repair > Noise Reduction, the Noise Reduction window should appear. Click on the "Get Noise Profile" button. Audacity will analyze the selected noise and create a noise profile.
Step 3. Adjust the settings as needed:
Noise Reduction: This determines the strength of the noise reduction effect. Start with a conservative value and increase gradually if needed.
Sensitivity: This controls how aggressively Audacity identifies noise. Higher values might remove more noise but could also affect desired audio.
Frequency Smoothing: Helps preserve audio quality by reducing potential artifacts.
Step 4. Click the "Preview" button to hear a preview of the noise reduction effect. Adjust the settings until you're satisfied with the results. Once ready, click "OK" to apply the effect. Then, save the cleaned audio using "File" > "Export."
Conclusion
In conclusion, if you're looking for basic audio editing or are new to audio editing, Audacity and online tools are great starting points. If you need advanced audio editing capabilities within a video editing context, or if you're already experienced with Adobe's suite of tools, Premiere Pro can offer more comprehensive options. Want to advanced editing features ad ease of use? Then WinXVideo AI can fit your bet.


