


Premiere Pro Time Interpolation User Guide
 Mike Rule
Updated on
Premiere Pro Time Interpolation, also can be called a Frame Interpolation method, refers to the method to calculate the frames between two keyframes to create smooth motion when changing duration and speed of a video clip. Premiere Pro offers three Time Interpolation modes, including Frame Sampling, Frame Blending, and Optical Flow for different situations. To know what they are and when to use them, let’s dive deep.
What is Time Interpolation in Premiere Pro?
After you drag your video clip to the timeline, right-click on the clip and you will see the Time Interpolation option. Click on the Time Interpolation option, and you will see the three modes.
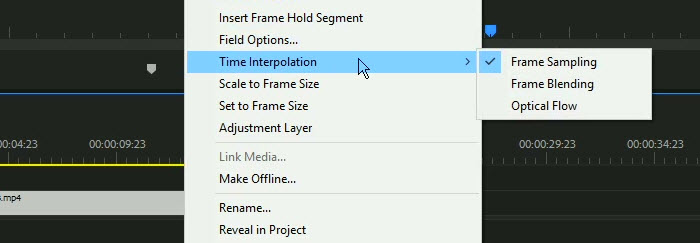
You can also access all the Time Interpolation methods using one of the following options:
- Click Clip in the menu bar > Video Option > Time Interpolation > Frame Sampling | Frame Blending | Optical Flow.
- Right-click on the clip > choose Speed/Duration > Time Interpolation.
- Open the Export Settings dialog and use the Time Interpolation drop-down (this option only applies to the exported media).
1. Premiere Pro Frame Sampling
Frame Sampling is the default option when trying to use Premiere Pro to change the speed of a clip. Frame Sampling duplicates or removes frames when you slow down or speed up a clip. Premiere Pro Frame Sampling is based on the concept of persistence of vision, which means that the human eye can hold onto an image for a brief period after it disappears. Through replicating frames, Frame Sampling gives the impression of fluid motion, despite the fact that the frame rate itself stays the same.
Frame Sampling can enhance the flow between two video clips, particularly when there are distinct variations in motion or lighting across the scenes. If you want to make a slow-motion video, Frame Sampling helps to create the slow-motion effect by generating additional frames, and makes the effect look natural. Also, when dealing with fast-paced action videos or low FPS videos, Frame Sampling helps reduce the appearance of motion jerkiness.
However, as it is a frame duplication way, it may result in stuttering or uneven motion when processing characteristics that have a complicated motion trajectory. Frame Sampling is best for smooth movements.
2. Premiere Pro Frame Blending
Premiere Pro Frame Blending is also employed to enhance the visual fluidity of footage that is either in slow motion or accelerated. By activating the Frame Blending mode, Premiere Pro seamlessly merges neighboring frames and generates a fresh frame to bridge any gaps, resulting in a seamless and fluid motion.
Frame Blending is particularly useful when processing clips that have varying frame rates, thus to prevent choppy or jumpy motion. It can be used to polish any uneven areas in the video footage. Also, if needed, it can create motion blur effects.
Unlike Frame Sampling that is best for simple and smooth and motion, Frame Blending performs better when there are lots of motion changes in the video. If the video remains relatively still, the impact may not be as apparent. However, an overuse of Frame Blending can occasionally result in a phenomenon known as 'ghosting', wherein the blended frames become apparent and introduce a slight blur between each real frame.
3. Premiere Pro Optical Flow
Optical Flow is an advanced interpolation method that can analyze pixel motion and generate completely new frames where there wasn’t any before to fill the gaps between keyframes. Compared to the above two methods, it can generate the smoothest results but it may require significant computational resources.
However, sometimes the results will not look smooth and natural. Optical Flow is best for working with videos with simple motion, such as skiing videos without rotation, jump, or turns. Also, remember to render the video after applying the Optical Flow function to make the effect more natural.
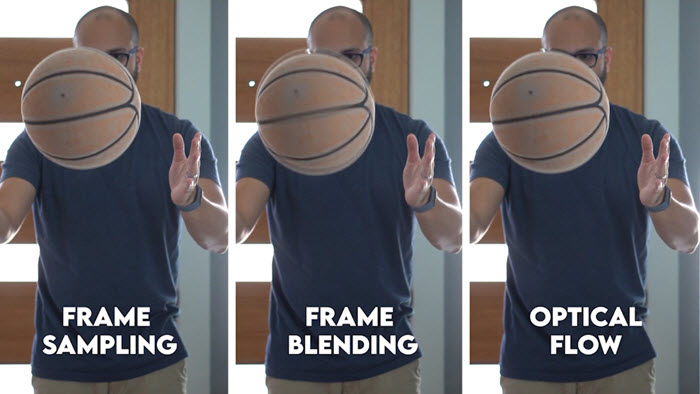
Frame Sampling vs. Frame Blending vs. Optical Flow
Here are a picture and comparison table to show you the differences between Frame Sampling and Frame Blending and Optical Flow.
| Pros | Cons | |
|---|---|---|
| Frame Sampling | Best for smooth movements. Natural result, no image distortion. |
Many duplicated frames. Not suitable for complicated motion. |
| Frame Blending | Best for varying frame rates. Polish uneven areas. Make motion blur effect. |
Cause 'ghosting' effect. Not suitable for relatively still videos. |
| Optical Flow | Best for videos with simple motion. Smoothest results compared to the other two methods. |
Cause distortion. Require significant computational resources. |
How to Apply Time Interpolation in Premiere Pro
Time Interpolation helps create smooth motion when changing clip speed. Follow these steps to apply it properly:
Step 1. Import and place your clip
Bring your video clip into Premiere Pro and drag it onto the timeline where you want it to appear.
Tip: Arrange your clips in the timeline first to avoid adjusting multiple clips later.
Step 2. Open the Speed/Duration settings
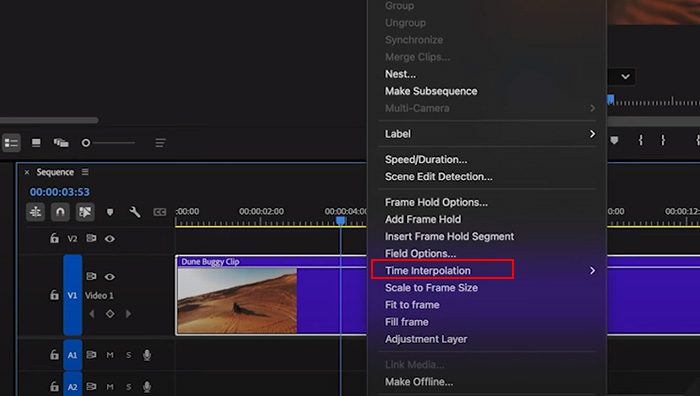
Right-click on the clip in the timeline and select Speed/Duration from the context menu.
Tip: You can also press Ctrl+R (Windows) or Cmd+R (Mac) as a shortcut.
Step 3. Choose Time Interpolation
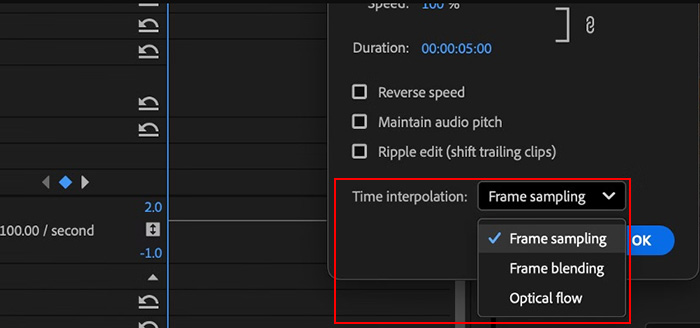
In the Speed/Duration dialog box, locate the Time Interpolation dropdown menu.
Step 4. Select an interpolation method
Pick the method that fits your video:
- Frame Sampling: Duplicates or removes frames to maintain motion. Best for smooth, simple movements.
- Frame Blending: Blends neighboring frames for smoother motion. Good for varying frame rates or uneven footage, but may create ghosting.
- Optical Flow: Generates new frames by analyzing pixel motion. Produces the smoothest results, ideal for simple motion, but uses more CPU/GPU resources.
Tip: Try the chosen method on a short section first to see how it affects playback quality.
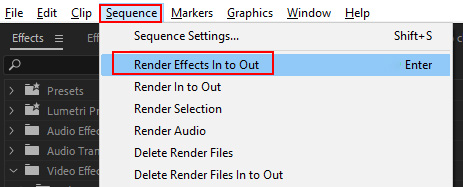
Step 5. Render the effect
Premiere Pro may not play these effects in real-time. To render, go to the menu bar and select Sequence > Render Effects In to Out or press the Enter key. This ensures smooth playback.
Tip: Rendering is especially important for Optical Flow, as it requires more processing power to calculate new frames.
 FAQs about Premiere Pro Time Interpolation
Time interpolation in Premiere Pro determines how new frames are generated when changing clip speed. It offers options like Frame Sampling, Frame Blending, and Optical Flow to control motion smoothness and quality when slowing down or speeding up footage.
Use Frame Sampling for quick edits, Frame Blending for smoother but less precise motion, and Optical Flow for the most natural slow motion. The best choice depends on your footage type, motion complexity, and desired quality.
Right-click your clip on the timeline, choose “Speed/Duration,” and in the dialog box, select Optical Flow under Time Interpolation. Then render the clip for smooth playback, since real-time preview may appear choppy before rendering.
Optical Flow may create warping or ghosting when objects move too fast or backgrounds have complex patterns. To reduce artifacts, try masking, cutting problematic sections, or lowering the speed change percentage for better results.
Yes. By setting your sequence to 60fps and applying Optical Flow, Premiere Pro can generate in-between frames. However, for extremely smooth results, specialized AI frame interpolation tools may provide better accuracy than Premiere alone.


