What Is the Best Format to Export from Premiere Pro for YouTube/Ins
Premiere Pro is one of the most popular video editing software that offers the most advanced features, from adding effects, changing color grading, stabilizing shaky video, to motion tracking. These changes result in good outcome if you export video in a proper format. But they can also be ruined when you choose the wrong format while exporting a video in premiere Pro. Typically,a bad exporting format will lower the video quality, cause compatibility issue when sharing to YouTube, and even burden your computer CPU. So what is the best format to export from Premiere Pro?
You may be overwhelmed by the large amount of options available in the export table in premiere pro. But don’t worry, here is the best export format for adobe premiere pro to make your project look and sound well on any platform.
Table of Contents
Part 1. Consider Where the Video Will Be Uploaded or Viewed before Choosing an Export Format
Video formats are not created equally. Some formats like H.264 are good for sharing to YouTube, Some formats such as MOV are good for playing on QuickTime, while some format like HEVC are great for storage purpose. It is somehow tricky to select the optimal format since it solely is dependent on the platform where you are going to share your final video and the device what you will play with. So you’d better ask yourself what’s your plan to do with the final video.
- Will you upload the exported video to YouTube/Instagram?
- Do you want to send it via email?
- Are you on the hunt for the highest possible version?
- Do you want to export video for collaborative work?
Whatever your purpose, here we will explain 4 commonly exported formats, and share the most suitable format in Premiere Pro in accordance to your final need even if you are unfamiliar with the video platform well.
Part 2. The Basics: Top 5 Best Formats to Export from Premiere Pro
There are a few standard video format that is compatible with most devices and platforms. Here are the 5 commonly used formats and codecs when exporting a video from Premiere Pro.
H.264: H.264 encodes video in a relatively smaller file size while maintaining high quality. Specifically, exporting video in format H.264 will render fast and produce good quality without ridiculously large file size. It is the standard for Blu-ray disc, widely used for online platforms like YouTube, video and ensures smooth playback. It is the most common format for video exports through Premiere Pro.
H.265: H.265, aka HEVC, is one of the latest video codecs featuring high compression efficiency. Compared with H.254, H.265 promises 25-50% more efficient compression. This helps to encode large formats like 4K and 8K at the lowest possible bitrate while ensuring a relatively high image quality. The new codec, however, requires more processing power, and rendering time can be relatively slower than that of H.264. Specifically, older computers cannot deal with the computer-intensive HEVC codec nor can you watch video unless you download HEVC codec extension beforehand. But if your computer is relatively modern and you want to use Premiere Pro to export a video in high quality but small size, HEVC is the optimal format to choose.
QuickTime MOV: MOV manages to export with an Alpha channel and maintain a higher image quality at the expense of compressing less file, which therefore leaves the file with considerably larger size. It is a best option to export a video if you need to further edit the file format in Premiere Pro. Plus, MOV is also the best format to choose if you are working with Apple ecosystem.
AVI: Uncompressed AVI ensures to maximize the highest possible quality but comes at the expense of huge file size. This is also the best format to export from premiere pro if you want the highest quality and have time to wait.
TIFF: TIFF sequence manages to output each frame individually and save it as a TIFF photo, which therefore enables you to quickly start back at the frame when there is a render failure. So if you are editing a longer video, TIFF is the most suitable format in Premiere pro to export?
A good format for premiere Pro to export is all about striking a good balance among quality, file size and playability. High quality settings increase overall file size and impact streaming performance on slower network, and vice versa. In this respect, H.264 is probably the best format to export from Premiere Pro, if without any concern about other settings.
Part 3. Other Video Settings to Be Considered While Exporting from Premiere Pro
In addition to the video format and codec that matters the playback, the export settings for Premiere pro like aspect ratio, bitrate, and many more also make the outcome different, determining how long it will take to export, together with the quality and file size of the exported file. Here what we are mentioning is all about the balanced settings that manage to export video with high quality, small file size and good compatibility.
To know more about the best export settings for Premiere Pro for YouTube, please click here >>
Presets: There is a long list of presets adobe Premiere Pro offers, which are especially helpful for beginners who don’t want to waste time learning the export option. You can choose the export profiles as per your needs. For example, if you want to share your project on YouTube, the best format and profile to export from premiere pro is the YouTube presets, ranging from 480p SD to 4k ultra HD. There is a caveat: if your source video is low in resolution, the high-quality preset doesn’t help to improve the quality only leaves your video huge in size.
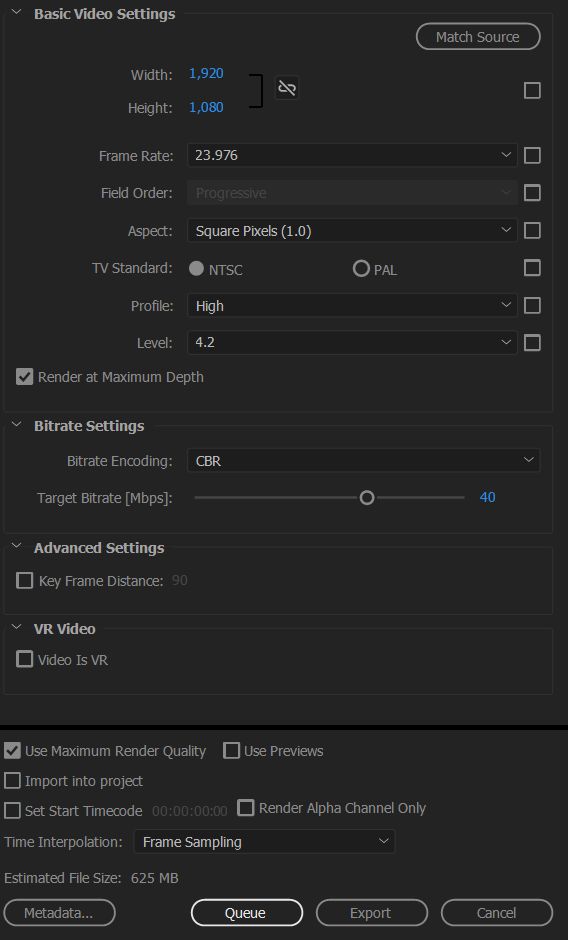
Resolution and Aspect ratio: You can change the width and height of the video by unchecking the box next to them or automatically match the sequence settings. For old TV look, you can change aspect ratio at 4:3, width and height at 1920x1443. Most higher resolution videos have a 16:9 aspect ratio. Some platforms like YoUTube Shorts, or Instagram Stories prefer a vertical 9:16 aspect ratio and 1080x1920 resolution.
Frame rate: It is advised to keep the frame rate the same as original. Upping the frame rate, e.g. from 30fps to 60fps, won’t improve the quality of the video but instead ruin the quality if the original video doesn’t offer enough frames to show in second. The best option is 23.976 since most cameras take footage at a frame rate of 23.976 or higher. But in some circumstance, higher frame rate produces better result. For example, if you are going to export motion graphics in Premiere Pro. You can choose higher frame rate.
Check the box Render at maximum depth: If you don’t want to see any wavy video, and involve in any fast motion in your video footage, please check the option Render at maximum depth. This focuses on rendering high contrast elements in your video. Please note:You will be warned with a message: Setting the Optimize Rendering preference to memory is highly recommended when max quality or max bit depth rendering is on. These settings are designed for high performance systems and increase the rendering time. If you have a low-end computer with low core, think again, it may cause problem exporting video.
Hardware or software encoding: This exerts great impact on the overall quality and file size of the video you are exporting. The former is faster but renders low-quality video. If you want a quicker rendering process, and don’t mind of the resolution and quality, it is a good option. The latter ensures higher image quality but takes longer time to export and file size will be larger. Some edits such as a non-accelerated effect or transition like Camera Blur, Unsharp Mask, etc are rendered in Software encoding even if you choose GPU rendering. So you can choose the export setting for premiere pro according to your own needs.
Profile: It tells the encoder which settings are allowed or preferred. Here are the recommendations of the export format for Premiere pro.
- Baseline: outdated and used for low-quality 480p and less.
- Main: for standard definition video
- High: for high quality footage and your video will be in high quality. It is highly recommended.
- High10: for extremely high quality video shot on raw cameras. This allows to export video in HDR. Check the Rec.2020 color primaries option.
Level: Choose the level at 5.1 or 5.2 if you want to export video at 1080p or 4k resolution. Higher level means better image quality. So if you want a tremendously improved quality, choose 5.2.
Bitrate: Higher bitrate brings about better quality, but also leads to bigger file size, which may cause problem such as you PC cannot handle the task properly. To upload video to YouTube, please check the size requirement. For example, the best bitrate for 4k 60fps video is 66-85 Mbps.
CBR/VBR 1pass/VBR 2 pass: CBR is good if your video doesn’t vary in complexity of the shots or you don’t have too much adjustment on the video. The latter two allows premiere pro to control the bitrate of the video where it wants. The difference is that the latter will do 2 passes and scan the video twice.
Part 4. Recommended Formats and Settings for Premiere Pro to Export in Diversified Needs
After you have a good understanding of the detailed formats to export from Premiere Pro, along with the detailed export settings, the following section will show you which format or settings to use when exporting a video in Premiere pro for you online platforms, storage or other purposes.
Settings |
Best Export Settings for YouTube |
Best Export Settings for Instagram |
Best Export Settings for Vimeo |
Format |
H.264 (.mp4) |
H.264 (.mp4) |
H.264 (.mp4) |
Frame size |
3840x2160 for YouTube 4K video. |
1080x1920 for Stories. |
Choose your source file's original width and height. If you wish to export your video at a smaller frame size, edit these values. If you aren't sure, leave them as-is. |
Aspect ratio |
16:9 |
1:1 (square) |
Square Pixels (1.0) |
Frame rate |
Keep it the same as your original footage. 23.976 fps is the safest option. |
30fps |
Keep it the same as your source video. |
Field order |
Progressive |
Progressive |
Progressive |
Encoding profile |
High |
High |
For HD footage, choose High. |
Encoding level |
4.2 (5.2 for 4K) |
4.2 |
4.2 |
Bitrate encoding |
VBR, 1pass |
VBR, 2pass |
VBR, 2pass |
Bitrate |
8 Mbps (45 Mbps for 4K) |
4 Mbps for 720p |
5-10 Mbps for 720p |
Audio codec |
AAC |
AAC |
AAC |
Sample rate |
48 kHz |
48 kHz |
48 kHz |
Channels |
Stereo |
Stereo |
Stereo |
Audio bitrate |
320 kbps |
320 kbps |
320 kbps |
Part 5. FAQ about Premiere Pro Export Format
1. How to export video from Adobe Premiere Pro as MP4 format?
Despite of its complicated interface and more bells and whistles, Premiere Pro offers a relatively straightforward process to export a video. How exactly a video gets exported? Here you can get started with premiere pro to export video freely by following the guide.
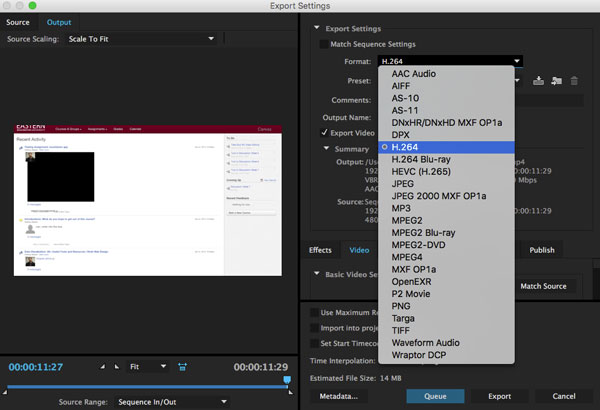
- To export a sequence as an MP4 video, make sure the Timeline panel is active, then choose File in the top menue bar > select the Export option > choose Media … option or press the keys Ctrl+M on Windows or Command+M on macOS platform. This will help to open the Export Settings panel.
- If you are going to export MP4 video format from Premiere Pro, make sure to choose H.264 instead of MPEG4. Here you can choose H.264 from the Format drop-down list in the Export Settings dialog box. Then select Match Source – High Bitrate next to Preset
- Open the Save As dialogue box by clicking the highlighted blue file name and choose an export location and name of the new file. Click Save.
- Click Export. The new video will be created and exported from Premiere Pro.
You can click to learn more about how to export Premiere Pro to MP4 as the best format >>
2. How to export video for social sharing/ online platform.
It depends. For one hand, if the final video will be further edited by others or is just used for archives, you are suggested to export the video in the highest possible quality: the original file straight from the camera.
For the other hand, video can be exported at a lower quality if someone just adds notes or markers. You’d better keep the format the same as original, which will help to make your timeline function well, especially when you are doing with coloring or similar edits in premiere pro.