


How to Upload DVD to YouTube on Windows/Mac?
 Donna Peng
Updated on
Summary: This is a tutorial on how to rip DVD collections to MP4 and YouTube accepted format/size/length and how to upload DVD to YouTube.
"I have a lot of DVDs including homemade DVDs and commercial-protected DVDs. I want to upload some DVD video clips to YouTube for sharing with other YouTubers, but I don't know how, because YouTube does not seem to support uploading DVDs directly. Can anyone suggest a solution? Many thanks."
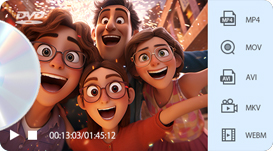
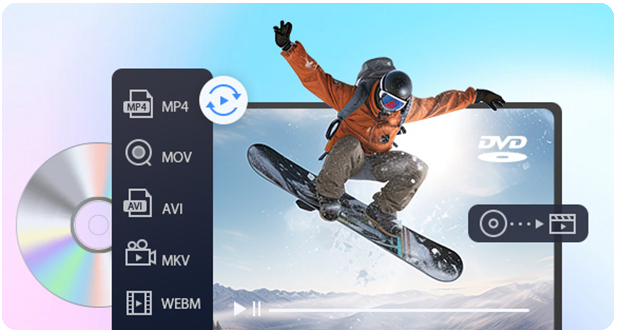
As a popular video-sharing site, YouTube is indeed a good option to upload and share your home-movies on DVD clips, like the wedding video, travel vlog, or memorable party moments. But have you noticed that you cannot directly upload DVDs to YouTube? There are some restrictions on video format - videos in MP4, MOV, 3GP, MPEG-4, FLV, AVI, WMV, WebM, etc. can be accepted by YouTube for uploading.[1] That's why you need to convert DVDs to YouTube-supported formats with DVD ripping software before uploading.
Notice! Some Restrictions You Should Know before Uploading DVD to YouTube
Besides video format [1], there are other restrictions you should know before uploading DVDs to YouTube.
- Uploading commercial DVD content to YouTube without proper authorization is illegal. [2]
- YouTube supports a wide range of video formats, including MP4, MOV, MPEG, AVI, WMV, FLV, 3GPP, WebM, ProRes, CineForm, and HEVC (h265). However, DVD and VOB formats are not directly supported. Learn more about YouTube supported formats.
- By default, you're only allowed to upload DVD files that's no more than 15 minutes. To upload longer videos, verify your account first. [3]
- For optimal video display on YouTube, a 16:9 aspect ratio is recommended. [4] Uploading 4:3 videos may result in black bars or distorted video. So please convert the DVD video from 4:3 to 16:9.
- YouTube prefers high-definition videos. The minimum resolution recommended is 1280 x 720 for 16:9 aspect ratio and 640 x 480 for 4:3 aspect ratio.
- For smooth playback, the frame rate (fps) should be between 24 and 30.
Step 1. Rip DVD to YouTube Accepted File Format
As recommended above, we can use WinX DVD Ripper Platinum to rip any DVD to YouTube accepted format for uploading with ease. It can:
- Rip any DVD including home-movie DVDs, documentary DVDs, copy-protected and region-locked DVDs;
- Cut/trim DVD video length, add external subtitle to DVD content, crop video image, merge clips into 1, etc. No WinX watermark!
- Change DVD 4:3 aspect ratio to YouTube 16:9, adjust resolution, frame rate, bit rate, reduce file size to better fit YouTube.
- Switch interlaced scanning DVD video to progressive scanning to put better video effects on YouTube.
- Finish DVD ripping at 3X-5X faster speed than ordinary DVD rippers on the market. It's the fastest DVD ripper.
- Maintain the output in highest possible video audio quality, 98% quality kept!
 Free Download
 Free Download
It helps upload a DVD to YouTube on Windows 11, 10, 8.1, 8, 7, Vista, XP, etc. And its Mac version can assist you in uploading DVDs to YouTube on Mac OS X 10.6 or later, including the latest macOS Ventura.
First of all, download, install and launch this DVD ripper on your PC or Mac.
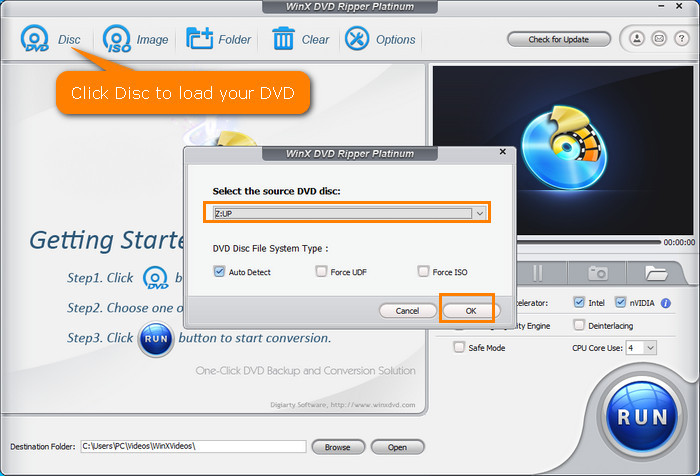
Step 1. Load the DVD you want to upload to YouTube.
Insert the DVD disc into DVD-ROM, and then click DVD Disc at the top left corner of the ripper to load the DVD. Typically, it will select the main title for you directly. Certainly, you can also choose anyone you like manually.
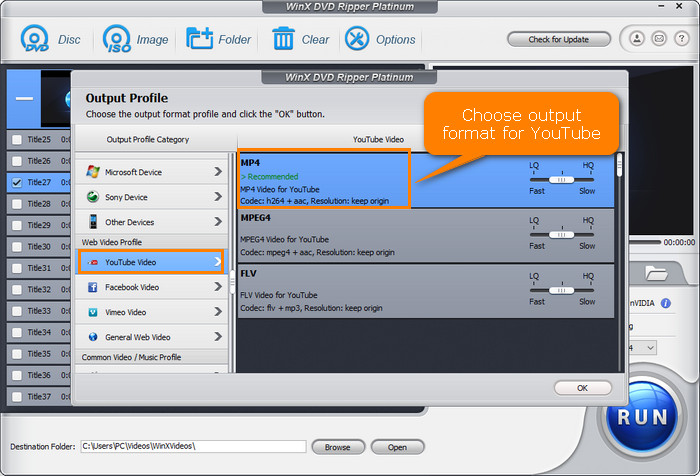
Step 2. Select an output format that YouTube supports.
This tool is badly user friendly, because it offers preloaded YouTube video profiles. Simply find one under the path: Web Video Profile -> YouTube Video. According to YouTube Help Center, an MP4 video format with H.264 video codec and AAC audio codec is the best choice for uploading on YouTube.
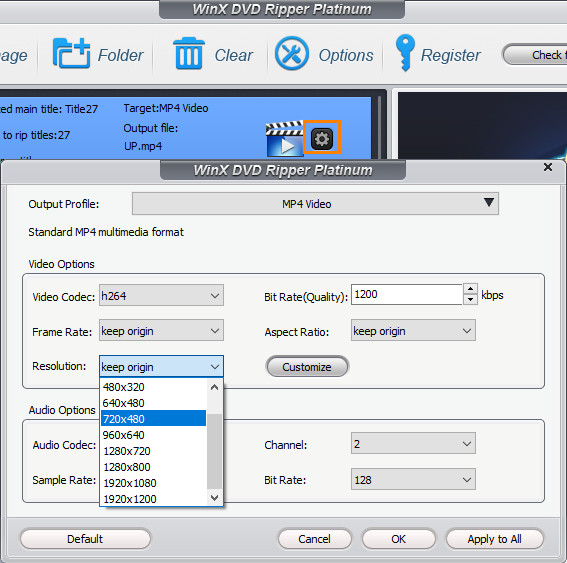
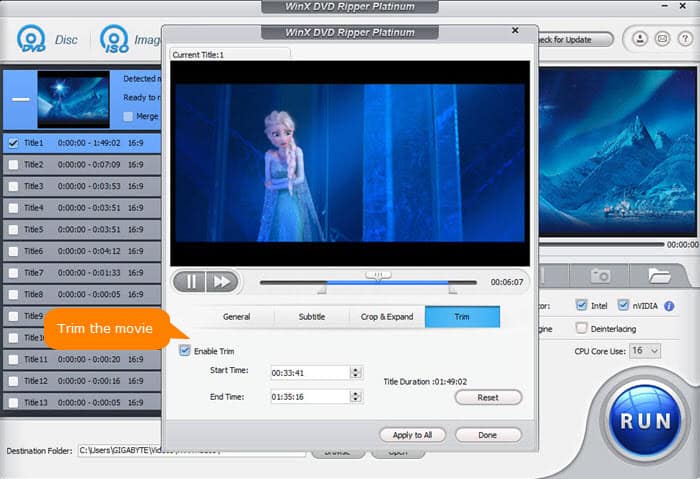
Step 3. Edit DVD video for uploading to YouTube. (Optional)
To set video audio parameters, simply click the gear icon.
Note:
- By default, users are allowed to upload videos no longer than 15 minutes. If you want to put longer DVD videos to YouTube, you should verify your account to increase your limit.
- With an up-to-date browser version, you can upload DVD files of more than 20GB. And the maximum file size is 128GB and the maximum duration is 11 hours. You can check the details from the post "best YouTube size for uploading".
- YouTube applies 16:9 aspect ratio players. If you are uploading a non-16:9 DVD video, it will be processed and displayed correctly as well, but with pillar boxes (black bars on the left and right) or letter boxes (black bars at the top and bottom) provided by the player. So you may want to change the aspect ratio from 4:3 to 16:9.
Step 4. Set destination folder and begin ripping DVD to YouTube.
If you wanna trim, crop, expand or modify subtitles, click the Edit button. Then click the Browse button to specify a folder to save ripped DVD videos. Then, hit the RUN button to begin ripping DVD to Youtube.
Disclaimer: Digiarty Software does not advocate ripping copy-protected DVDs for any commercial purpose and suggests referring to the DVD copyright laws in your countries before doing so.
Step 2. Upload DVD to YouTube on Windows/Mac
Warning: Please do not upload a DVD video that will violate others' copyright or privacy rights to YouTube.
After finishing the following steps, your DVD video will be able to transferred to YouTube.
Step 1. Open the YouTube website and login into YouTube. If you don't have an account, sign up for one.
Step 2. Click the Upload button at the top of the page.
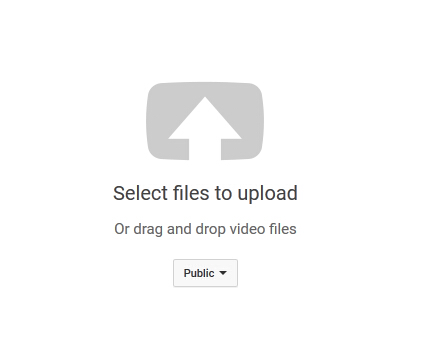
Step 3. Define the video privacy settings and select the DVD video you want to upload to YouTube.
Step 4. Edit the basic information and advanced settings of the DVD video while uploading. The uploading speed will vary depending on your file size, bandwidth, and YouTube server.
Step 5. Click Publish when finishing uploading a public video to YouTube. As for the private or unlisted videos, please click Done or Share. After uploading DVDs to YouTube, an email will pop up to notify you that your video has done uploading and processing.
 FAQs about Uploading DVD to YouTube
It's illegal to upload commercial DVD content to YouTube. Uploading DVD to YouTube for commercial use is not allowed, unless you are the copyright holder or creator. Unlicensed DVD content will be removed by YouTube upon upload.
If it’s a home-movie DVD you created, it’s fine. For commercial DVDs, it’s illegal and violates YouTube’s terms and copyright law. Setting to private doesn't bypass Content ID detection, and uploading any copyrighted content—even privately—is copyright infringement.
Rip the DVD to a YouTube-supported format first. Use WinX DVD Ripper for Mac:
Step 1. Install WinX DVD Ripper for Mac.
Step 2. Insert your DVD.
Step 3. Click the DVD Disc button.
Step 4. Choose YouTube Video output format, e.g. MP4.
Step 5. Set output folder via Browse.
Step 6. Click RUN to rip the DVD.
Then upload the ripped file to YouTube as usual.
Yes. WinX DVD Ripper includes a trim feature, letting you select and rip a specific video clip. The trim tool is accessible via the Edit button.
Ensure the video is authorized for download. Use a downloader or extension to save it. Then, use WinX DVD Author (Windows) or Disk Utility (Mac) to burn the video to DVD for personal use. Avoid using it commercially.
No. You must convert a Video_TS or VOB file to a YouTube-supported format like MP4 before uploading. Use a converter like WinX DVD Ripper to handle this.
No, WinX DVD Ripper does not add a watermark on the video output screen.
Rip CD audio to MP3 using iTunes or CD ripping software. Ensure your CD content is copyright-free or authorized. Then upload the MP3 file to YouTube. See a guide here.
Reference:
- Supported YouTube file formats - Google Help. Google
- Terms of Service. YouTube
- Upload videos longer than 15 minutes. Google
- YouTube recommended upload encoding settings. Google


