


-
Table of Contents
- Part 1. Prerequisites: Install HandBrake and libdvdcss
- Part 2. How to Rip DVD with HandBrake on Windows?
- Part 3. How to Rip DVD with HandBrake on Mac?
- Part 4. Why Won't HandBrake Rip DVD? How to Fix It?
- Part 5. FAQs
[2026 Tutorial] How to Rip Protected DVD with Handbrake on PC/Mac
HandBrake is one of the best free tools for digitizing your DVD collection, but running into copy protection or ripping errors is extremely common. This comprehensive guide walks you through the step-by-step process of successfully ripping DVDs with HandBrake, from downloading and setting up the software to the critical step of installing libdvdcss to help you handle copy-protected DVDs.
Additionally, we'll provide proven solutions to fix the most frustrating HandBrake ripping errors, such as "No valid source or titles found" and "can't rip the entire DVD", ensuring you get a perfect rip every time. Whether you're a tech whiz or a complete beginner, this comprehensive Handbrake guide will have you ripping DVDs like a pro in no time!
![]() Important Notice: HandBrake can't handle DVD copy protection schemes on its own
Important Notice: HandBrake can't handle DVD copy protection schemes on its own
Even with libdvdcss being installed, HandBrake can rip CSS-encrypted DVDs only. To rip DVDs with other DVD copy protections, you need a more powerful alternative like WinX DVD Ripper.
Main features of WinX DVD Ripper:
- Bypass CSS, UOPs, region code, Sony ARccOS, Disney X-Project, and more DVD copy protections on its own. No libdvdcss required.
- Rip DVD to MP4, AVI, MPEG, WMV, MOV, ISO, MP3, iPhone, iPad, Apple TV, Samsung, PS4, etc. 350+ output presets.
- Support GPU hardware acceleration and multi-core CPU. Rip a DVD in 5 minutes only.
- Built with High Quality Engine and Deinterlacing feature. Keep Original Quality.
- Allow customizing output: adjust video audio parameters, trim, crop, merge, subtitle, etc.
Table of Contents
- Part 1. Prerequisites to Rip DVD with HandBrake: Install HandBrake and libdvdcss
- Part 2. How to Rip a DVD with HandBrake on Windows (with Pictures and Video)
- Part 3. How to Rip a DVD with HandBrake on Mac (with Pictures and Video)
- Part 4. Why Won't HandBrake Rip DVD? How to Fix It?
- Part 5. FAQs about Ripping DVD with HandBrake
Part 1. Prerequisites to Rip DVD with HandBrake: Install HandBrake and libdvdcss
1. Download and install HandBrake DVD ripper.
HandBrake is a cross platform program. The current version 1.10.2 is available for Mac (macOS 10.13 and later), Windows (10 and later) and Linux Flatpak. As an open-source DVD ripper, it won't cost you a penny. Simply go to HandBrake.fr download center - the only official place to download HandBrake DVD ripper - to get a copy fit for your computer and install it following wizard.
The old releases of HandBrake are available here.
2. Download libdvdcss if you want to rip copy-protected DVD with HandBrake.
HandBrake itself can't rip commercially copy-protected DVDs. If you want to use HandBrake to rip encrypted DVDs (actually, almost all store-bought DVDs are copyright-protected), you should firstly download libdvdcss. libdvdcss is a part of VideoLAN project capable of reading and decrypting DVDs locked by region codes 1, 2, 3, 4, 5, 6 and CSS.
Get libdvdcss at: https://download.videolan.org/pub/libdvdcss/
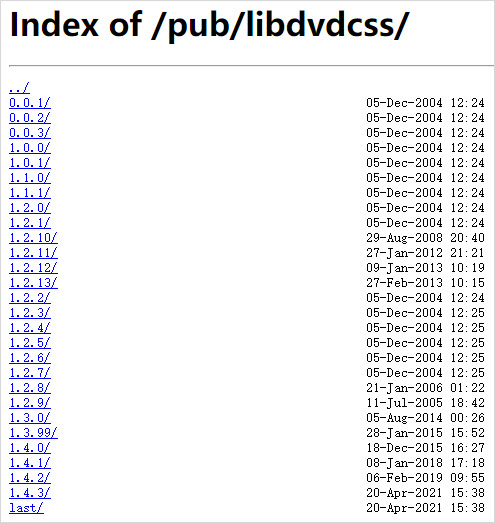
Here you'll find a selection of libdvdcss versions ranging from 0.0.1 to 1.5.0 as of November 9, 2026. You should select the appropriate file based on your operating system and the version of HandBrake you are using.
- For older versions (e.g., 1.2.12), click the version number to find pre-compiled binaries in subdirectories named macosx/, win32/, and win64/.
- For the latest version (1.5.0), we recommend following our detailed instructions below to ensure correct installation, especially for Mac users who may need to use the Homebrew command.
Please select the folder corresponding to your Windows system version to download the libdvdcss-2.dll file:
- If you're using a Windows 32-bit system, select the win32/ folder and download libdvdcss-2.dll.
- For Windows 64-bit, opt for win64/ and download libdvdcss-2.dll.

Note for Mac Users: Please skip the manual file download and proceed directly to the Homebrew installation steps below, as the manual PKG install method often fails on modern macOS versions.
Next, you can install libdvdcss on your computer. The process is different on Windows and Mac.
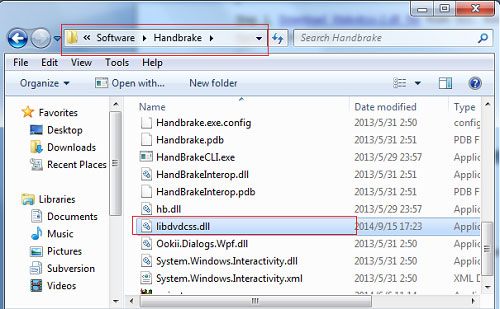
On Windows, you simply need to copy the downloaded libdvdcss-2.dll to HandBrake folder. Specifically, locate the downloaded libdvdcss-2.dll file and copy it to your HandBrake installation directory (typically C:\Program Files\HandBrake).
On Mac OS X Yosemite or older, you can download the libdvdcss package file and double click it to install. If you use Mac OS X El Capitan or later, you need to install libdvdcss via Homebrew. Follow these steps to install Homebrew and libdvdcss:
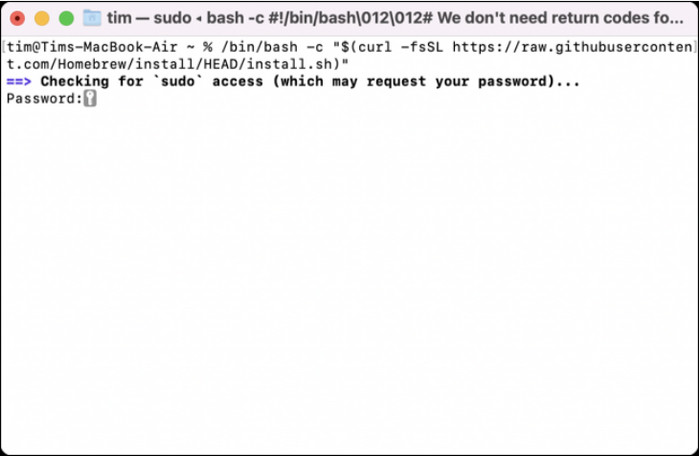
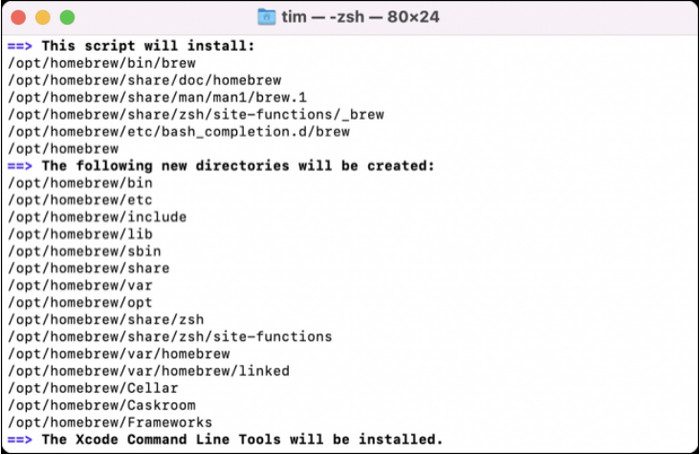
Step 1. Open Terminal: You can find it in the "Utilities" folder within the "Applications" folder, or you can use Spotlight search by pressing Command + Space and typing "Terminal".
Step 2. Install Homebrew: In the Terminal, paste the following command and press Enter: /bin/bash -c "$(curl -fsSL https://raw.githubusercontent.com/Homebrew/install/HEAD/install.sh)"
This command will download and execute the Homebrew installation script. You may be asked to enter your password to proceed. In this case, just enter your password.
Step 3. Wait for the Installation: The installation process will take a few minutes as Homebrew downloads and configures the necessary files.
After the installation finishes, you will receive instructions to to execute additional commands to ensure the brew command is recognized in your shell: eval $(/opt/homebrew/bin/brew shellenv)
If you don't do this, you'll get a "command not found: brew" when trying to run Homebrew commands.
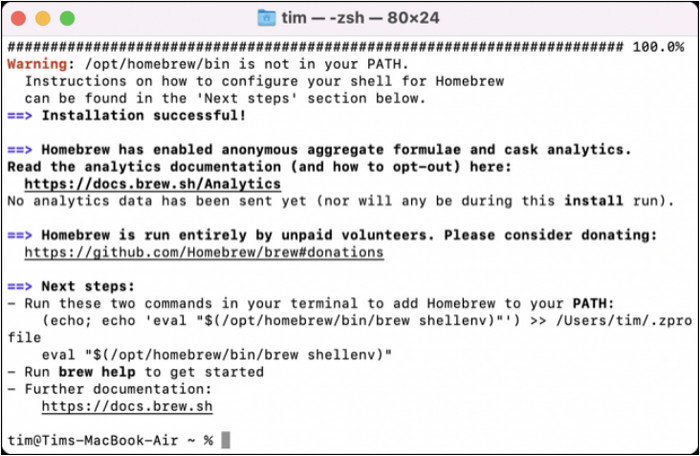
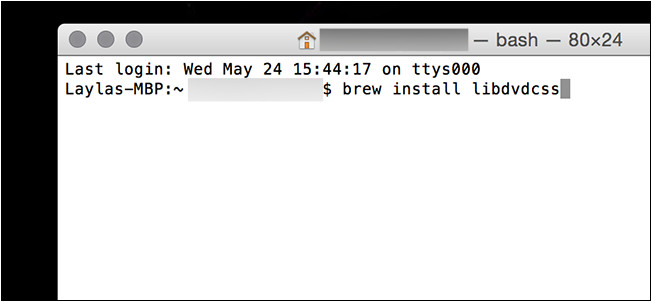
Step 4. Verify the Installation: Once Homebrew is successfully installed and configured, run the following command in the Terminal: brew install libdvdcss. Moments later, the libdvdcss will be installed on El Capitan or later.
Note: Using the Apple's Hardened Runtime, HandBrake 1.3 and higher versions can load only dynamic libraries that are signed with a valid Apple Developer ID certificate. However, HomeBrew libdvdcss is not signed. So, you'll get a scrambled DVD rip file when you use HandBrake 1.3 and later to rip a DVD on Mac. In this case, you can either install an older version like 1.2.2 or lower or install a HandBrake alternative to rip protected DVDs.
With libdvdcss installed, HandBrake now can rip CSS copy-protected DVDs.
Part 2. How to Rip a DVD with HandBrake on Windows
In this example I show how to rip a DVD with HandBrake on a Windows 10 PC, but the principle is the same for other systems.
Step 1. Load the DVD you want to rip into HandBrake.
Insert target DVD into the DVD drive of your computer. Then, open HandBrake and you will be able to see Source Selection where your DVD should be already detected. (Tips: HandBrake can also rip DVD VIDEO_TS folder and ISO file to mainstreaming format.)
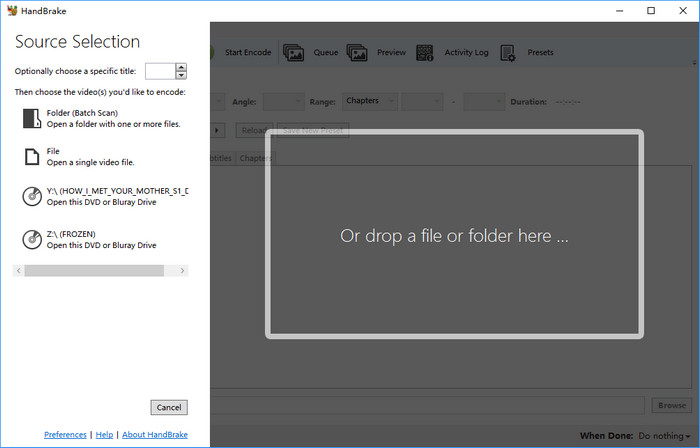
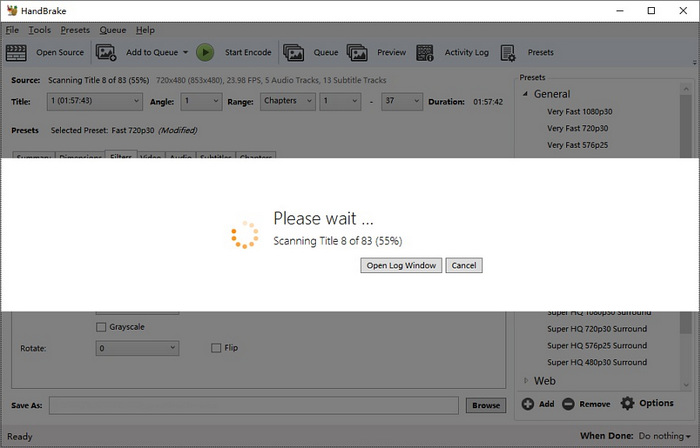
Click target DVD and HandBrake will begin scanning it. Scanning time varies with content on your disc.
Step 2. Choose the DVD title and chapter you want to rip.
HandBrake will select a title for you automatically, but you can click the Title drop-down menu to choose a different DVD title. All chapters of the selected title will be covered, but you can also specify it as needed.
Generally speaking, if it is a movie DVD, main movie part should be the one with the longest duration. But this rule doesn't apply to 99-title movie DVDs and HandBrake can't deal with such kind of disc. If it is a TV series DVD, simply select your favorite title/episode - each usually being 20 - 44 minutes. But in most cases we want to select all episodes to rip.
Well, how to select multiple titles in HandBrake?
After you select a title, choose a preset, and then you can click the drop-down arrow of Add to Queue. There're three options: Add Current, Add All and Add Selection.
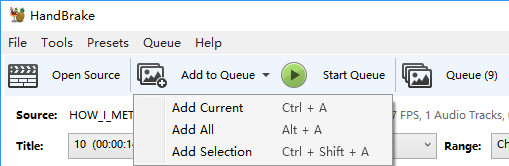
- When you click Add Current, HandBrake will add currently selected title to the queue.
- When you click Add All, HandBrake will add all DVD titles to the queue simultaneously.
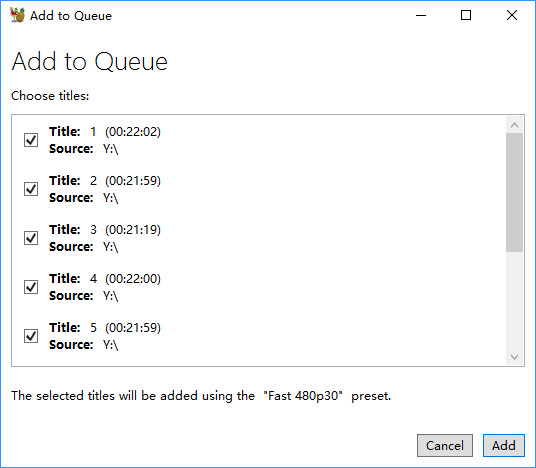
- When you choose Add Selection, HandBrake will pop up a window where you can specify which titles to add to queue.
So that's how to rip multiple titles off DVD or copy several/all episodes of TV show DVD.
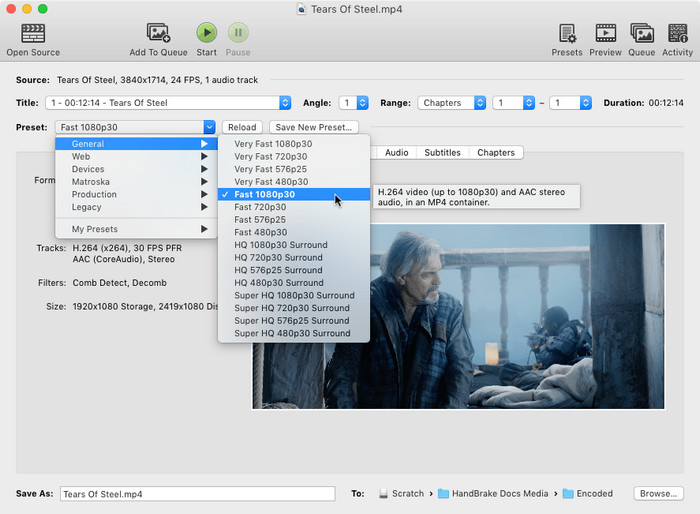
Step 3. Configure output.
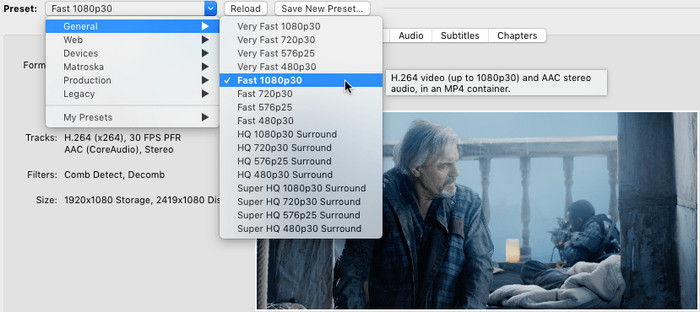
HandBrake DVD ripper empowers you to convert DVD to MP4, MKV, and WebM format. In addition, it offers dozens of output presets, grouped under General (1080p, 720p, 576p, 480p), Web (Gmail, YouTube, Vimeo, Discord), Devices (Android, Apple, Chromecast, Playstation, Amazon Fire, Roku, Xbox), Matroska (H.264, H.265, VP8, VP9), and Production. You can choose any one at will, or add personalized preset by clicking Save New Preset.
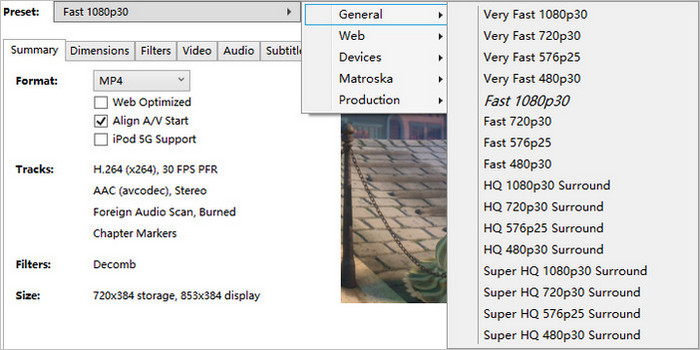
When choosing a preset, don't choose 720p and 1080p presets for DVDs. The resolution for PAL DVD is 720 x 576 (576p), while the resolution for NTSC DVD is 720 x 480 (480p). Choosing a larger preset won't make the output look better but bigger.
One more thing, "Fast" and "Very Fast" presets will sacrifice some output quality, while "HQ" and "Super HQ" presets will slow the DVD ripping speed and increase output file size.
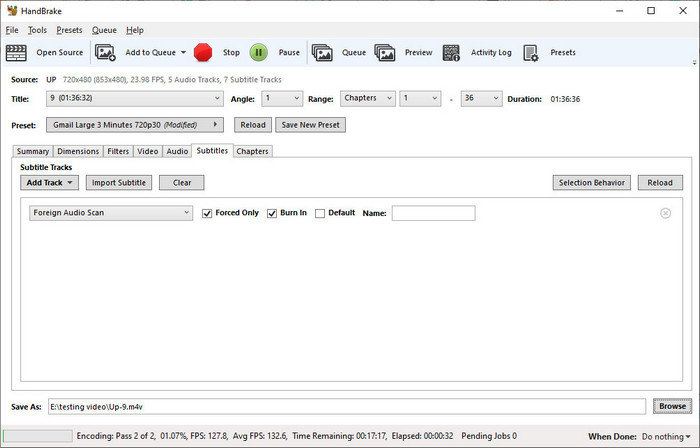
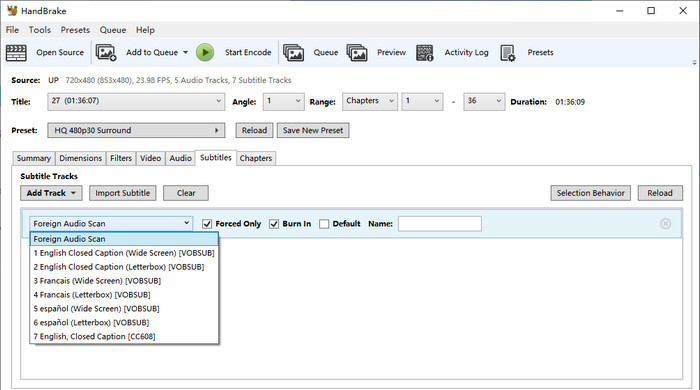
Besides container format and preset, HandBrake also allows you to select subtitle, specify audio track, tweak video parameters like codec and framerate, set quality, and do so much more. But if you know little about those features, just keep the default settings untouched. You can click here for more detailed Handbrake subtitles gudie.
Step 4. Adjust video settings (optional).
If you want the highest quality and most compatible rip, we recommend ignoring the presets and manually configuring these settings. This ensures the best balance between file size and video fidelity, especially for DVDs.
- Container: Ensure the format is set to MP4 (M4V).
- Video Codec: Select H.264.
- Quality: Set the Constant Quality (RF) slider to 20 for standard DVDs.
- Audio: Change the AAC Bitrate from 128 kbps to 192 kbps for significantly better audio fidelity.
Step 5. Specify the destination to save your DVD rip file.
Navigate to Save As section and then click Browse to choose the location for storing the resulting file. HandBrake allows you to rip DVD to computer hard drive or external storage devices.

Step 6. Ask HandBrake to rip DVD in no time.
If you have nothing to modify, simply click Start Encode button at the top menu bar to start ripping video/audio from DVD with HandBrake.

Then you will see a display bar and can estimate the time remaining to complete. So this is how to rip DVD with HandBrake on Windows. If you encounter an error, jump to "Part 4"
to find a solution.
By the way, we also have an article on how to rip Blu-Ray with HandBrake. If you have some Blu-Rays that you want to rip, click the link to read the article.
Watch video tutorial on how to rip a DVD with HandBrake (for beginners)
Part 3. How to Rip a DVD with HandBrake on Mac
Assuming you have already installed HandBrake and libdvdcss, follow these steps to rip your DVD on macOS:
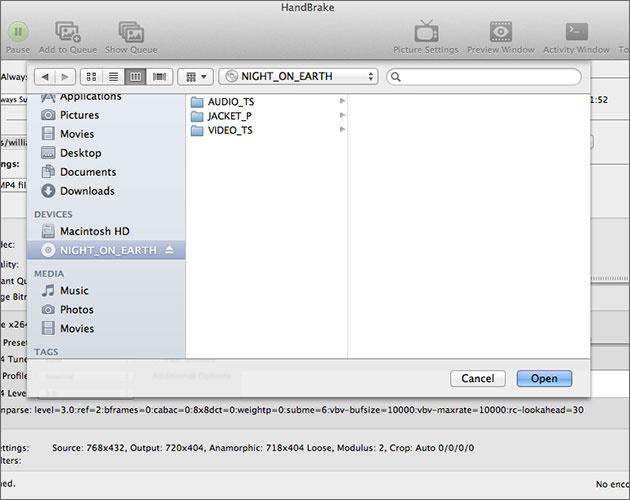
Step 1. Open the source DVD with HandBrake.
Insert the physical DVD you wish to rip into your Mac's optical drive. Launch HandBrake and it should automatically detect the DVD. If not, click the "Open Source" button in the top left corner, and select the DVD title (usually labeled by the disc name or drive name) from the sidebar. It will take a while for HandBrake to scan the titles on your DVD.
Step 2. Select the DVD title to rip.
Click on the box next to Title to choose the DVD title you want to rip. For commercial movies, select the title with the longest duration (this is generally the main feature). If you don't want to rip the whole title, you can also specify the range by setting starting and ending chapters, seconds or frames.

Step 3. Select preset or adjust parameters.
Click on the box next to Preset to choose the output format from the panel (e.g. General, Web, Devices). After that, you can click the Summary, Dimensions, Filters, Video, Audio, Subtitles, and Chapters tab to adjust settings futhe. For example, you can set Constant Quality to RF:20 or increase the AAC Bitrate to 192 kbps.
Step 4. Specify file name and location.
Enter a desired file name for the DVD rip file into the box next to Save As and click the Browse … button to select the location where the DVD rip file be saved.

Step 5. Start ripping DVD with HandBrake on Mac.
When you have done all settings, click the Add to Queue button located on the top toolbar. Click the Start button which looks like a green play button on the toolbar. Then, HandBrake will start ripping DVD on your Mac. You can check the ripping process in teh status bar at the bottom of the Window.
Part 4. Why Won't HandBrake Rip DVD? How to Fix It?
Various problems may occur when we use HandBrake to rip DVDs. Here, we pick out several common issues. If you fail to rip DVD with HandBrake because of one of the reasons, just head to the solution we provide.
1. No valid source or titles found
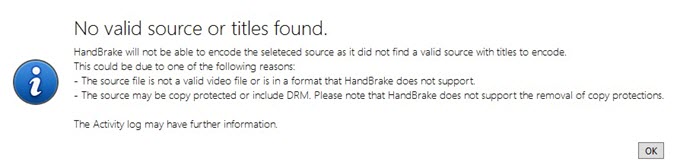
This error pops up after you attempt to open the source of DVD. Here are some common reasons:
- Copy protection: Some DVDs have encryption that prevents copying. HandBrake may not be able to access the content in these cases.
- Disc damage: Scratches or other physical damage on the DVD can make it unreadable.
- Drive permissions: On some systems, you might need specific permissions to access the DVD drive. Check your system settings to ensure you have read access.
- Short titles: HandBrake might skip titles shorter than a certain default duration. You can adjust this setting in HandBrake's preferences to include shorter titles like special features.
So, here are some solutions you can try to fix this error.
- For copy protection: Follow the steps above to download and install libdvdcss correctly on your computer. However, libdvdcss doesn't work for all DVD copy protections. If libdvdcss struggles, you can try a more powerful DVD decrypter.
- For disc damage: Inspect your DVD and check if your DVD is scratched or damaged. Try cleaning the disc with a soft, lint-free cloth.
- For drive permissions: If you encounter the "No valid source or titles found" error on Mac, it might be due to insufficient permissions for the source DVD. In this case, you can right-click the source DVD, select "Get Info", and then add yourself under "sharing & permissions". This can make sure you have read access.
- For shorter titles: Increase the minimum title duration to prevent HandBrake from skipping short titles, like special features or trailers. To adjust this setting, go to HandBrake > Tools > Preferences, look for the "Advanced" tab in the preferences and then you should find a setting labeled "Minimum DVD and Blu-ray title duration in [] seconds. Shorter titles will be skipped:", and then enter a shorter value to allow HandBrake to detect shorter titles.
2. HandBrake only rip part of DVD
HandBrake is reported to unable to finish the entire DVD ripping. For example, it only outputs one-hour video from a two-hour movie. Here are the reasons:
- Copy protection: Many commercially-produced DVDs have encryption (copy protection) that Handbrake can't bypass. This can lead to the ripping process getting stuck or incomplete.
- Corrupted DVD: Scratches or damage on the DVD can prevent Handbrake from reading certain parts, resulting in a partial rip.
- Hardware issues: Problems with your DVD drive might cause Handbrake to stop ripping midway.
- Dual-layer DVDs: Handbrake might have difficulty handling dual-layer DVDs and only rip content from one layer.
To fix Handbrake incomplte DVD ripping, you can try the following solutions:
- For copy protection: Download and install the libdvdcss library (with VLC on Mac). This can help Handbrake decrypt some DVDs, but it may not work for all encryption types. If libdvdcss fails, explore alternative tools that can handle stronger encryption.
- For corrupted DVD: Gently remove dust or debris from your DVD with a soft, lint-free cloth. Or you can try to rip DVDs with WinX DVD Ripper which may work with damaged DVDs.
- For hardware issues: Try testing your DVD on another computer. If Handbrake rips the DVD fully on another computer, your DVD drive might be faulty and needs repair.
- For dual-layer DVDs: Try another DVD ripper that can handle dual-layer DVDs.
3. HandBrake distorted video when ripping DVD on Windows 10
Below are the main reasons:
- DVD copy protection: Handbrake can't decrypt most DVDs with copy protection (CSS, ARccOS, etc.). This can lead to errors and distorted output.
- Incorrect Handbrake settings: Choosing very high resolutions (e.g., 720p, 1080p) for a standard-definition DVD won't improve quality and might distort the video.
- Aspect Ratio Issues: Adjusting the aspect ratio can distort the picture.
- Incompatible Codecs: Choosing a codec not supported by your playback device can cause distortion.
- Insufficient System Resources: Low processing power, memory, or disk space can lead to errors and distorted output during ripping.
You can try the follow solutions to handle Handbrake distorted video after ripping:
- For copy protection: Download and install the libdvdcss library to help Handbrake decrypt some DVDs. To handle stronger encryption, you may need to consider a paid DVD ripper.
- For incorrect settings: Use recommended settings for DVD rips: Video: 576P30 (PAL) or 480P30 (NTSC); Encoder: H.264 with RF 18-22 quality settings. Avoid changing aspect ratio unless necessary.
- For aspect ratio issue: Leave the aspect ratio set to the source DVD's native resolution (usually found on the DVD case).
- For incompatible codec: Use a widely supported format like H.264 if playback issues occur.
- For insufficient system resource: Close unnecessary applications, ensure enough free disk space, and verify your system meets Handbrake's requirements.
Tested Solution: Rip Protected DVD with the Best HandBrake DVD Ripper Alternative
Overall, most of HandBrake errors are result from copy protections. And the best way to fix them could be trying a HandBrake alternative like WinX DVD Ripper Platinum, capable of processing various encryption schemes. With nearly 20-year experience, this software supports almost all DVD copy protection schemes, like general CSS mechanism, region code, Sony ARccOS, UOPs, APS, RCE and Disney X-project DRM. It can rip Disney DVDs even with 99 confusing titles, workout DVDs, special Japanese DVDs, and others, without hassle.
The alternative to HandBrake has the advantages not only in wide range of supported DVDs, but also in more well-configured output presets, more output file formats, super fast speed, high output quality, intuitive interface and more.
Part 5. FAQs about Ripping DVD with HandBrake
1. Can HandBrake rip protected DVD?
HandBrake itself can't decrypt DVD, but you can install libdvdcss to help HandBrake decrypt and rip drmed DVD. We have explain how to download and install libdvdcss for HandBrake in part 1.
2. How to rip DVD with HandBrake on Windows 11/10/8/7?
Simply follow our detailed guide above to rip a DVD using HandBrake on PC.
3. How to rip a DVD with HandBrake on Mac?
Just follow the same steps as you use HandBrake to rip DVD on Windows: download and install HandBrake Mac version -> choose title -> choose output format -> select destination folder -> start encoding DVD on Mac.
4. How to rip a DVD with multiple episodes (TV series DVD) in HandBrake?
When you want to rip a multi-episode DVD with HandBrake, you can add multiple or all episodes at the same time using the Add to queue feature.
5. How to rip DVD with subtitles on HandBrake?
HandBrake has a Subtitles tab where you can select desired subtitle track, closed caption, and import external subtitle.
Related article: A Complete Guide to Add or Remove Subtitles in HandBrake
6. Can HandBrake rip DVD to ISO?
No. HandBrake cannot export ISO files. If you want to copy DVD to ISO or VIDEO_TS folder, you can try WinX DVD Ripper.
7. How to use HandBrake to rip DVD with menu?
Actually, HandBrake doesn't support ripping DVD with menu. If you want to create a DVD copy with menu, you can use WinX DVD Ripper.
8. How to rip Disney DVD with HandBrake?
Disney DVDs are often copy-protected. If you want to use HandBrake, install libdvdcss first and then try your luck.
9. How to rip audio from DVD with HandBrake?
HandBrake can only rip video from DVD. If you want to get audio only, you need to take the extra step, namely converting video to audio.
10. How to rip DVD with 5.1 surround sound on HandBrake?
Go to Audio tab in HandBrake, and choose an audio track tagged with 5.1 ch.
11. How long does it take to rip a DVD with HandBrake?
Handbrake DVD rip time depends on the size of your DVD, the performance of your computer CPU and GPU, and your preferences and choice of settings in HandBrake. It could be tens of minutes to a few hours.
12. How to rip HD-DVD with HandBrake?
According to HandBrake supported source formats, HandBrake supports HD-DVD. You can follow our tutorial above to rip a HD-DVD with HandBrake.
13. How do I rip a full DVD with HandBrake?
Some users complain that HandBrake cannot rip the entire DVD. Actually, this is usually because your DVD is copy-protected. To rip a full DVD with HandBrake, you can try installing libdvdcss for HandBrake. If this doesn't work, you will have to try an alternative to HandBrake.
14. Can HandBrake rip DVD without losing quality?
Since HandBrake will re-encode the video, there is some loss of quality. if you want to rip DVD while keeping the original quality, you can try WinX DVD Ripper. This tool offers 1:1 DVD backup modes.


