


How to Copy DVD to USB with/without Computer: 3 Ways for PC/TV/Car
Summary: This guide covers three proven ways to transfer DVD to USB: using professional software for protected discs and flexible digitization, direct copy-paste for homemade DVDs, or utilizing retail services like Walmart. Learn how to copy DVD to USB drive for playback on Smart TVs, cars, and mobile devices. Below are the key takeaways:
- To play DVD on TV/car via USB, convert DVD to MP4 (H.264) using software like WinX DVD Ripper and ensure your USB is exFAT.
- To keep full quality, use ISO/MKV backup (but this will result in large size).
- If most DVDs are protected, direct copying DVDs to USB usually won't work. Instead, try professional tools for encrypted DVDs.
- If you don't have a computer or drive, try a transfer service.
"How do I transfer DVD movies to a USB flash memory stick? I no longer have a DVD player, but I have a few DVD movies I would like to watch on my TV via an Android box that does accept USB drives. My only tool to do the transfer is a Windows 10 notebook. Do I need specific software or does Win10 have it built-in?" - Reddit
Like this user, many people who no longer have a DVD player want to copy DVD to USB flash drive so as to watch movies on a TV, Android box, or even car screen or save the collection digitally. The challenge is that most commercial DVDs are copy-protected, so simply copying files or using a "DVD to USB cable" won't work. To make DVDs playable on modern devices, you need to rip them into a compatible format like MP4 — or choose another method based on your situation. Here I provide 3 main ways to copy DVD to USB:
- For protected DVDs: Use software to bypass encryption and convert DVD to MP4 for the best compatibility and viewing via USB.
- For free / homemade DVDs: Copy DVD to USB directly or use free tools.
- No computer: Use a DVD-to-USB transfer service.
Here are the main ways to copy DVD to USB, choose the one that fits your needs:
Quick Decision: Which DVD to USB Transfer Method Should You Choose |
||||
Method |
Best For |
Pros |
Cons |
|
Use a DVD ripper |
Encrypted DVD movies and flexible TV/car/mobile playback |
▪ Process unlimited DVDs at home. |
▪ Requires a software download and a brief learning curve. |
|
Direct Copy-Paste |
Homemade discs (no protection) |
▪ Free and no extra apps needed. ▪ Very fast, simple drag-and-drop operation. ▪ 100% original files copied. |
▪ Fails on 99% of movie DVDs becuase this method cannot handle these commercial DVDs. ▪ Copied VOB files are often unplayable on modern TVs and devices. |
|
Home Transfer Service |
Users with no PC or drive. |
▪ Totally hands-off. ▪ Professional service handles all conversion and technical issues. |
▪ Expensive ($15-30 per disc) and long turnaround time (requires shipping/drop-off). ▪ You lose immediate control over the process. |
|
Method 1. Rip Copy Protected DVD to USB for TV/Car/PC via Professional Ripper
To copy a DVD to a USB drive, using professional software is the most reliable method. Whether you need to bypass DVD encryption on commercial movies or looking for a completely free open-source tool, there are several options available.
Below, we will compare the top-rated DVD to USB converters, from professional-grade tools like WinX DVD Ripper to popular free alternatives like Handbrake and VLC, to help you find the best success rate for your specific discs.
Option 1. WinX DVD Ripper
- Best for copying protected, old, and multi-title DVDs to USB/flash drive
- Supported OS: Windows 11 or earlier, macOS Tahoe or earlier
WinX DVD Ripper is a GPU-accelerated DVD transcoding software that converts copy-protected DVDs to MP4 for USB playback on PCs, Smart TVs, cars, and mobile phones, reducing file size by up to 80% while maintaining original quality. It automatically removes copy protections and chooses the right title, allowing you to convert any DVD to a digital file directly. Unlike Handbrake, WinX DVD Ripper can bypass Disney 99-title protections directly without third-party plugins.
In my testing, I copied a 4.7GB DVD to MP4 using WinX DVD Ripper on a Windows 10 PC (Intel i5, 16GB RAM). The process took about 8 minutes with hardware acceleration enabled, and the output file was reduced to 1.2GB while maintaining smooth playback on a Samsung TV via USB.
Why it stands out:
- Strong Decryption: Handles everything from classic CSS to the latest intricate disc protections (e.g. 99-title discs).
- TV/car Compatibility: Rips DVD to MP4, making your movies playable on almost any Smart TV, car screen, iPhone, Android, etc via USB.
- High Speed & Quality: Uses Full GPU acceleration to finish the job quickly without sacrificing image quality
What You Need: Before starting, ensure you have the following:
- A DVD Drive: Internal or external DVD drive.
- USB Flash Drive: Plug in a drive with enough space.
- The Software: Download and install WinX DVD Ripper below.
Trusted by 86 million users since 2006. 100% safe & clean.
Once you have all the necessary tools and equipment ready, you can follow the steps below to copy a DVD to USB and watch it on your TV or other devices.
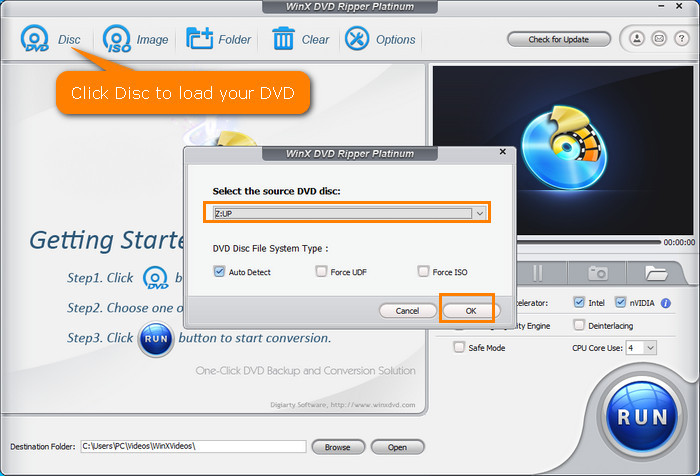
Step 1. Insert the DVD into your DVD-ROM drive and load it into WinX DVD Ripper.
First, insert the DVD into your DVD-ROM drive. Then, launch WinX DVD Ripper and click the "DVD Disc" button to load the DVD. The software will bypass any copy protections and detect the correct DVD title, which may take a few seconds.
![]() Tips: You can also import a VIDEO_TS folder or ISO image file and convert it to a more manageable format, such as MP4.
Tips: You can also import a VIDEO_TS folder or ISO image file and convert it to a more manageable format, such as MP4.
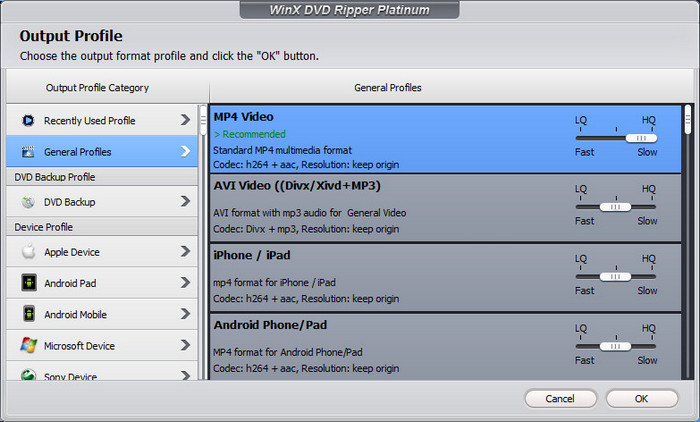
Step 2. Select an output format.
Once the correct title is detected, the software will prompt you with the Output Profile panel. Here, you can choose an output format for the copy. You can save the files in any format compatible with your USB flash drive.
Goal |
Recommended Format |
Pros & Cons |
Watch on TV / Phone |
MP4 (H.264) |
Best Compatibility: Plays on almost any device with a USB port. |
Lossless Backup |
ISO Image |
1:1 Quality: Keeps original menus, tracks, and extras. |
Step 3. Choose your USB drive as the output folder.
When you have selected the output format, click the "Browse" button to choose the folder in your USB drive where you want to save the ripped DVD video. Make sure your USB drive has enough storage capacity.

Step 4. Start to copy the DVD to USB drive.
Once you have set everything up, click the "RUN" button to start the DVD to USB conversion process. The software will begin to rip the DVD and convert it to the selected format for your USB drive. The time it takes to complete the process depends on the size of the DVD, the speed of your computer, and your settings.
After the process is finished, you can safely remove the USB drive from your computer and plug it into your TV or other devices to enjoy your digital DVD video.
💡 Pro tips for 100% compatibility an make old DVDs look like 4K
To ensure your DVD movies play perfectly on Samsung/LG TVs or Tesla/Car screens, please choose MP4 (H.264) as the output format. Also, make sure your USB is formatted to exFAT to handle high-quality files larger than 4GB.
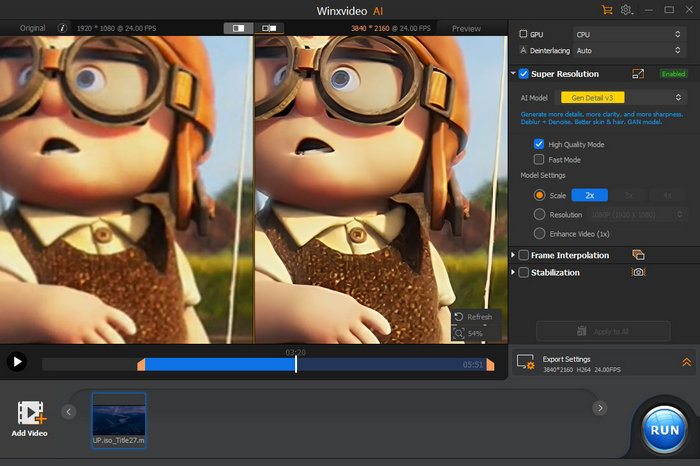
In the meantime, DVDs typically have a low resolution (480p), which can look blurry on modern 4K TVs. If you want to further enhance your DVD video quality, such as upscaling it to 1080p or even 4K, you can use Winxvideo AI. This tool uses advanced AI models to boost resolution, sharpen details, and make your old DVD videos look clearer and more vibrant.
Option 2. Handbrake (Best Free Open-Source Option)
- Best for tech-savvy users who want a free way to digitize unprotected DVDs to MP4/MKV.
- Supported OS: Windows 10/11 (64-bit), macOS 10.13 or later, Linux.
HandBrake is a free, open-source video transcoder that allows users to rip DVDs and convert them into various digital formats. However, by default, HandBrake cannot handle encrypted DVDs due to licensing restrictions. To rip protected DVDs with HandBrake, you will need to install libdvdcss, an external library that enables HandBrake to bypass encryption.
In my real test (i5, 16GB RAM), ripping a 4.7GB DVD to MP4 using the Fast 480p preset took about 18 minutes. While Handbrake supports GPU encoding (like Intel QSV), its DVD decryption and de-interlacing still rely heavily on the CPU. This is why it remains slower than some rippers that feature specialized DVD processing, especially when handling complex copy protections. But if you are a pro user, you will be surprised at Handbrake's strong customization.
Here's how you can copy a protected DVD to a USB drive using HandBrake and libdvdcss:
Step 1. Download and Install HandBrake and libdvdcss
First, head over to the official HandBrake website to download the software. After installing HandBrake, you'll also need to download libdvdcss from the official VideoLAN website to handle commercial discs like the CSS or region-locked DVDs.
Make sure libdvdcss is installed in Handbrake program folder correctly before proceeding, as it is essential for HandBrake to decrypt protected DVDs.
Step 2. Insert Your DVD and Launch HandBrake
Once you have everything set up, insert your DVD into your DVD drive. Open HandBrake and select the DVD as source. HandBrake will begin scanning the DVD and show you the available titles. If the DVD is encrypted, libdvdcss will help HandBrake bypass the protection and load the content for ripping. Otherwise, you may see an No Valid Source Found error.
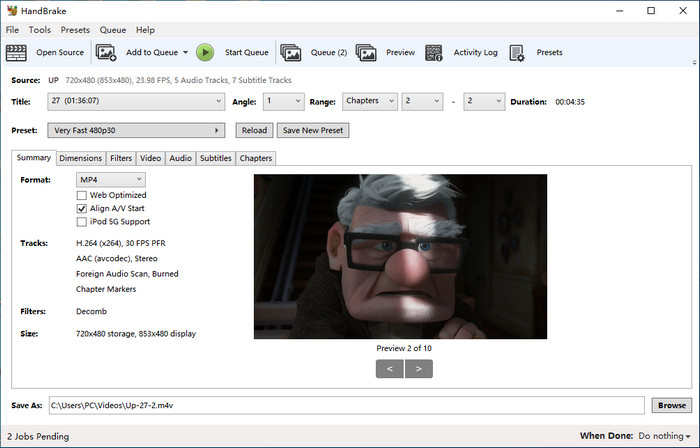
Step 3. Choose the DVD Title and Set Output Format
Select the main movie title for ripping. Once you've selected the title, you'll need to choose an output format like MP4, which offers the optimal USB compatibility with TVs adn Cars, under the Summary tab.
Step 4. Set the Destination Folder to Your USB Drive
Now that you've selected the output format, it's time to choose the destination folder for your ripped file. Click the "Browse" button next to the "Save As" field. Navigate to your USB drive and give your file a name. This ensures your ripped file is saved directly to your USB drive.
Step 5. Start Ripping and Wait for the Process to Complete
Once you've set everything up, click the "Start Encode" button to begin the DVD ripping process. HandBrake will now begin converting the DVD into the selected format and save it to your USB drive. You can monitor the progress in the HandBrake interface.
After the ripping process is complete, your digital movie is ready for playback via your USB drive.
Option 3. VLC Media Player (Best for Quick One-Off Rips)
- Best for users who already have VLC installed and need to rip a single, unprotected DVD without downloading new software.
- Supported OS: Windows 7/8/10/11, macOS, Linux, Android.
VLC Media Player is more than just a versatile video player; it also includes a hidden "Convert" feature that allows you to convert DVDs into digital formats. Since most users already have VLC installed, it serves as a convenient, no-cost method to transfer DVD content to a USB drive without downloading additional software.
While VLC is reliable for unprotected discs, it often struggles with some copy-protected commercial DVDs and generally offers slower conversion speeds compared to professional rippers because it has no hardware acceleration for ripping.
In my real-world test, VLC ripped a 90-minute DVD movie took nearly 1hour23min to complete. Unlike professional rippers that read the data directly, VLC essentially plays and records the stream into an MP4 file. This makes it the slowest option in our list and not suitable for bulk DVD to USB transfers. But if you prefers no additional software installation, VLC is still a good option for single DVD to USB conversion. Below is the step-by-step guide on how to use VLC to save your DVD movies directly to a USB flash drive.
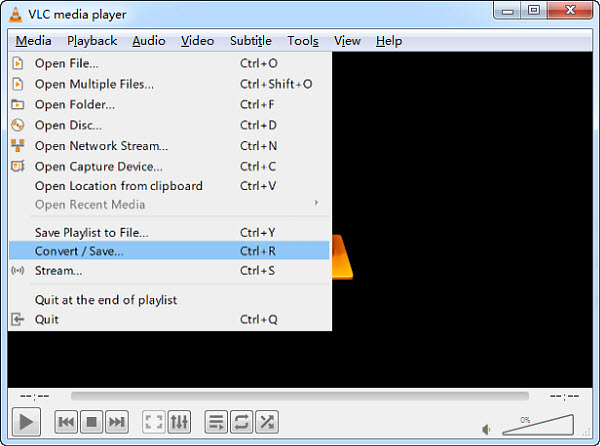
Step 1. Open VLC Media Player and Go to Convert
Launch VLC Media Player on your computer. Click on the "Media" menu in the top-left corner and select "Convert / Save..." from the dropdown list (or press Ctrl+R on Windows).
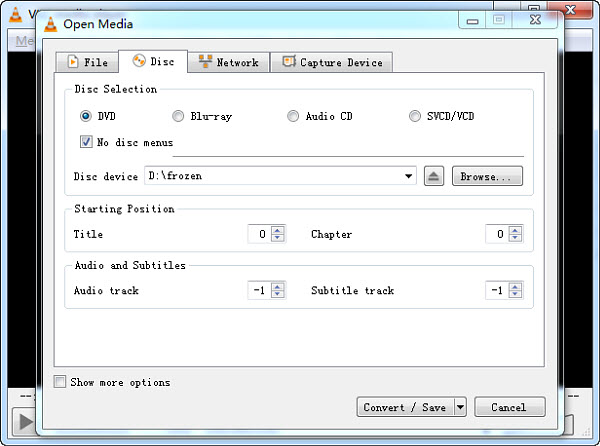
Step 2. Load the DVD Source
In the Open Media window, click on the "Disc" tab. Under Disc Selection, ensure "DVD" is selected. Check the "No disc menus" box if you want to skip the DVD menu and rip only the main movie. Then, click the "Convert / Save" button at the bottom.
Step 3. Choose the Output Format (MP4)
In the Convert window, look for the "Profile" section. Select "Video - H.264 + MP4 (MP4)" from the list. This is the most recommended format for USB drives as it is compatible with almost all Smart TVs, laptops, and gaming consoles.
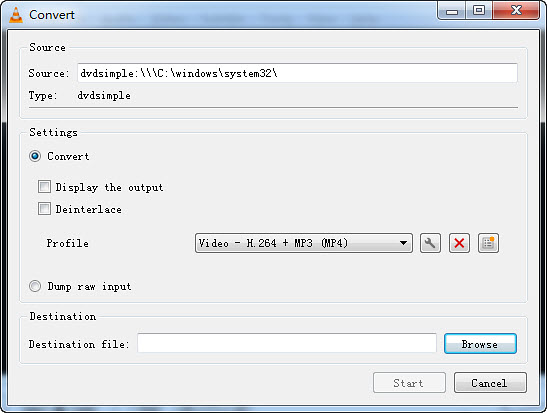
Step 4. Set the USB Drive as Destination
Click the "Browse" button next to the Destination file box. Navigate to your USB drive in the file explorer, give the file a name, and click Save. Make sure the file extension ends in .mp4 to ensure smooth playback later.
Step 5. Start Converting DVD to USB
Once everything is set, click the "Start" button. VLC will begin streaming and converting the DVD content into the file on your USB drive. You will see the progress bar moving along the seek bar area. Note that this process may take as long as the movie's duration, so keep your USB drive plugged in until the blue progress bar reaches the end.
Option 4. MakeMKV (Best for 1:1 Lossless MKV)
- Best for movie enthusiasts who want to preserve 1:1 original quality, along with audio and subtitle tracks kept.
- Supported OS: Windows 7/8/10/11 (64-bit), macOS 10.7 or later, and Linux.
MakeMKV is a straightforward tool for ripping DVDs and Blu-rays into MKV files, a versatile and high-quality video format. Unlike other DVD rippers, MakeMKV focuses on remuxing- preserving the video and audio quality without compressing the files. This means you get the exact same quality as the original disc, but it also produces much large files compared with the compressed MP4.
In my real-world test, ripping the 4.7GB DVD took about 12 minutes. The process is faster than Handbrake because there is no conversion envolved. However, the output MKV file was 4.3 GB-nearly the full size of the disc. While the quality is perfect, many older Smart TVs and car players cannot play MKV files directly from a USB drive. You might require additional tools for converting to more widely supported formats like MP4. Now we will guide you through the steps to use MakeMKV to copy a protected DVD to your USB drive.
Step 1. Download and Install MakeMKV
To get started, you'll need to download MakeMKV from its official website and install the software by following the installation prompts.
Step 2. Insert the DVD and Launch MakeMKV
After installation, insert the DVD into your computer's DVD drive. Open MakeMKV, enter registration code, and select the DVD as source. Then, MakeMKV will start scanning the DVD for titles.
Once the scan is complete, MakeMKV will show the available titles, such as the main movie, special features, and other content.
Step 3. Select the DVD Title and Output Folder
Next, choose the title you want to rip. In most cases, the main movie will be the longest title, so simply select that. You may also choose additional titles or extras if needed.

Select the Output Folder by clicking on the folder icon on the right-hand side of the interface. Here, you will specify the location on your USB drive where you want to store the ripped MKV file. Ensure that the USB drive has enough space, as MKV files can be large (up to several gigabytes depending on the length of the movie and the quality settings).
Step 4. Start Ripping the DVD
Once you have selected the title and the destination folder on your USB drive, you are ready to start the ripping process. Simply click on the Make MKV button.
MakeMKV will begin the process of copying the DVD to the selected folder on your USB drive. It will maintain the original video and audio quality, making this an excellent choice for users who want high-quality rips without compression.
Step 5. Wait for the Process to Complete
During the ripping process, MakeMKV will display a progress bar. Depending on your system’s performance and the size of the DVD, the process may take some time. Once completed, MakeMKV will notify you that the ripping is finished.
Method 2. Free Solution to Copy Homemade DVD to USB Directly [No Software]
- Best for quickly moving personal, unencrypted video files from DVD to USB drive for storage or backup.
- Warning: This method only works for non-protected, homemade DVDs only (like wedding videos or home movies burned to a disc). It creates a complex folder structure (Video_TS) that most Smart TVs cannot play and will fail on 99% of store-bought movie DVDs due to encryption.
This is simpler solution and you don't need any third-party ripping software, but it only works for DVDs without copy protection, like homemade ones. You can use the "Drag-and-Drop" method that copies the entire DVD structure to USB, which might not be playable on all devices. You will need a media player like VLC to open the copied folders later. Here's how to copy DVD to USB directly for free.
Step 1. Insert the homemade DVD into your computer's disk drive and connect your USB stick to an available port.
Step 2. Access and copy the DVD content.
- On Windows: open File Explorer and double-click the DVD drive.
- On Mac: Double-click the DVD icon that appears on yoru Desktop, or find it in the Finder sidebar under Locations. .
Here you can see two main folders: AUDIO_TS and VIDEO_TS. Select both folders (or just VIDEO_TS, which contains teh actual movie data). Right-click and select Copy (or press Ctrl+C on Win / Command+C on Mac).
Step 3. Open the USB drive, then copy and paste DVD files to the USB driv (or press Ctrl+V on Win /Command+V on Mac). Wait for the transfer to complete.
![]() Important Note for Manual Copying:
Important Note for Manual Copying:
1. USB drive format and capacity (FAT 32 vs exFAT): A standard single-layer DVD holds up to 4.7GB, while dual-layer discs hold 8.5GB, so make sure your USB drive has sufficient storage capacity. If you are copying a single ISO image file larger than 4GB, a FAT32 formatted USB drive will fail, since it has a 4GB individual file size limit).
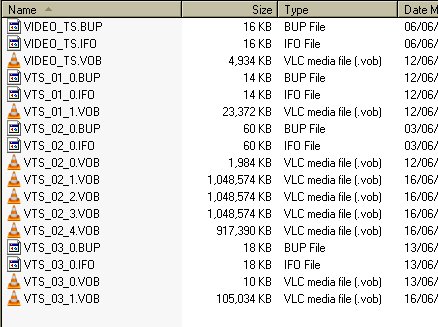
2. The VOB playback issue: Although copying a DVD to a USB drive seems easy, the playback may not be. The copied DVD files can typically end up with a structure featuring a Video_TS folder that contains a VTS_01_1.VOB, VTS_01_2.VOB, VTS_01_3.VOB, etc. Each VOB represents part of the movie content on the DVD, which is generally unplayable on most smart TVs, car players, mobile players and devices.
3. The encryption barrier: The manual method is only applicable for non-protected, homemade DVDs. In reality, various encryption measures such as CSS, Sony ARccOS are encoded on DVDs to prevent unauthorized copying. If you attempt to transfer a protected DVD directly, the process is likely to end in an "I/O Device Error", or the copied files will appear as 0 bytes, corrupted, or unplayable.
If you want to transfer protected DVDs to USB sticks in any format with a smaller size and playable on more devices, you need a third-party DVD ripper or resort to transfer services to rip DVDs to USB drives.
Method 3. No Computer? Use Walmart/CVS DVD to USB Transfer Service
If you don't have the hardware to rip DVDs yourself, or if you are dealing with fragile, decades-old family discs, using a professional mail-in or drop-off service is a solid choise. These services in the US and UK typically involve sending your DVD to the service provider, who will then convert the data to a digital format and save it onto a USB drive. There are many such services on the market. Let me introduce a few services here.
- Best for users who don't have a computer or a DVD drive, or those who have a large collection and prefe a professional service.
- Estimated cost: $15-$30 per disc (varies by provider).
How the Process Works?
Step 1. Place order online: Visit the website of a provider like Walmart Photo or CVS. Be sure to select "USB Flash Drive" as your preferred output format.
Step 2. Send or Drop Off Media: For Walmart or CVS, take your DVDs to a local Photo Center counter. For Forever Studios, pack your discs securely and use their provided shipping label to mail them to the studio. Please label your homemade discs so the digital files can be named correctly.
Step 3. Digitization and delivery: The professional lab will convert your DVDs to MP4. Most services also upload a copy to the MemoryCloud for immediate viewing.
Step 4. Receive Your USB Drive: After 2-4 weeks, the service will ship your original DVDs back to you, along with a new USB stick containing your movies in MP4 format, ready to plug into your Smart TV or computer.
Important Considerations for Services
- Copyright Restrictions: Most retail services (like Walmart or CVS) will not digitize commercial Hollywood movies due to strict copyright laws. They primarily focus on homemade videos, wedding films, and personal recordings. For store-bought movie DVDs, Method 1 (WinX DVD Ripper) remains the only viable solution.
- Privacy: While professional services are generally secure, you are handing over personal footage to a third party. If your DVDs contain highly sensitive or private content, doing it yourself at home is the most private option.
- The "Hidden" USB Cost: Most services charge for the transfer plus the cost of the USB drive itself (often $10-$15 extra). Be sure to check the final checkout price.
However, it is important to note that pricing and turnaround time can vary by specific store location. It is recommended to contact your local center to confirm the current local service availability.
FAQs
1. How to copy DVD to USB on Windows 7/8/10/11?
If you want to copy a non-protected DVD to USB on Windows 7/8/10/11 and don't mind the copy is a DVD folder, simply insert the disc and plug in your USB. Open the File Explorer by pressing the Win + E. Navigate to your DVD drive and right-click on it. Select "Copy" or press Ctrl+C on your keyboard, then Paste the VIDEO_TS folder into yoru USB drive.
For commercial DVDs, this manual copy will fail. You can try the professional tools like WinX DVD Ripper to bypass the encryption and follow the steps mentioned above to copy the DVD to USB in MP4 format on Windows 7/8/10/11.
2. Can VLC rip encrypted DVDs to USB?
By default, VLC can only rip unprotected DVDs. While it supports various formats like MPEG, MP4, AVI, Divx, ASF, WMV, FLV, etc, it lacks the internal decryption needed for most store-bought movies. Additionally, VLC isn't optimized for hardware encoding, meaning it takes long DVD ripping to finish the transfer. Read our guide on how to rip DVDs with VLC.
3. What is the best video format to copy DVD to USB for playing on TV?
MP4 (H.264+AAC) is the most universally compatible format, balanced for small file size and high image quality. Below are some of the general video formats supported by most common TVs.
- Apple TV: H.264/HEVC/MPEG4 video in .m4v, .mp4, and .mov.
- Roku TV: H.264/HEVC in MP4, MOV, M4V, MKV.
- Sony TV: MP4, HEVC, H.264, MPEG, VP8/9, WMV, MJPEG.
- Samsung TV: AVI, MKV, MP4, MOV, 3GP, TS, WebM. (Supports 4K/HEVC on newer models).
- LG TV: MP4, MOV, M4V, MKV, AVI, WMV, TS, etc.
If you are unsure which one to pick, use WinX DVD Ripper, which offers output profile list regarding to the TV Video category. You can scroll down the output list to TV Video and pick your TV model (Samsung, Sony, Apple TV, etc), ensuring the perfect aspect ratio and bitrate for your screen.
4. Why won't my DVD movies play on TV via USB?
If your files are on the UBS but won't play or even show up, check the four things:
- Format incompatibility: Ensure the file is MP4. If you manually copied the VIDEO_TS folder or VOB files, most TVs won't recognize or play them in sequence.
- USB File System: Most modern TVs (QLED, OLED, 4K) support exFAT, which is ideal for large video files. NTFS and FAT32 are also supported on many models. Older TVs usually support FAT32, but may have limitations with large files (over 4GB). While VIZIO TVs typically work best with FAT32, though some newer models also support exFAT. If you're using the FAT32 USB drive, make sure the DVD movies ripped for the USB are under 4GB. For larger, high-quality rips, re-format your USB to exFAT or NTSF.
- Folder Depth: Avoid burying your movies in too many subfolders. Keep them in the root directory or one Movies folder. In addition, some TVs like older LV/Sony models fail to index the drive if it contains more than 4000 files or too many nested folders.
- Hardware check: Check the ports on the TV and make sure there is no dusty or faulty USB port.
5. What USB format should I use: FAT32, NTFS, or exFAT?
- Use exFAT: This is the best choice for DVD-to-USB. It works on both Windows and Mac, widely supported by modern Smart TVs, and has no 4GB file size limit. This means you can either store high-quality 1:1 ISO rips or large MP4 files without issues.
- Avoid FAT32 for ISOs: A full DVD ISO image is ~4.7GB, but FAT32 cannot handle any single file over 4GB. If you must use FAT32, make sure to rip the DVD to a compressed MP4 (usually 1.2GB - 2GB).
- Use NTFS for Windows only: NTFS is good for windows based storage and supports large files, you can copy DVD to USB in NTFS format for this format. However, some older TVs may fail to recognize the USB drives formated in NTFS.
6. How can I speed up DVD to USB transferring speed so slow?
It's very annoying if it takes a long time to transfer the DVD movies to a USB flash drive. The speed bottleneck is typically caused by outdated USB interfaces or low CPU power. Here are 3 proven ways to speed it up.
- Upgrade to USB 3.0/3.1 or USB-C: Ensure you are using a USB 3.0/3.1 or a USB-C flash drive. These modern interfaces offer up to 5Gbps bandwidth, which is 10x faster than USB 2.0. For the best performance, plug it into a blue (USB 3.0) or Type-C port.
- Enable hardware acceleration: Many DVD rippers support GPU acceleration (Intel, NVIDIA, AMD), which can significantly reduce conversion time. So make sure the Intel QSV or NVIDIA NVENC is checked to use your GPU for the heavy lifting.
- Rip to local SSD first: It's highly recommended to rip the DVD to computer's desktop first, then drag the finished file to the USB. This is often faster than ripping directly to a slow USB drive.
Tip: The overall speed depends on your DVD drive, computer performance, and the software you use.
7. Are there any other DVD to USB services?
Yes, but they are physical services, not "web-based" converters. Providers like Walmart photo, CVS allow you to drop off or mail in your discs. They charge roughly $15-30 per disc. This is a great option if you don't have any computer or drive. But it can be expensive if you have large collections.
8. Can I rip a DVD directly to a USB from a DVD player?
No. Most DVD players are designed only for playing media files (like videos, photos, or music) from a USB drive, not for copying DVDs. It doesn't have the software or hardware to rip the disc to the drive. To rip a DVD to a USB drive, you usually need a computer with a DVD drive or a professional ripping software to perform the task.
9. Can I copy DVD movies to a MicroSD card instead of a USB?
Yes. The process is identical. Use a professional ripper to convert the DVD to MP4, then insert your MicroSD card into a card reader and transfer the file. This is ideal for Android tablets, Nintendo Switch, or smartphones with expandable storage.
Disclaimer: Digiarty Software does not advocate ripping/copying copy-protected DVDs for any commercial purpose and suggests referring to the DVD copyright laws in your countries before doing so.


