


-
Table of Contents
- • Install VLC
- • Open VLC
- • Load the source DVD into VLC
- • Adjust the VLC DVD ripping settings
- • Select an output format
- • Start DVD ripping
- • Install VLC
- • Load the source DVD into VLC
- • Disable DVD Menus
- • Configure DVD Ripping Settings
- • Start DVD ripping
Part 1. Rip DVD with VLC on Windows
Part 2. Rip DVD with VLC on Mac
How to Rip DVDs with VLC: The Complete Guide
Summary: How to rip DVDs with VLC? Insert the DVD, open VLC, click Media > Convert / Save, select your source DVD, choose format and destination, give it a name, and then click Start to rip the DVD with VLC.
Ripping a DVD with VLC seems simple: insert the disc, adjust a few settings, and hit Start. In reality, it’s rarely that smooth. DVDs, subtitles, and DRM protections can make the process tricky, leading to crashes, freezes, or poor-quality output.
Common challenges include:
- Choosing the right VLC version for your system
- Loading discs that libdvdcss might not fully support
- Handling DVD titles and subtitles correctly
- Dealing with freezes, crashes, or incomplete MP4 files
Most tutorials skip these pitfalls, leaving you to troubleshoot on your own. Here we provide comprehensive instructions on how to rip DVDs using VLC on PC and Mac, along with solutions to address the common VLC DVD ripping errors.
Download FREE VLC DVD Ripper to Rip Protected DVDs Easily
VLC won't support DVD copy protections. You may see choppy VLC DVD rip, slow speed, crashes, missing subtitles, A/V out of sync, etc.
Try WinX DVD Ripper. It’s a 100% free alternative that rips both protected and unprotected DVDs hassle-free. No libdvdcss tweaks, no title scanning errors. WinX DVD Ripper handles region-locked, RCE, Disney 99-title, scratched, and old DVDs smoothly — and converts them to MP4, MOV, WMV, AVI, ISO, and 420+ device presets. With GPU acceleration, it takes just 5 minutes to rip a full DVD to MP4 — without audio glitches, subtitle loss, or crashes.
Part 1. How to Rip a DVD in VLC on Windows
Make sure your computer has an optical drive in order to rip DVDs with VLC. If your computer or laptop ditches internal DVD drive, you need to get a reliable external DVD drive for your laptop/computer. Then follow the the below guide on how to rip DVD with VLC.
1. Install VLC
Most users may have VLC on their computer. Those who haven't installed VLC, click here  to download VLC on your Windows PC. Then follow the instruction to install VLC.
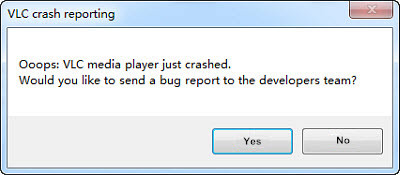
VLC install crashed: "VLC crashes frequently and then I have to restart computer to fix it. I've uninstalled/reinstalled VLC a few times and upgraded a few times and the problem persists. I'm running Windows 11 if it matters."
- Check the video driver.
- Update to a newer version.
- Check if there is another app/software that conflicts with VLC.
VLC security issue: VLC comes with security vulnerability from time to time. For example, in the VLC 3.0.7.1 brought a vulnerability called CVE-2019-13615, which allowed unauthorised modification and disclosure of data/files, and overall disruption of service. There was also a severe remote code execution flaw tracked as CVE-2020-13428. To rip DVDs without VLC security flaws, try WinX DVD Ripper Platinum.
2. Open VLC
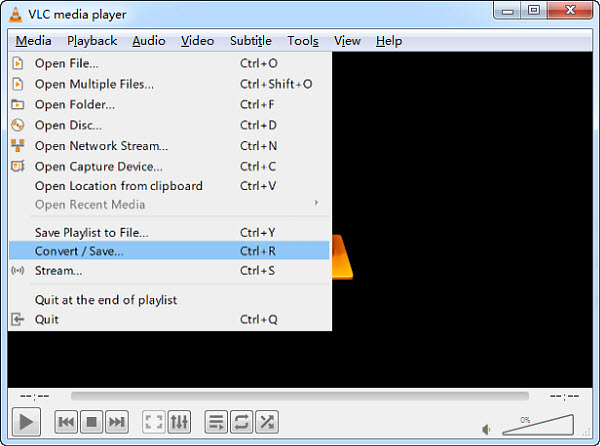
After you install VLC, open it. Insert the disc you want to rip into the optical drive of your PC. Click the Media drop-down menu and select Convert/Save. Then you should see the picture in Step 3.
Or, you can enter into the converting window in another way: click Media on the top menu tab and then click Open Disc. Then you will see a window similar to the one in Step 3, except that the bottom button is Play instead of Convert/Save. Select the DVD, click the downward-facing arrow next to the Play button and select Convert from the drop-down menu.
3. Load the source DVD into VLC
In the Open Media window, click Disc from the top tab and enable DVD option. Then select the DVD to rip in Disc device. You can also add a Blu-ray, Audio CD, SVCD/VCD, or click File button to add an IFO file or ISO image file of DVD.
Important: Don't forget to check the "No Disc Menus" box. It can help avoid possible errors. If you don't check it, VLC may get stuck ripping the DVD titles over and over until you manually close it.
DVD won't load: After you select a DVD from the Disc device, VLC just won't load the DVD. Sometimes, it goes with an error message saying MRL 'dvd:///D:/' (though this error happens more often when VLC plays DVDs or videos) or "There is no disk in Drive D." while there is a DVD in Drive D. This error happens when libdvdcss in VLC won't support the encryption of a DVD. You need to:
- Update VLC to the latest version.
- To rip DVD with VLC in Ubuntu, you should know that the libdvd applications are not installed by default. Open a terminal window: sudo apt install libdvdcss2 libdvdread4 libdvdnav4 ubuntu-restricted-extras
- Remove DVD protection with other software.
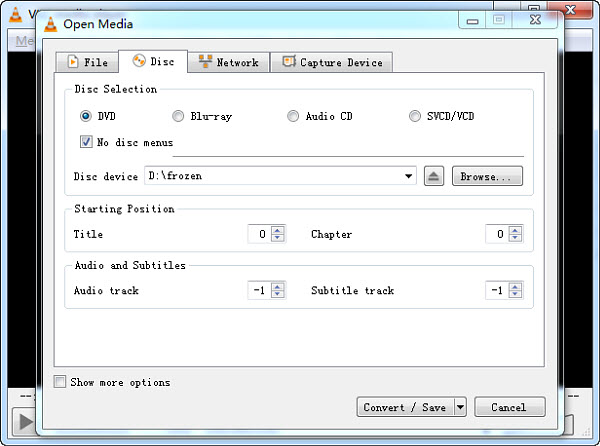
Step 4. Select the DVD title and adjust the settings
Click the Disc tab and you will find 3 sections on this page: Disc Selection, Starting Position, Audio, and Subtitles. Check the DVD option, browse and import the DVD source to VLC. Don't forget to enable the box No disc menus. If not, VLC may get stuck ripping the menus of the DVD.
Next, designate the title (typically the main title) and specify the chapter you want to convert into MP4 format. Here's a workaround for converting a protected DVD to MP4 using VLC: first, play the DVD using a standard DVD player and make a note of the correct title for the movie. Then, input the title/chapter number into VLC. It's important to note that this method may not be effective for all protected DVDs.
Select the audio/subtitle tracks. Then click Convert / Save button.
Starting Position: If you wish to extract a specific portion of a DVD or rip multiple episodes using VLC, you can specify the title and chapter you want to rip. Since VLC cannot rip protected DVDs automatically, you can manually identify the correct DVD title in VLC. To do this, play the source DVD in a standard DVD player, make note of the movie title, and then enter the corresponding title/chapter number in VLC. VLC will then rip the chosen DVD title into the final video. However, it's important to note that this method may not be 100% effective for all DVD copy protections.
Important: VLC doesn’t natively hardcode subtitles into a video during DVD ripping. It can only rip video and external subtitle tracks separately or display them during playback. DVD subtitles are usually stored as VobSub (bitmap images), not text. VLC can't hardcode these directly into your ripped MP4. You’ll need to extract subtitles separately using tools like Subtitle Edit and convert them to .srt for embedding.
No subtitle: "I am trying to hardcode subtitles into the ripped video using VLC player. I have followed the turtorials, and everything seems right until the final output has no subtitles embedded in."
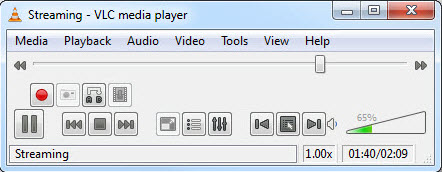
- After you rip the DVD, use Streaming wizard (Media > Stream...) to add subtitles.
- You'd better use subtitles in .srt formats as VLC 3 has no support for autodetection ot txt subtitles.
- Try to use ":no-sout-all" option in the streaming chain and save the ripped video and subtitles in diffferent folder.
- Try an older version or the nightly build. Check how to add subtitles to DVD >>
Rip corrupted DVD: In some cases, you may select a corrupted title from Starting Position when it is a DVD protected with 99-title or bad sector protections. Then you can play the DVD on VLC first and go to VLC menu > Playback > Title and find the right title.
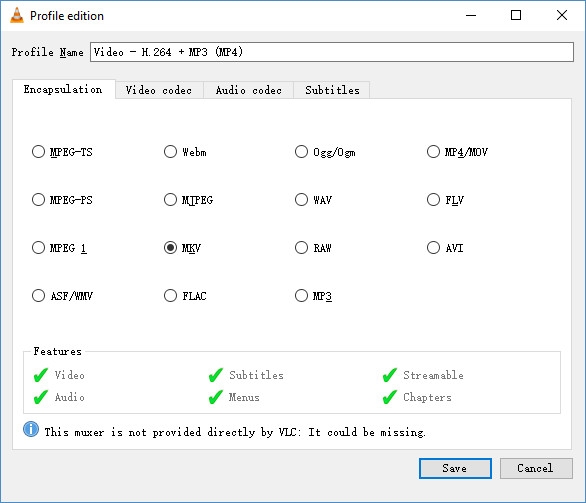
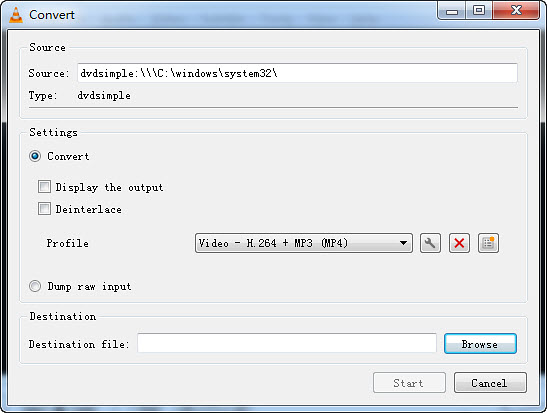
VLC provides two MP4 options: H.264 + MP3 and H.265 + MP3. Choose the most appropriate one depending on your needs.
In the Profile edition window, VLC offers some basic options to adjust the DVD to MP4 rippping on Windows 11/10/7. Click the Encapsulation tab, you can set VLC to convert DVDs to MP4 as well as MOV, MKV, AVI, and some other formats. For the best output MP4 file that keep a good balance between the file size and quality, here are the best DVD to MP4 settings using VLC Media Player:
- In the Video codec tab, set the Bitrate to 1500 and select 2 Pass Encoding for Encoding mode.
- In the Audio codec tab, set the Bitrate to 128 and select MP3 for Codec.
- Click Save to save your changes and close the Profile Edition window.
5. Select an output format
Click the Convert/Save button and now you can set the output format for the DVD rip. Click Profile drop-down menu and find the format you want. You can use VLC to rip DVD to MP4, H.264, WMV, MPEG4, iPod, Android, YouTube, and a few others. Select the output you need.
In the Destination section, click Browse and select a folder on your Windows PC for the VLC ripped DVD video and give the output file a name.
6. Start DVD ripping
After the above settings, click Start and VLC should start ripping the DVD on Windows. You can see the Streaming progress bar at the bottom. Simply wait for VLC to finish the rip.
Watch a video tutorial on how to rip DVD with VLC to your PC.
Part 2. How to Rip DVD with VLC on Mac
Ripping DVDs with VLC on Mac also involves opening the DVD in the player, selecting the desired output format, and specifying a destination for the ripped file. Let's break down each step in detail.
Step 1. Install VLC
Download the latest version of VLC Media Player on your Mac from the official website: https://www.videolan.org/
Step 2. Load the DVD to VLC
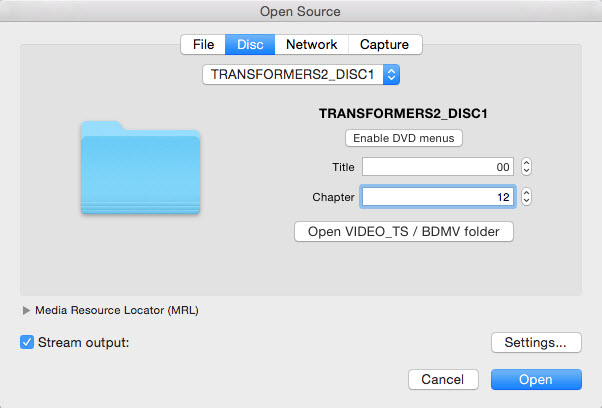
Insert the DVD you want to rip into your Mac's optical drive. Launch VLC Media Player. On the main interface of VLC, click Open Media. In the Open Source window, click the Disc tab and choose the DVD that you just insert into the Mac's DVD drive.

Step 3. Disable DVD Menus
Next, you need to click the "Disable DVD menus" button. This is to avoid VLC from getting stuck ripping the DVD menu in a loop. Then you will need to input the correct title and chapter of the DVD. If you don't know the corect title/chapter, you can play the DVD in a player and write down the title/chapter number that is playing.
Step 4. Configure DVD Ripping Settings
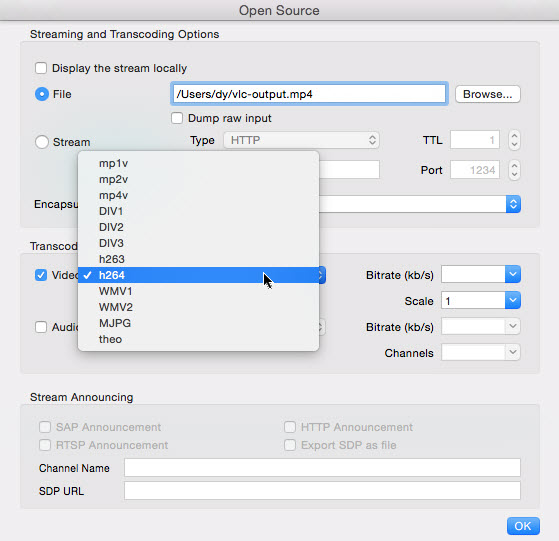
Next, click the "Stream output" and then the "Settings" button. This will open the output setting window. Click the "Browse" button to choose the destination folder on your Mac to save the ripped DVD video file. Then go to the “Encapsulation Method” as well as Transcoding options to choose which format you would like to rip the DVD to with VLC.
Step 5. Start Ripping DVD in VLC on Mac
After the above settings, click the "Open" button and VLC will start ripping the DVD. The progress of the ripping process will be displayed in the VLC interface.
Part 3. VLC Not Ripping DVD? Common Errors, Causes & Fixes
While VLC can handle basic DVD ripping tasks, it’s not built as a full-featured DVD ripper. As a result, users often run into issues like crashes, missing audio, failed conversions, or incomplete output. Below is a streamlined guide that brings together the most common VLC DVD ripping problems, why they happen, and how to fix them effectively.
1. VLC Crashes or Fails to Start Ripping
VLC may crash when converting a DVD to MP4, sometimes immediately after starting, or fail to select the feature track without navigating the DVD menu first.
- Newer copy protections (beyond CSS) can break VLC’s decoding ability.
- Disable hardware decoding under Preferences > Input/Codecs.
- Try a different VLC version (older stable or nightly build).
- Ensure the correct title is selected by previewing the DVD first.
2. Cannot Rip Copy-Protected DVDs
VLC is able to rip CSS-protected movies, and even if you can't tell the correct title of a DVD, you can find it by playing the movie with VLC. But this doesn't mean a flawless DVD ripping process. Errors like VLC crashes, no audio, pixelated output, etc. can happen easily.
- Install libdvdcss manually if not already included.
- Verify DVD region compatibility with your drive.
- Use a dedicated DVD ripper if VLC repeatedly fails on protected discs.
3. Ripping Gets Stuck or Loops
Sometimes VLC loops short segments or shows errors like "output file already exists."
- Turn off loop playback in VLC controls.
- Make sure the destination file path is valid and writable.
- Switch to a different output profile or container format.
4. Slow Ripping Speed
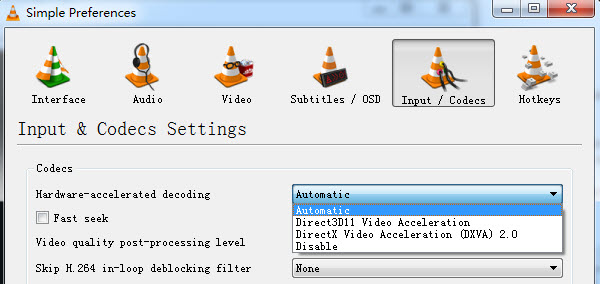
VLC often rips DVDs slowly because it streams the video during conversion and primarily uses CPU resources.
- Enable GPU decoding for supported codecs (Tools > Preferences > Input & Codecs > Hardware-accelerated decoding set to Automatic).
- Try another output profile.
- Use a DVD ripper that supports hardware-accelerated encoding for faster performance.
- Double-check the settings in VLC, ensuring that the appropriate audio, subtitle tracks, and output options are selected.
5. No Audio or Audio/Video Out of Sync
Missing sound or sync issues are among the most reported problems after conversion DVDs in VLC.
- Select the correct audio track before converting.
- Adjust audio codec (AAC/MP3) and sample rate (e.g., 48000 Hz).
- In the Preferences > Advanced Preferences, search ffmpeg and set the value of Strict standard compliance from -2 to 2.
- Open VLC, navigate to the Tools > Preferences. Click on Audio and then select Reset Preferences in the button.
- Modify FFmpeg settings (Strict standard compliance from -2 to 2).
6. Incomplete Output or Missing Episodes
VLC may only rip part of a DVD (e.g., one episode from a TV series). Some rips may produce very small or unplayable files due to scratches or newer DRM protections. In such cases:
- Manually select the correct title/chapter instead of default Title 1.
- Preview content in VLC to identify the full-length title.
- Avoid DVDs with complex multi-title structures when using VLC.
7. Choppy Playback or Poor Quality
Even when the ripping process finishes without errors, the output may still look blurry or play unevenly. In most cases, this is caused by mismatched encoding settings or overly aggressive compression choices.
- Match the frame rate with the original DVD source (commonly 23.976 or 29.97 fps) to avoid stutter.
- Manually increase bitrate instead of relying on defaults—low values often cause pixelation.
- Avoid unnecessary upscaling during ripping; keep native resolution for cleaner results.
- Use widely supported formats like MP4 (H.264) or MKV (H.264/H.265) for smoother playback.
- Enable deinterlacing (such as Yadif) if the source is interlaced to remove combing artifacts.
8. File Path or Disc Access Errors
Errors like “VLC is unable to open the MRL” usually indicate that VLC cannot correctly locate or access the disc or file path, often due to simple configuration or permission issues.
- Double-check the DVD drive path (e.g., D:/ or E:/) and confirm VLC is targeting the correct device.
- Create the output folder in advance and ensure it has proper write permissions.
- Run VLC as administrator to avoid access restrictions, especially on Windows.
- Close other programs that may be using the DVD drive and causing conflicts.
- Reinsert the disc, clean its surface, or try a different drive to rule out hardware problems.
9. General Fixes Worth Trying
If the VLC not ripping error persists, some general troubleshooting steps can help eliminate hidden glitches, outdated components, or configuration conflicts that may interfere with VLC’s normal ripping process.
- Update VLC to the latest version for improved stability and compatibility.
- Reset VLC settings to default to fix potential misconfigurations.
- Reinstall VLC completely to remove corrupted files or leftover data.
- Install missing codecs if your system lacks proper decoding or encoding support.
- Restart your system to clear temporary conflicts and refresh device access.
VLC is primarily a media player, not a dedicated DVD ripper. Its conversion process is closer to real-time recording than true ripping, which explains slower speed, limited format control, and compatibility issues with protected discs.
For occasional, simple DVD conversions, VLC can still be useful. However, for consistent results—especially with encrypted, damaged, or multi-title DVDs—a specialized ripping tool is usually the more reliable option.
Convert Protected DVDs Easily without VLC DVD Ripping Errors
If you have any trouble to rip a DVD using VLC successfully, for example, crashes, no audio, missing subtitles, black bars, freezes, etc. and can't fix the problem through the above guide or other forums, try VLC alternative DVD ripper - WinX DVD Ripper Platinum.
- A professional DVD ripper that supports regions, old DVDs, latest commercial movies, damaged, and scratched discs.
- It converts DVDs to any formats you may need, including mp4, mov, hevc, mkv, wmv, avi, flv, etc.
- Make 1:1 DVD copy to ISO image, back up full title, main title, rip and convert as you need.
- Advanced features to select audio/subtitle tracks, add subtitles, cut, crop, etc.
- Unique support for Level-3 Hardware Acceleration tech (powered by Intel QSV, Nvidia NVENC/CUDA ) to rip DVDs in 5 minutes only.
To provide a clearer perspective, here are the reasons why you should consider using an alternative tool to rip DVDs to MP4 on Windows/Mac instead of VLC.
 |
 |
|
Trusted by millions of users. Safe and clean. |
Free |
Free for a Limited Time |
Supported DVD formats |
No |
 |
Rip DVD to basic video and device formats |
Limited |
|
Back up DVDs |
 |
|
Unique for Special DVDs |
|
|
Hardware Acceleration enabled |
GPU accelerated decoding. Slow DVD to MP4 speed. |
|
Edit DVD video |
|
|
Select subtitle/audio tracks |
|
|
Upscale DVD to higher quality |
|
|
Play DVD movies |
|
|

FAQ about How to Rip A DVD with VLC Player
1. Can VLC rip copy protected DVDs?
No, VLC can't rip a protected DVD on its own. VLC is a media player instead of a DVD ripper. It has libdvdcss built-in to help it read the data on a protected disc, but it can't rip the DRM content into another format. To rip a protected DVD, you can:
- Play the DVD in a DVD player and remember the title that it plays. Then select the correct title in the VLC ripping settings.
- You can also rip a protected DVD using VLC and Handbrake together.
- Or simply try a VLC alternative DVD ripper to handle a protected disc.
2. How do I rip a DVD to MP4 with VLC?
It's easy to rip DVDs to MP4 using VLC. Detailed steps are listed above, but here is a simple guide:
- Load your DVD and open VLC. Then click on Convert/Save under Media.
- Click on the Disc tab and select your DVD drive. Wait for it to load, then click Convert/Save at the bottom.
- To rip DVDs to MP4, select Video - H.264 + MP3 (MP4) under Profile.
- Click the Browse button and select the destination, then click Start.
3. Can VLC rip DVDs with multiple episodes?
Yes, VLC can help rip TV show DVDs with many titles. After your DVD is loaded into VLC, you simply need to choose the title and chapter you want to rip in the Starting Position. VLC can only rip one episode at a time, as each episode is stored as a separate title.
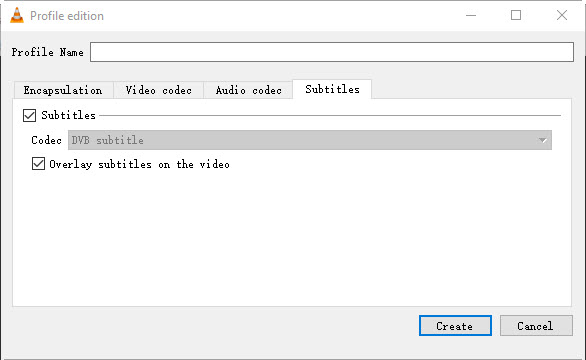
4. How to rip DVD with subtitles using VLC?
To convert DVDs in VLC while keeping built-in subtitles, first choose the subtitle track when loading your disc. If subtitles don't appear, go to VLC DVD ripping settings, select the Subtitles tab, check both "Subtitles" and "Overlay subtitles on the video", then press Save.
5. How to rip a DVD with the menu in VLC Media Player?
To keep DVD menus during ripping, choose an output format that supports extra files, such as ISO image, DVD folder, or MKV. VLC can rip DVDs to MKV. Click the Profile edition, choose MKV from the Encapsulation list to preserve all source DVD data, including menus.
6. How long does it take to rip a DVD with VLC?
It takes around 30 to 50 minutes to rip a DVD with VLC. VLC is slower because it relies on CPU for ripping, rather than using system resources efficiently like dedicated transcoders. Speed depends on your computer, DVD size, DVD-ROM speed, and output format.


