








How to Rip DVDs for Plex & Add Movies to Plex Media Server
If you’re looking to digitize DVD collection for a Plex Media Server (especially on a Synology or QNAP NAS), you've likely hit two common roadblocks: lossless rips from tools like MakeMKV balloon to 4–8GB per disc, quickly eating up storage, while improper formats trigger heavy CPU transcoding on Plex. To stream smoothly via Direct Play, preserve subtitles/extras, and save space, here is the complete guide to rip DVDs for Plex.
Quick Answer: How to Rip DVDs for Plex
To rip DVDs for Plex, make sure to use an optical DVD drive and a ripping tool such as MakeMKV or WinX DVD Ripper to convert the disc's main title into an MP4 or MKV video file.
- Best Settings for Compatibility: Choose MP4 (H.264 + AAC) to enable seamless Direct Play across most Plex clients without heavy CPU transcoding.
- Best Settings for Archival: Choose MKV if you prefer to preserve raw quality, multiple audio streams, and soft subtitles.
Once ripped, organize your files using Plex's movie naming conventions (Movie Name (Year)), point your Plex Media Server to the media folder, and test playback on your target device.
Table of Contents
How to Rip DVDs for Plex: 3 Best Methods
- Method 1. MakeMKV Only (Best for Lossless 1:1 Archival)
- Method 2. MakeMKV + HandBrake (Most Recommended by Reddit for Size & Quality)
- Method 3. WinX DVD Ripper (Best One-Click Solution for Encrypted DVDs)
What're the Best Video Formats and Encoding Settings for Plex?
How to Rip DVDs for Plex: 3 Best Workflows
Preparing DVDs for Plex media streaming generally involves balancing three factors: original video/audio quality, NAS storage limits, and conversion effort. Before choosing a tool, evaluate your setup against these core goals:
- Stream Compatibility: Ensuring smooth Direct Play across your smart TVs, tablets, and streaming sticks to avoid CPU-heavy transcoding.
- Storage Optimization: Managing file sizes so a large DVD collection fits comfortably on your hard drives or NAS.
- Content Preservation: Retaining desired language audio tracks, soft SRT subtitles, and bonus featurettes.
- Support Copy Protection: Verifying disc encryption support and rip a protected DVD to Plex successfully.
To help you quickly choose the right DVD ripper solution, the table below compares the three most effective workflows, followed by step-by-step instructions for each.
Quick Comparison of the 3 Workflows
Feature / Goal |
MakeMKV Only |
MakeMKV + HandBrake |
WinX DVD Ripper |
Best for |
Lossless 1:1 archival | Balanced storage & high quality | Fast, one-click conversion |
Output Format |
Raw lossless MKV | Compressed MP4 / MKV (H.264/HEVC) | MP4 / AVI / MOV / 4 lossless copy modes |
Average File Size |
4-8 GB/movie | 1-2 GB /movie | 1-2 GB /movie |
Process Complexity |
1 step (extract only) | 2 steps (Extract then Encode) | 1 step (direct decrypting & ripping) |
Encryption Handling |
Yes | Yes (via MakeMKV) | Yes (built-in title-check mechanism) |
Plex Direct Play |
Dependent on client support | Excellent | Excellent (optimized profiles) |
Conversion Speed |
Fast (copy-level speed) | Moderate (requires re-encoding time) | Fast (full GPU acceleration) |
Method 1. MakeMKV Only – 1:1 Lossless Archival
If you have plenty of NAS storage, prioritize preserving the original DVD video and audio quality, and your Plex clients can play the resulting files as expected, MakeMKV is a simple free option. It extracts selected DVD titles and tracks into MKV files without re-encoding the video or audio.
Key Considerations:
- 1:1 Bit-for-Bit Backup: MakeMKV copies the selected encoded video and audio streams into an MKV container without re-encoding them. You can keep the original MPEG-2 video streams, select uncompressed Dolby Digital/DTS audio, subtitle tracks you want. However, the resulting MKV is not a bit-for-bit copy of the entire DVD, and interactive DVD menus are not preserved.
- Large File Sizes: A feature-length DVD movie may produce an MKV file of several gigabytes. In our test, a single MKV file from a DVD rip was anywhere between 4 and 8GB, depending on the source and selected tracks.
- Potential Transcoding in Plex: Raw DVD MPEG-2 video inside an MKV container is not natively supported by every Plex client (such as older web browsers or low-end streaming sticks), which may cause your Plex Media Server to transcode the video during playback. In this situation, you can consider reencoding the MKV movie to H.264 or HEVC with Handbrake as described in Method 2 or Method 3.
How to Rip DVDs for Plex with MakeMKV?
Step 1. Insert the source DVD into the computer's DVD drive and download and install MakeMKV on your operating system.
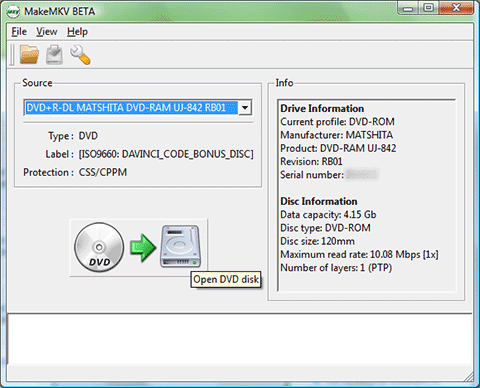
Step 2. Open MakeMKV and click the big optical drive button. MakeMKV will read the DVD and then display the DVD info.
Step 3. You can click on the disclosure triangle icon next to the disc to select the main title, the audio, or subtitle tracks you'd like to store in Plex. Generally, check the title duration to avoid selecting an unwanted short clip or duplicate title.
Step 4. Choose the output format. There is no further setting for Plex that you can adjust. Simply click on the MakeMKV button to start ripping the DVD for Plex. If the files are too large or playback requires transcoding, consider Method 2 or Method 3.
Step 5. Add the resulting files to the appropriate Plex media folder and check playback on your primary Plex client. If the files are too large or playback requires transcoding, consider Method 2.
Method 2. MakeMKV + HandBrake Combo – Reddit's Top Recommendation for Balanced Size and Quality
If you want to keep your DVD collection manageable without costing a single penny or sacrificing more source quality than necessary, MakeMKV and HandBrake can be used together. The two-step process is the most widely recommended free workflow across Plex forums and Reddit when it comes to ripping DVDs for Plex. It utilizes MakeMKV to rip protected DVDs and Handbrake to compress the MKV file for efficient storage and playback.
Why Community Users Prefer This Workflow:
- Handle Copy Protection: MakeMKV handles commercial DVD encryption without requiring complex system library configurations.
- Optimized NAS Storage: Reduces large 4–8GB DVD files down to a manageable 1–2GB with virtually no perceived visual quality loss.
- Prevents CPU Transcoding: Converts raw DVD video into an MP4 (H.264 + AAC) container for maximum Direct Play compatibility across smart TVs, mobile devices, and streaming devices.
- Preserves Flexible Subtitles: Retains multiple audio commentary tracks and allows you to keep soft SRT subtitles or burn in forced subtitle tracks.
Note: If you are going to digitize your home DVDs for Plex streaming, Handbrake is a great tool. If you have any commercial discs protected by CSS and want to store them in plex server, you can also follow the libdvdcss for Handbrake tutorial to rip CSS-protected DVDs and enjoy them on Plex. But for complex DVDs, stick to the combo or try WinX DVD Ripper.
How to Rip DVDs for Plex with MakeMKV and Handbrake Combo?
Step 1. Extract lossless file with MakeMKV
Insert your DVD and use MakeMKV to create a lossless MKV file. This preserves your preferred subtitles, audio tracks, and export a lossless .mkv file to your drive. You can follow the method 1 to do the MKV extraction.
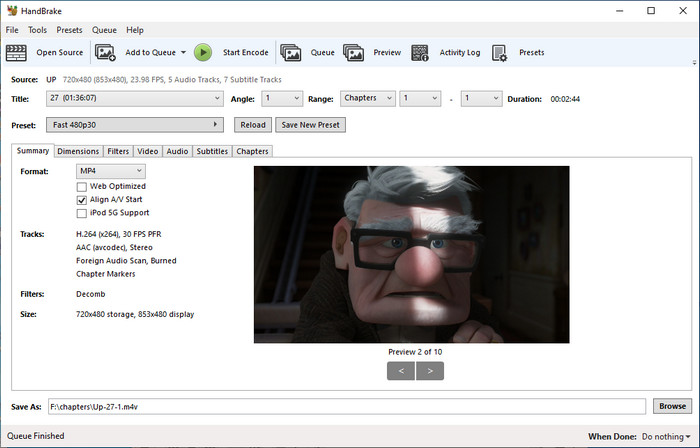
Step 2. Transcode with HandBrake. Launch HandBrake and open the MKV file in HandBrake. Choose an MP4 container (H.264) or HEVC (H.265) if storage is a concern.
Step 3. Configure Subtitles and Audio. HandBrake allows you to:
- Select specific subtitles to burn into the video or keep as soft subtitles for Plex.
- Adjust audio tracks to AAC or AC3 pass-through to maintain compatibility and quality.
- Reduce file size while keeping video quality close to original DVD.
- Optional: Crop black bars, trim, or apply filters if needed.
Step 4. Start Encoding. Specify output file name and save path. Click Start Encode and then HandBrake will begin ripping DVD and produce a compressed, streaming-ready file for Plex.
Here’s how to rip Blu-ray for Plex, as well as DVDs to Plex, step by step:
Method 3. One-Click Solution: WinX DVD Ripper (Fast Hardware-accelerated Workflow)
If you find the two-step MakeMKV + HandBrake process too time-consuming, or if you encounter advanced disc encryption (such as 99-title discs, regional locks, or damaged sectors), WinX DVD Ripper provides a direct, single-application alternative. It can convert both homemade and commercial DVDs to Plex formats with optimal balance among speed, quality and file size.
Key Advantages:
- One-step ripping: Decrypt, convert, and compress commercial DVDs directly into Plex-optimized MP4 files in a single pass.
- Full hardware acceleration: Leverage Intel/NVIDIA/AMD GPU hardware acceleration to rip a full DVD in under 5 minutes.
- Smart storage compression: Automatically compress 8GB DVD content down to 1-2 GB MP4 files while maintaining high visual quality.
- Handle all encrypted DVDs: Support region codes, CSS, ARccOS, 99-title protection, etc. without requiring extra software or plug-ins.
Note: The downloads above are for Windows and Mac only. If you are a mobile user, please click here.
Please DO NOT use WinX DVD Ripper to rip rental DVDs.
How to Rip DVD to Plex in Clicks with WinX DVD Ripper?
Free download and install the free DVD to Plex ripper on your desktop, then follow the step-by-step instruction below:
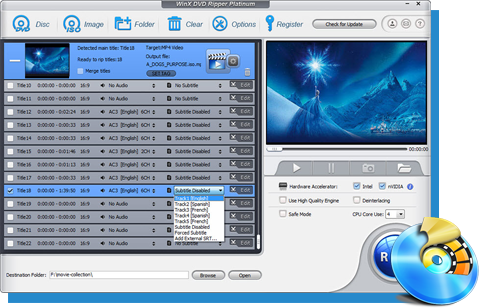
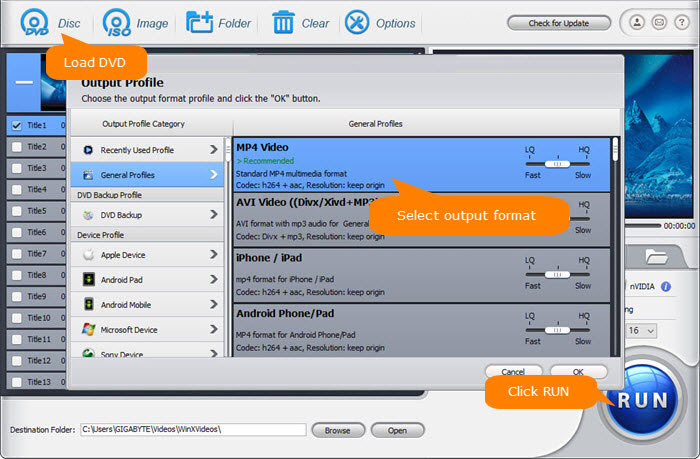
Step 1. Insert the DVD disc to the DVD-ROM and launch the DVD movie to Plex ripper. Click on the DVD Disc button to import the DVD. The software will automatically analyze and select the correct main movie title. It helps back up all your DVDs to the Plex media server.
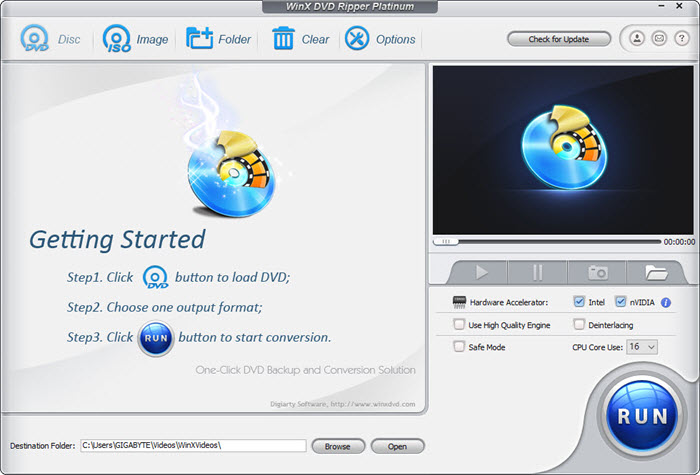
Step 2. To rip DVD movies to Plex, go to General Profiles and select MP4 Video (h264+aac) at the profile library for broad playback compatibility across all Plex devices. (If you prefer retaining multiple audio tracks and soft subtitle streams, select MKV Video instead). Then click OK.
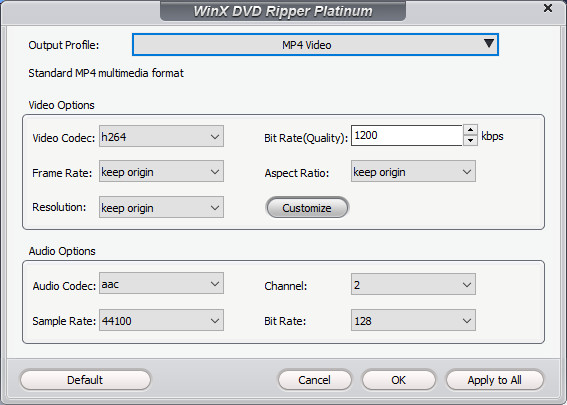
Step 3 (optional). Back on the main interface, click the setting icon next to the selected profile, you can adjust video audio parameters. But if you don't know parameters very well, just keep them as default which are the best settings for ripping DVDs to Plex.
You can also click on the selected title to choose the preferred audio track and subtitle you'd like to store in Plex.
Best Settings for Ripping DVDs to Plex:
- Leave the frame rate, aspect ratio, and bitrate as default unless you know exactly what they mean.
- Keep the original DVD resolution unless you have a specific reason to resize it. Common DVD video dimensions are 720×480 for NTSC and 720×576 for PAL. Avoid unnecessary upscaling, as increasing the output resolution alone does not restore detail that was not present in the source.
- Choose video codec H.264 to avoid possible compabibility issues on Plex.
Step 4. Next, click on the Destination Folder to set an output folder for the converted DVD movie. Then click the RUN button to rip DVD for Plex at lightning speed with best quality. Minutes later, the DVD video will be saved in the destination folder in an format of Plex.
Note: Please check the video, audio, subtitles, and playback behavior before adding the file to your Plex library. MP4 with H.264 and AAC is a reasonable starting point, but the actual Direct Play or transcoding behavior depends on the target Plex client and its supported formats.
Legal Disclaimer: WinX DVD Ripper, developed by Digiarty Software, is a DVD conversion tool. Copying commercial DVDs may be restricted by copyright law or anti-circumvention rules, even when you own the disc. Check the laws that apply in your location and the rights attached to the content before making a copy. This article does not encourage unauthorized distribution or infringement.
Video Tutorial: How to Rip and Add DVD Movies to Plex Library for Easier Playback
Best DVD Formats and Encoding Settings for Plex
Choosing the right format and encoding parameters is critical to avoiding heavy CPU transcoding on your Plex Media Server (especially when running on a low-power Synology or QNAP NAS). Your main goal is to achieve Direct Play across as many client devices as possible.
1. Container & Codec: MP4 vs. MKV (H.264 vs. HEVC)
- MP4 (H.264 + AAC/AC3): The universal standard. Recommended if your priority is maximum compatibility across Smart TVs, Apple TV, Firestick, Roku, web browsers, and mobile devices without transcoding.
- MKV (H.264 or HEVC): Recommended for lossless archival or when you need to preserve multiple audio tracks (e.g., director commentaries, multi-language audio) and embedded soft subtitles.
- H.264 vs. HEVC (H.265): While HEVC offers smaller file sizes, H.264 provides broader hardware decoding support across older Plex clients. For standard-definition (SD) DVDs, H.264 is usually the safest starting point.
2. Resolution & Bitrate: Why You Shouldn't Upscale SD DVDs
- Keep Original SD Resolution: Standard DVDs use 720×480 (NTSC) or 720×576 (PAL).
- Avoid Upscaling to 1080p/4K: Increasing the output resolution during ripping uses pixel interpolation, which inflates file size without restoring missing source detail. Let your client TV or Plex player handle display scaling natively.
- Bitrate & Quality: Leave bitrate as Default/Keep Original or set a Constant Rate Factor (CRF) between 18 and 20 for optimal visual quality.
3. Audio & Subtitles: Soft SRT vs. Burned-in PGS, AAC/AC3 Passthrough
- Audio Track: Use AAC for 2-channel stereo or AC3 / DTS Pass-through if you have a multi-channel home theater setup.
- Subtitles: Standard DVD bitmap subtitles (VOBSUB/PGS) can cause Direct Play to fail on web browsers and smart TVs, triggering forced transcoding. For the best performance, extract or download external soft SRT subtitles.
Not sure whether MKV, MP4, or H.265 is best for Plex? See our best DVD ripping format guide.
4. Recommended Starting Settings for DVD Rips by Reddit Users
For a quick reference, these baseline settings are widely recommended across r/PleX and home server communities for the best balance of quality, compatibility, and file size:
- Container: Choose MP4 for maximum universal playback and MKV for flexible multi-track retention.
- Video Codec: H.264 (DVDs are SD; don’t upscale to 1080p unless you’re okay with interpolation – it won’t improve true quality)
- Audio: AAC or AC3 pass-through (keeps Dolby/DTS tracks intact)
- Resolution: Keep original DVD SD resolution (typically 720×480 for NTSC or 720×576 for PAL)
- Frame Rate: Keep original DVD framerate (usually 23.976, 25, or 29.97 fps)
- Subtitles: Use external or soft SRT subtitles whenever possible. If using HandBrake, keep DVD embedded subtitles as soft tracks or burn in forced subtitles for foreign dialogue.
How to Add DVD Movies to Plex Media Server?
Once your DVDs are ripped and encoded, organizing them according to Plex’s media guidelines ensures the metadata agent automatically pulls high-resolution posters, release dates, plot summaries, and cast information.
Step 1. Organize Files with Standard Plex Naming Conventions
Plex relies on a strict directory structure to differentiate between movies and television series. For official guidelines and advanced ID tagging, refer to the Plex Support: Naming & Organizing Movies and Plex Support: Naming & Organizing TV Shows documentation.
For DVD movies: Place each movie inside its own folder, named with the movie title and release year:
- /Movies/Movie Name (Release Year)/Movie Name (Release Year).ext
- Example: /Movies/Avatar (2009)/Avatar (2009).mp4
For DVD TV Shows: Organize TV series into dedicated main directories with numbered Season folders and SxxExx episode tags:
- /TV Shows/Show Name (Release Year)/Season 01/Show Name - S01E01 - Episode Title.ext
- Example: /TV Shows/The Office (US) (2005)/Season 01/The Office (US) - S01E01 - Pilot.mp4
Handling Extras & Bonus Features (Optional): To organize deleted scenes, featurettes, or behind-the-scenes footage without cluttering your main library, place them inside recognized subfolders:
- /Movies/Avatar (2009)/Behind The Scenes/making_of.mp4
- /Movies/Avatar (2009)/Deleted Scenes/alternate_ending.mp4
Step 2. Add Media Folders to Your Plex Library
After organizing your files, add the parent folder containing your movies or TV show folders to the corresponding Plex library.
- Open the Plex Web App in your browser and sign into your server.
- In the left-hand navigation menu, click Settings (Gear Icon) > Manage > Libraries.
- Click Add Library, select the appropriate library type (Movies or TV Shows), and assign a name and language.
- Click Browse for Media Folder and select the directory containing your converted DVD files (e.g., D:\Movies or /volume1/Media/TV Shows).
- Click Add Library to complete the setup.
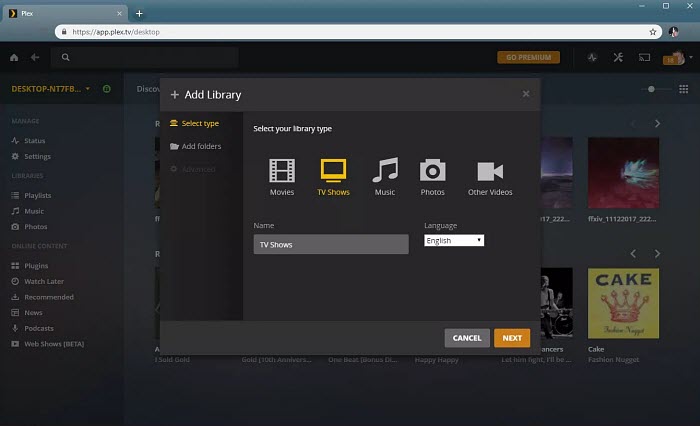
Note: If you already have a library configured, hover over it in the left sidebar, click the Three Dots (...) icon, select Manage Library > Edit > Add folders, and point to your new directory.
Step 3. Scan Library Files & Verify Playback
Plex will automatically begin scanning your folders and matching metadata. If your newly added movies do not appear immediately, click the Three Dots (...) icon next to your Movies library and select Scan Library Files to trigger a manual scan.
FAQs & Troubleshooting for Ripping DVDs to Plex
1. Why is Plex not recognizing or matching my DVD movie?
Plex relies heavily on strict file and folder structures to query online media databases. When a movie is placed loose in a root folder, lacks a release year, or contains arbitrary characters in the file name, the automated metadata agent may fail to identify the title or match it to the wrong movie entirely.
How to fix it:
- Place each movie in its own dedicated subfolder named strictly following the convention: /Movies/Movie Name (Release Year)/Movie Name (Release Year).ext.
- Navigate to your Plex library, hover over your Movies section, click the Three Dots (...) icon, and select Scan Library Files.
- If the movie is still misidentified, click Fix Match on the movie page, or append the exact IMDb/TMDB ID inside curly braces to the file name (e.g., Movie Name (2009) {imdb-tt1234567}.mp4).
2. Why does Plex transcode my DVD rips?
Transcoding occurs when the playback client—such as an older Smart TV, web browser, or mobile app—lacks native hardware support for the video codec, multi-channel audio format, or subtitle layer contained in your DVD file. When this happens, the Plex Media Server is forced to decode and re-encode the stream in real-time, which heavily taxes your CPU and often leads to buffering on low-power NAS drives.
How to fix it:
- Re-encode raw DVD files into MP4 (H.264 + AAC) using WinX DVD Ripper or HandBrake before importing them to ensure maximum Direct Play compatibility.
- Verify that your Plex client app's remote and local video quality options are set to Original / Maximum rather than a throttled bitrate.
- Switch off embedded bitmap subtitles or replace them with external soft SRT subtitles.
3. Why are DVD subtitles missing or causing buffering and stuttering?
Standard DVDs store subtitles as image-based bitmap overlays (VOBSUB or PGS) rather than text. Because many modern streaming sticks and web clients cannot overlay bitmap graphics natively during video playback, Plex has to burn the subtitles directly into the video frames on the server side, triggering intense CPU transcoding that causes buffering.
How to fix it:
- When extracting your DVD with MakeMKV or WinX DVD Ripper, ensure you check the intended language audio/subtitle track.
- For seamless streaming without transcoding, download or extract external text-based soft SRT subtitles and save them in the same folder with a matching name: Movie Name (2009).en.srt.
4. Can Plex play DVD ISO images or VIDEO_TS folders directly?
No, Plex does not support physical disc images like ISO files, IFO files, or raw VIDEO_TS folder directories. Plex is specifically architected to index and stream continuous digital media files rather than emulate physical optical disc menus and interactive navigation structures. You can convert your ISO images or VIDEO_TS folders into standard MP4 or MKV video files using WinX DVD Ripper or MakeMKV before adding them to your server directory.