


How to Rip and Add DVDs to Jellyfin Server
Jellyfin is a free and open-source media server that empowers users to create their personalized home entertainment center. It allows you to organize, manage, and stream various media content, including movies, TV shows, music, and photos. Therefore, some people want to rip their DVDs onto Jellyfin server.
In this article, we'll explore the process of ripping DVDs for Jellyfin, enabling you to digitize your movie library and seamlessly integrate it into your media server.
Table of Contents
Part 1. Ripping DVDs for Jellyfin
Ripping DVDs is the first step towards making your physical DVD collection accessible via Jellyfin. There are a variety of software options available to accomplish this task, with WinX DVD Ripper being the most popular choice.
Download the Best DVD Ripper for Jellyfin
WinX DVD Ripper is recognized as one of the best DVD ripping software solutions available, and it excels at preparing your DVD collection for use with Jellyfin. This powerful tool offers a range of features that make it an ideal choice for converting your physical DVDs into digital formats that Jellyfin can easily handle.
Here's why WinX DVD Ripper stands out as the top choice for DVD ripping when you want to build a comprehensive digital media library for Jellyfin:
Support for Copy-Protected DVDs: WinX DVD Ripper is equipped to handle copy-protected DVDs, including those with region code, CSS, RCE, UOPs, Sony ARccOS, Disney X-project DRM, and more. This feature ensures that you can convert your entire DVD library, even if some of your discs are protected by copyright measures. In addition to DVDs, WinX DVD Ripper also allows you to convert ISO image files and VIDEO_TS folders for Jellyfin.
Wide range of supported formats: This software supports a variety of output formats, including popular options like MP4, TS, and more. These formats are compatible with Jellyfin, ensuring seamless integration.
Ripping speed: WinX DVD Ripper boasts hardware acceleration technology, which significantly speeds up the ripping process. Ripping a DVD can be accomplished within a matter of minutes. This is very beneficial for people with a large DVD collection.
High-quality ripping: WinX DVD Ripper is known for its ability to maintain excellent video and audio quality during the ripping process. You can expect your digital copies to be virtually indistinguishable from the original DVDs.
Customization options: WinX DVD Ripper allows you to tailor your ripped content to your preferences. You can select specific titles, chapters, audio tracks, and subtitles, and you can trim, crop, and merge videos, giving you full control over the output.
You can free download and install WinX DVD Ripper, and follow the steps below to rip your DVDs to Jellyfin.
Steps to Rip a DVD for Jellyfin
Step 1. Insert the DVD.
Insert the DVD you want to rip into your computer's DVD drive.
Step 2. Import the DVD into WinX DVD Ripper.
Launch WinX DVD Ripper and click the "DVD Disc" button to select the source DVD.
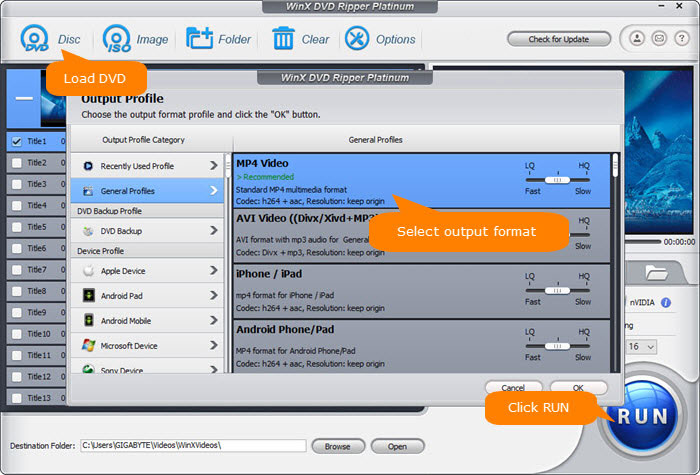
Step 3. Select the output format.
After loading the DVD, WinX DVD Ripper will display the Output Profile window, where you should choose an output format compatible with Jellyfin.
For optimal compatibility across all Jellyfin clients, it's recommended to select MP4 (h.264+aac) from the "General Profiles" category.
Learn more about Jellyfin supported formats and codecs >>
Step 4. Choose the title you want to rip.
WinX DVD Ripper typically automatically selects the main movie title. You can customize this selection based on your preferences.
Additionally, you can specify your desired audio track and subtitle track. You can also click the "Edit" button to trim, crop, and add an external subtitle track. Furthermore, you can click the gear icon to adjust parameters like resolution, bit rate, and audio channel.
Step 5. Specify the save path.
Click the "Browse" button to designate where you want to save the resulting file.
Step 6. Start the ripping process.
Click the "RUN" button to begin ripping DVD for Jellyfin. The duration of the ripping process will depend on your hardware and chosen settings.
Part 2. Adding Ripped DVDs into Jellyfin
Once you have successfully ripped your DVDs into digital formats, it's time to import them into Jellyfin and build your digital media library.
Step 1. Setting up Jellyfin.
Install and set up Jellyfin on your server or computer. This process involves configuring your server settings and creating user accounts if needed.
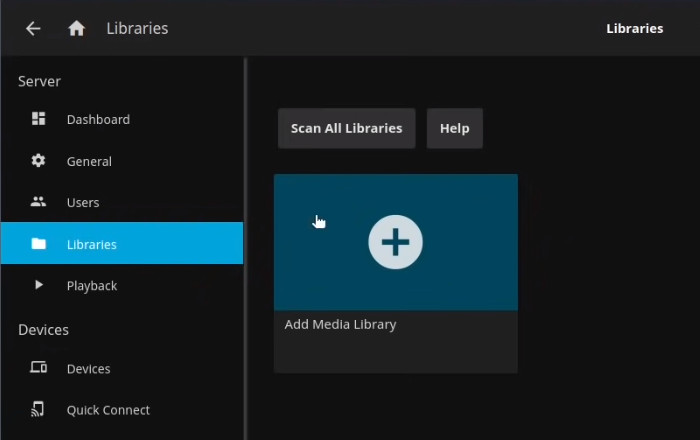
Step 2. Adding a new library for ripped DVDs.
In Jellyfin's web interface, navigate to the "Libraries" section and click the "Add Media Library" to add a new library for your ripped DVDs. A dialogue box will appear, prompting you to specify the content type and path for the media library.
Under "Content type", select the appropriate category from options such as "Movies," "Music," "Shows," "Books," "Photos," "Music Videos," or "Other."
In the "Path" section, browse and choose the directory where your ripped DVD files are stored.
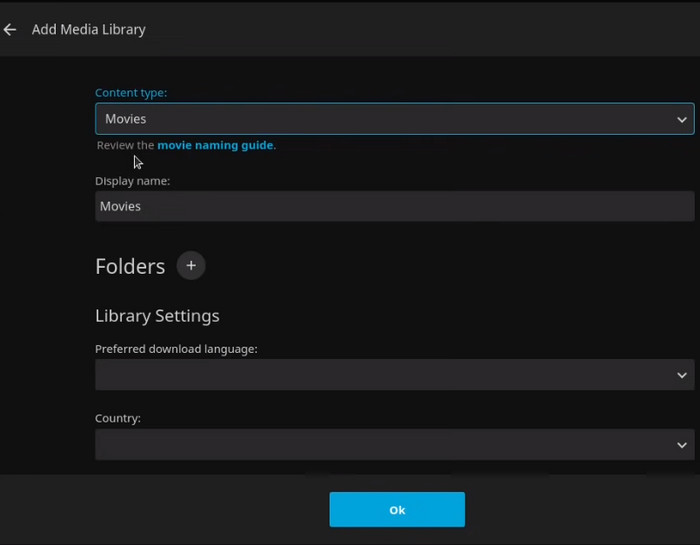
For further customization, Jellyfin offers various Library settings to match your preferences. For instance, you can check the box of "Enable real-time monitoring". This feature ensures that any newly ripped DVD movies placed in the specified directory are automatically detected and added to your Jellyfin library. It simplifies the process of keeping your digital media library up-to-date.
By following these steps, you can seamlessly integrate your ripped DVD collection into Jellyfin and enjoy easy access to your digital media content.
Part 3. Streaming Ripped DVDs via Jellyfin
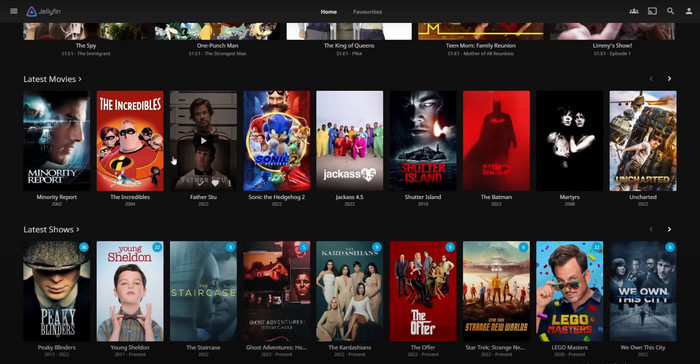
With your ripped DVD collection integrated into Jellyfin, you can now enjoy your movies on various devices throughout your home.
Step 1. Accessing Jellyfin on your device.
Install the Jellyfin app or access the Jellyfin web interface on devices like smartphones, tablets, smart TVs, or gaming consoles.
Step 2. Browsing and selecting ripped DVD content.
Navigate through Jellyfin's interface to browse and select the movie you want to watch.
Step 3. Streaming DVD content with Jellyfin.
Click on the desired DVD title, and Jellyfin will seamlessly stream the movie to your chosen device.
This is the comprehensive tutorial on how to rip and add DVDs to Jellyfin. Follow these steps, create your digital media library, and start streaming your favorite movies via Jellyfin. Happy movie watching!
Disclaimer: Digiarty Software shares steps to build Jellyfin movie library with users' own DVDs and strongly discourages ripping copy-protected DVDs for any commercial purpose. Please refer to the DVD copyright laws in your countries before doing so.


