


How to Fix CD DVD Drive Not Working in Windows 11/10/8/7
Sometimes when we happily insert a DVD into the CD DVD drive in preparation for our movie tour, something bad might happen - the CD DVD drive isn't working. We can't see the DVD drive in File Explorer (called Windows Explorer in Windows 7 and earlier versions of Windows). When we open the Device Manager, we might see a yellow exclamation mark on the DVD drive. In this case, if we right click on the drive and choose Properties, we may see one of the following error messages in the Device status area.
- Windows cannot start this hardware device because its configuration information (in the registry) is incomplete or damaged. (Code 19)
- The device is not working properly because Windows cannot load the drivers required for this device. (Code 31)
- A driver (service) for this device has been disabled. An alternate driver may be providing this functionality. (Code 32)
- Windows cannot load the device driver for this hardware. The driver may be corrupted or missing. (Code 39)
- Windows successfully loaded the device driver for this hardware but cannot find the hardware device. (Code 41)
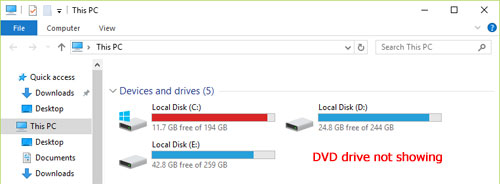
As you can see, each error message explains why the CD or DVD drive is not showing up in File Explorer. The issue that CD or DVD drive becomes unable to be recognized usually occurs after you upgrade your operating sytem (such as after Windows 10 upgrade), after you install or uninstall CD or DVD recording programs, or after you uninstall Microsoft Digital Image.
So far, we have found a total of 12 possible solutions to fix DVD drive not working on Lenovo, Dell, HP, Toshiba satellite, and other laptops or desktop computers.
12 Solutions to Fix DVD Drive Not Working:
- Solution 1. Reset the computer power
- Solution 2. Use the Hardware and Devices troubleshooter
- Solution 3. Check BIOS/UEFI settings and chipset drivers
- Solution 4. Reinstall or update driver in Device Manager
- Solution 5. Uninstall and reinstall IDE ATA/ATAPI Controllers
- Solution 6. Fix corrupted Windows registry entries
- Solution 7. Create a registry subkey
- Solution 8. Go to Windows Update and install the latest drivers
- Solution 9. Uninstall virtual drive software
- Solution 10. Buy a new DVD drive
- Solution 11. Downgrade Windows 10 to previous version
- Solution 12. Check the drive cable connections
Solution 1. Reset the computer power
Sometimes, we can fix DVD drive not working simply by resetting the computer power. Follow the steps below.
Step 1. Press and hold the Power button of your computer for 5 seconds to turn off it completely.
Step 2. Wait until the computer fully shuts down, and then unplug the power cord from the computer.
Step 3. This step is for laptop users only. Remove all batteries from their compartments, wait 10 seconds, and then reinsert the battery (or batteries). If your laptop has a battery that is sealed within the computer case or a battery that cannot be removed easily, skip this step.
Step 4. Wait at least 10 seconds, and then reconnect power to the computer.
Step 5. Turn on the computer and wait for Windows to start. If any messages display indicating that Windows is installing new hardware, wait for Windows to finish before checking to see if the CD/DVD drive is detected.
Note: This article focuses on fixing CD/DVD drive not showing up in all Windows computers. If you want to fix CD/DVD drive not recognized in Windows 11, check this article.
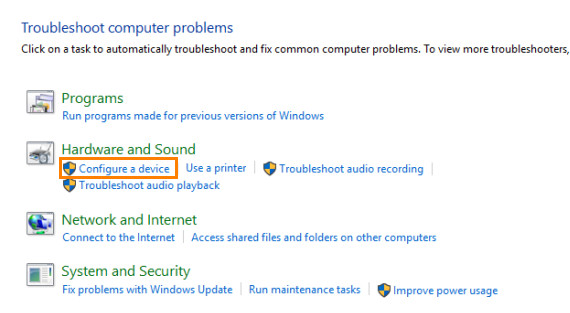
Solution 2. Use the Hardware and Devices troubleshooter
This method can be used to fix DVD drive not working in Windows 7 or Windows 8.1. Below are the steps to take.
Step 1. Press the Windows logo key and the R key to open the Run dialog box.
Step 2. Enter control in the Run dialog box to open Control Panel.
Step 3. Type troubleshooter in the Search box of Control Panel, and then click Troubleshooting.
Step 4. Under the Hardware and Sound item, click Configure a device. If you are required to enter an administrator password or provide confirmation, just type the password or provide confirmation.
Solution 3. Check BIOS/UEFI settings and chipset drivers
When DVD drive is missing in Windows 10, you should make sure the DVD drive shows up in BIOS. If it isn't there, you can check the drive cable connections or contact the manufacture for help.
Follow the steps below to check if DVD drive appears in BIOS.
For laptop:
Step 1. Press and hold the power button for 5 seconds to shut down computer completely.
Step 2. Open the computer and immediately press the F10 key repeatedly until the BIOS Setup Utility screen appears.
Step 3. Use the arrow keys to navigate to the System Configuration screen.
Step 4. Choose Boot Options, and then press Enter.
Step 5. On the Boot Options sub-screen, select Boot Order, then press Enter.
Step 6. In the Boot Order list, look for a CD/DVD drive entry. Depending on your notebook model and specific CD/DVD drive, the entry name indicates the exact type of disc drive you have (for example, it might read Internal CD/DVD-ROM Drive).
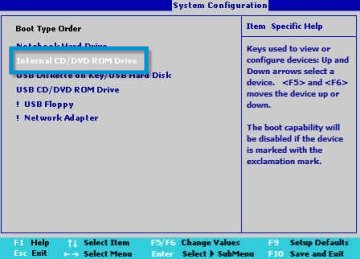
Step 7. Press Esc, and then press Enter to Exit BIOS.
If you can find CD/DVD drive in BIOS, then the DVD drive not detected problem is probably software related. In this case, go to check the CD/DVD drive name in Device Manager, and then reinstall the CD/DVD drive in Device Manager to determine if Windows is able to detect the drive.
If you can't find CD/DVD drive in BIOS, then it's a hardware-related problem. What you need to do now is to test for optical drive hardware failure.
For desktop:
Step 1. Press and hold the power button for 5 seconds to shut down computer completely.
Step 2. Open the computer and immediately press the F10 key repeatedly until the BIOS Setup Utility screen appears.
Step 3. Use the arrow keys to navigate to the Storage tab.
Step 4. Use the arrow keys to select Device Configuration, and then press Enter.
Step 5. Look for a CD/DVD drive entry in the Device Configuration sub-screen.
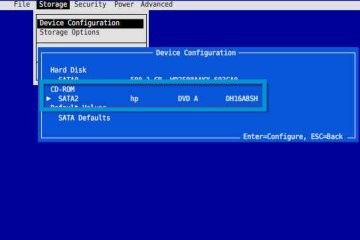
Step 6. Press the Esc key to exit Device Configuration.
Step 7. Press the Esc key again, press Enter, and then press Enter again to Ignore Changes and Exit BIOS.
If you can find CD/DVD drive in BIOS, then the DVD drive not detected problem is probably software related. In this case, go to check the CD/DVD drive name in Device Manager, and then reinstall the CD/DVD drive in Device Manager to determine if Windows is able to detect the drive.
If you can't find CD/DVD drive in BIOS, then it's a hardware-related problem. What you need to do now is to check the drive cable connections (desktop tower computers only).
Additionally, your chipset drivers may be obsolete and that is the cause for many DVD player reading errors. Go to your computer manufacturer's official website, browse the downloads section for your particular model, install the latest chipset driver, and see if your DVD drive not working problem is resolved.
Solution 4. Reinstall or update driver in Device Manager
An outdated DVD drive can also cause DVD drive missing issue, especially after you've upgraded to a new Windows system. For that, you can search for the driver on the device manufacturer's website, and install it within the following steps.
Step 1. Press the Windows key + R to run a dialogue box, then type devmgmt.msc and hit Enter to open Device Manager.
Step 2. Locate on expand DVD/CD-ROM drives item and expand it.
Note: If DVD/CD-ROM drives doesn't exist here, try reseting your computer power to fix the issues with the CD/DVD drive.
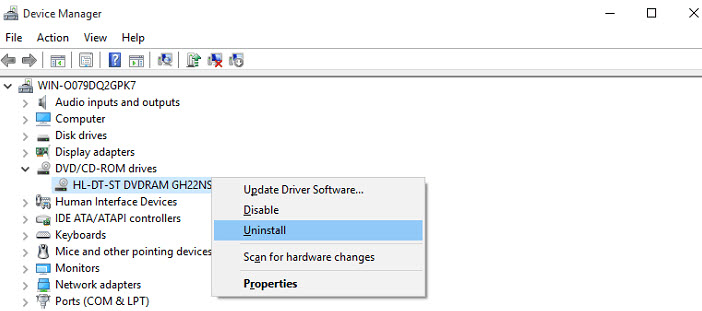
Step 3. Right-click the CD and DVD devices and then click Uninstall. (Alternatively, you can right click on the optical drive and choose Update Driver Software.)
Step 4. Click OK or Yes when you're prompted to confirm that you're sure to remove the device. Then the name of the CD/DVD drive will be removed from the list. If there is only one CD/DVD drive, then the DVD/CD-ROM drives category will be removed as well.
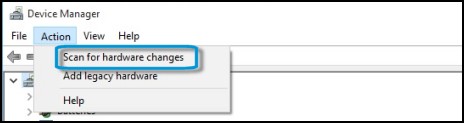
Step 5. In Device Manager, click Action, select Scan for hardware changes.
Step 6. Restart your computer and the Windows system will reinstall and update version of driver automatically.
Step 7. Open the DVD/CD-ROM drive category again and check what displays on DVD/CD-ROM drives.
If CD/DVD drive name doesn't show up, the DVD drive is not being detected by Windows. Then, click Scan for hardware changes again to see if it can detect the drive. If it still doesn't work, close Device Manager, reseat the DVD drive cables if necessary, and reset the computer power to resolve issues with the CD/DVD drive.
If the CD/DVD drive icon name is displayed with an alert symbol, double-click the drive name to find more information. Do the following depending on what displays in the Device Status section:
- If error code 10, 19, 31, 32, 30, or 41 displays in Device Status, a problem exists with the integration of previous CD burning software. Go to Clear the upper and lower registry filters to remove associated control filters from the registry.
- For any other error, see the information that is provided with the error code.
If the CD/DVD drive is shown with a disabled icon (an arrow pointing down), it means that the CD/DVD drive has been disabled. Then just right-click the drive name and select Enable. You might have to restart the computer. The CD/DVD drive should work correctly after it is enabled.
If the drive cannot be enabled, a required software service or driver is disabled or not functioning properly. Then, taking these actions might resolve this problem.
1. Go to Device Manager and double-click IDE ATA/ATAPI controllers to see if there are any problems and troubleshoot them according to the error codes.
2. Reset the BIOS.
- Turn off the computer.
- Press the Power button, and then repeatedly press esc until the Startup Menu opens, and then press f10 to access the BIOS.
- On a laptop, press f9 to Setup Defaults, press enter, and then press f10 to save and exit.
- On a desktop computer, use the arrow keys to navigate to the File tab, select Apply Defaults and Exit, press enter, and then press enter again to confirm.
Solution 5. Uninstall and reinstall IDE ATA/ATAPI Controllers
Firstly, Windows software update may make your DVD drive a hidden device. You can unhide DVD device in Windows to get it back in File Explorer. If it doesn't work, try to uninstall IDE ATA/ATAPI Controller.
Step 1. Press the Windows key + R then type devmgmt.msc and hit Enter to open Device Manager.
Step 2. Locate the IDE ATA/ATAPI controllers item and expand it.
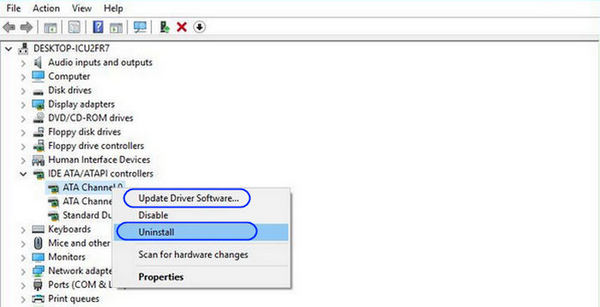
Step 3. Right-click on the listed controllers (ATA Channel 0, ATA Channel 1, and Standard Dual Channel PCI IDE Controller, etc.) and select Uninstall.
Step 4. Right-click again these items and select "Scan for hardware change" this time.
Step 5. Reboot your computer and Windows will automatically installed the drivers for IDE ATA/ ATAPI controllers.
Solution 6. Fix corrupted Windows registry entries
If the CD/DVD drive still not showing up after exhausting these troubleshooting steps, you try to make changes to the Windows 10 registry, which might restore functionality. However, registry entry needs to be taken very carefully, make sure you've backed up your registry before carrying out steps to fix DVD drive not detected error.
Note: To fix corrupted registry entries, you must be logged on to as an administrator. To verify that you are logged in as an administrator, open Control Panel, select User Accounts, and then select Manage User Accounts.
Step 1. Likewise, press Windows key + R to launch a run command. Type regedit in the run dialogue box and press Enter.
Step 2. Go to path: HKEY_LOCAL_MACHINE\SYSTEM\CurrentControlSet\Control\Class\ {4D36E965-E325-11CE-BFC1-08002BE10318}
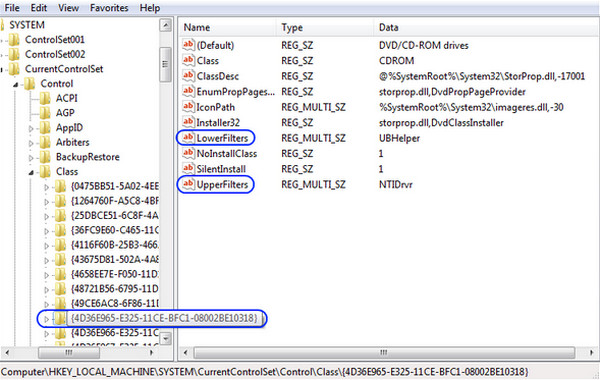
Step 3. In the right pane, click UpperFilters from the Edit menu, and click Delete then click Yes to confirm changes.
Note:
- Delete UpperFilters only. Don't remove UpperFilters.bak registry entry.
- If you don't see the UpperFilters registry entry, you still might have to remove the LowerFilters registry entry. To do this, go to step 4.
Step 4. Repeat the same steps for LowerFliters. Don't delete LowerFilters.bak.
Step 5. After you've done, exit the registry then restart your computer to check whether Windows 10 can recognize DVD drive now.
If some apps, such as CD or DVD recording software, won't work correctly after you try this method, try uninstalling and reinstalling these apps.
Solution 7. Create a registry subkey
This method should be used to fix DVD drive not working on Windows 7, 8, 8.1, or Windows 10 version 1507.
As with the previous method, you need to back up the registry in case anything goes wrong, and you need to make sure you are logged in as an administrator.
Now follow these steps to create the registry subkey.
Step 1. Press the Windows logo key and the R key to open the Run dialog box.
Step 2. Enter regedit in the Run box. If you are prompted for an administrator password or for a confirmation, type the password, or select Allow.
Step 3. In the navigation pane, locate the following registry subkey: HKEY_LOCAL_MACHINE\SYSTEM\CurrentControlSet\Services\atapi
Step 4. Right-click atapi, point to New, then select Key.
Step 5. Enter Controller0, right-click Controller0, point to New, and then select DWORD(32-bit) Value .
Step 6. Enter EnumDevice1, right-click EnumDevice1, and then select Modify....
Step 7. Type 1 in the Value data box, and then select OK.
Step 8. Exit Registry Editor.
Step 9. Restart your computer.
Solution 8. Go to Windows Update and install the latest drivers
New updates may be able to fix the problems with DVD-ROM drive. So click Start, choose Settings -> Update & Security, and then check if there're any hardware driver updates to install. If there are, install it following the instructions.
Solution 9. Uninstall virtual drive software.
Virtual drive software may cause conflict with physical optical drive. So if you have installed this kind of software on your Windows 10. Uninstall it and see if your problem is fixed.
Solution 10. Buy a new DVD drive
DVD drive not working may be a result of damaged drive. If above solutions can't troubleshoot your issue, you can buy an external DVD drive to have a try. It often sells for over $20.
Solution 11. Downgrade Windows 10 to previous version.
If DVD drive works well before you upgrade to Windows 10, downgrading may help you. You can find many guides about how to revert back to Windows 7/8.1 from Windows 10.
Solution 12. Check the drive cable connections
If your DVD drive not working problem happens on a desktop tower computer, you can also try this method.
Note: This product contains components that can be damaged by electrostatic discharge (ESD). To reduce the chance of ESD damage, work over a non-carpeted floor, use a static dissipative work surface (such as a conductive foam pad), and wear an ESD wrist strap connected to a grounded surface.
Step 1. Turn off the computer, unplug all cords from the computer, and then press the Power button for 5 seconds.
Step 2. Remove the side panel. The edges of metal panels can cut skin. Be careful not to slide skin along any interior metal edge of the computer.
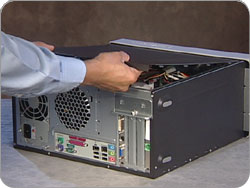
Step 3. Gently unplug both the data cable and the power cable from the back of the CD/DVD drive.
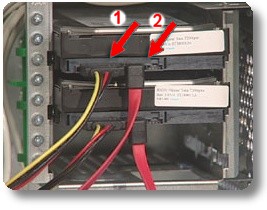
Step 4. Reconnect the power and data cables into the back of the drive. Make sure that the cables fit snugly into their connectors and there are no bent pins.
Step 5. Gently disconnect and reconnect the CD/DVD drive data cable from the connector on the system board. Be careful not to dislodge other cables.
Step 6. If the CD/DVD drive is not original equipment and was recently added, make sure that the drive cables are installed correctly.
Step 7. Replace the cover and connect the power, keyboard, mouse, and video cables.
Note: The edges of metal panels can cut skin. Be careful not to slide skin along any interior metal edge of the computer.
Step 8. Confirm whether the drive name displays in the BIOS.
Step 9. Do one of the following actions depending on what is listed in the BIOS:
- If the drive name is displayed, the drive is recognized by the BIOS and should also be recognized by Windows. If Windows recognizes the drive, you are finished. If Windows does not recognize the drive, repeat the steps in Check the CD/DVD drive name in Device Manager. Then, troubleshoot disc burning software if needed.
- If the drive name still does not display, replace the cable, the drive, or have the computer serviced.
If you suspect that the drive might be bad after using these steps, test the drive to see if the hardware has failed.
Video Tutorial: How to Fix DVD Drive Not Working in Windows 10
Final Words
Hopefully, these tips can resurrect your optical drive. But if your DVD drive is still missing in Windows or happens again in the future, you might as well try a new way - make a digital copy of DVD disc to eliminate DVD drive not showing error fundamentally. What's more, physical DVD disc also could be not working suddenly because of scratches or something else.
WinX DVD Ripper Platinum is an easy yet powerful DVD ripper to rip DVDs to digital formats. After ripping, you can save your digital copies on computer hard drive or other storage devices or services, and play them without bothering DVD drive, DVD player, DVD disc.
- Rip DVDs of all sorts, such as new DVD releases, old discs, Disney/Sony DVDs, damaged/99-title DVDs etc.
- Digitize DVD to MP4, MKV and more for playing on any media players or devices without DVD drive.
- Bypass region code, CSS as well as more advanced protection like multiple titles, Sony ARccOS, fake playlists, etc.
- It takes 5 mins only to achieve a full DVD ripping, thanks to the unique hardware acceleration tech.
After downloading the DVD decrypter installation package, proceed with the wizard's steps to install it. Now let's start with the DVD ripping process following the steps below.
Step 1. Place your DVD disc into the drive. Launch the program and click "DVD Disc" button to import your DVD. Your disc will be loaded in a blink of time with the main title selected and an output window popped up automatically.
Step 2. Choose an output format according to your device, player or specific purpose. For example, to rip DVD to MP4 H.264 for better compatibilty, digitize DVD to Nas or media server for better storage and playback, 1:1 clone DVD to ISO image for handy burning, and convert DVD to MKV for all titles, chapters, audio and subtitle tracks reservation.
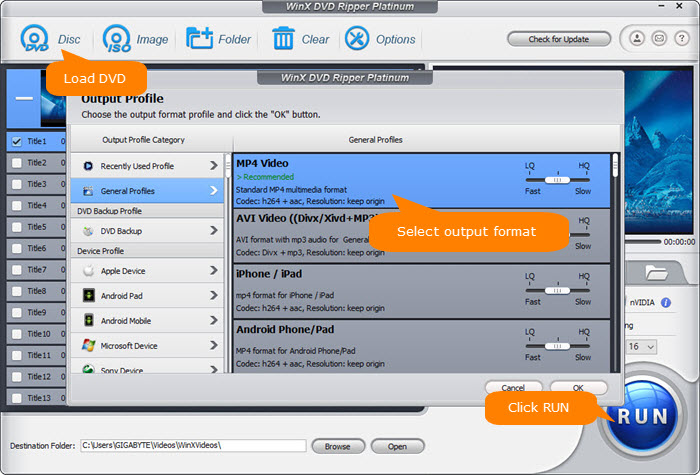
Step 3. Tick on the box of Intel or nVIDIA hardware accelerator if GPU acceleration is available on your computer. Then hit RUN button to proceed DVD ripping. It will be accomplished in a very short time, merely 5 minutes to rip a 2-hours long DVD movie.
Disclaimer: Digiarty Software does not advocate ripping copy-protected DVDs for any commercial purpose and suggests referring to the DVD copyright laws in your countries before doing so.


