How to Crop a Video Using VLC and Save?
Diverse auxiliary features besides the main media playback function make VLC popular among people, and among them video cropping is one of the most used features. If you want to crop a video to remove the black bar or keep the certain part of a video, you can use VLC cropping video feature when playing a video with VLC. And here is the complete guide to crop a video and save the video via VLC on computer permanently.
VLC Crop not Working or Complicated? Try a Much Easier Way
In fact, cropping video in VLC is very complicated and often gets non-ideal result. To make things easier, you are suggested to use VLC alternative – Winxvideo AI to crop a video simply by dragging the video edges to any scale you need.
Table of Contents
Part 1. How to Crop a Video in VLC Temporarily?
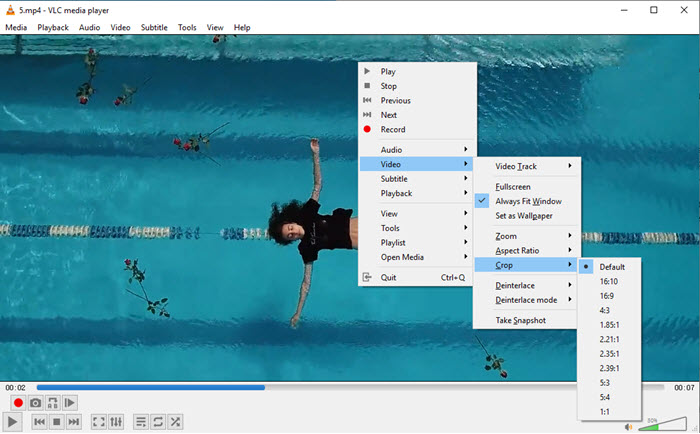
For one-time video cropping, VLC has preset some options for you to choose. It is quite similar to aspect ratio adjustment, you can choose from 16:10, 16:9, 4:3, 1.85:1, 2.21:1, 2.35:1, 2.39:1, 5:3, 5:4, and 1:1.
Step 1. Open a video with VLC Media Player
Step 2. Right click on the playback window > Video > Crop, and then choose the option you desire.
Part 2. How to Crop a Video in VLC and Save the Video Permanently?
Note: Before cropping a video using VLC, you should be told that you may encounter some issues during the process. For example, you can’t crop by just dragging the video edges, you can’t preview during cropping, you probably won’t save the cropped video, or VLC gets crashed during cropping. So, you should follow the step-by-step guide very carefully, otherwise you won't get a cropped video. Alternatively, you can simply switch to a much easier way.
You should also bear in mind that there are two main parts of VLC cropping video: Preview and Save. The first one is in Video Effect to determine and preview the part you need, and the second one is in the Advanced settings in Preferences for later cropping and saving.
Step 1. Open VLC on your PC
Step 2. Go to Media > Open File to load the video you want to crop.
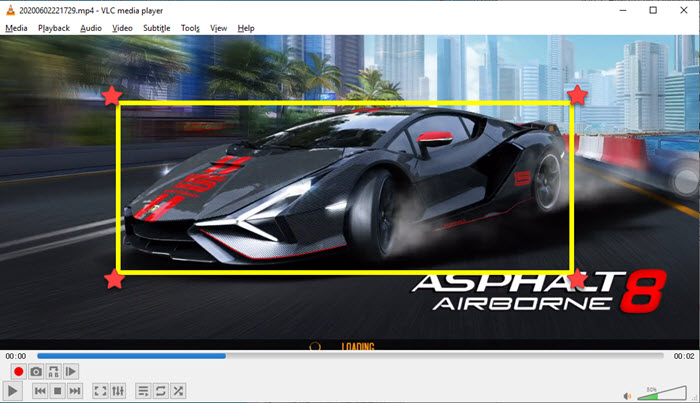
Step 3. Once opened, decide on the parts you need and the parts you’d like to cut out. For example, I only want the car in the below picture.
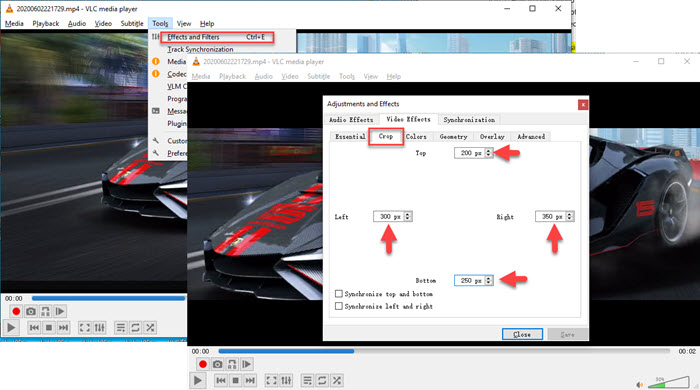
Step 4. Now, go to Tools > Effects and Filters > Video Effects > Crop.
Then, simply enter the values (in pixels) in the appropriate fields to crop out the unnecessary parts. Here, you can preview the part temporarily.
Note: You will need these values you just entered later, so remember them.
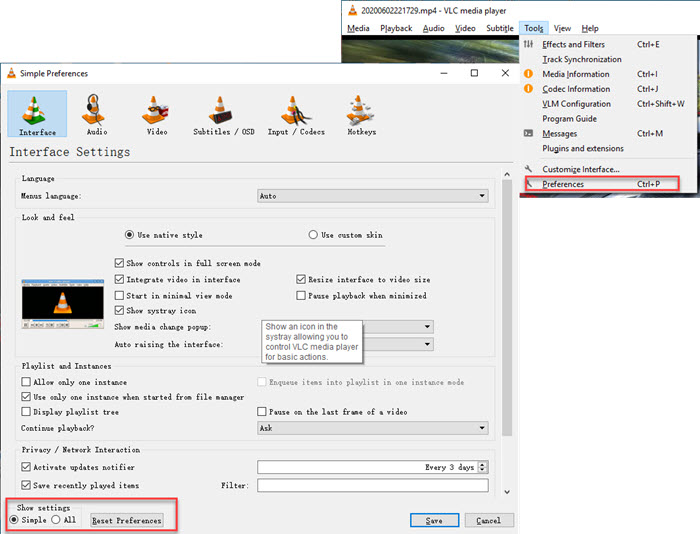
Step 5. Close the "Adjust and Effects" window, and go to Tools > Preferences in VLC.
Step 6. In this new pop up window, go to "Show settings" and click All button to access "Advanced Preferences" window.
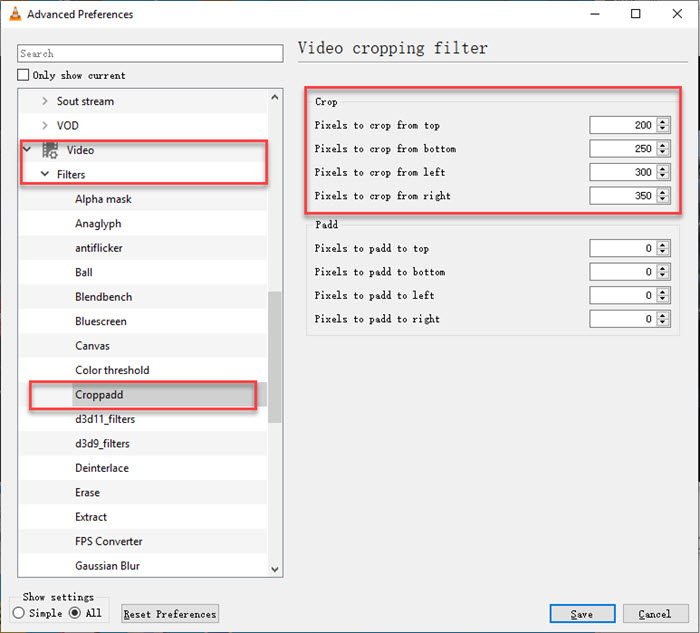
Step 7. In the "Advanced Preferences" window, scroll down to Video > unfold Filters > select Croppadd. Under the Crop section, just enter the values you remember earlier.
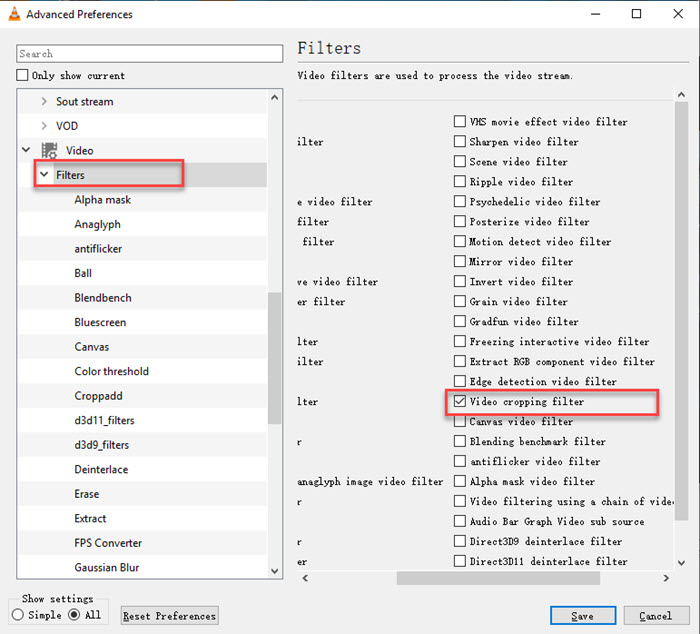
Step 8. Once entered, click on the Filters option in the left. Tick the "Video cropping filter (Video scaling filter)" checkbox, and then click on the Save button to apply the changes.
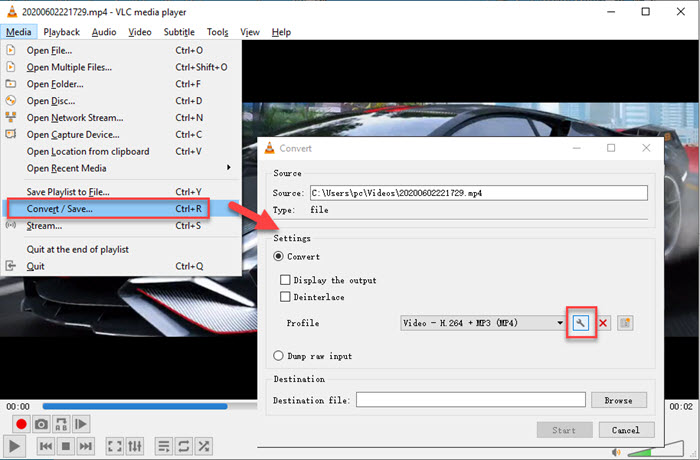
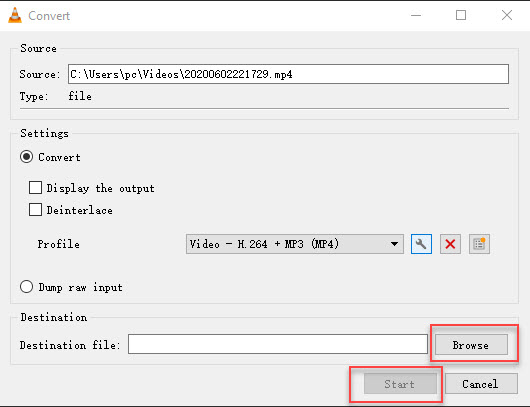
Step 9. Go to Media menu again and choose Convert/Save.
Step 10. Click the +Add button to add the video you want to crop with VLC, and then click Convert/Save in the bottom.
Step 11. In the new pop up window, click the spanner shaped icon.
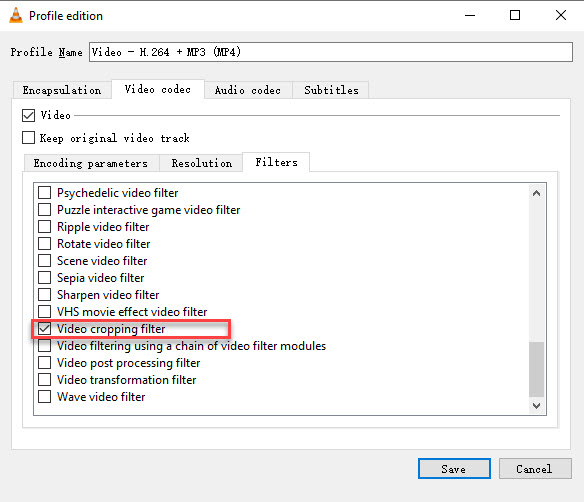
Step 12. Switch to Video codec > un-tick "Keep original video track" > Filters > select "Video cropping filter" > Save.
Step 13. Click the Browse button to pick a destination folder, and then hit Start button to start cropping video with VLC.
For Mac users:
Step 1. Go to File > Open File and decide on the areas you’d like to cut out.
Step 2. Go to Window > Video Effects > Crop.
Step 3. Enter the values in pixels.
Step 4. Once entered, hit the Enter to make the changes reflect. Please remember the values.
Step 5. Go to VLC and choose Preferences.
Step 6. In the pop up window, click on the Show All button in the bottom left corner.
Step 7. Now, go to Video > Filters > Croppadd.
Step 8. Under the Crop section, enter the values you’d entered earlier.
Step 9. Once entered, click on the Filters submenu, then tick the Video scaling filter or Video cropping filter checkbox, and then click on the Save button in the bottom right corner to apply the changes.
Step 10. Follow the last steps of Windows guide to crop and save the video on Mac with VLC.
Part 3. The Shortcomings of VLC Cropping Video
Indeed, you can crop a video in VLC and save the video permanently. However, after trying, you will find a few flaws.
1. You can’t crop a video with VLC by simply dragging the video edges.
The only way to decide on which parts to keep is to enter specified pixels to crop from top/bottom/left/right sides by hand, which is quite time-consuming and inconvenient.
2. You can’t preview during cropping.
You can see the video preview when you enter the values to decide which part to keep temporarily. However, when you do the last step to crop and save a video, you can’t preview in VLC.
3. Video won’t be saved if the "Video Cropping Filter" box is not selected.
You have to tick the "Video Cropping Filter" in the last step, otherwise you won’t get a cropped video even you have entered a value before. This step can be missed as there are multiple steps you need to follow.
4. VLC gets crashed during cropping.
If the video is too long, video file size is large or the video resolution is high, VLC crashing error happens in high possibility. That’s because VLC is not a professional video editor and may be not compatible with some video codecs.
5. All videos will be cropped the same if you forget unchecking the filter.
You have to uncheck the "Video Cropping Filter" option once complete cropping a video using VLC first, then do the same steps from start to end as the first video to crop the second video. When cropping the second video, the only thing you can change is to change the values.
6. Batch cropping is not available.
VLC cropping video feature only lets you crop a video each time. When the whole process finishes, you can go to next video.
From the above explanations, cropping video with VLC media player is obviously not the best choice. So, to make things easier, you can use a more convenient method.
Part 4. How to Crop a Video Much More Easily?
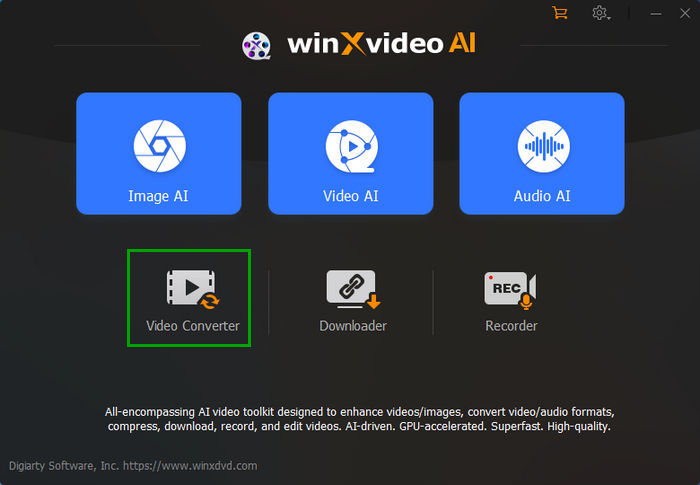
The tool example we use here to show you how to crop a video easily by dragging the video edges is Winxvideo AI. Only a few simple steps can you get a perfect cropped video.
Step 1. Free download Winxvideo AI on your computer, install and launch it.
Step 2. Click Video Converter > tap the +Video button to add the video you want to crop with VLC alternative.
Optionally, choose an output format from the popup Output Profile window.
Step 3. Click the Edit button to access the video cropping window.

Step 4. Navigate to Crop & Expand section > check Enable Crop option > drag the video edge, input a value or select aspect ratio from the presets to decide which part to keep.
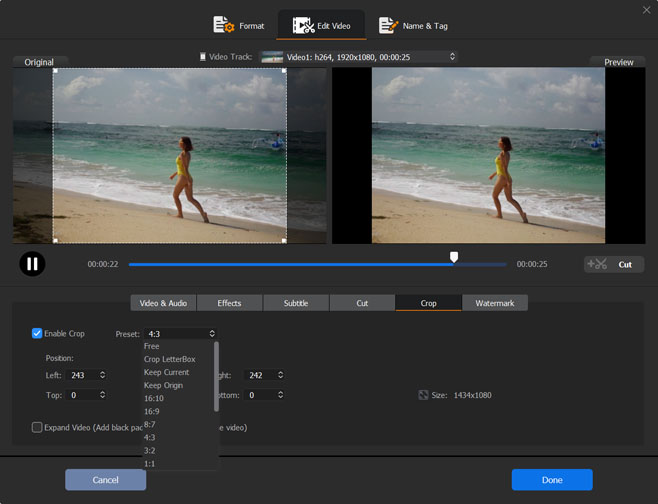
Step 5. After that, click Done.
Step 6. Now, hit RUN button to start cropping a video. Once done, the folder with the cropped video will pop up.