[Fixed] Premiere Pro No Audio on Timeline, Importing/Exporting…
When editing videos using Adobe Premiere, an annoying issue seems to happen quite often: no audio in Premiere Pro CC. Sometimes, Premiere audio is not playing on the timeline, or the imported MP4/MOV/AVI files get no audio on clip. While in some other cases, Premiere Pro has no sound when exporting. Troubleshooting no sound issues in Premiere Pro involves a set of complicated settings. Here we gather all the effective fixes to Premiere Pro CC no audio problem with detailed steps.
Basic Fixes You Should Try First
First of all, make sure you have tried the following fixes:
- Change the default audio settings in Windows.
- Changing audio hardware settings in premiere.
- Check for muted or low track volume.
- Check if your microphone is on.
- Rename the initial raw files and reimport them back into Premiere.
- Reboot your computer and try again.
- Create a new project.
- Drag the problematic audio to a new track.
Adobe has offered some official fixes to no sound in Premiere Pro. Try them first. If your Premiere still gets no audio in timeline, importing, exporting, etc., then try the fixes below.
Table of Contents
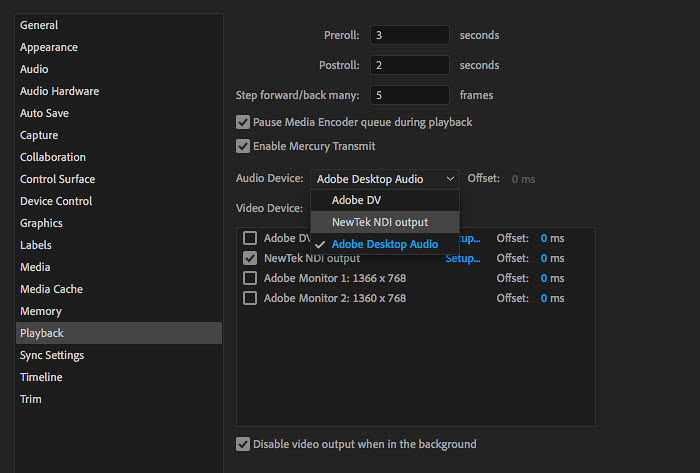
1. Disable the NewTek NDI Output
If you have installed NDI tools on your computer to help output NDI IP-video directly from Adobe Premiere or After Effects, it may cause errors like no audio in Premiere Pro CC. If the NDI drive is set as the default and the audio is routed to it, then the audio goes nowhere as there is no endpoint. As a result, Premiere Pro gives you no sound. To fix, you need to set the playback settings back to Premiere.
- Open up the Preferences tab in Premiere Pro > go to the Playback > Audio Device - NewTec NDI output was selected as audio output.
- Set it back to Adobe Desktop Audio or Adobe DV and you should hear the audio now.
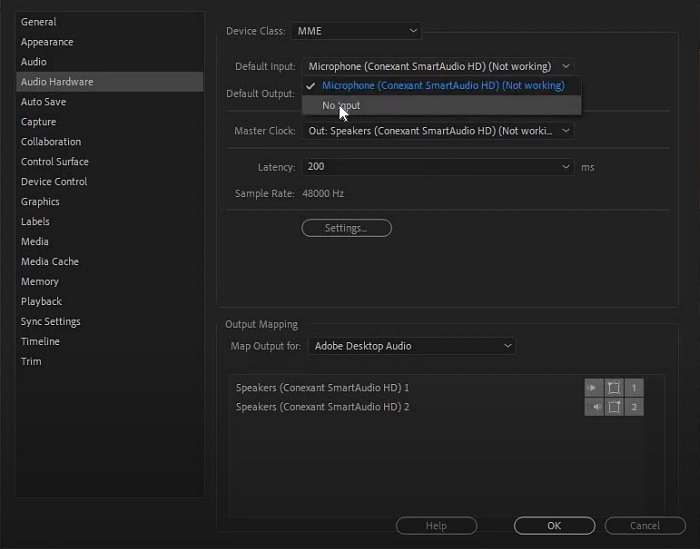
2. Change the Audio Hardware
Similarly, if the input audio devices is wrong, you will still get no audio in Premiere Pro timeline. This often happens when someone switch between headphones and internal speakers frequently. For example, you may change the Default Input in the Audio Hardware from Microphone to No Input. If there are multiple devices connected, you can change the device and test the sound one by one.
- Open up the Preferences tab in Premiere Pro > go to the Audio Hardware tab > Default Input.
- Change the selected device to No Input or others. And click Yes in the pop-up window.
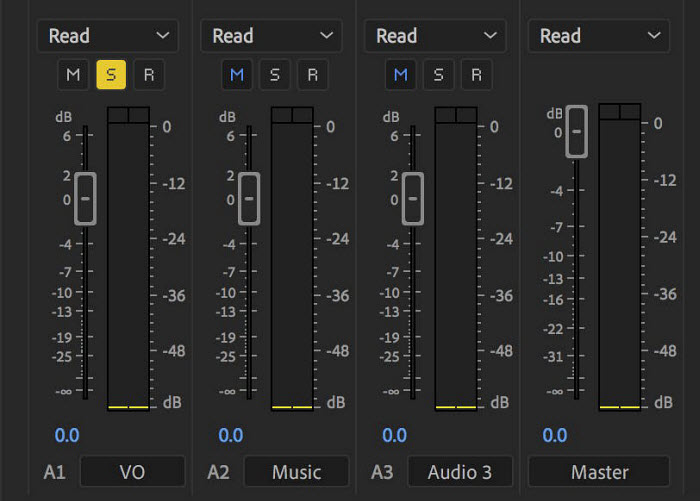
3. Solo and Unsolo the Track
The Mute and Solo button is an easy way to temporarily silence all other tracks. It can also cause audio missing errors in Premiere Pro. In fact, many users have successfully fixed Premiere Pro no sound errors by soloing each audio track and then unsoloing it (or muting and unmuting). You can do it with the button on the timeline. Don't forget to check the master volume panel and check if you've clicked the yellow S button by chance. If yes, toggle it off.
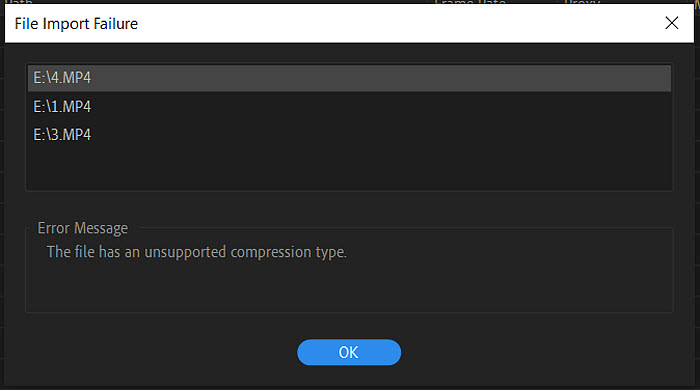
4. Convert the Incompatible Formats or Codecs
If your videos in MP4, MOV, AVI, MKV has no audio importing to Premiere Pro CC, check if the imported file contains any codec not supported by Premiere Pro. If the codec or format (for example, MKV videos, AV1 codec) is not listed in the supported file formats list or the file does not have a proper folder structure, the Premiere has trouble to access the audio and therefore you will see no audio playback or rendering in Premiere Pro.
You can fix this by transcoding the video to one of Premiere Pro supported formats with a third-party tool. You may find a video transcoder easily online. Here we use Winxvideo AI. It can easily and fast convert videos like MKV, AV1, MTS, into any of the long-list Premiere supported formats. No quality loss.- Free download the converter on your computer (Windows version or Mac version).
- Run the converter, load the unsupported videos to the converter.
- Select an output format like MP4, and then start to convert.
- Once converted, you can import the video and get the audio back in Premiere Pro.
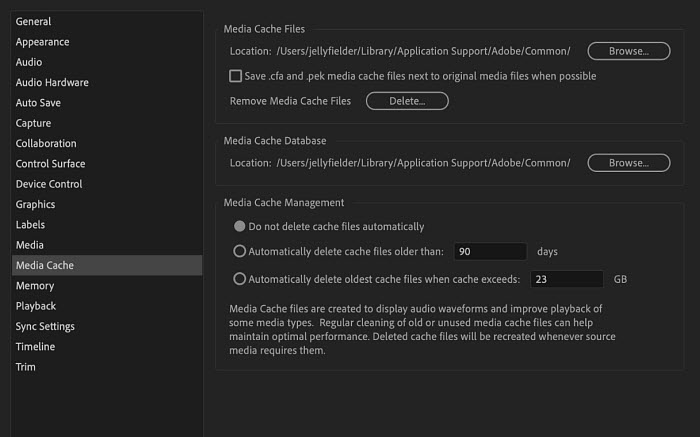
5. Clear the Cache
Some users have bought the missing audio back to Premiere Pro by deleting all the cache files. There are two ways to do it:
- - Open up the Preferences tab in Premiere Pro > go to Media Cache > click the Delete button to remove all of the temporary files for the project. This will delete files that are not using by Premiere now.
- - You can manually delete all the cache files, go to the folder "C:\Users\[XXX]\AppData\Roaming\Adobe\Common" on PC or Mac HDD > users > [XXX] > Library > Application support > Adobe > Common. Then delete the folders including Media Cache, Media Cache Files, Team Projects Cache, and Peak Files.
If Premiere Pro still has no audio rendering, also try to reset preferences and plug-in cache at the same time:
- Hold down Shift-Alt (Windows) or Shift-Option (Mac OS) while the application is starting.
- Release the Shift-Alt keys or Shift-Option key when the splash screen appears.
- You should get a box asking you if you want to reset. Click OK.
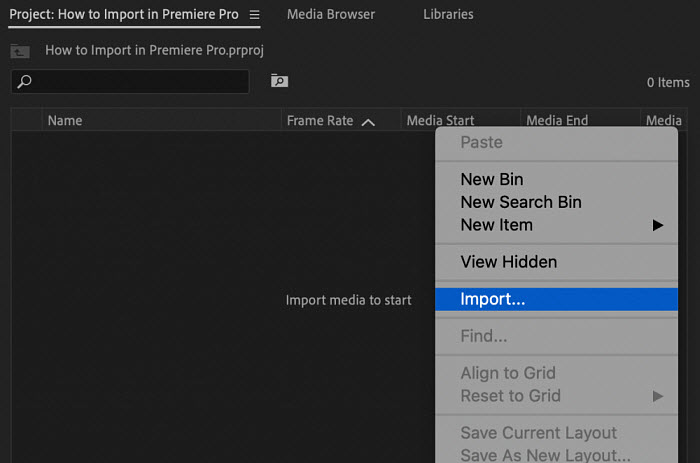
6. Use Media Browser to import media
When you use the dialog to import media, especially videos that may store the audio and video tracks separately, like MOV, MTS, and MP4 formats, it may fail to load the audio and result in Premiere Pro CC only video no sound in timeline. The import dialog may import the video from one directory and ignore the audio in another directory. To avoid Premiere Pro no audio importing MP4, MTS, MOV, AVI, etc., you’d better use the Media Browser to import media. The Media Browser is smarter and can access and import the entire media files.
7. Use a Card Reader
Before you edit videos in Premiere Pro CC, you should copy the videos you shot from the camera's memory card to the computer or external hard drive. If you edit the video right from the camera's memory card that's plugged into the computer, the audio may randomly miss from Premiere Pro. You can do it by connecting the memory card to the computer using a card reader, and drag and drop the videos onto the computer.
It's also important to copy the full folder from the card to the computer. If you copy the folder or file one by one, video footages like AVCHD or XAVC may get corrupted as you lost the folders that contain metadata to help Premiere Pro open the videos. In that case, you will get no audio playback in Premiere Pro CC.
That's it for fixing Premiere Pro no audio issue. If you've other solutions, please fell free to email us or leave us a comment through Twitter or Facebook.