


Tutorial: How to Add Captions and Subtitles in Premiere Pro
Adobe Premiere Pro has been the industry-standard video editing software for years, attributing to its unmatchable editing capabilities, and great ecosystem of tools. But powerful functionality comes at the expenses of usability. When it comes to subtitle a video, Premiere Pro definitely fits you bill, while on the other hand, it seems to be a daunting task to create captions and subtitles on Adobe Premiere Pro.
If you are stick to Premiere Pro but don’t know where to start, the post will guide you to add subtitles in Premiere Pro in detail, so that you won’t miss any dialogue spoken in an unfamiliar accent or increase engagement with your audience.
Caution! MKV isn't supported by Premiere Pro. If you are going to subtitle an MKV file, please resort to premiere pro alternative for help. Winxvideo AI is here for you to add subtitle file to MKV, MOV, MP4, or any other file with ease.
Two Ways to Add Subtitles in Premiere Pro
Way 1. Create Subtitles Manually, Add Them to Each Sequence.
Manual subtitling with Premiere Pro actually requires a lot of energy and good skills such as synchronizing, transcribing, or even translating your video. It takes time to add subtitles manually. The good thing is the quality and fidelity can be ensured. If you have short sequences, you can choose to transcribe sequences manually. You can follow the steps to add subtitles yourself in Premiere Pro.
Step 1. Open the Captions workspace by selecting Window > Workspaces > Captions. Here the Text panel (where you create and edit caption text) and the Essential Graphics panel (where you customize the text) will be open.
Step 2. Select Create New Caption Track in the Text Panel.
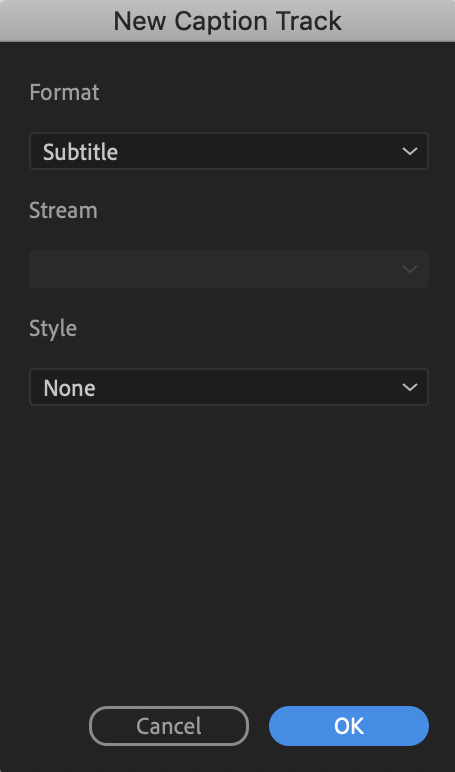
Step 3. After you create a new track, a dialog box pops up, showing the default format option – Subtitle, which allows you to create nice looking subtitles that you can either burn into the video image or export as a sidecar. If you’ve created a text style previously, select it from the Style drop-down list, click OK and apply to your subtitles.
Step 4. Set the playhead at the beginning of your first piece of dialogue and click the + icon in the Text panel on the text panel to create a blank caption.
Step 5. Double click New Caption in the Text panel or the Program monitor to start editing the caption. Type in your caption.
Step 6. Adjust the timing. Since the transcription and synchronization process is not always very accurate, it’s better to proofread the subtitles, adjust the subtitle timecode and edit your sequences in Premiere Pro, when the subtitling process is finished. Make sure the subtitles align with the spoken dialogue.

Step 7. Repeat to add caption throughout the video.
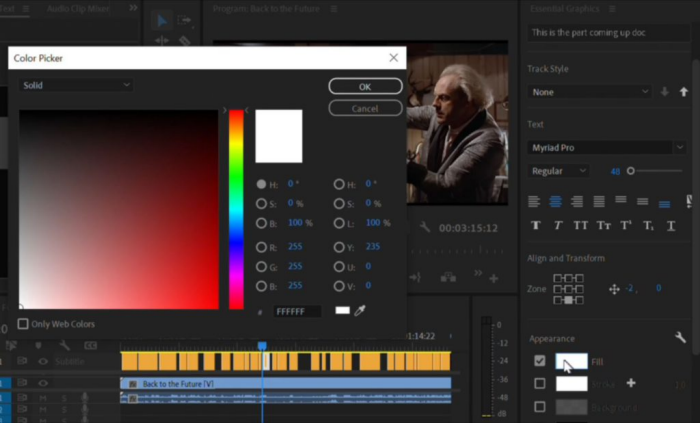
Step 8. Head to the Essential Graphics panel to customize the style of the subtitles, change the font, size, color, paragraph alignment, tracking, leading, faux styles, and position of your subtitles.
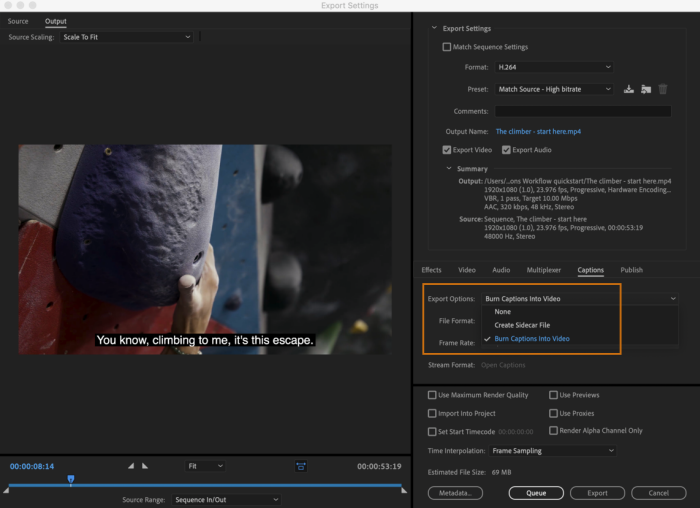
Step 9. Select File > Export > Media, and choose your format. Under the caption tab, choose Create Sidecar File or Burn Captions into Video. The former means the sidecar file will have the timecode and text of the captions, while the latter means the captions will be embedded onto the image permanently. Then Premiere Pro will start exporting your video with subtitles.
Way 2. Import an SRT Subtitle File to Video in Premiere Pro.
Premiere pro features adding subtitle file in .srt (also known as a SubRip Subtitle file) to a video, which may save you a lot of time and energy especially when the video file is lengthy or you have a large volume of video. To get such a file, you can either create it yourself, though it is a long and complex job, download subtitle files from website, or rely on an automatic SRT generator to automatically generate SRT file. Here are the detailed steps after you’ve generated or downloaded subtitles on your computer.
Step 1. To start subtitling a video on Premiere Pro, you need to first add the video file like MP4, AVI, MOV, WMV or other video file into Premiere Pro. (Note: MKV is unsupported by Premiere Pro currently, you need to convert MKV to MP4 or other format before adding to Premiere Pro.)
Step 2. Open the video in the Premiere Pro project timeline. After you’ve done most of your video editing, then you can add a dedicated track of subtitles.
Step 3. Drag and drop the subtitle SRT file into your Premiere Pro project.
Step 4. Drag the SRT from the Project panel into your sequence and drop it anywhere in the sequence.
Step 5. Then Premiere pro will automatically create a new caption track that contains all of your subtitles.
Step 6. Set the caption to the right length by using the handles in the caption track so that the both the caption track and the spoken phrase appear at the same time. Expand your view of the audio track in your timeline so as to make the process easier. Adjust the time of the captions to match the waveform of the voice in the track.
Step 7. Go to the Essential Graphics, where you can change the font, size, alignment, tracking, style, color, etc. It’s better to increase the font size to make it legible for viewers watching on the phone if you are going to upload the subtitled video to social media channel.
FAQ about Premiere Pro Subtitles and Captions
1. Why my subtitles not showing in Premiere Pro?
Go to the settings icon in the program monitor, then go to Closed Caption, Enable and go to Settings, make sure to choose the same standard & stream as of the caption your using). If this doesn’t help, you can create 708 or 608 captions and bu sure the CC display settings are also 708 or 608.
2. What's the best Premiere Pro alternative to add subtitles with ease?
Premiere Pro doesn’t support subtitling MKV video, plus it is relatively time-consuming and complex to add captions or subtitles to the video. If you want an alternative that can speed up the subtitling workflow and make the whole process hassle-free, you can use Winxvideo AI to add subtitle to your video. It is an easy-to-use video converter and editor that can crop, trim, and merge video, add srt subtitle file to video with ease.
You can follow the step-by-step guide to add subtitle to a video with the premiere Pro alternative here.


