


5 Ways to Enlarge Images without Losing Quality
 Mike Rule
Updated on
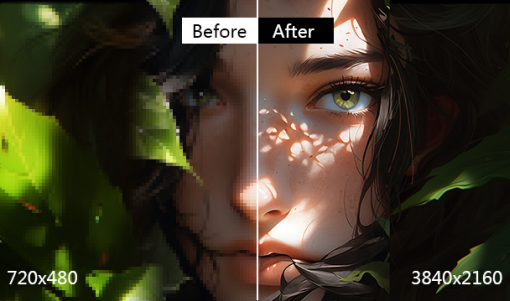
Sometimes we need to make an image larger to see more details, print at a larger size, or for other purposes. There're many photo editing tools that allow us to enlarge images. However, a conventional tool may export blurry and pixelated pictures.
Is it possible to enlarge image without losing quality? Absolutely. Here we'll introduce 5 ways to help you make images larger without sacrificing quality.
Best 5 Ways to Make Images Larger
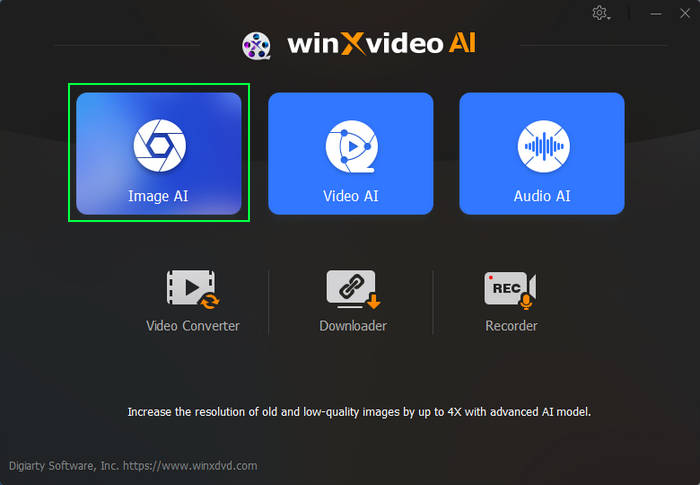
1. Winxvideo AI (Windows)
Winxvideo AI is an AI-powered image enlarger. It utilizes advanced AI models to intelligently enlarge images. It analyzes each pixel and compensates for enlargement, minimizing quality loss. Additionally, Winxvideo AI can automatically remove blur and noise from your images, further enhancing the images. Therefore, you won't see quality loss after enlarging images.
With Winxvideo AI, you can enlarge images by 2x, 3x, and 4x or enlarge them to 4K or 8K resolution. And if it isn't enough for you, you can re-enlarge the images that are already processed by Winxvideo AI. The maximum supported image resolution is 10K.
How to make image bigger with Winxvideo AI?
Step 1. Download and install Winxvideo AI on your computer.
 Free Download
  Free Download
Winxvideo AI is for PC, while Macxvideo AI (from our MacXDVD brand) is for macOS.
Step 2. Open Winxvideo AI and then select Image AI to access the image enlarger.
Step 3. Click the Add Image button to import the image you want to enlarge.
Step 4. Select AI model, go to Model Settings and select desired enlargement factor (2X, 3X, 4X) or resolution (1K, 2K, 4K, 8K).
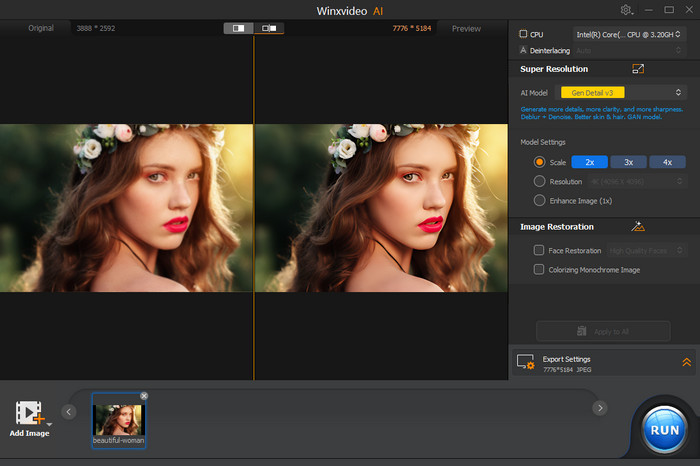
Step 5. Hit RUN button to export the enlarged image.
That's it. It's really easy to use. And the result is very impressive. As you can tell from the screenshot above, the quality doesn't lose. Instead, it gets improved. The blur on the image is gone.
- AI-powered technology for impressive results.
- GPU-hardware accelerated for fast processing.
- No quality loss during enlargement.
- Beginner-friendly interface.
- A feature-rich tool. Also support enhancing, converting, editing, recording, and downloading videos.
- This feature is currently limited to Windows.
- Lack customization options for specific width and height in pixels.
Pricing:
Winxvideo AI allows users to enlarge 5 images for free. After that, you can purchase a license. There’re three plans for you:
- 1-year plan/3 PCs: $34.95 (original price: $39.95)
- Lifetime/1 PC: $54.95 (original price: $69.95)
- Family / 3-5 PCs: $79.95 (original price: $119.90)
2. Adobe Photoshop (Windows, Mac)
If you want to enlarge your image to specific pixel dimensions, you can try Photoshop. Photoshop allows you to enter desired width and height values in pixels for the enlarged image.
Additionally, Photoshop offers a few resampling methods. With the right method, you can minimize any unwanted pixilation when enlarging your images.
How to make image larger in Photoshop
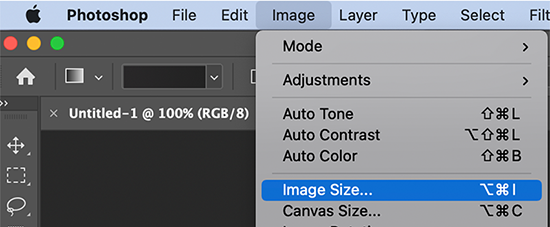
Step 1. Launch Photoshop, go to File > Open and select the image you want to enlarge.
Step 2. Navigate to the top menu bar and click on Image > Image Size. This opens a window with options to adjust your image dimensions.
Step 3. In the "Image Size" window, enter your desired width and height values for the enlarged image.
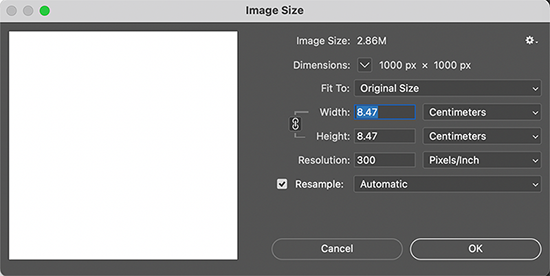
Step 4. Choose Resample method.
You're suggested to choose Preserve Details (2.0) (if available in your Photoshop version) or Bicubic Smoother.
Then, click OK to save your changes.
Step 5. Sharpen with smart objects (optional).
This step can further enhance the clarity of your enlarged image.
Right-click on your image layer (in the Layers panel) and select Convert to smart object. This allows non-destructive edits.
Next, duplicate the layer by right-clicking and selecting "Duplicate Layer". Go to the top menu and choose Filter > Other > High Pass. Adjust the filter strength to sharpen edges and details subtly. Set the duplicated layer's blending mode to "Soft Light" in the Layers panel for a more natural effect.
Step 6. Go to File > Export > Export As. Choose a suitable file format (like JPEG for web or PNG for graphics with transparency). Click "Export" to save your enlarged image with minimal quality loss.
- Allow precise adjustment.
- Offer various resample methods.
- Resource-intensive software, requiring a powerful computer to run smoothly.
- Steeper learning curve compared to simpler tools, potentially challenging for beginners.
- It may be expensive for casual users.
Pricing:
- 7-day free trial available.
- Monthly: $34.49/mo. Cancel anytime. No fee.
- Annual, paid monthly: $22.99/mo. Fee applies if you cancel after 10 days.
- Annual, prepaid: $263.88/yr. no refund if you cancel after 14 days.
3. Preview (Mac)
Preview is macOS's default image and PDF viewer. In addition to viewing and printing digital images and Portable Document Format (PDF) files, it can also edit images and PDFs. With Preview, you can enlarge your pictures to desired image dimensions with ease.
How to make image bigger in Preview
Step 1. Locate the image you want to enlarge in Finder. Then, drag and drop the image onto the Preview icon in your Dock to open the image.
Step 2. Click the "Edit" button (a square with a pencil) in the top toolbar to enter Edit Mode.
Step 3. Go to the menu bar and select "Tools > Adjust Size". In the "Adjust Size" window, enter your desired new width and height values.
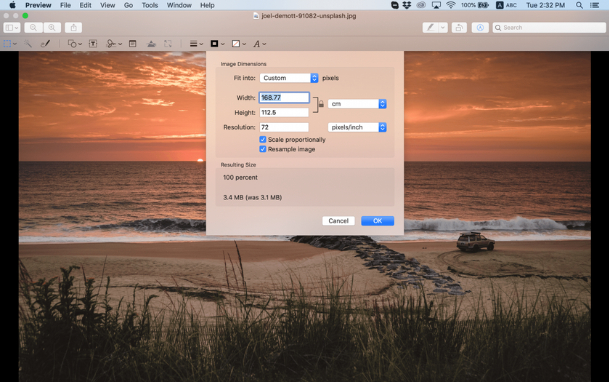
Tips: Make sure to check "Scale proportionally" to prevent the image from becoming distorted.
Then, click "OK" to apply the new size.
Step 4. Press "Command (⌘) + S" on your keyboard to save the changes to a new file (recommended) or overwrite the original.
- Preview is readily available on all Macs, making it a convenient option for basic image enlargement.
- Easy to use.
- Limited to Mac.
Pricing:
It is free.
4. GIMP (Windows, Mac, Linux)
If you're looking for a free alternative to Photoshop that can make image bigger, GIMP stands out as a capable option. GIMP is a free and open source image editor capable of performing image enlargement, photo retouching, image composition, and image authoring. Similar to Photoshop, GIMP offers various interpolation methods to minimize quality loss during image upscaling.
How to make image larger in GIMP
Step 1. Download and install GIMP on your Windows or Mac computer.
Step 2. Open the image you want to upscale.
Step 3. Go to Image and select Scale Image.
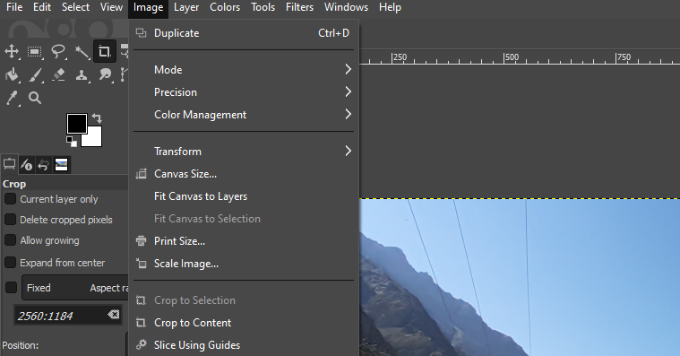
Step 4. In the Scale Image window, enter your desired pixels for the Width and Height.

Step 5. Click the drop-down menu of Interpolation and select an interpolation method. After finishing all settings, click Scale.
Step 6. Export the enlarged image.
- Free and open source.
- Multiple interpolation methods to choose.
- It may have a steeper learning curve compared to simpler tools.
Pricing:
It is free.
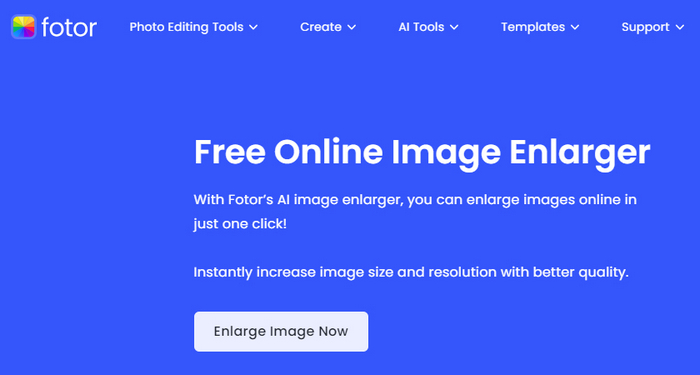
5. Fotor (Online)
If you want to make image larger online for free, you can try Fotor. Fotor offers a user-friendly online tool to enlarge your images by 2x, up to 4000 x 4000 px. It's ideal for situations where you need a simple enlargement without downloading software.
How to enlarge image with Fotor
Step 1. Open your web browser and then access Fotor's image enlarger. Then, click the Enlarge Image Now button.
Step 2. Click the Open Image button to import the image you want to enlarge. Then, Fotor will smartly fix the image details and automatically improve the image resolution. Once done, you'll see a helpful before-and-after comparison.
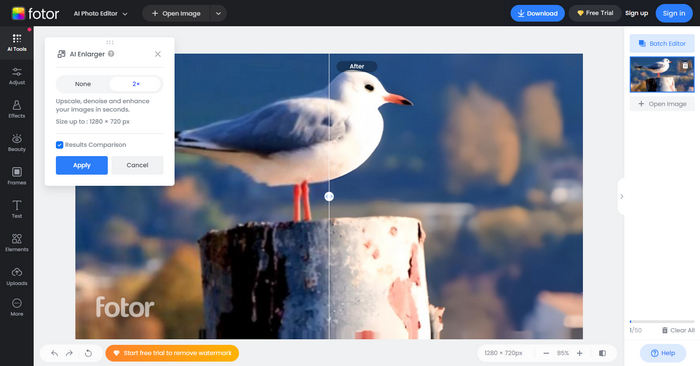
Step 3. If you're satisfied with the results, click Apply and then Download to save your enlarged image.
- No software download required, accessible online.
- Simple interface.
- Limited to a maximum 2x enlargement factor.
- Lack the ability to specify precise pixel dimensions for width and height.
- The free trial version includes a watermark on exported images.
- Need sign-up.
Pricing:
- Fotor Pro: $3.33/month. Billed annually.
- Fotor Pro+: $7.59/month. Billed annually.
Image quality starts at the source. Discover SDXL resolution tips to maximize clarity before enhancement tools.
Choosing the Right Method for Enlarging Your Images
There are several factors to consider when selecting the best method to make your image bigger.
1. Desired level of control
If you need precise adjustments and want to optimize the enlargement process, traditional photo editing software like Photoshop offers the most granular control. AI-powered image enlargers like Winxvideo AI provide a good balance between user-friendliness and customization options. Online image enlargers like Fotor are convenient but offer minimal control over the process.
2. Importance of image quality preservation
If maintaining the highest possible quality is essential, consider AI-powered image enlargers or traditional software with advanced resampling options. For moderate enlargements with less critical quality needs, online tools or simpler software might suffice.
3. Budget and software access
Powerful tools like Photoshop often involve subscription fees. AI-powered enlargers might also have paid plans for advanced features. GIMP is a free and versatile option, but it may require a steeper learning curve. Many online image enlargers have a freemium model with limitations in the free version.
4. Convenience and ease of use
Online enlargers are convenient for quick enlargements without software downloads. AI-powered enlargers often have user-friendly interfaces with straightforward workflows. Professional editing software might have a steeper learning curve, requiring more time investment.
By weighing these factors against your specific needs, you can choose the optimal method to enlarge your images effectively.
Tips for Enlarging Images with Minimal Quality Loss
Enlarging an image may involve some degree of quality loss, but by following the tips below, you can minimize the impact and achieve the best possible results.
1. Start with a high-resolution source
The quality of your enlarged image hinges on the quality of the original. Whenever possible, begin with a high-resolution image. Images with more pixels to work with provide more information for the software to utilize during the enlargement process, leading to sharper and clearer results.
2. Choose the right resampling method
Different software offers various resampling methods for image enlargement.
- Bicubic (Smoother): Ideal for enlarging photos as it smooths out any harsh edges that might appear during the process.
- Lanczos: A good all-around option for both photos and graphics, offering a balance between sharpening and smoothing.
- Nearest Neighbor: Preserves the original pixel data but might result in a blocky or pixelated appearance, especially with significant enlargements. (Least recommended for quality preservation)
Explore the resampling options available in your chosen software and experiment to see which method produces the best outcome for your specific image.
3. Consider AI-powered tools
AI-powered image enlargers are becoming increasingly sophisticated, often delivering impressive results with minimal quality loss. These tools leverage advanced algorithms to analyze and intelligently fill in the gaps created during the enlargement process, potentially leading to sharper and more detailed results compared to traditional methods.
4. Save in a suitable format
When saving your enlarged image, choose a format that supports the level of detail and transparency required.
- PNG: Ideal for graphics with transparency, as it preserves the original alpha channel.
- JPEG: A good choice for photos, but it uses compression, which can introduce some quality loss. Consider adjusting the quality settings during saving to find a balance between file size and image quality.
- TIFF: A lossless format that maintains the highest quality but can result in larger file sizes.
By following these tips, you can effectively enlarge your images while minimizing the impact on quality, ensuring visually pleasing and usable results.


