


3 Methods to Stabilize Shaky Video in After Effects
 Mike Rule
Updated on
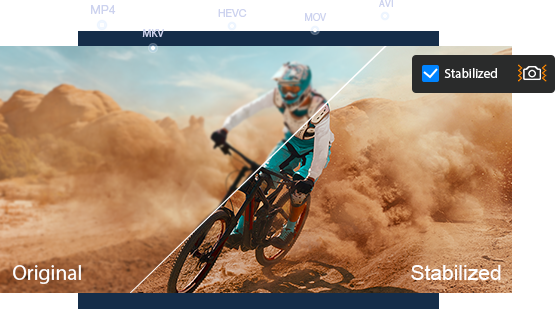
Ever felt frustrated when your footage turns out shaky after all the hard work? You're not alone. But fear not! Adobe After Effects offers solutions to stabilize those shaky videos effortlessly.
Similar to Adobe Premiere Pro, After Effects boasts a powerful built-in tool called Warp Stabilizer VFX, capable of automatically smoothing out shaky footage. Moreover, its Stabilize Motion feature empowers users to manually stabilize footage by tracking specific points in the scene and applying stabilization based on their movement. And if the built-in tools fall short, you can always turn to third-party video stabilizer plugins for After Effects, such as ReelSteady and Mercalli.
Well, how to use these features and tools to stabilize footage in After Effects? Join us as we guide you through the process.
Method 1. Use Warp Stabilizer VFX in After Effects
Warp Stabilizer VFX stands out as one of the go-to tools in After Effects for stabilizing shaky footage. This built-in feature analyzes the motion in your video and applies adjustments to reduce unwanted camera movement. With intuitive controls for adjusting parameters such as smoothness and framing, Warp Stabilizer VFX offers a straightforward solution for quickly stabilizing most types of shaky footage. However, it's worth noting that while Warp Stabilizer VFX can produce impressive results in many cases, it may struggle with more complex motion or extreme shake.
Here's how to use Warp Stabilizer VFX in AE to stabilize video.
Step 1. Select your footage.
Open Adobe After Effects and load your project containing the shaky footage into the timeline. Navigate to the timeline and select the shaky footage layer that you want to stabilize. Click on it to ensure it's highlighted.
Step 2. Access the Effects & Presets panel.
In the workspace, locate the "Effects & Presets" panel. If you can't find it, go to the "Window" menu at the top of the screen and select "Effects & Presets" to open it.
Step 3. Search for "Warp Stabilizer VFX".
In the "Effects & Presets" panel, there is a search bar at the top. Type "Warp Stabilizer VFX" into this search bar and press Enter. The search results will display the Warp Stabilizer VFX effect.
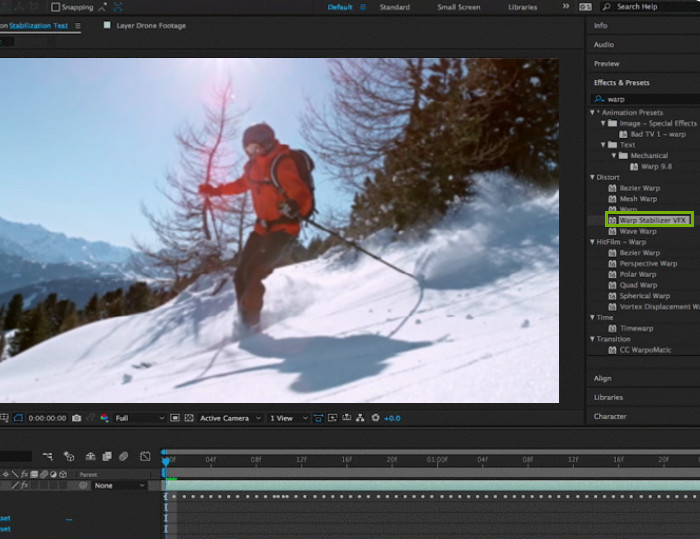
Step 4. Apply the effect.
Click and drag the Warp Stabilizer VFX effect from the "Effects & Presets" panel onto your selected footage layer in the timeline. Alternatively, you can double-click on the effect to apply it directly to the selected layer.
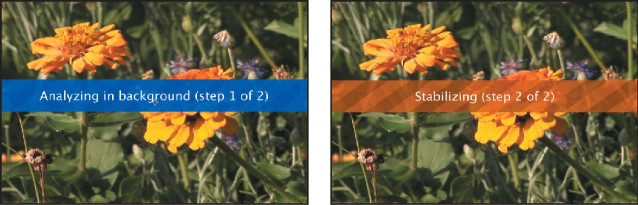
Step 5. Automatic analysis.
After applying the Warp Stabilizer VFX effect, After Effects will automatically begin analyzing the footage to determine the amount of stabilization required. You'll see a progress bar in the Effect Controls panel indicating the analysis process.
Step 6. Fine-tune stabilization settings.
Once the analysis is complete, you can fine-tune the stabilization settings in the Effect Controls panel.
Look for the Warp Stabilizer VFX effect applied to your footage layer in the Effect Controls panel. Here, you'll find various parameters that you can adjust to customize the stabilization.
Common settings include:
- Smoothness: Adjusts the level of smoothing applied to the stabilized footage. Higher values result in smoother motion but may introduce more distortion.
- Method: Allows you to choose whether to stabilize position, scale, rotation, or all three.
- Framing: Provides options for how After Effects handles the framing of the stabilized footage. You can choose between "Stabilize," "Smooth Motion," or "No Motion" to control how much the footage is stabilized.
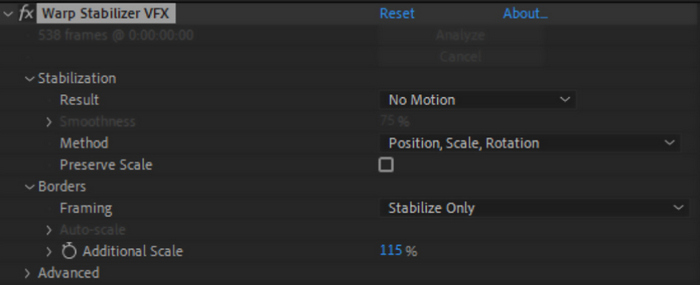
Experiment with different settings to achieve optimal results for your specific footage and creative vision.
Step 7. Preview and adjust.
After adjusting the stabilization settings, preview the footage to see how the changes affect the stabilization. You can do this by scrubbing through the timeline or pressing the spacebar to play the composition.
If necessary, go back to the Effect Controls panel and continue tweaking the settings until you achieve the desired result.
Step 8. Render your stabilized footage.
Once you're satisfied with the stabilization, render your composition to export the stabilized footage. You can do this by going to the "Composition" menu at the top of the screen and selecting "Add to Render Queue" or "Add to Media Encoder Queue." Adjust any rendering settings as needed, then click "Render" to export your stabilized footage.
By following these steps, you can effectively use the Warp Stabilizer VFX in Adobe After Effects to stabilize shaky footage and enhance the quality of your videos.
Method 2. Use Stabilize Motion Feature in After Effects
Stabilize Motion is another built-in feature in After Effects that offers a different approach to stabilization. Instead of analyzing the entire frame, Stabilize Motion tracks specific features in the footage and applies stabilization based on their motion. This method is particularly useful for stabilizing footage with significant camera movement while retaining the natural motion of the scene.
Step 1. Access the Tracker panel.
If the Tracker panel isn't already visible, head to the "Window" menu at the top. Scroll down and ensure that "Tracker" has a checkmark next to it.
Step 2. Set your Tracking box.
Click on "Stabilize Motion" in the Tracker panel. This action will create a tracker box in your Layer Panel. Find a suitable area in your footage with solid contrast for the tracker to focus on.
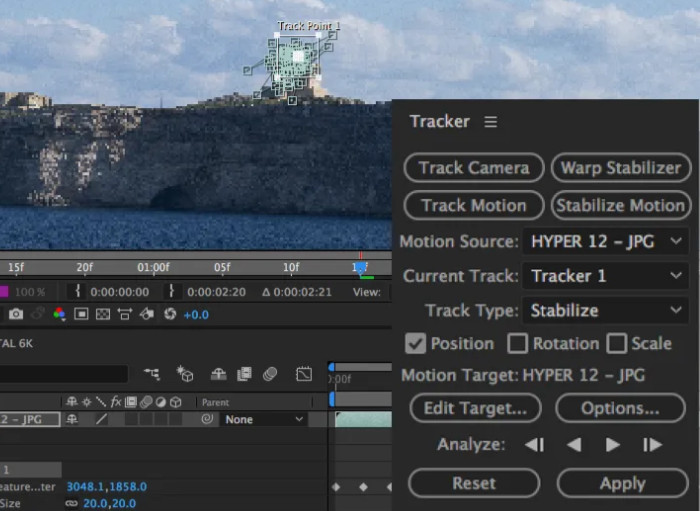
Step 3. Pause analysis to refine tracking points, then resume by pressing play.
After setting the tracking box, hit the "play" button in the Tracker panel. The tracker box should stay locked onto your chosen spot or object. If the tracking points seem off, pause the analysis, manually adjust the tracking point, and resume by pressing play.
Step 4. Adjust "Edit Target".
Once the tracking is complete and you're satisfied with the data, click "Edit Target" to confirm the tracking data applies to the correct layer. Then, click "Apply." A dialogue box with apply options will appear; typically selecting "X and Y" is recommended.
Return to the Composition panel, and press the spacebar to preview how well the stabilize motion tracker worked. If the results are unsatisfactory, you may need to readjust and try again.
For footage with identifiable tracking points or features, manual tracking provides a robust solution for stabilization. By manually selecting tracking points and applying stabilization based on the tracked data, you gain precise control over the stabilization process. While manual tracking requires more time and effort compared to automatic methods like Warp Stabilizer VFX, it excels in scenarios where finer adjustments are necessary or when automatic stabilization tools fall short.
Method 3. Use Third-Party Plugins
While After Effects provides robust built-in tools for stabilization, third-party plugins offer additional features and capabilities for users with more advanced stabilization requirements. These plugins often incorporate specialized algorithms and advanced controls to achieve superior stabilization results. However, they may come with a learning curve and additional cost, making them best suited for users who require specialized features beyond what After Effects provides by default.
Here are some third-party plugins for video stabilization in After Effects.
1. ReelSteady
ReelSteady functions similarly to Warp Stabilizer but offers additional features, including a built-in rolling shutter repair tool. This tool allows users to stabilize footage while simultaneously correcting rolling shutter distortion, resulting in smoother and more professional-looking footage.
Furthermore, ReelSteady operates as a two-pass effect, allowing users to refine and customize the stabilization process. After running the effect for the first time, users can isolate specific areas of the footage to further smooth out or "iron-out" portions of the clip, ensuring optimal stabilization results.
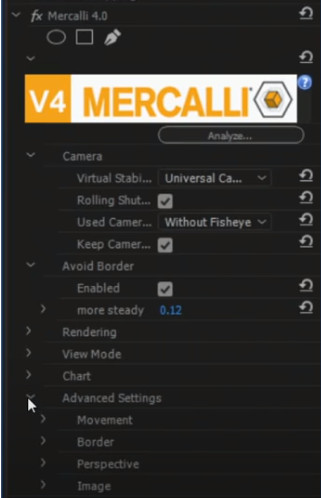
2. Mercalli
Mercalli is a comprehensive stabilization plugin that works with After Effects, Premiere Pro, and other video editing software. It offers various stabilization modes, including 3D stabilization, and features advanced tools for correcting shaky footage and reducing motion blur. Mercalli also includes rolling shutter correction and other post-processing effects.
To use a third-party video stabilization plugin for After Effects to stabilize video, you'll generally follow similar steps to using the built-in stabilization tools, but with some variations depending on the specific plugin. Here's a general guide:
Step 1. Install the plugin.
Purchase and download the third-party stabilization plugin from the developer's website. Follow the installation instructions provided by the developer to install the plugin on your computer. Ensure it is compatible with your version of After Effects.
Step 2. Open After Effects and import your footage.
Launch Adobe After Effects on your computer. Then, import the video footage that you want to stabilize into your After Effects project.
Step 3. Create a new composition.
Drag your footage from the Project panel into the Composition panel to create a new composition with your footage.
Step 4. Apply the stabilization plugin.
Locate the stabilization plugin in the Effects & Presets panel, drag the stabilization plugin onto your footage layer in the timeline.
Step 5. Adjust plugin settings.
With your footage layer selected, navigate to the Effect Controls panel, adjust the settings in the stabilization plugin to customize the stabilization according to your preferences, experiment with parameters such as smoothness, strength, cropping, rolling shutter correction, and more to achieve the desired effect.
Step 6. Analyze and render.
Follow the plugin's instructions to initiate the stabilization process, after the analysis is complete, preview the stabilized footage to ensure it meets your requirements, if satisfied, render your composition to export the stabilized footage, adjust any rendering settings as needed.
Conclusion
With a comprehensive toolkit of stabilization techniques at your disposal in Adobe After Effects, you can tackle shaky footage with confidence and achieve professional-quality results. Whether you're stabilizing handheld footage, addressing camera shake, or integrating motion graphics into your compositions, After Effects provides the tools and flexibility you need to elevate your video production to the next level. By mastering these stabilization methods and experimenting with different approaches, you can enhance the visual impact of your videos and deliver a smoother, more engaging viewing experience for your audience.


