


How to Stabilize Video in Google Photos and Save Stabilized Video Successfully
 Mike Rule
Updated on
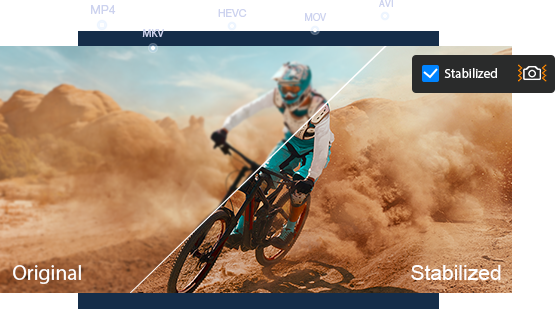
Google Photos is a cloud-based photo and video storage and management service. It goes beyond merely allowing users to store, organize, and share their media; it also includes a built-in video stabilization feature that effectively reduces shakiness and jitteriness in your videos.
Stabilizing a video in Google Photos can be a straightforward process. In this article, we will provide you with a comprehensive guide on stabilizing your videos in Google Photos and address common questions related to this valuable feature.
How to Stabilize Video in Google Photos
It's important to note that Google Photos' video stabilization feature is exclusive to Android. That's why you cannot find video stabilization option in iPhone or iPad. So, don't expect that you can stabilize video in iPhone's Google Photos.
Here's a step-by-step guide for stabilizing videos with Google Photos on Android devices:
Step 1. Download and install Google Photos from Google Play Store.
Step 2. Open Google Photos and log in to your Google account.
Step 3. Locate and open the video you want to stabilize.
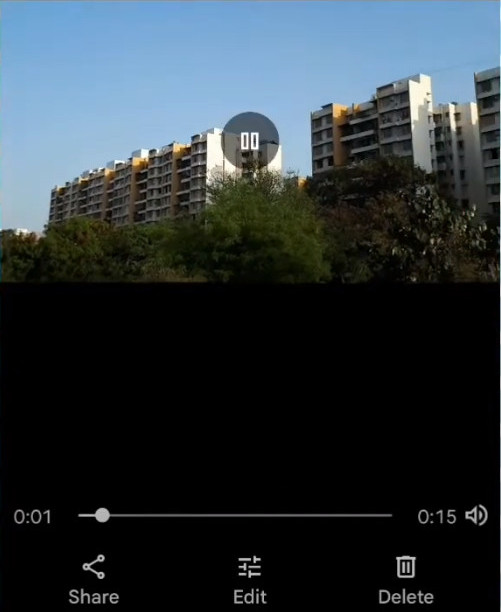
Step 4. Tap the "Edit" button (maybe looks like a pencil) located at the bottom of the screen.
Step 5. Click the "STABILIZE" button or maybe a rectangle with a diagonally positioned rectangle inside. Upon selecting this option, Google Photos will initiate the stabilization process, displaying a progress bar. The time taken for stabilization varies based on the video's length and quality.
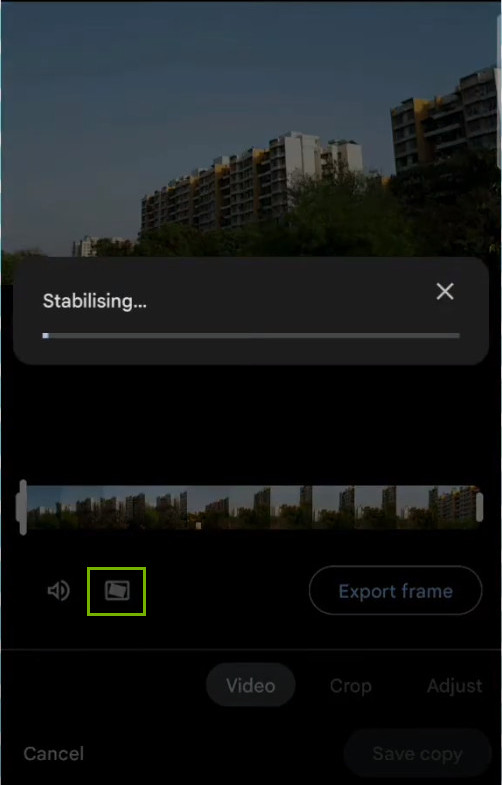
Step 6. After the stabilization process completes, you can preview the improved video. If you are satisfied with the result, save it by clicking the "Save copy" button. Google Photos will save a copy of the stabilized video while preserving the original. Feel free to rename the video as you see fit.
Your video is now stabilized and ready to be shared, enjoyed, or viewed with reduced shakiness. Please note that the availability and location of the stabilization feature within Google Photos may slightly differ depending on the app version and updates. However, the general process outlined here should assist you in stabilizing your videos with ease.
Common Errors in Google Photos' Video Stabilization
While Google Photos is a user-friendly and free video stabilizer, users occasionally encounter issues. Some examples from Google Photos Help include:
1. Unable to save changes
On Oneplus 7T, whenever i try to stabalize a video in google photos, it stablizes it fine and shows me preview. When i tap "save copy". It doesn't save it and throws an error "unable to save changes" or something like that.
To fix Google Photos "unable to save changes" error, you can try the following methods:
Method 1. Update Google Photos.
Older versions have been known to encounter issues preventing image edits and saving, especially when using SD cards. So updating this app may fix this issue.
Method 2. Force stop Google Photos.
To do this, firstly long-press the Google Photos app and tap the "App info" icon. Next, select "Force Stop" and confirm by tapping "OK."
Method 3. Modify background battery & data usage.
You can enable background data usage and disable background restriction for Google Photos and then see if you can save changes on Google Photos.
Enable Background Data Usage:
- Long-press the Google Photos app icon and tap "App info."
- Choose "Mobile data & Wi-Fi."
- Toggle on the "Background data" option. If it's already enabled, toggle it off and back on.
Disable Background Restriction:
- On the Google Photos "App info" page, select "Advanced" from the drop-down menu.
- Choose "Battery."
- If "Background restriction" is set to "Restricted," tap on it to enable background battery usage for Google Photos.
- A warning will appear, indicating that disabling background battery restriction for Google Photos may affect battery life. Tap "Remove" to proceed.
Additionally, temporarily disabling Battery Saver could help resolve the issue. You can turn off Android Battery Saver from the notification panel or navigate to Settings > Battery > Battery Saver > Turn Off Now.
Method 4. Modify storage location
It has been observed that the 'Unable to save changes' error primarily affects media stored on external storage (such as an SD card). So, changing the storage location for Google Photos to your device's internal storage my fix your problem.
Follow these steps to make this adjustment:
- Launch Google Photos and tap your profile photo/icon at the top-right corner.
- Select "Photos settings."
- Choose "SD card access."
- Tap "Get started" to proceed.
- Select your phone's name or internal storage from the hamburger menu.
- Tap "Allow Access to [Phone Name]" and confirm by tapping "Allow" on the prompt. This will grant Google Photos access to your device's internal storage and store edited videos there.
Method 5. Move your video
Moving the video you wish to stabilize from the SD card to your device's internal storage may also work. Here's how:
- Open the File app and select the video you want to move.
- Tap the three-dotted menu icon at the top-right corner and select "Select all."
- Again, tap the three-dotted menu icon and choose "Move to."
- Select "Internal Storage" and wait for the video to be moved.
2. Low-quality output
It still stabilizes video but output file is 10x smaller so low quality that squares are on every scene.
Regrettably, there are no straightforward fixes for this issue, so users may seek alternatives for video stabilization that yield higher-quality results. However, if you find Google Photos' stabilization effective for your needs, you can explore third-party upscaling tools (like Winxvideo AI) to improve the resolution of the compressed video after stabilization.
3. Can't find stabilize option
I cannot see any option of video stabilization.
The video stabilization is only available on Android devices. Additionally you need to know that this button only appears when the video is on your device or after you click the Edit button on a video and it's fully downloaded onto your device.
4. Can't stabilize 4K 60 fps video
This is likely because processing such high-resolution, high frame rate videos requires significant computing power. For smoother performance, you can consider compressing your video to lower resolution, such as 1080p.
5. Stabilizing a 60fps video in Google Photos reduce the frame rate to 25fps
There isn't any official confirmation from Google about why stabilizing 60fps videos in Google Photos might reduce the frame rate to 25fps. However, here are two possible explanations.
- For processing efficiency: Stabilizing a video, especially at high frame rates like 60fps, requires significant processing power. Reducing the frame rate (like dropping to 25fps) during stabilization could be a way for Google Photos to streamline the process and make it more efficient.
- For maintaining video quality: The stabilization process might involve analyzing and adjusting individual frames in the video. Reducing the frame rate could allow Google Photos to dedicate more processing power to each remaining frame, potentially leading to smoother and less blurry stabilization results.
Google Photos Video Stabilizer Alternative
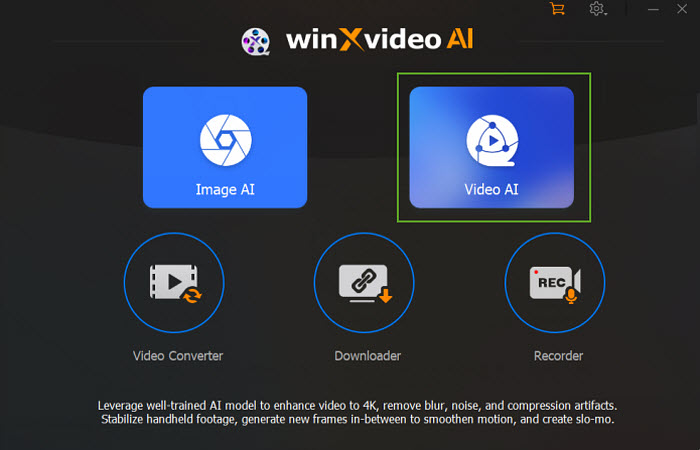
For users in need of an alternative video stabilization tool with superior output quality, Winxvideo AI is a recommended choice. This software enables you to stabilize shaky videos on your computer, supporting a range of resolutions, including 4K and 8K. It utilizes advanced AI technology to swiftly analyze and process videos, producing high-quality results.
Compared to Google Photos, Winxvideo AI provides greater customization options, allowing users to select the stabilization mode, preset, border color, crop type, and crop ratio, and prioritize either speed or quality.
In addition to video stabilization, Winxvideo AI offers a wide array of useful features, including video upscaling, frame interpolation, video conversion, compression, recording, and editing.
To stabilize a video using Winxvideo AI, simply follow the steps below:
Step 1. Free download and install Winxvideo AI on your computer.
 Free Download
  Free Download
Winxvideo AI is for PC, while Macxvideo AI (from our MacXDVD brand) is for macOS.
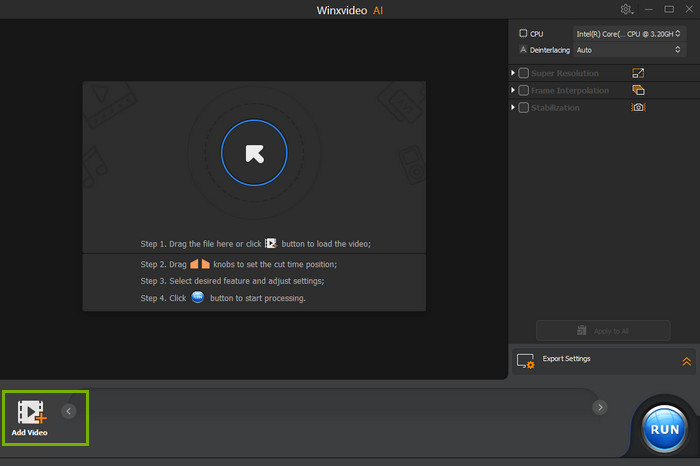
Step 2. Open Winxvideo AI and select the "Video AI" feature.
Step 3. Click the "Add Video" button at the bottom left corner to import the shaky video you wish to stabilize.
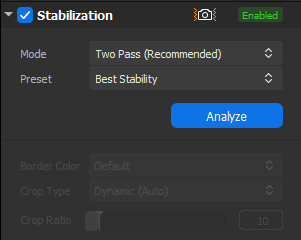
Step 4. Enable "Stabilization" and customize the mode and preset, according to your preferences.
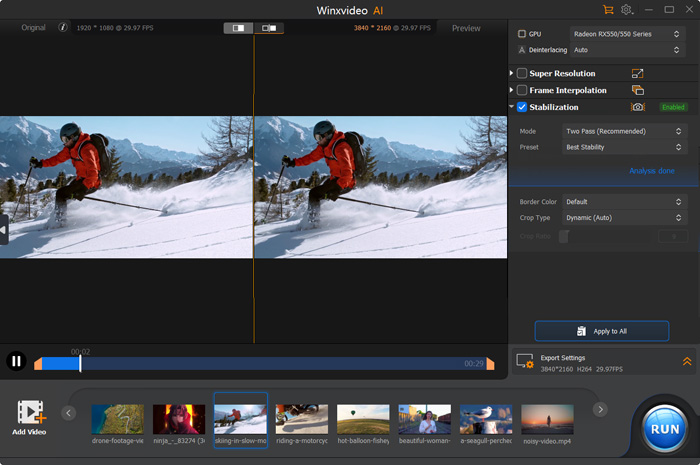
Step 5. Click "Analyze" and observe the AI-powered progress in the preview window. After analysis completion, preview the result. If dissatisfied, you can try other mode and preset, and adjust border color, crop type, and crop ratio.
Step 6. Click the "RUN" button to export the stabilized video.
With Winxvideo AI, you can expect superior video stabilization results and access a wealth of additional video-related features. It's a valuable alternative for users who prioritize high-quality video stabilization.
 FAQ about Stabilizing Videos in Google Photos
Google Photos' video stabilization feature is currently only available on Android devices. There is no option to stabilize videos directly within the iPhone app.
Similar to the iPhone app, Google Photos on desktop (web interface) doesn't offer stabilization feature.
There's no online editing suite within Google Photos. You'll need to use alternative solutions for stabilizing your videos.
Conclusion
Google Photos offers a convenient and straightforward solution for stabilizing videos on Android devices. This built-in feature effectively reduces shakiness and jitteriness, enhancing the overall quality of your videos. While occasional errors like "unable to save changes" or lower output quality might occur, the troubleshooting methods outlined in this guide can help you overcome these hurdles.
For users seeking more advanced video stabilization with features like higher output quality, frame rate preservation, and extensive customization options, exploring alternative software like Winxvideo AI is recommended.
With Google Photos or a preferred third-party solution, you can easily transform shaky videos into polished and visually pleasing content.


