


How to Change Frame Rate in Premiere Pro?
 Mike Rule
Updated on
Adobe Premiere Pro is a powerful video editing software used by professionals and hobbyists alike to create stunning videos. One of the fundamental aspects of video editing is adjusting frame rates to ensure smooth playback and maintain the aesthetic quality of your content. So, this article focuses on how to change the frame rate in Premiere Pro to help you get the desired video frame rate.
Part 1. How to Change Frame Rate in Premiere Pro?
Changing the frame rate of your video project in Premiere Pro is straightforward. Here's how you can do it:
1. Change the frame rate of a sequence
If you want to maintain a consistent frame rate for the majority of the video, you can modify the frame rate of the specific sequences that necessitate changes.
Step 1. Begin by launching your project in Adobe Premiere Pro.
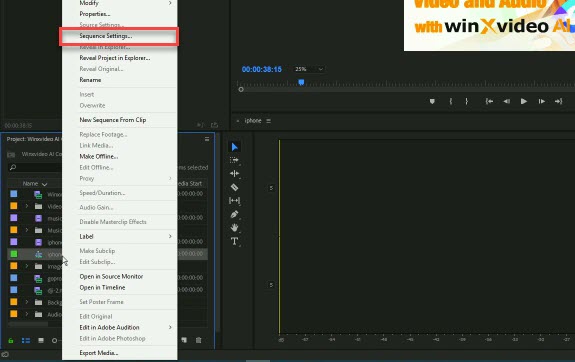
Step 2. Within the Project panel, pick out the sequence that requires a frame rate adjustment. Proceed to right-click on the selected sequence.
Step 3. Opt for "Sequence Settings" from the contextual menu that pops up.
Step 4. Locate and click on the drop-down menu labeled "Timebase".
Step 5. From the options provided, choose the desired frame rate for the sequence.
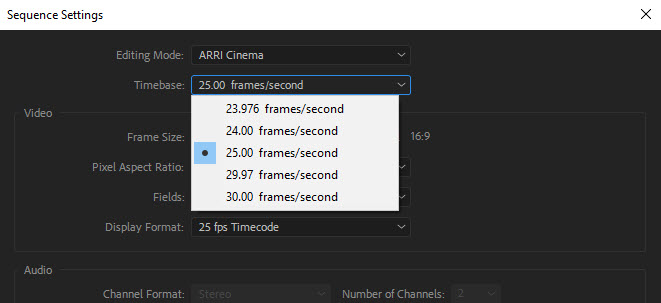
Step 6. Confirm your selection by clicking on "OK".
2. Change the frame rate of a video clip
If you wish to modify the frame rate of an entire video clip in Adobe Premiere Pro, here are the steps you need to adhere to. This method changes the frame rate of the selected clip without altering its speed, keeping the playback duration the same.
Step 1. Import your video clip to Premiere Pro, and then simply drag it onto the timeline.
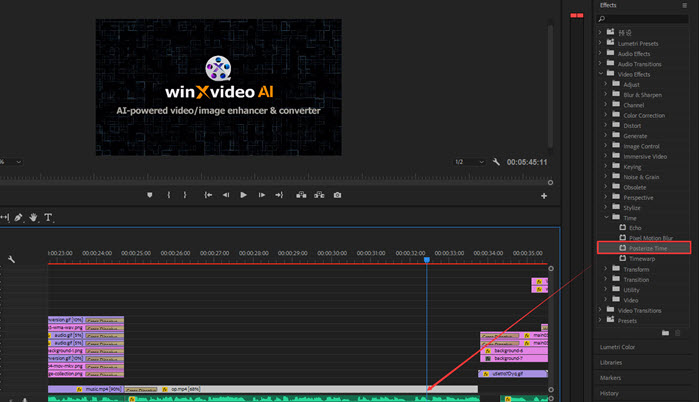
Step 2. Navigate to the "Effects" tab, located within the options at the bottom left corner of the screen.
Step 3. Choose "Video Effects" > "Time" > "Posterize Time" from the menu.
Step 4. Drag and drop the Posterize Time effect onto the clip for which you wish to adjust the frame rate.
Step 5. Access the "Effect Controls" at the top left of the screen.
Step 6. Click on the small "arrow" icon next to the "Frame Rate" text under "Posterize Time".
Step 7. Adjust the frame rate to your desired preference. For instance, input "60" to set the video to 60 fps.

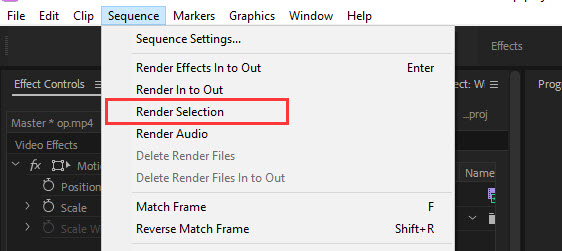
Step 8. Finally, click on "Sequence" > "Render Selection" to complete the process.
Part 2. Tips for Changing Video FPS in Premiere Pro?
You may have some other questions about the frame rate adjustment with Adobe Premiere Pro, so here are some tips for helping you find answers.
1. How to check the video frame rate in Premiere Pro?
To check the frame rate of a video in Premiere Pro, simply select the clip in your project panel or timeline, then look at the information displayed at the bottom of the panel or by hovering over the clip. The frame rate is shown in frames per second (FPS).
2. How to change the frame rate without changing the speed?
If you want to change the frame rate in Premiere without affecting the video speed, use the "method 2" described above. This way, Premiere Pro just adjusts the playback to match the new frame rate without changing the clip's duration.
3. How to convert 30fps to 60fps in Premiere Pro?
If you want to convert video to 60fps from a 30fps video in Premiere Pro and then export it, you can follow the method below to change the video frame rate.
Step 1. Open Adobe Premiere Pro. Click "File" > "New" > "Sequence".
Step 2. Choose the "AVCHD" option, then select "1080p" and finally click on "AVCHD 1080p60" and confirm by clicking "OK".
Step 3. Import your video, which has a frame rate of 30 fps, into Adobe Premiere Pro.
Step 4. Place the video onto the timeline by dragging it.
Step 5. Ensure that the existing settings are preserved by clicking on "Keep existing settings".
Step 6. To apply time interpolation, right-click on the video in the timeline and choose "Time Step interpolation" followed by "Optical Flow".
Step 7. Press the "Enter" key and patiently wait for the processing to complete. Please note that this process may take several hours.
Step 8. Access the "File" menu and select "Export", then choose "Media".
Step 9. From the available options, select a preset that suits your requirements.
Step 10. Scroll down to the "Effects" section and verify if the frame rate is set to 60 fps. If it is not, make the necessary adjustment to change it to 60 fps.
Step 11. Finally, initiate the export process by clicking on "Export", and you will get a 60fps video.
4. How to convert 60fps to 24fps in Premiere Pro?
To convert videos from 60fps to 24fps in Premiere Pro, you can use the same method just mentioned above.
5. How to make a 120fps video with Premiere Pro?
Creating a 120fps video involves shooting your footage at that frame rate or higher. In Premiere Pro, you can export your video to play back at 120fps, but this is a hidden feature. Don’t worry, here we will help you export a 120fps video in Premiere Pro.
Step 1. Import your 120fps video to Adobe Premiere Pro.
Step 2. Select your video clip, and drag it to the timeline to create a sequence.
Step 3. Select the Timeline panel. Click "Sequence" > "Sequence Settings".
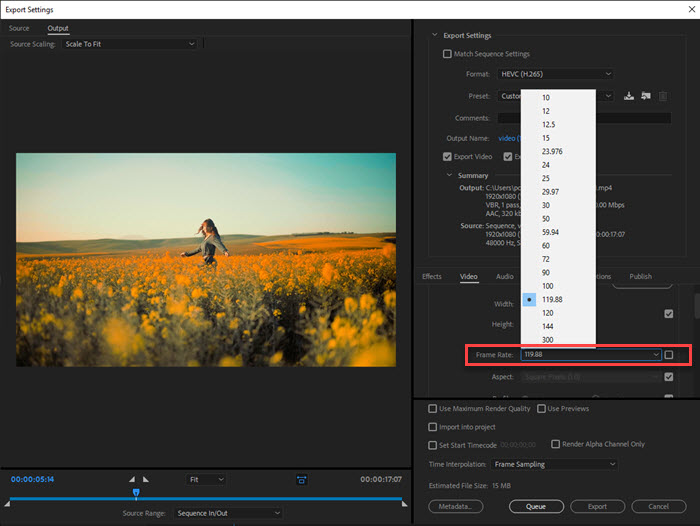
Step 4. Check the "Timebase" section and it should say "119.88 frames/second".
Step 5. Edit your video as needed.
Step 6. Tape "Ctrl + M" on your keyboard to pop up the export settings, choose HEVC (H.265) as the output format, and then you can choose 119.88 or 120 as the output fps.
Step 7. Hit Export to start.
6. Why change video frame rate?
Frame rate, measured in frames per second (FPS), significantly affects the look and feel of your video. Changing the video FPS can be necessary for several reasons:
- To create a consistent look across clips shot at different frame rates. For example, a video @60fps looks more fluid than a video @24/30fps.
- To achieve a specific visual style, such as the cinematic look often associated with 24fps.
- For technical reasons, such as conforming to broadcast standards or device playback requirements.
- To create slow-motion or fast-motion videos.
Conclusion:
Changing the frame rate in Premiere Pro is an essential skill for video editors, allowing for greater control over the aesthetic and technical aspects of their projects. By understanding how to manipulate and interpret footage within Premiere Pro, you can achieve the desired effect, whether it's matching frame rates for consistency, creating cinematic motion, or experimenting with slow-motion and time-lapse effects.


