


How to Change Frame Rate in DaVinci Resolve?
 Mike Rule
Updated on
DaVinci Resolve allows you to adjust the frame rate of your video project. This is important for ensuring compatibility with different playback devices and achieving the desired visual effect. This guide will walk you through the effective ways to change frame rate in DaVinci Resolve, ensuring your project matches your desired specifications.
1. Change Project Frame Rate in DaVinci Resolve
Project framerate is set in project settings and is the framerate of the timeline you will edit. It’s hard to change that as soon as you upload media to your timeline. Namely, your timeline frame rate setting gets locked in. So, you are suggested to get into the habit of setting the frame rate before you upload anything to your timeline.
Step 1. Bring up your Project Manager window by selecting File > Project Manager.
Step 2. Start a new project by clicking on the New Project button.
Step 3. Name your new project and confirm.
Step 4. In the menu bar at the top of the DaVinci Resolve interface, locate the "File" dropdown menu and click on "Project Settings".
Step 5. In the Project Settings panel that appears, select "Master Settings". Under "Timeline Format", you'll find a dropdown menu for "Timeline frame rate".
Step 6. Choose the desired frame rate from the dropdown menu, such as 24 FPS, and click "Save".
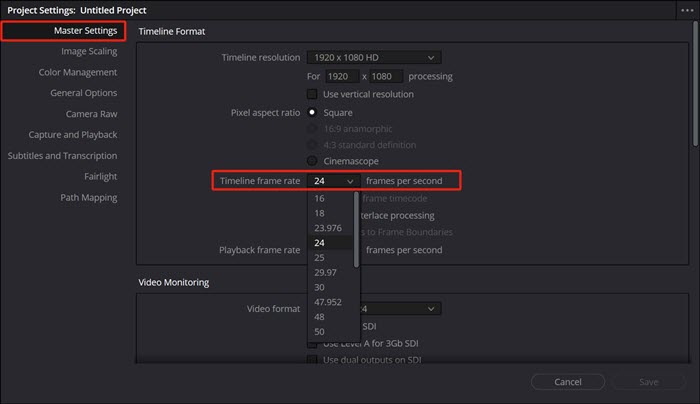
Notice. Remember, once you import any media, you will be unable to change this. Also, make sure your Playback Frame Rate matches your Timeline Frame rate.
Learn more: A Guide to Davinci Resolve Denoise & Plugins
What to do if your Project is stuck at the wrong frame rate setting?
It is important to be aware that once you have imported clips and added them to a timeline in the master project settings, the timeline frame rate cannot be altered. The best way to fix this is to make a new timeline with the timeline frame rate settings you want.
Step 1. Make sure you have already opened your chosen project.
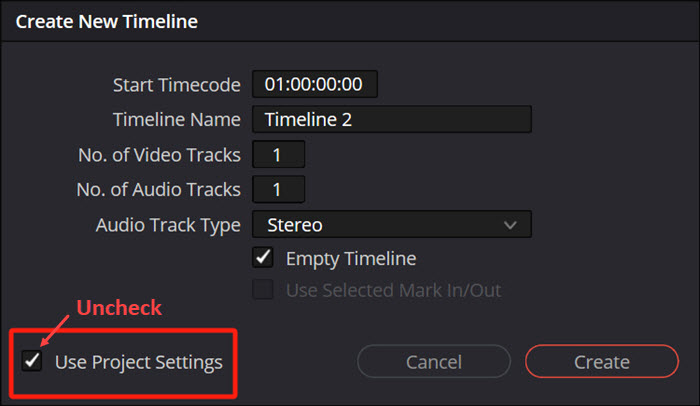
Step 2. Click Cmd/Ctrl + N, or File > New Timeline to start a new timeline and give it a name.
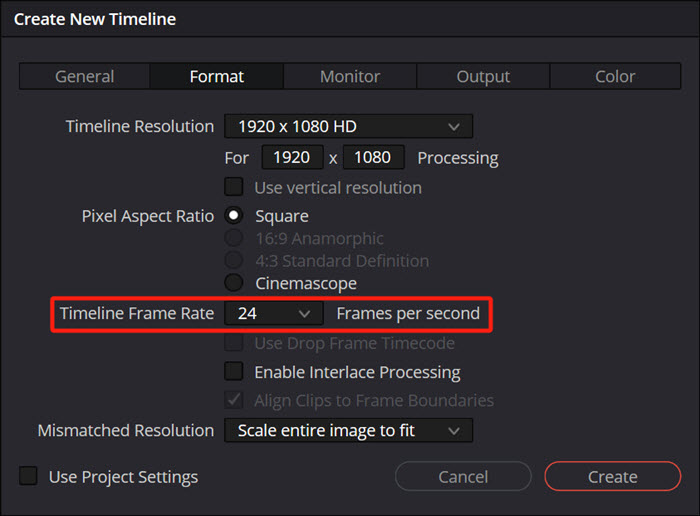
Step 3. Click on the Use Custom Settings button and go to the Format tab.
Step 4. Select the frame rate you need from the Timeline Frame Rate dropdown menu and hit Create.
Step 5. Go back to your old timeline using the dropdown menu above the preview panel.
Step 6. Click and drag to select everything on your old timeline and press Control + C to copy it.
Step 6. Navigate back to your new timeline on the same dropdown menu, and click Control + V to paste your old timeline media onto your new timeline.
Make sure the Use Project Settings box at the lower left corner is unchecked; this allows you to change the settings in multiple tabs. You can change the Timeline Frame Rate by going to the Format tab.
2. Change Specific Clip Frame Rate in DaVinci Resolve
If the frame rate of your imported footage does not align with the frame rate chosen for your project, there is no need to worry. DaVinci Resolve is programmed to seamlessly manage clips with varying frame rates within a timeline. The software will guarantee that all content plays back smoothly at the designated timeline frame rate.
For instance, in a scenario where you are working with a 30 fps timeline containing clips at varying frame rates such as 30 fps, 23.97 fps, and 60 fps, all the clips will playback at their normal speed on the 30 fps timeline. DaVinci Resolve will generate additional frames for the 23.97 fps clips through frame interpolation during the retime process, while every other frame of the 60 fps clips will be dropped.
Step 1. On the "Edit" page, click on the "Media Pool" tab. Select the clip you want to modify. Right-click on the selected clip and click on "Clip Attributes".
Step 2. In the "Clip Attributes" panel, click on the "Video" tab. Under "Video Frame Rate", choose the desired frame rate and click "OK". The clip will now be updated with the new frame rate.

If you import a new video with a frame rate that doesn't match the frame rate of the project timeline, you will receive a warning message.
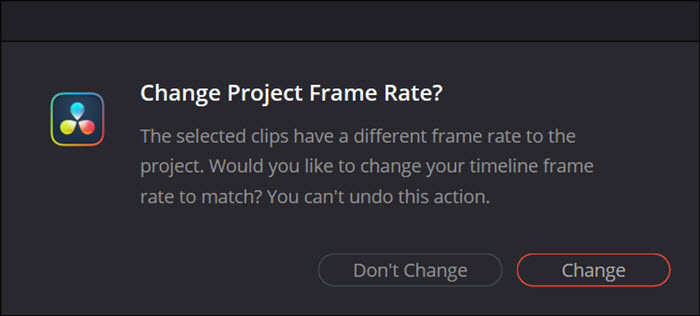
- Selecting "Change" will synchronize the project timeline's frame rate setting with the frame rate of the clip.
- Selecting "Don't Change" will maintain the original frame rate of the project timeline and import the clip without any alterations.
- In the future, importing media with varying frame rates will no longer trigger a warning. The clips will be imported according to the frame rate of the initial clip imported, and the project's frame rate will be adjusted to align with that of the first imported clip.
 FAQ
FAQ
Frame rate refers to the number of still images (frames) displayed per second in a video. Higher frame rates create smoother motion.
The ideal frame rate depends on your project's purpose. Here's a general guideline:
- 24 fps: Cinematic look, standard for film.
- 30 fps: Common for broadcast television and video.
- 60 fps: Smoother motion, ideal for high-action content.
DaVinci Resolve supports a wide range of frame rates, from 23.976 fps to high frame rates like 120 fps and beyond.
The playback frame rate is determined by your computer's performance and the project settings. DaVinci Resolve aims to play back at the project's frame rate, but limitations might occur.
While changing the project frame rate can technically slow down 30fps footage, it's not recommended. A better approach is to use the "Retime" feature:
Step 1. Select the clip you want to slow down.
Step 2. Right-click on the clip and choose "Retime Controls" (or press Ctrl/Cmd + R).
Step 3. In the "Retime" panel, adjust the speed percentage (e.g., 50% for half speed).
Step 4. Enable Smoother Slow Motion (Optional): While simply reducing the speed slows down the clip, it can appear choppy. To achieve smoother slow motion, DaVinci Resolve offers interpolation methods: "Retime Process" > "Optical Flow" or "Smooth" > "Enhanced".


