Does FFmpeg Support AV1? How to Encode Videos in AV1 with FFmpeg
The popularity of royalty-free AV1 video codec is growing by the day. Since FFmpeg 4.0, AV1 codec files can be encoded in FFmpeg through libaom. Recently, FFmpeg annonunced to support NVIDIA NVENC AV1 encoder, as well as offer better quality at lower bit rate and outperforming HEVC (H.265) encoding by 75 to 100%.
However, even if AV1 encoder is supported in FFmpeg, many users still have no idea on how to encode videos AV1 with FFmpeg. In this article you'll find a detailed FFmpeg guide for AV1 encoding.
Suggested reading: AV1 vs VP9
Best AV1 Video Encoder to Convert AV1 Files without Command Line
For those who are not used to using command lines, Winxvideo AI is a nice option to decode and encode AV1 codec files. It's one of the few video converters that supports AV1. By using it, you can convert AV1-encoded videos to MPEG-4, H.264, HEVC, VP9, etc. packaged in any video containers, such as MP4, MOV, MKV, AVI, WebM and more.
Surprisingly, Winxvideo AI is also a video/image enhancer, which can upscale video to 1080p/4K,and image up to 10K, stabilize shaky footage, convert 24FPS/30FPS to 60FPS, 120FPS and even higher with CineAI.
Table of Contents
Part 1. How to Download and Install FFmpeg on Your Computer
I wonder if you're in the same boat: knowing FFmpeg can convert videos, but don't know exactly how? As FFmpeg is a command line tool for video processing, many people might get stuck in the first step - download and install it on the computer. Here, I'd like to show you how to fet started with FFmpeg.
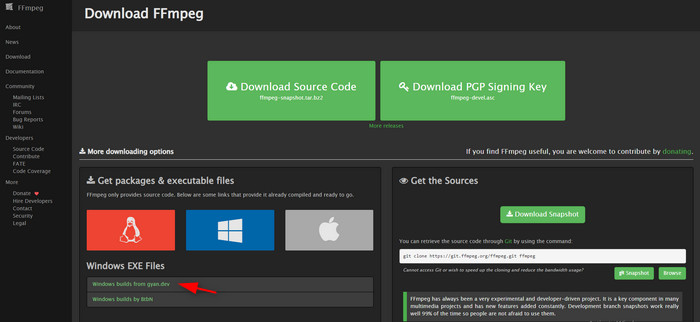
Step 1. Navagate to FFmpeg official download page: https://ffmpeg.org/download.html. Choose the platform that your computer is running. Take Windows and an example. Click on the Windows builds from gyan.dev option. This will direct you a new exe download page.
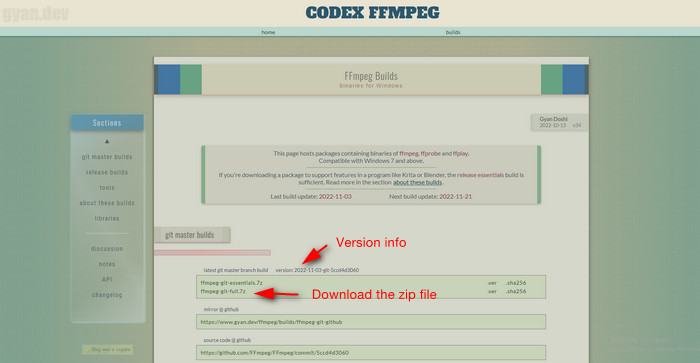
Step 2. In the new window, you can see different versions of FFmpeg. Click on what you need and download the zip package.
Step 3. Extract the downloaded file, and open it. You can find the FFmpeg.exe file under the bin.

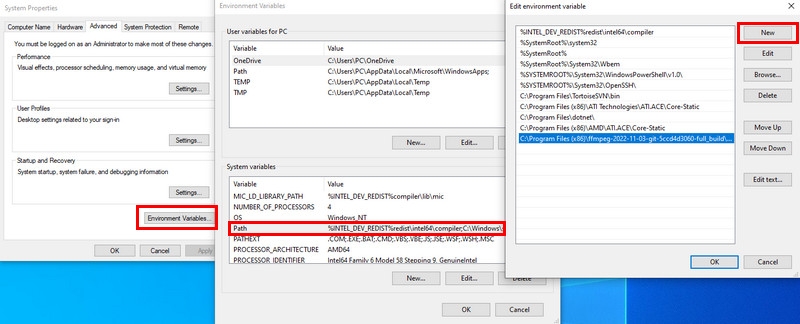
Step 4. Configuring Environment Variables to facilitate the subsequent execution of commands on the CLI.
- Just open the "Edit the system environment variables" in start menu.
- Click on the "Environment Variables" option.
- Find the "Path" under the System variables, double-click on it to enter the editing window.
- Click on the New button, paste the absolute path to the bin directory in the ffmpeg folder and click OK to save. Here, my bin path is:
C:\Program Files (x86)\ffmpeg-2022-11-03-git-5ccd4d3060-full_build\bin
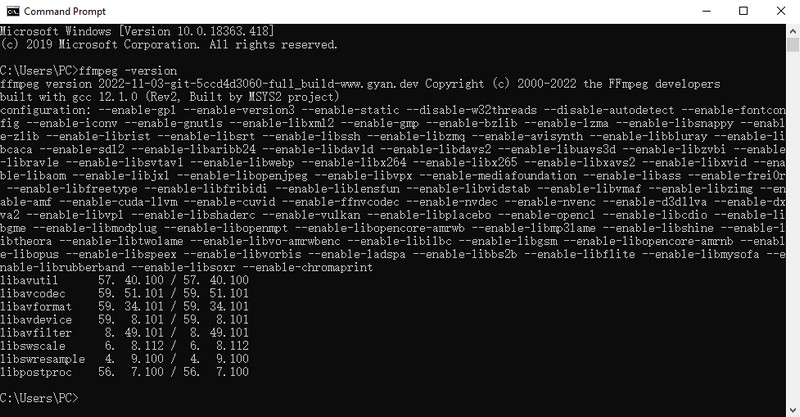
Step 5. Check whether FFmpeg is installed or not on your computer. Just open the cmd Command Prompt, type in ffmpeg -version and press the Enter on the keyboard. If you see the ffmpeg version like below, it's installed successfully.
Part 2. How to Encode AV1 Files with FFmpeg
You know, FFmpeg AV1 encoding is achieved by libaom-av1. Thus, your command line should be included with libaom-av1 besides input and output, for example:
ffmpeg -i input.mp4 -c:v libaom-av1 F:output.mkv
Now, let's start AV1 encoding on FFmpeg.
Step 1. Open the cmd Command Prompt window.
Step 2. Type in the FFmpeg command of input and output video as follow: (Here, I also set the video in constant quality with -crf at 30. )
ffmpeg -i F:av1.webm -c:v libaom-av1 -crf 30 F:av1_test.mp4
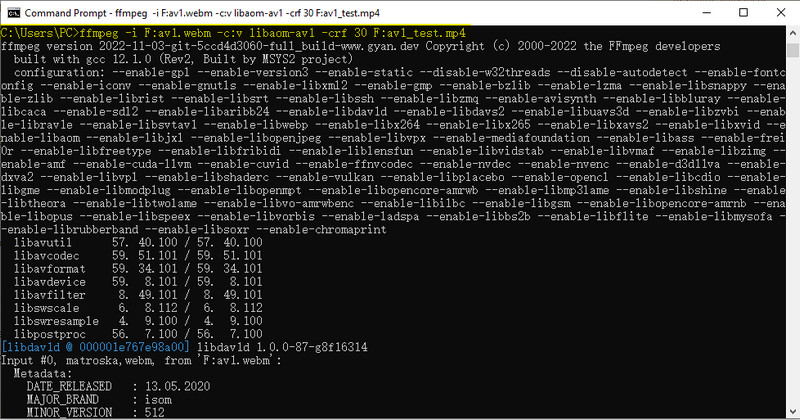
Step 3. Press the Enter on the keyboard, and wait. The AV1 encoding will be finished after a while. It depends more on your video file size and length.
To know more about FFmpeg command for AV1 encoding:
1. Constrained quality: libaom-av1 also has a constrained quality (CQ) mode that will ensure that a constant quality is reached while keeping the bitrate below a specified upper bound or within a certain bound. This method is useful for bulk encoding videos in a generally consistent fashion. The quality is determined by the -crf, and the bitrate limit by the -b:v where the bitrate MUST be non-zero.
ffmpeg -i input.mp4 -c:v libaom-av1 -crf 30 -b:v 2000k output.mkv
2. Two Pass: In order to create more efficient encodes when a particular target bitrate should be reached, you should choose two-pass encoding. Two-pass encoding is also beneficial for encoding efficiency when constant quality is used without a target bitrate. For two-pass, you need to run ffmpeg twice, with almost the same settings, except for:
- In pass 1 and 2, use the -pass 1 and -pass 2 options, respectively.
- In pass 1, output to a null file descriptor, not an actual file. (This will generate a logfile that FFmpeg needs for the second pass.)
- In pass 1, you can leave audio out by specifying -an.
ffmpeg -i input.mp4 -c:v libaom-av1 -b:v 2M -pass 1 -an -f null nul && ^
ffmpeg -i input.mp4 -c:v libaom-av1 -b:v 2M -pass 2 -c:a libopus output.mkv
3. Average Bitrate (ABR): libaom-av1 also offers a simple "Average Bitrate" or "Target Bitrate" mode. In this mode, it will simply try to reach the specified bit rate on average, e.g. 2 MBit/s.
ffmpeg -i input.mp4 -c:v libaom-av1 -b:v 2M output.mkv
4. Lossless encoding: When the -crf is set at 0, it refers to lossless encoding.
ffmpeg -i input.mp4 -c:v libaom-av1 -crf 0 output.mkv
Part 3. How to Encode AV1 Files without Command Line
As above, if you find it's too complicated to encode AV1 files with FFmpeg, especially being confused by knids of command lines, you can switch to a way to convert AV1 files without command line. Winxvideo AI is a nice option. It allows users to decode AV1 codec files and encode it to MP4, MOV, MKV, WebM, AVI, HEVC, H.264, MPEG-4, VP9 and 420+ preset profiles.
It also supports AV1 NIVIDIA, AMD, and Intel QSV hardware encoding, which accelerates your AV1 encoding to 47x real-time faster without quality loss visually.
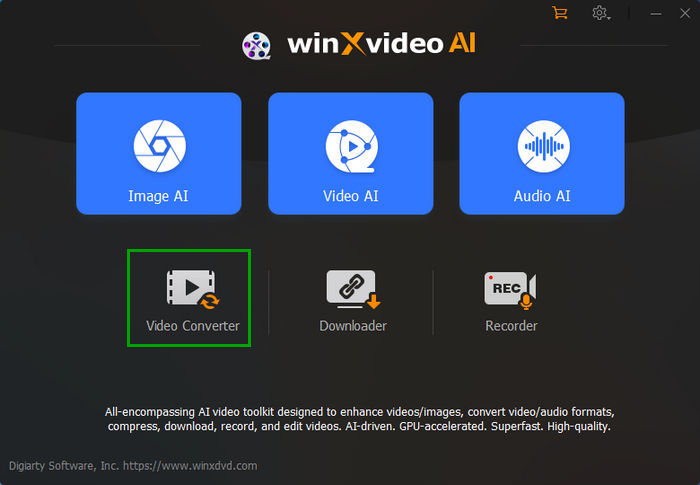
Step 1. Free download Winxvideo AI, install, and launch it on your computer. Click "Video Converter" to get ready for AV1 video transcoding. Then click on the "+ Video" button on the main UI to load the target AV1 videos.
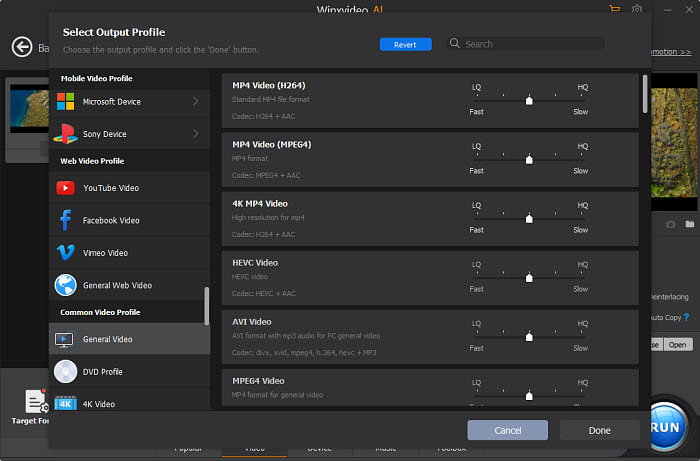
Step 2. Choose an output format from the Target Format section at the bottom, or click "Target Format" icon for more preset profiles. "MP4 (h264+aac)" is always suggested for wide compatibility.
Step 3. Optionally, you can click on the Settings icon to adjust the video codec, frame rate, aspect ratio, video resolution etc. as you need.
Step 4. Once done, click the "Browse" button to choose a destination folder to save the converted file. Then, hit "RUN" button to start transcoding the AV1 video. The hardware accelerator is always ticked on, if your computer is configured with qualified graphic cards.
![]() New Feature Alert:
New Feature Alert:
Winxvideo AI now includes AV1 profile in its list of supported formats. This allows users to convert AV1 videos to other format for seamless playback on various devices and editing tools. Additionally, you can convert any video to AV1 to compress file size without compromising quality, perfect for storage, streaming, and sharing.