


How To Upscale An Image In Photoshop [Photoshop Tutorial]
 Mike Rule
Updated on
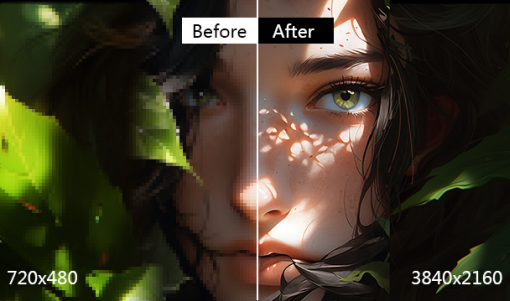
Are you tired of losing image quality when enlarging your photos in Photoshop? Upscaling an image means enlarging it without sacrificing quality, and it's a technique that's been crucial in various industries, from film to digital imaging.
Traditionally, resizing images larger than their original size in Photoshop was a risky endeavor. The process often resulted in soft, dull, or overly sharpened images due to the limitations of previous upscaling algorithms. However, with the introduction of Preserve Details 2.0 in Photoshop CC 2018, everything changed. In this tutorial, we'll explore how to Upscale Images to 4K in Photoshop without losing quality using Preserve Details 2.0.
How To Upscale An Image In Photoshop without Detail Loss
Here's a detailed guide on upscaling images in Photoshop without stretching/distortion using Preserve Details 2.0, incorporating best practices and tips.
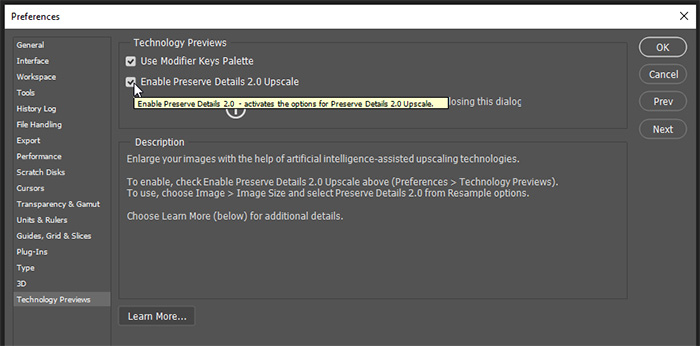
Step 1. Enable Preserve Details 2.0
This step activates the AI-powered upscaling feature. It's only required once per Photoshop session. Go to Edit > Preferences (Windows) or Photoshop CC > Preferences (Mac). Select the Technology Previews tab. Locate the Enable Preserve Details 2.0 Upscale option and check the box next to it. Click OK to confirm the changes.
Read more: How to Colorize Black and White Photos Photoshop
Step 2. Prepare Your Image
Starting with a high-resolution image is crucial for better upscaling results. If possible, use the original source file of your image rather than a compressed version. Consider basic image enhancements like minor adjustments to brightness, contrast, or sharpening before upscaling. This can sometimes yield slightly better results with Preserve Details 2.0.
Tips: Remember, the quality of the original image significantly impacts the upscaled outcome. A high-quality source file will always yield better results with any upscaling method.
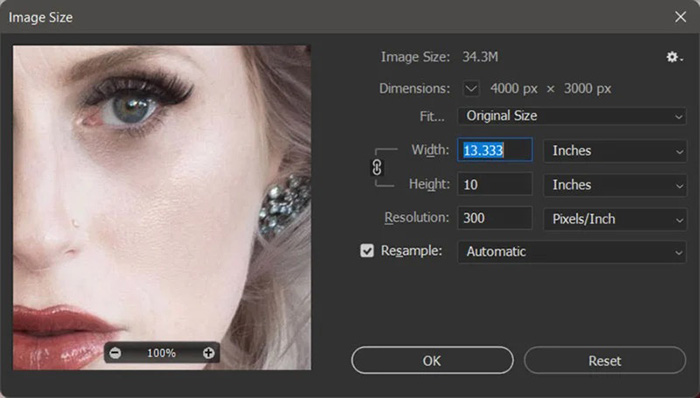
Step 3. Open the Image Size Window
Navigate to Image > Image Size. This window allows you to define the new dimensions for your upscaled image.
Tips: Shortcut for Upscaling Image in Photoshop
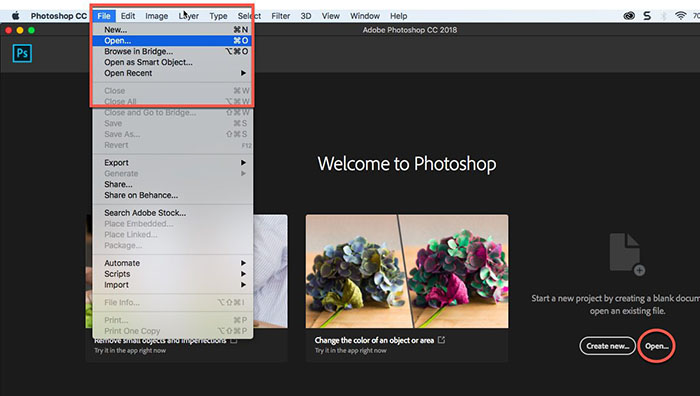
Open your image: This can be done by dragging the image file into Photoshop or using the standard "Open" function (Ctrl/Cmd + O).
Access the Image Size window (keyboard shortcut): Press Alt + Ctrl + I (Windows) or Option + Command + I (Mac).
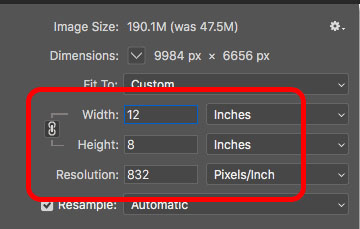
Step 4. Set New Dimensions
Enter your desired Width and Height values in pixels. It's important to be realistic about the level of enlargement. Excessive upscaling will introduce more noticeable quality loss even with Preserve Details 2.0. Consider the final usage of the image. For example, a slight upscale for web use might be more forgiving than a massive increase for printing.
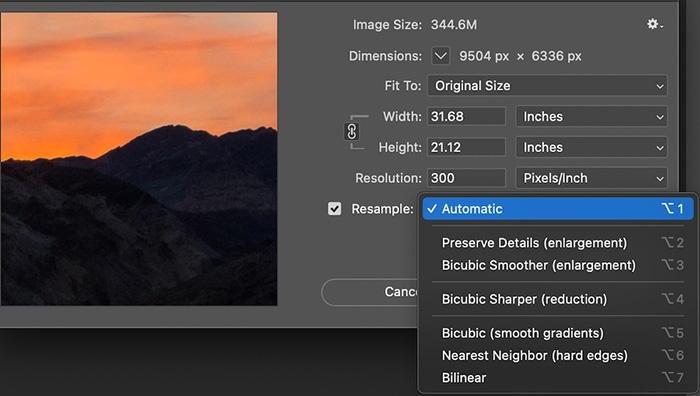
Step 5. Choose "Resample" and Select "Preserve Details 2.0"
Ensure the Resample checkbox is ticked. This indicates you want to change the image's pixel dimensions. Click the dropdown menu next to Resample and choose Preserve Details 2.0. This instructs Photoshop to use the AI-powered method for upscaling.
In Photoshop, resampling is a way to increase image resolution. Check more about How to Increase Image Resolution.
Step 6. Preview and Adjust (Optional)
The Image Size window might offer a preview of the upscaled image based on the chosen settings. While not always a perfect representation, it can give you a general idea of the outcome. If the preview reveals unwanted blurring or artifacts, you can experiment with slightly lower upscaling values.
Step 7. Save Your Upscaled Image
Click OK in the Image Size window to apply the changes. When saving, consider using a lossless format like PNG or TIFF if image quality preservation is critical. For web use, a high-quality JPEG with minimal compression might be suitable.
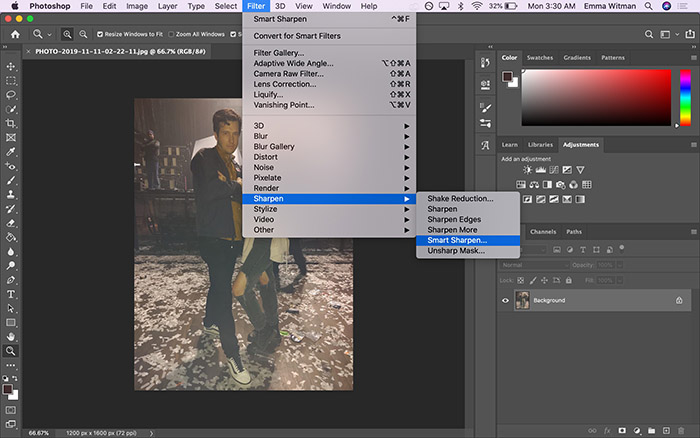
Tips: After upscaling, you might want to use the Smart Sharpen filter (Filter > Sharpen > Smart Sharpen) very subtly to sharpen image with AI in Photoshop and enhance details without introducing artificial sharpening artifacts.
Learn more: how to restore old photos with Photoshop.
If you want to upscale an image in Photoshop for Instagram, you’d better know that Instagram might still resize your image upon upload. Aim for a starting image slightly larger than the recommended size (1080 x 1080 pixels) to account for this potential reduction. These methods focus on minimizing quality loss, but some may still be noticeable, especially if the original image is very small. The key is to start with a high-resolution image and make small adjustments to minimize any compromise in quality.
Photoshop Upscaling: Bicubic Smoother vs Preserve Details vs Preserve Details 2.0
When enlarging images in Photoshop, preserving detail becomes crucial. Here's a breakdown of common upscaling methods and their impact on image quality.
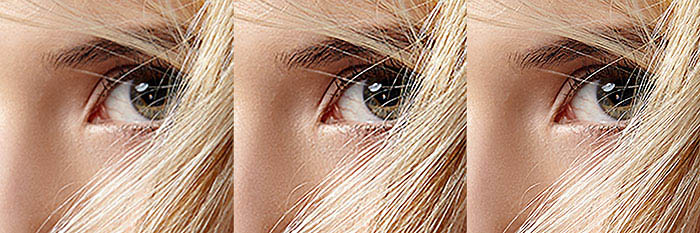
Bicubic Smoother (Legacy Method)
This was the standard photo upscaling method in older Photoshop versions (CS6 and earlier). Bicubic Smoother relies on a mathematical interpolation technique to add new pixels when enlarging an image. This process considers the surrounding pixels to create a smooth transition, aiming to remove noise or imperfections.
While it attempts to smooth out the image for a cleaner look, it often sacrifices details, making the image appear soft and blurry. Bicubic Smoother offered minimal user control. You couldn't adjust the level of smoothing or prioritize detail preservation. It applied a one-size-fits-all approach that often sacrificed sharpness for a noise-free look.
Preserve Details (Previous Version)
Compared to Bicubic Smoother's excessive smoothing, Preserve Details attempted to maintain more image details during upscaling. This resulted in sharper edges and a clearer representation of textures like hair and skin. Oversharpening Risk: However, the algorithm sometimes overcompensated, leading to oversharpening of the image. This created a visually "chunky" or "artificial" look, particularly in areas with smooth textures like skin. Edges might appear too harsh and unrealistic.
Similar to Bicubic Smoother, users had minimal control over the upscaling process. The sharpening intensity couldn't be adjusted, potentially leading to oversharpening in some images.
Preserve Details 2.0 (Photoshop CC 2018)
Introduced in Photoshop CC 2018, Preserve Details 2.0 utilizes advanced AI (deep learning) to significantly improve upscaling results. It excels at preserving image details: Fine details like hair strands and eyes remain sharp and crisp. Unlike the previous version, it maintains natural-looking textures, particularly in areas like skin. Even at extreme upscaling levels (like 400% increase!), Preserve Details 2.0 delivers impressive results, minimizing quality loss and retaining a remarkably high level of detail.
For the best results when upscaling images in Photoshop, choose Preserve Details 2.0. It offers a significant leap in quality compared to older methods. However, even with AI assistance, significant upscaling might still introduce some level of quality loss. It's always best to start with a high-resolution image for optimal results.
 FAQs about How to Upscale an Image in Photoshop
Unfortunately, upscaling always introduces some quality loss. However, Photoshop's Preserve Details 2.0 (available in CC 2018 and later) minimizes this loss by using AI.
Open your image and go to Image > Image Size. 2. Check "Resample" and choose "Preserve Details 2.0" from the dropdown menu. 3. Enter your desired new dimensions and click "OK."
Even with AI, significant upscaling can still reduce quality. Starting with a high-resolution image is always recommended.
There isn't a direct way to upscale an image in Photoshop without technically changing the canvas size. However, you can achieve a similar effect by using a technique called "smart sharpening" which focuses on enhancing details within the existing image boundaries.


