


How to Increase Picture DPI on Windows/Mac/Online
 Mike Rule
Updated on
Have you ever been surprised by a blurry or pixelated printout of a photo that looked fantastic on your screen? The culprit behind this printing frustration is often a low DPI (dots per inch). DPI determines the level of detail and sharpness captured in a physical print. A higher DPI means a higher quality print. To achieve high-quality prints, you can increase the DPI of your images.
In this guide, we'll help you understand more about DPI and show you how to use popular image editing software, Windows and Mac built-in programs, and online DPI converter to increase picture DPI.
What is DPI
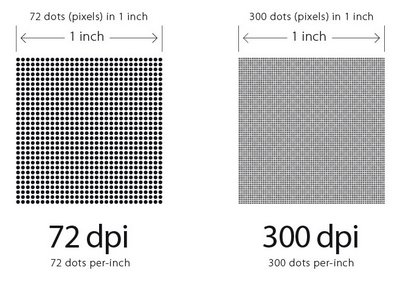
Imagine you're creating a mosaic picture with tiny tiles. The more tiles you use per inch, the clearer and more detailed the overall image will be. DPI, which stands for Dots Per Inch, works in a similar way for printed images. A printer uses tiny ink dots to build up the image on paper. The number of dots refers to how many are placed in every single inch of the printed picture.
So, a higher DPI means more dots are squeezed into each inch, resulting in a sharper and more detailed print. Just like with the mosaic tiles, the more detail you have (more dots), the better the final image looks.
72 DPI is typically the DPI of images you see online. They might look fine on your screen, but if you try to print them at a large size, they'll likely appear blurry or pixelated because there aren't enough dots to create a smooth image. 300 DPI is considered a good standard for printing photos. With 300 dots per inch, there's enough detail to create crisp and clear images.
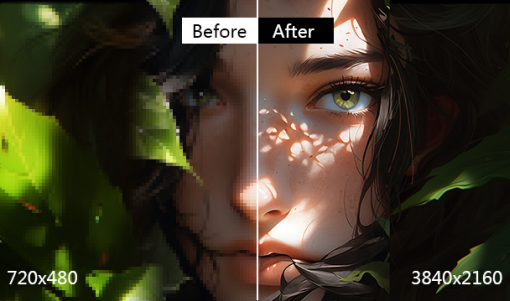
Think of it this way: zooming in on a low-resolution image on your phone makes the picture look blocky because you're seeing the individual pixels. Increasing the DPI for printing is like zooming out and adding more detail, so the final image looks smooth and sharp.
What DPI Should You Use for Printing
While it's true that increasing the DPI (dots per inch) of an image can improve print quality, there's an optimal range to consider. The ideal DPI for printing depends on a few key factors, including the image quality, printer type, print size and viewing distance.
For top-notch photos and detailed images, 300 DPI is the holy grail. It strikes the perfect balance between sharp, crisp prints and manageable file sizes. This is the go-to for professional prints or anything you want to look its absolute best.
For everyday printing needs like flyers, brochures, or posters viewed from a distance, 150 DPI can be sufficient. You might see a slight decrease in sharpness compared to 300 DPI, but for these applications, it's a good compromise. While technically offering more detail, increasing image DPI to 300 isn't always necessary. Most printers can't effectively utilize the extra information, and the file size can become quite large.
It's also important to consider your printer type. Inkjet printers typically recommend 300 DPI for best results, but some modern models might produce good results at 240 DPI or even lower. Laser printers generally require lower DPI settings. While 300 DPI is often sufficient, some laser printers can achieve acceptable results even at 200 DPI. You can consult your manual and see if there is a specific DPI range recommended for optimal results with your model.
Print size and viewing distance also play a role. Larger prints like posters, viewed from afar, can often have a lower DPI (around 150) without sacrificing noticeable quality. Smaller prints like photos, intended for close viewing, benefit from a higher DPI (300 or more) to maintain sharp details and crispness.
To maximize your prints, start high with the original high-resolution image if you have it. You can always adjust and slightly lower the DPI to reduce file size if it becomes a concern. Experiment with test prints at different DPI settings to see what produces the best balance between image quality and file size for your specific project.
Remember, while 300 DPI is widely recommended for high-quality prints, the ideal DPI can vary depending on your needs. By considering these factors, you can make an informed decision and achieve stunning printed results every time.
Read more: 600 DPI vs 300 DPI, Which Is Better?
How to Increase DPI of Image
There are many tools you can use to increase your image's DPI (dots per inch). Popular image editing programs such as Photoshop offer this functionality. For those who don't want to invest in dedicated editing software, both Windows (with Paint) and Mac (with Preview) offer built-in programs to adjust DPI. Additionally, you can leverage free online DPI converters for a quick and convenient solution. Scroll down to explore these methods in detail and learn how to increase your image DPI for stunning prints.
Method 1. Increase DPI of Image with Photoshop
For graphic designers and photo enthusiasts, Adobe Photoshop is a powerful tool for image editing, and that includes adjusting DPI. Using Photoshop offers a precise and controlled approach to increasing your image's DPI. Now, let's walk through the steps involved.
Step 1. Launch Photoshop and open the image you want to increase the DPI for. You can do this by going to File > Open and selecting the image file.
Step 2. Navigate to the top menu bar and select Image > Image Size.
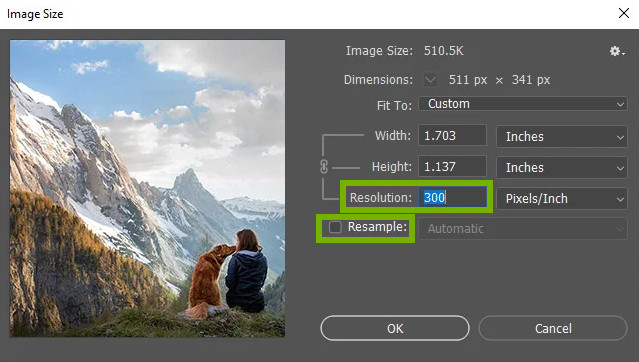
Step 3. Check or uncheck Resample.
This step lets you control how Photoshop handles the image size when changing the DPI.
If you want to increase the image size for printing at a specific DPI, tick the "Resample" checkbox. This instructs Photoshop to add pixels to the image while maintaining the desired DPI. However, resampling can introduce a slight quality loss, especially for low-resolution images. Only check this box if you're comfortable with a minor decrease in quality.
If you don't intend to enlarge the image and want to avoid any quality loss, leave the "Resample" checkbox unchecked. This keeps the original pixel dimensions intact. However, the file size might still increase slightly due to the DPI change.
Step 4. Increase the Resolution (DPI) to desired value.
Important Note: Increasing the DPI simply adds more dots (pixels) proportionally to maintain the same image dimensions. This doesn't inherently improve the image quality if the original image wasn't high resolution. It just creates a larger file with potentially no significant visual improvement.
Step 5. Export the image.
That's it. It's easy to increase image DPI with Photoshop.
Method 2. Increase DPI of Image in Paint (for Windows)
If you're a Windows user, you may not need to install additional program to increase image DPI. You can utilize the built-in program - Paint. Paint is a simple yet versatile tool that allows you to create, edit, and view images. While it doesn't offer a direct option to adjust an image's DPI, there's a clever workaround available. Now, we’ll show you the trick.
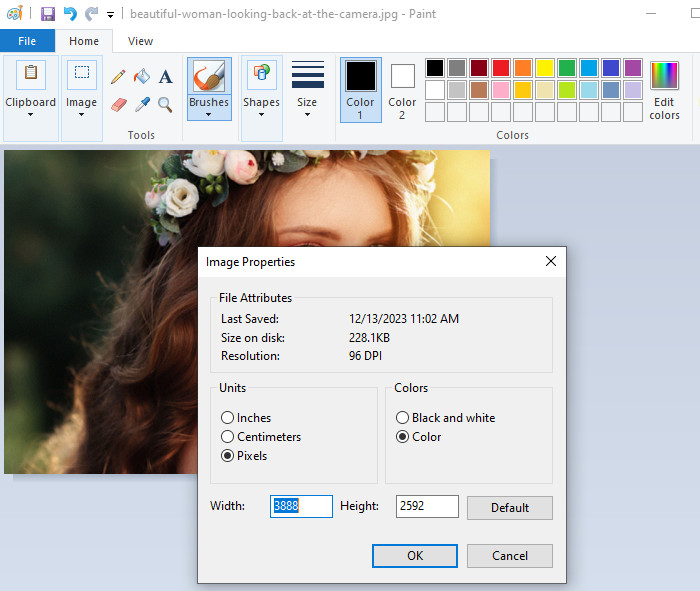
Step 1. Launch Paint, navigate to File > Open to open the image you want to adjust the DPI for.
Step 2. Go to File > Properties (or press Ctrl + E). You'll see information about the image, including the DPI.
Step 3. Open another instance of Paint and open a different image that already has the desired DPI (e.g., 300 DPI for printing). Check its properties to confirm.
Step 4. Return to your original image. Select the entire image using Ctrl + A. Right-click and choose Copy (or press Ctrl + C). Go back to the second image with the desired DPI. Right-click and choose Paste (or press Ctrl + V). If the pasted image is smaller, crop it to remove excess background from the second image. Use the zoom bar in the bottom right corner to see the entire image, then drag the selection box to crop around the pasted image.
Step 5. Go to File > Properties (or press Ctrl + E) to check if the DPI has changed. It should now display the desired DPI from the second image (e.g., 300 DPI).
Important Note: This method essentially replaces your original image with the one containing the desired DPI. Remember to save the final result as a new file to avoid overwriting your original image.
Method 3. Increase DPI of Image in Preview (for Mac)
Mac also offers a built-in solution, namely Preview, to increase the DPI of pictures. This program allows you to adjust your image's DPI quickly and easily, making it a great option for everyday tasks. Let's explore how to use Preview to increase your photo’s DPI.
Step 1. Launch Preview and use the File > Open menu to open the image you want to adjust the DPI for.
Step 2. Navigate to the top menu bar and select Tools > Adjust Size.
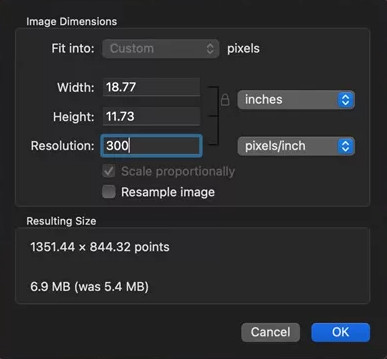
Step 3. Uncheck Resample if you don't need to enlarge the image dimensions and lose quality.
Step 4. Locate the Resolution section, change the unit to "pixels/inch", and enter your desired DPI.
Step 5. Click OK to save the changes.
Method 4. Increase DPI of Image Online for Free
Online tools offer a convenient solution, allowing you to modify DPI from any device with a web browser. While there are several options available, Convert Town (https://convert.town/) is a popular and user-friendly choice. This free tool allows you to convert images to various DPI values, including the common standards of 72, 150, 200, 300, 400, and 600 DPI.
Step 1. Head over to Convert Town's image DPI conversion page.
Step 2. Choose a pre-defined DPI value from the list or click "Other" to enter a specific desired DPI.
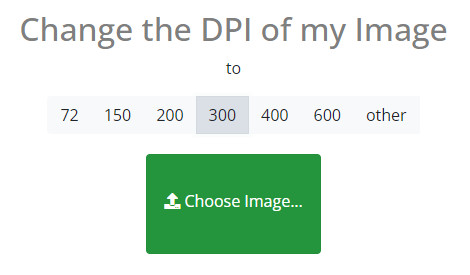
Step 3. Click the "Choose Image" button to select the image you want to adjust the DPI for.
Once your image is uploaded, the conversion process will take just a moment. Once complete, the new image with the adjusted DPI will automatically download to your default download folder. That's it! You're ready to use your image with the new DPI settings.
 Frequently Asked Questions
Yes, you can use any method we mentioned above to increase the DPI of an image from 72 to 300.
No, 72 DPI is generally considered low resolution for printing. While it might be suitable for web display or viewing on screens, it often results in poor print quality. For high-quality prints, it's recommended to use a DPI of at least 300 or higher, depending on the printer and print size.
With a resolution of 72 DPI, the size at which you can print a photo while maintaining decent quality is limited. Typically, you can print a photo with 72 DPI at smaller sizes, such as 4x6 inches or 5x7 inches, without significant loss of quality. However, larger prints may appear pixelated or blurry due to the lower resolution. For larger prints or better quality, it's advisable to start with a higher DPI image.


