


How To Use Midjourney To Create AI-generated Images
 Mike Rule
Updated on
Midjourney boasts over 16 million registered users on Discord, a testament to its widespread appeal. Over 1 million users are online on the Discord server at any given time, highlighting the active and engaged nature of the Midjourney community.
Have you ever scrolled through the mind-blowing AI art on Midjourney, only to feel lost when it comes to actually using it? Perhaps the technical jargon and unfamiliar prompts on forums leave you feeling more confused than inspired. Achieving consistent results with ever-evolving AI technology requires some know-how. Get a quick and easy start with the guide on how to use Midjourney to create AI-generated images.
Part 1. Quick Guide on How to Use Midjourney
1. Get Discord. If you don't have it already, sign up for a free Discord account. You can use Discord on your web browser, phone, or computer.
2. Join Midjourney. Head to the Midjourney website and click "Join the Beta." This will take you to Discord and grant you access to the Midjourney server.
3. Pick a plan (Optional). Midjourney has free and paid plans. Free lets you experiment in newbie channels, but paid lets you submit private prompts and skip the wait.
4. Start Creating Image on Midjourney. Newbie Channels (Free): Type "/imagine" followed by your image description (e.g., "/imagine a cat riding a bicycle"). The bot will generate Midjouney images based on your prompt. Paid Plans: These let you submit prompts directly to the bot in a private chat.
Part 2. [Detailed Guide] How to Use Midjourney to Create Images
Step 1. Sign up or Log in Discord Account
Discord is the platform where Midjourney works. Here's how to get started. Visit the Midjourney website: open https://www.midjourney.com/ and click "Join the Beta" at the bottom. You'll be redirected to Discord. If you already have an account, click "Already have an account" and sign in. Otherwise, click "Register" and fill in the required information (email, username, password, and date of birth). Click "Continue" to create your account.
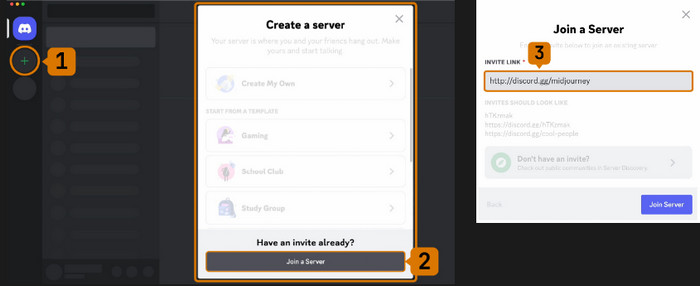
Connect Discord to Midjourney. Locate the "+" button on the top left corner of the Discord toolbar. This allows you to add servers. Join the Midjourney server when a popup will appear. Click "Join a server" and then "Don't have an invite." Under "Featured Communities," locate "Midjourney" and click on it.
Step 2. Subscribe to Midjourney
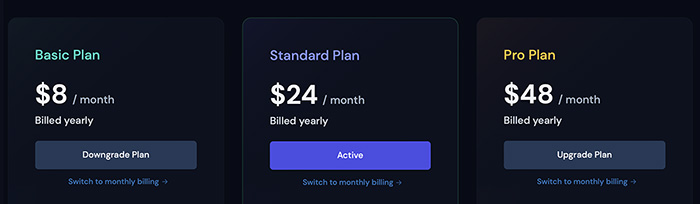
You'll need a Midjourney subscription to create images. Here's how to sign up. Access the Subscription Menu: In the message field at the bottom of your Discord screen, click and start typing "/subscribe." This will activate the subscription prompt. Choose your plan. Click on "Subscribe to Midjourney" followed by Enter. This will take you to a webpage with three subscription options.
- Basic ($10/month): Ideal for beginners. Offers 200 image generations per month and a private chat room for creating images.
- Standard ($30/month): Provides 15 hours of image generation, unlimited "relaxed" (slower) generations, and a private chat room.
- Pro ($60/month): Includes 30 hours of fast image generation, a free chatroom, and unlimited "relaxed" generations.
While paid plans let you submit prompts directly to the Midjourney bot in a private chat, your creations will still be displayed publicly in the member's gallery. If you want to create private image Midjourney, you'll need to subscribe to the Pro Plan, which offers an image generation feature.
Step 3. Find Midjourney Channel for Beginners
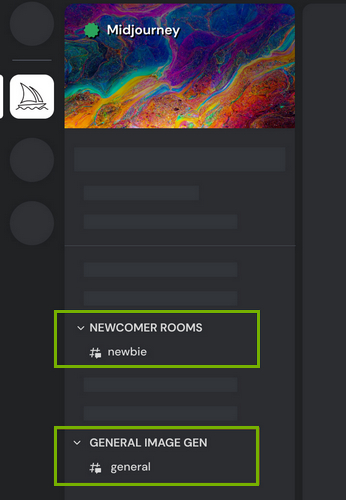
Once you're on the Midjourney server, you'll see a list of channels in the sidebar. Here's how to find where to start. Locate any channel labeled "#general-" or "#newbie-". These channels are specifically designed for beginners to interact with the Midjourney bot.
Note: The Midjourney bot will only generate images in these designated channels or on servers that have specifically invited the bot.
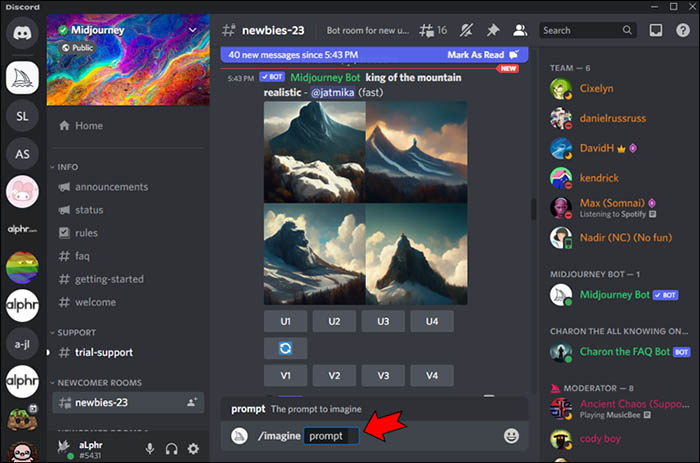
Step 4. Enter the /imagine Command.
Midjourney uses commands to perform various actions. Here's how to use the /imagine command to generate images. This may be a bit confusing for starters.
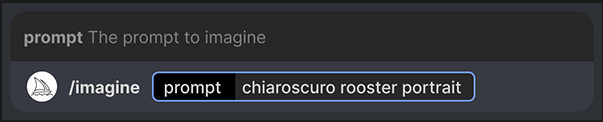
Locate the message field at the bottom of the Discord window where you can type messages. Type /imagine prompt: (including the colon) or simply select "/imagine" from the list of commands that appear when you start typing "/". In the "prompt:" section, describe the image you want Midjourney to create. The more details you provide, the better the AI can understand your vision. Example (Simple): "/imagine prompt: cat" Example (Detailed): "/imagine prompt: A fluffy Persian cat wearing a crown, sitting regally on a velvet cushion in a sunbeam."Hit Enter to send your prompt to the bot. The bot will interpret your text and begin generating images.
Related article: Midjourney Prompt Guide: How to Write a Good Prompt
Tips: Before generating any images, the Midjourney bot will require you to agree to their Terms of Service. Read them carefully and click "Accept" to proceed.
Step 5. Start creating images with Midjourney
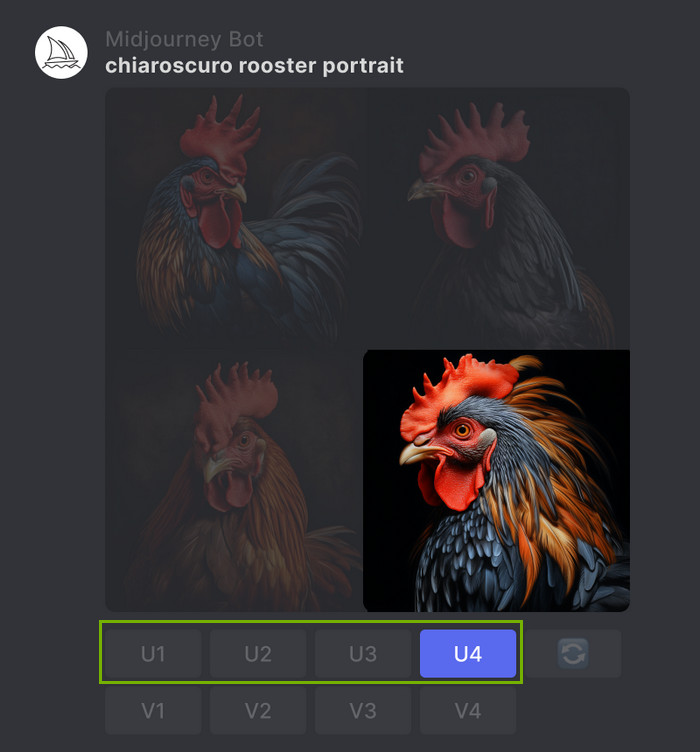
The Midjourney bot will process your request and generate four unique image options within about a minute. This process utilizes powerful graphics processing units (GPUs), and each generation uses a portion of your allotted GPU time according to your subscription plan. You can monitor your remaining time using the /info command.
Step 6. Further Edit Your Image.
Once the initial image grid appears, you'll see two rows of buttons below it.
U Buttons (Image Selection):
While previously used for upscaling, the latest Midjourney model generates images at 1024x1024 pixels by default. Now, these buttons (U1, U2, U3, U4) let you select a specific image from the grid for further editing and downloading.
V Buttons (Image Variations):
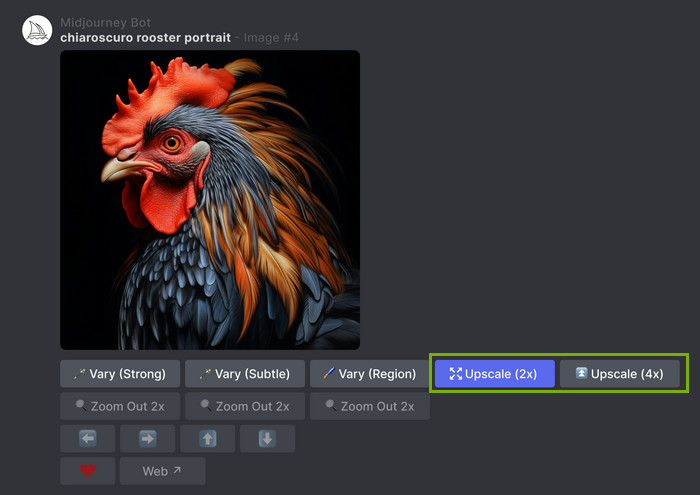
These buttons (V1, V2, V3, V4) allow you to create variations of your chosen image. Each button generates a new set of four images based on the original prompt and the style of the selected image. After selecting an image with a "U" button, you'll see additional options become available:
- Make Variations: Generates a new grid with subtle variations of your chosen image.
- Light Upscale Redo/Beta Upscale Redo: These options allow for upscaling the image resolution, but with some variations in quality and processing time. "Light Upscale Redo" is faster but may introduce minor artifacts, while
- "Beta Upscale Redo" offers higher quality but might take longer.
- Web: Opens the image in a larger window on your web browser.
Step 7. Download AI Generated Images
Once you've created your perfect image, it's time to save it for future reference or use. Here's how:
On Desktop: Click on the image to view it in full size. Then, right-click on the image and choose "Save image" (or a similar option depending on your browser) to download it to your computer.
On Mobile: Long-tap the image to bring up a menu. Then, tap the download icon (usually an arrow pointing downwards) located in the top right corner of your screen to save the image to your mobile device.
Tip: All the images you generate with Midjourney are automatically saved in your online gallery accessible at https://docs.midjourney.com/docs/image-prompts. This allows you to view and download them from any device with an internet connection.
Part 3. Bonus Tips for Generating Images in Midjourney
Command: /prefer remix
If you want more control over how variations deviate from your original prompt, you can activate remix mode with the /prefer remix command before running your /imagine prompt. This encourages the AI to create variations that subtly modify the existing elements in the image rather than generating entirely new compositions.
Lock the Seed for consistent result
A "seed" is a random value used by the AI to generate images. By locking the seed, you ensure that subsequent variations based on the same prompt will share similar characteristics. There are two ways to lock the seed.
Lock current Seed. After generating an image you like, use the buttons below the grid (U1, U2, etc.) to select it. Then, click on the "..." button that appears and choose "Copy Seed." Paste this seed value into your next /imagine prompt along with your desired changes.
Specify a Seed value. You can directly specify a seed value in your prompt by adding --seed [seed value] at the end. This allows you to reference a seed from a previous generation or experiment with specific values.
Remaster to upscale images
The "remaster" feature in Midjourney can help remove unwanted details or artifacts from your image. This can be especially useful when working with complex prompts or variations.Select the image you want to remaster using the "U" buttons (U1, U2, etc.). Then, click on the "..." button and choose "Remaster."
Note: If remastering fails, it might be because you used image references in your prompt. In this case, try generating a new variation without any image references and then use remaster again.
Denoise Image references for image enhancement
Importance: When using images as references in your prompts, consider denoising them first (removing noise or grain). This helps create image in Midjourney cleaner and more accurate results based on your reference images.
Denoising Tools: Many online tools and software programs can denoise images. Check for more information about image noise reduction here.
Combine Prompts and Weights
Don't be afraid to use multiple reference images in your prompt! You can combine photos, paintings, or even other Midjourney creations to guide the AI towards your desired visual style. Midjourney allows you to combine multiple prompts separated by "::" (double colon) and assign weights to each prompt for better control.
Prompt Weights: Each prompt can be assigned a weight value (e.g., prompt1:1.2 :: prompt2:0.8). This tells the AI how much emphasis to place on each prompt when generating the image. Experiment with different weights to achieve the balance you desire.
Read more: >> How to Combine/Blend Two or More Images in Midjourney
Blending Images for More Control
Command: /blend (or /imagine with only images). Sometimes, using the /blend command or the /imagine command with only images as references can be more effective than combining an image reference with a text prompt. This approach allows the AI to directly blend the features from the reference images without the potential for misinterpretation that can occur with text descriptions. This can lead to a more accurate transfer of specific visual elements from your references.
 FAQs about How To Use Midjourney Free
Step up Discord, then join Midjourney’s server and find beginner channels (#general- or #newbie-). Enter a detailed description of your desired image (e.g., "/imagine prompt: A majestic dragon soaring through a starry night sky") and send it with the /imagine command. Choose your favorite image from the generated options and refine it with variations.
No, you cannot currently use Midjourney without Discord. Midjourney's functionality is entirely integrated within the Discord platform. While they may explore other platforms in the future, as of today, Discord is the only way to interact with the Midjourney AI and generate images.
Midjourney itself can't be directly trained on your images. But you can incorporate your images into prompts to influence the AI's generation.
Midjourney previously offered a free trial with a limited number of credits, but this program is no longer available. Even with the free trial, credits would likely be used up very fast. A typical prompt and an upscale each cost 1 credit.
No, Midjourney cannot be used directly in a web browser at this time (as of March 9, 2024). While there may be rumors or speculation about a future browser version, currently it interacts solely through Discord.
You can invite the Midjourney bot to your own private Discord server. This keeps your prompts and generated images out of the public channels on the official server, but the final images are still publicly viewable on the Midjourney website. Alternatively, use the /settings command within your direct message to enable Stealth Mode.


