How to Upscale Video in VLC – VLC Upscaler Settings & RTX Upscaling
Can VLC upscale video? VLC does not include a true AI video upscaler, but it offers several settings that can improve playback quality. You can adjust color range, change output modules, apply video filters, or enable NVIDIA RTX Video Super Resolution to upscale videos during playback. This guide explains how to improve video quality in VLC and when to use a dedicated AI upscaler instead.
A More Efficient Way to Improve VLC Video Quality
VLC can upscale video during playback, but it doesn't actually enhance the original file. In many cases, users also notice issues like choppy playback when playing 4K HEVC videos, especially those recorded at high frame rates such as 60FPS.
If VLC struggles to handle these files smoothly, preprocessing the video can help. For example, reducing the frame rate from 60FPS to 30FPS while keeping the 4K resolution and HEVC codec intact can significantly improve playback stability in VLC.
Tools like Winxvideo AI can help prepare videos before playback. Besides adjusting frame rates, it can also upscale videos to HD or 4K, remove noise, stabilize shaky footage, and fix interlaced artifacts.
Solutions to Upscale and Improve Video Quality in VLC
Part 1. Change Video Color Range to Upscale Video Quality in VLC
Sometimes videos played in VLC may look washed out or less vibrant. This usually happens when the color range used by the graphics card does not match the video's color range. Adjusting the color range settings in your GPU control panel can help restore proper contrast and improve overall playback quality.
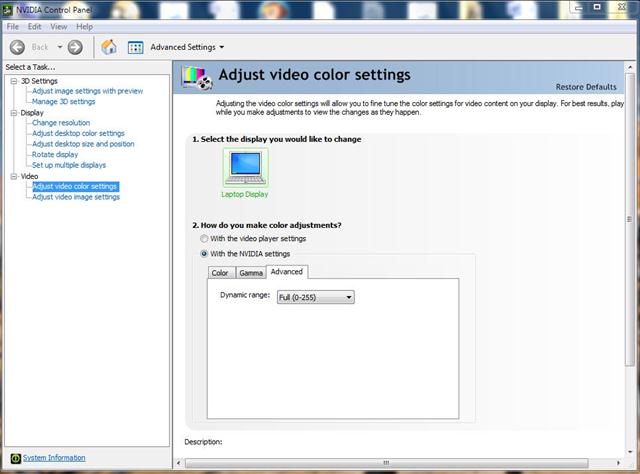
For a dedicated NVIDIA graphics card:
- Head to Nvidia control panel.
- Locate to "Video" under "Advanced Settings".
- Tap "Adjust video color settings" > tick "with the Nvidia settings" > "Advanced".
- Change color range from limited (16-235) to full dynamic range (0-255)
- Re-launch VLC on your desktop.
Depending on the driver version, the option may appear under Display or Video settings.
If your Nvidia control panel doesn't show up this setting or the above solution doesn't work for you, check here to get alternate solutions to fix VLC washed out color error.
For an integrated Intel HD graphics card:
- Right-click your computer and opt for "Graphics Properties..."
- Tap VIDEO icon > Driver Settings is your target under Input Range category.
- Choose "Full Range". That's all.
- Remember to restart your VLC on your desktop.
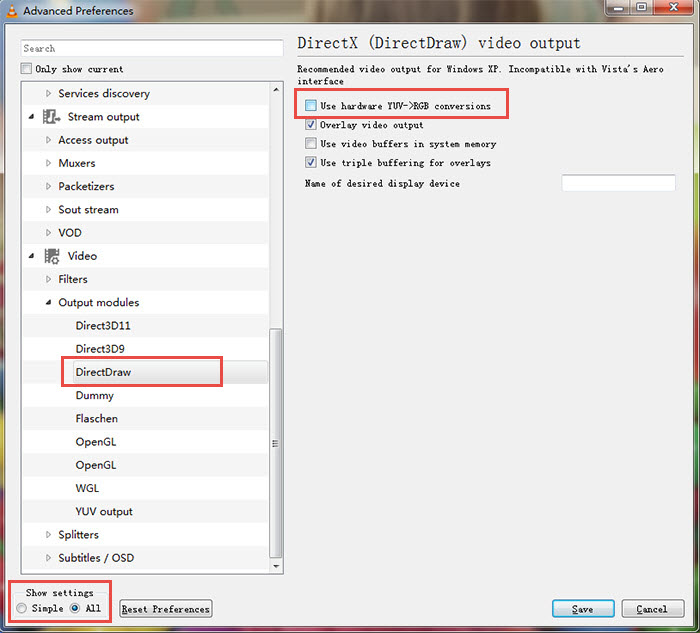
Part 2. Adjust VLC Output Modules to Improve Playback Quality
If the color range adjustment in Part 1 didn't resolve the issue, another thing you can try is changing VLC's video output module. The output module determines how VLC renders video frames using your graphics hardware. Switching to a different module may improve playback smoothness, color rendering, or compatibility depending on your GPU and drivers.
- Open VLC Media Player and click Tools on the top menu, then select Preferences.
- Under the Show settings section, switch from Simple to All.
- Scroll down to the Video section and open Output modules.
- Try switching the output module between Automatic, Direct3D11, or OpenGL.
- Click Save, exit VLC, and reopen it to test the playback again.
Changing the output module will not increase the actual resolution of the video. However, it can help improve playback quality in certain situations, such as when videos appear slightly washed out, choppy, or incorrectly rendered due to GPU compatibility issues.
For example, OpenGL output sometimes provides more accurate color rendering, while Direct3D11 may deliver better hardware acceleration performance on Windows systems.
In addition, some advanced output settings allow you to fine-tune color processing behavior. Depending on the selected module, VLC may provide options related to color conversion and rendering intent.
- Under OpenGL output, you may find options related to Rendering intent for color conversion.
- Depending on the source video and display device, options such as Relative colorimetric or Saturation may slightly affect color appearance.
These adjustments won't upscale the video resolution, but they can sometimes improve how colors and brightness are displayed during playback.
Part 3. Use VLC Filters to Improve Video Appearance
When discussing VLC settings for better video quality, the built-in video filters are also worth mentioning. VLC includes dozens of filters that can adjust color, sharpness, and playback characteristics. While these filters cannot truly upscale video resolution, they can sometimes improve how the video looks during playback.
For example, filters such as Adjust, Sharpen, and Deinterlace can help improve the visual appearance of certain videos. The Adjust filter allows you to tweak brightness, contrast, saturation, and gamma values, while the Sharpen filter may make details appear slightly clearer.
Meanwhile, enabling the Deinterlace feature can help fix interlaced footage (such as 480i or 1080i video) and convert it into progressive frames, which often results in smoother and cleaner playback.

VLC also provides many other filter effects that you can experiment with depending on your video source and playback needs.
However, it is important to understand that VLC filters do not actually increase the real resolution of a video. For example, if you attempt to upscale a 1080p video to 4K within VLC, the player may scale the image to fill a 4K display, but the original detail level will not significantly improve. This type of scaling is sometimes referred to as “pseudo 4K” or “fake 4K”.
Part 4. Enable NVIDIA’s RTX Video Super Resolution in VLC
NVIDIA introduced a cutting-edge technology for video playback called RTX Video Super Resolution. Initially, it was limited to a few select programs like the latest Chrome and Edge versions, but it has now been integrated into the widely used VLC media player.
This feature empowers users to elevate their video playback experience by upscaling resolutions, including upscaling VLC from 720p to 1080p, 1080p to 1440p or 4k, and even 1440p to 4k. Currently accessible in the latest beta version of VLC (version 3.0.19), activating this feature requires manual intervention in the NVIDIA Control Panel and is exclusively compatible with NVIDIA RTX series graphics cards utilizing the latest driver (531.14 and above).
VLC RTX Upscaling Step by Step Tutorial
To enhance your video playback experience, follow these three simple steps.
Step 1. Download the latest beta version of VLC, which includes support for RTX Video Resolution, from https://downloads.videolan.org/testing/vlc-rtx-upscaler/vlc-3.0.19-nvidia-upscaler2.7z.
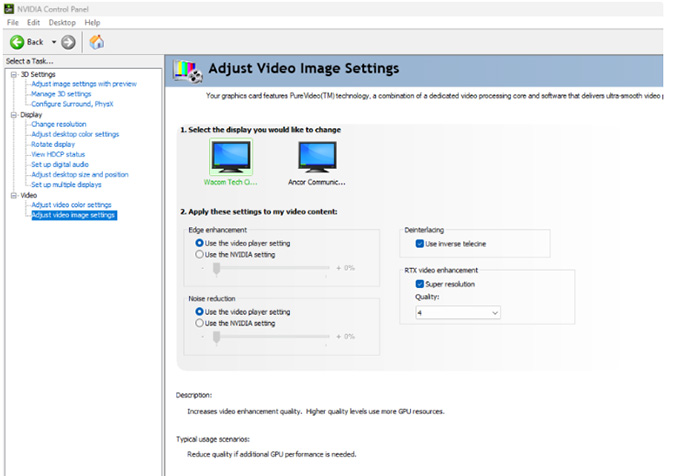
Step 2. Activate RTX Video Super Resolution through the NVIDIA Control Panel. Open the panel, navigate to "Video," and select "Adjust video image settings." Within this menu, locate the "RTX video enhancement" settings and check the Super resolution option.
Step 3. Fine-tune the quality to your liking, with level 4 providing optimal results. Once enabled, enjoy the benefits of higher-resolution video playback on VLC. Notice sharper details and a reduction in image blur, offering a more immersive and satisfying viewing experience.
Part 5. Best VLC Upscaler Aternative to Upscale Videos to HD/4K
Although VLC can scale video during playback, it does not actually enhance the original resolution. When a 720p or 1080p video is displayed on a 4K screen, VLC simply stretches the pixels to fit the display. As a result, the image may look slightly larger but the details remain the same.
This is why many users notice that VLC upscaling does not significantly improve video clarity. To truly increase video resolution and recover lost details, AI-based video upscaling tools are usually required.
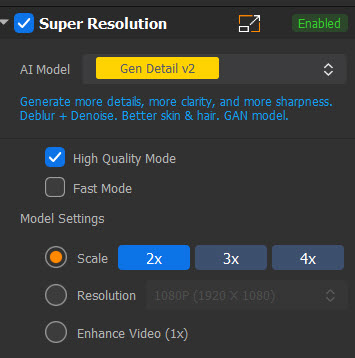
- It features 4 different AI models to ensure the best output quality when upscaling different video types.
- It lets users to freely upscale videos by 2x, 3x, and 4x to HD, 2K, and 4K.
- This VLC alternative upscaler will also fix noise, interlaced effects, pixelated artifacts, etc.
- Stabilize shaky videos, increase frame rates, compress, enlarge images, edit, download, and more.
[Guide] Upscale Video Quality with Simple Steps
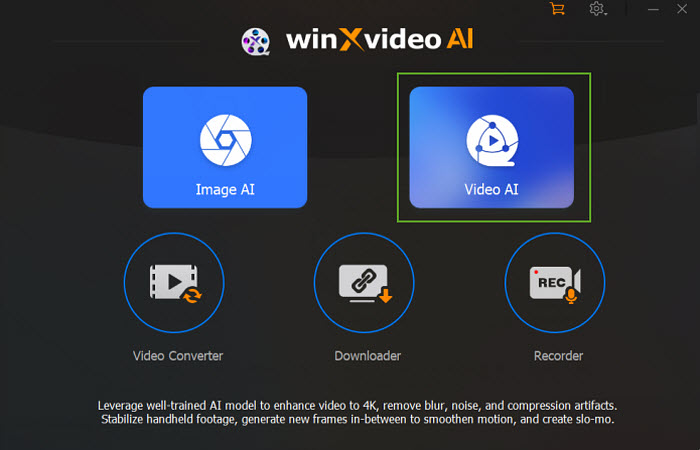
Step 1. Download and install the VLC alternative on your computer. Once installed, open the software. Then click the "Video AI" module ON THE main interface.
Step 2. Next, click the + Add Video button located at the bottom left corner of the interface. Browse and select the video you want to upscale.
Step 3. Once the video is loaded, you'll see several enhancement options on the right panel. Enable the Super Resolution feature to initiate the upscaling process.
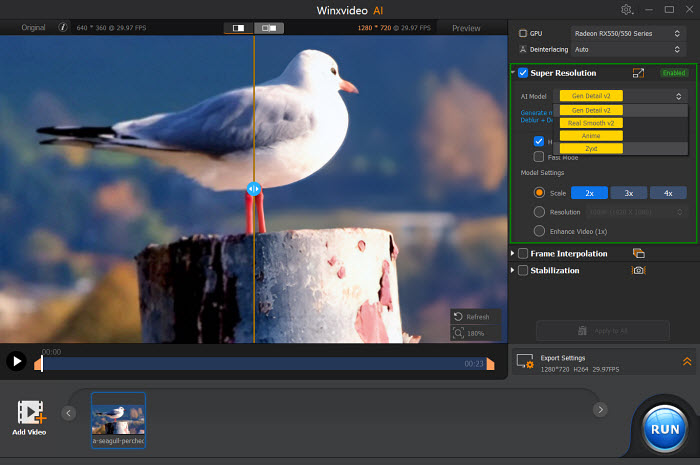
Step 4. Choose the desired AI model (e.g., Gen Detail V2 for optimal results). Select the desired upscaling scale (2x, 3x, or 4x) or specify the target output resolution.
Step 5. Once you've configured the settings, click the Run button to begin the video enhancement process. The software will utilize its AI capabilities to analyze the video and apply the necessary enhancements.
FAQs about VLC Upscaling / VLC RTX Upscaling
Does VLC really upscale video?
VLC can scale videos to fit higher-resolution displays, but it does not perform true AI upscaling. In most cases, VLC simply stretches the original pixels during playback. This means a 1080p video displayed on a 4K screen may appear larger, but the actual detail level remains the same.
Why does VLC upscaling sometimes look blurry?
Many users notice that VLC upscaling can look blurry because it relies on traditional scaling algorithms instead of AI-based super resolution. When a lower-resolution video is stretched to a larger display, the missing details cannot be reconstructed, which may result in softer or slightly blurred visuals.
How do I enable RTX upscaling in VLC?
To enable RTX Video Super Resolution with VLC, first install the VLC RTX test build from VideoLAN. Then open the NVIDIA Control Panel, go to the Video settings section, and enable RTX Video Super Resolution. For best results, set the quality level to 3 or 4. This feature requires an NVIDIA RTX graphics card and a recent driver version.