How to Copy Any DVD to MacBook Air/Pro Hard Drive
Summary: Learn how to make a digital or DVD copy of unprotected/copy-protected DVDs on Mac computer.
I came across some old home videos recently that are on DVDRW discs and I want to download the DVDs to my MacBook. How? -- Reddit
Trying to import home dvds to my computer...pictures will save but not the video or sound. How to transfer to computer? --Apple Community
If you have old home videos on DVD-RW or purchased DVDs you want to back up, copying DVDs to your Mac is the safest way to preserve them and watch them anywhere. Whether your DVD is unprotected or uses copy protection, there are reliable ways to save it to your Mac’s hard drive.
In this guide, you’ll learn how to copy a DVD on Mac step by step, using Disk Utility for unprotected DVDs, and professional DVD ripping software to handle protected discs. We’ll also show you how to copy a DVD to a blank disc or convert it to MP4, ISO, or VIDEO_TS formats.
 How to Copy a DVD on Mac (Quick Steps):
To copy a DVD on Mac, choose the method based on your DVD type:
- * For unprotected or home-burned DVDs: use Disk Utility (built-in on macOS) to create a 1:1 DVD image (.cdr or .dmg)
- * For copy-protected DVDs (Disney, Marvel, Sony, etc.): use WinX DVD Ripper / HandBrake / MakeMKV to bypass protection.
- Note: MacBook Air and newer MacBook Pro models require an external USB DVD drive to load discs.
How to Copy any DVD on Mac Easily (Homemade/Protected)
The easiest way to copy DVDs to Mac is using WinX DVD Ripper for Mac. It's able to handle homemade or protected DVDs from Disney, Marvel, Sony, etc., bypass DVD encryptions (e.g., region code, CSS, RCE, UOPs, 99 titles, bad sectors, etc.) and copy DVDs to Mac MP4 MOV, ISO image or MKV/MPEG2 with 1:1 original quality.
With GPU acceleration, WinX DVD Ripper for Mac can copy DVDs significantly faster than most free solutions. Tasks that often take much longer with tools like Disk Utility or HandBrake can be completed in just a few minutes.
It's compatible with macOS 26 Tahoe, Sequoia, Sonoma, Ventura, and earlier.
Why Copy DVD to Mac?
Copying DVDs to Mac isn't just about convenience, it helps you get more value from DVDs you already own. Here’s why many users choose to copy or rip DVDs to their Mac:
1. Create a digital backup: DVDs can scratch, degrade, or get lost. Copying DVDs to Mac helps preserve your collection long-term.
2. Watch DVDs without a disc or drive: Once copied, you can watch DVDs on your Mac anytime, no external DVD drive required.
3. Enjoy better portability: Ripped DVDs can be played on MacBooks, iPhones, iPads, Apple TV, or other devices.
4. Save space and reduce clutter: Digital copies eliminate the need to carry or store physical discs.
5. Watch anywhere, anytime: Perfect for travel, offline viewing, or streaming your DVD library at home.
Before You Copy a DVD on Mac, Make Sure You Have the Following:
Before copying DVDs on macOS, you’ll need a few basic things. The exact tools depend on whether the DVD is homemade, unprotected, or copy-protected.
1. An External DVD Drive (Required)
Modern Macs don’t include a built-in DVD drive. You'll need a USB external DVD drive, such as Apple USB SuperDrive or any compatible third-party drive.
2. Enough Free Storage Space
Most DVDs require 4 to 8GB of free space, depending on the DVD length, the output format (ISO, MKV, MP4), and whether you keep original quality or compress the video.
3. The Right DVD Copy Software for Mac (Based on DVD Type)
Different DVDs require different tools. Here’s a quick breakdown:
- Use Disk Utility for copying homemade or unprocted DVD on Mac (in .dmg or .cdr);
- Use Handbrake + libdvdcss download DVD to Mac with simple DRMs (in .mp4 or .mkv);
- Use MakeMKV to make DVD copies on Mac without recompression (in .mkv);
- Use WinX DVD Ripper to copy protected DVDs on Mac (in .mp4, .iso, any other formats)
Is it legal to copy DVDs to Mac?
According to the law in the US, "the moment you crack DRM to rip the DVD, you've violated Title I of the Digital Millennium Copyright Act. 17 U.S.C. 1201 prohibits circumvention of DRM..." In many other countries, it's also illegal to copy a DVD, even if you own it, as long as it contains copy-protected content. However, owners of a DVD are free to make backup copies under the concept of fair use. Therefore, it's widely regarded as legal to copy a DVD that you purchased for personal use. And in practice, it's totally safe to copy DVDs on your Mac or PC.
1. How to 1:1 Copy Unprotected DVDs on Mac with Disk Utility
MacOS attaches a feature for copying unprotected DVDs. Disk Utility, designed for disk tasks, makes DVD copy much easier. However, Disk Utility can't work with copy-protected DVDs. It is usually used to copy DVDs that you made using iDVD or something. If you want to copy commercial movie releases, see the copy protected DVD on Mac methods.
[Steps] How to Save DVDs to Mac with Disk Utility
Step 1. Insert the DVD you want to copy into the Mac disc drive. Since modern Macs ditched the disc drive in 2012, you can get an external drive, such as an Apple USB SuperDrive, to load the disc before making a DVD digital copy on Mac.
Step 2. Open Applications and click Disk Utility to launch it.
Step 3. On the Disk Utility interface, select your DVD under the External header in the left sidebar.
Step 4. Click the File menu, click New, and select Disk Image from "your DVD name".
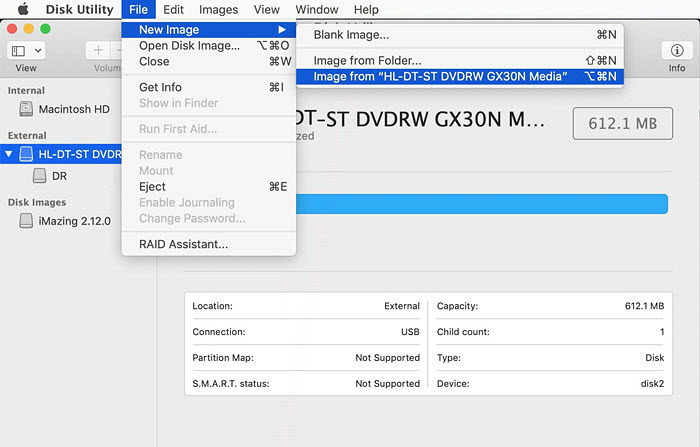
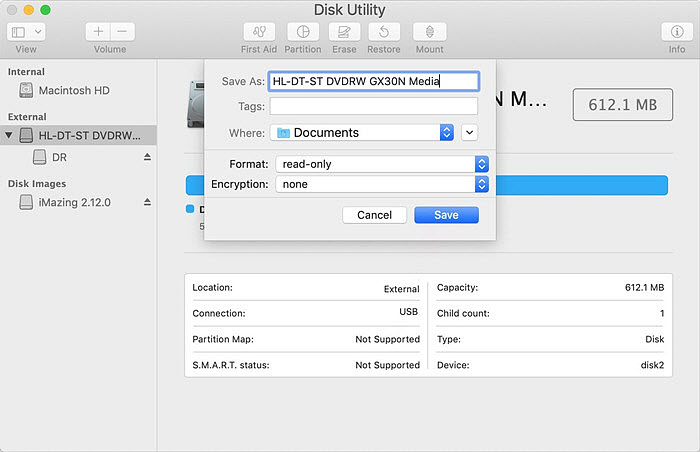
Step 5. Next, a window will appear prompting you to enter a file name for this DVD copy in the "Save As" bar and specify a destination folder on your Mac to save this DVD copy. Ensure that the destination folder has sufficient space to accommodate the DVD copy file. When it comes to selecting the Image Format, opt for "DVD/CD Master" to maintain the highest quality without compression. Additionally, set the encryption option to "None." Finally, click on the "Save" button.
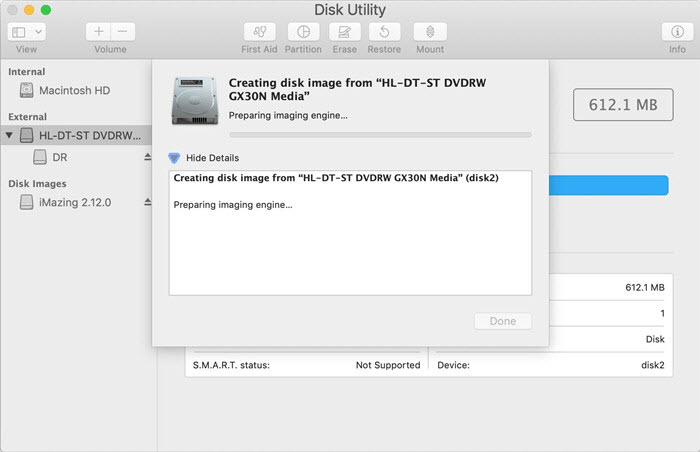
Step 6. After that, Disk Utility will start creating a disk image for your DVD. Depending on the speed of your Mac, the DVD copy process may take anywhere from 30 to 60 minutes or possibly longer. Once it's finished, you will have a .cdr file of the DVD on your Mac. You can then safely eject your DVD.
[Optional] How to Copy DVD to Another Blank DVD on Mac
Now you have download DVD to Mac in an ISO file. If you wish to copy a DVD to a blank DVD disc on Mac, users with Mac OS X 10.11 (El Capitan) or newer can utilize the Finder to burn the disk image you've just created, whereas earlier Mac OS X users can still rely on Disk Utility. Here, you'll find step-by-step guides for both methods.
1. How to Copy Disk Image to DVD on Mac El Capitan or Higher
Step 1. Right click on the disc image file you want to copy to DVD.
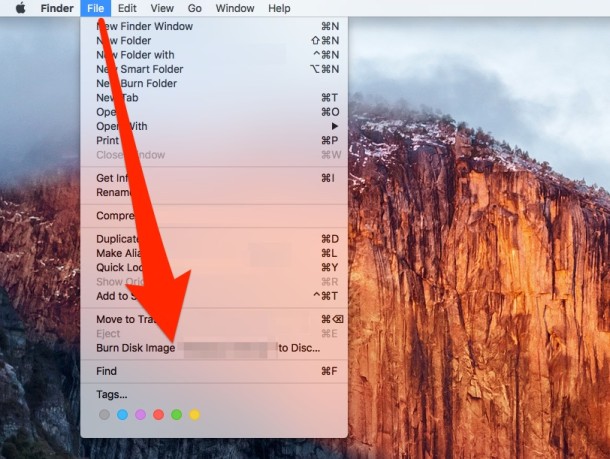
Step 2. Choose "Burn Disc Image [disc name] to Disc" from the shortcut menu, then follow the instructions.
2. How to Copy Disk Image to DVD on Mac Yosemite or Lower
Step 1. Open Disk Utility, then go to the Images menu and select Burn.
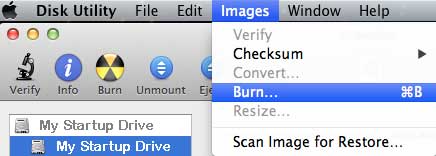
Step 2. In the "Select Image to Burn" window select the disk image which you just created from your DVD, then click the Burn button.
Step 3. Now put a blank DVD-R disk into your disc drive and wait for the disk image to be burned onto this blank DVD disk. Like creating disc image, burning process can also easily take 30-60 minutes or more.
So above are the steps on how to free copy unprotected DVD to Mac using Disk Utility and how to free copy DVD to DVD on Mac using Disk Utility or Finder.
2. Use WinX DVD Ripper to Copy Protected DVD on Mac
Best for: Users looking for a fast and reliable to copy protected DVDs on Mac without needing technical know-how.
There is no built-in software to copy protected DVD on macOS. But third-party tools provide solution to copy protected DVDs to Mac. Give a shot on WinX DVD Ripper for Mac. This software supports both unprotected and copy-protected DVDs, including those protected by CSS, region codes, RCE, UOPs, Sony ArccOS, Disney DRM, Lionsgate fake playlists, etc.
This DVD copy software for Mac stands out because it doesn't require additional decryption software, making the DVD ripping process seamless. It can copy DVDs to Mac hard drive into various output formats, such as MP4, MOV, M4V, MPEG-4, iPhone iPad, Apple TV, iMovie, etc. It can also save an intact DVD copy on Mac in MKV, VOB, and ISO with 1:1 quality and data!
Step 1. Insert a DVD disc into your DVD drive.
If your Mac doesn't have a built-in DVD drive, connect an external optical drive and insert the DVD into it. You can use any DVD, as this software can effortlessly rip protected discs on Mac without any issues.
Step 2. Launch Mac DVD copy software and import the source DVD.
Click on the "DVD Disc" button in the navigation bar to import the source DVD. After a few seconds of loading the DVD, all available titles will be displayed, and the main title will be automatically selected. Simultaneously, a dialog box for selecting the output profile will appear.
Step 3. Copy DVD to Mac or Rip DVD to MP4 for Mac.
Select one format as output format from listed categories (for example, you can choose General Profiles, and save DVD to Mac in MP4, MOV, MKV, etc.). On top of downloading DVD to Mac hard drive, you can also pick up Apple Device > hit iPhone or iPad to rip DVDs to iPhone iPad for on-the-go playback.
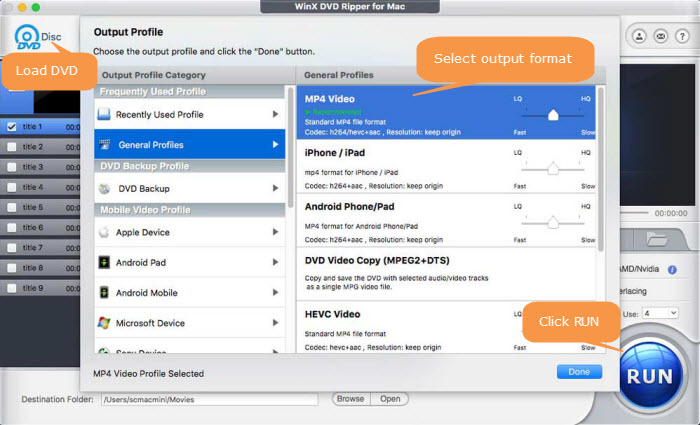
To 1:1 keep DVD with main/full title, meta data, all subtitle tracks, audio tracks, choose the DVD Backup profile with 4 modes provided. Copy DVD to ISO image, Backup DVD to Video_TS folder, clone DVD to MPEG, or copy DVD to MKV high quality.
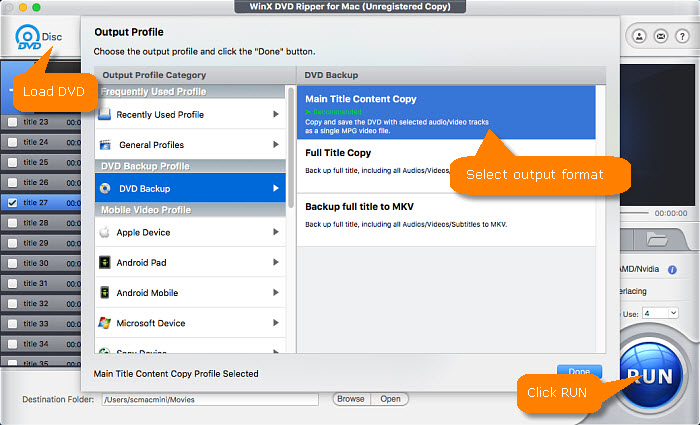
Step 4. Start copying DVD on Mac.
Browse to set destination folder and hit RUN button to start copying DVD on your Macintosh computer.
Pros:
- It can copy both protected and unprotected DVDs.
- It will copy DVDs to multiple output formats such as MP4, MKV, MOV, and ISO.
- No need for third-party decrypting software.
- Fast ripping speed, especially with hardware acceleration (Nvidia, AMD, Intel).
Cons:
- It's not free, though a free trial is available.
- Some output formats require additional configuration for optimal speed.
3. Use HandBrake & libdvdcss to Copy (CSS, Region Codes) Protected DVD on Mac
Best for: Tech-savvy users comfortable with setup and customization, or those who want a free, open-source solution for copying DVDs.
HandBrake is the big name in DVD ripping and copy world. It supports MP4, MKV, and WebM output, making it a go-to DVD copy software for many Mac users—including those on MacBook Air, MacBook Pro, and iMac. However, Handbrake cannot copy protected disc out of the box. But with the help of libdvdcss, it's able to copy DVDs with region code and CSS on Mac.
Pros:
- It's free and open-source software.
- If lets users to c ustomize the copied DVD file (adjust video/audio parameters).
- It's able to copy region-free DVDs and CSS DVDs when combined with libdvdcss.
Cons:
- It requires manual setup for libdvdcss, which may be challenging for beginners.
- Even with libdvdcss, it does not support all protections (e.g., Disney DRM, Sony ArccOS).
Now, let me show you how to install and use libdvdcss with HandBrake on Mac to copy protected DVDs.
Step 1. Install libdvdcss on Mac.
It's easy to do this if you use Mac OS X Yosemite or older OS. Simply download the libdvdcss.pkg here and double click on it to install.
If you use Mac OS X El Capitan or later, the process will be a little bit complicated due to a security feature called System Integrity Protection arriving with EI Capitan. First of all, we need to install a command line tool called Homebrew. Once done, press Command+Space and search for Terminal to open a command line window.
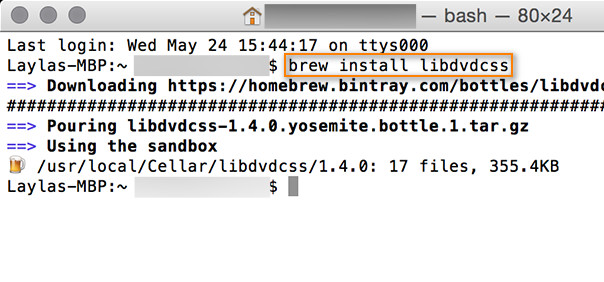
Next, type in brew install libdvdcss and hit enter. Then, Homebrew will start downloading and installing the libdvdcss library. Once done, HandBrake should be able to access copy-protected DVDs on Mac.
Here is a detailed process on how to install libdvdcss for Handbrake
Step 2. Install HandBrake.
The latest HandBrake version didn't make any substantial improvements on DVD ripping performance. So, needless to upgrade Handbrake if it's already on your Mac computer.
Step 3. Insert and Select your DVD disc.
Insert target DVD into your Mac's disc drive and open HandBrake. Under Source Selection, you should select your DVD. Then HandBrake will scan DVD titles. Once done, make sure selected title and chapters are what you want.
Step 4. Choose Output format or profile.
Specify preset if needed (it offers you with iPhone iPad Apple TV profiles, too) and format/codec (MP4, MKV or WebM). If necessary, you can adjust video audio parameters, like VBR, CBR, quality, frame rate, aspect ratio, resolution, etc. If handbrake is too challenging for you, just keep the settings default.
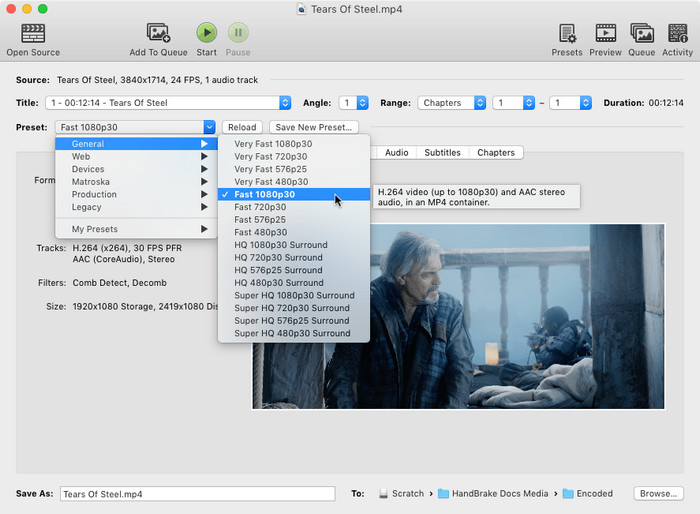
Step 5. Rip and Copy DVD to Mac Now.
Click the Browse button at the bottom right to specify save path and output file name. Before you go, you're strongly suggested to exit other unnecessary programs to save more CPU and GPU compute for handbrake, since Handbrake would consume much CPU resource and cause CPU overheating issue now and then.
When you finish all settings, now simply click the Start button. Now, HandBrake will begin copying DVD movies to your Mac.
4. Use MakeMKV to Copy (CSS, Region Codes) DVD to Mac
Best for: Users who want to save a lossless DVD copy on Mac in MKV format, with all original content intact.
MakeMKV is an expert in creating copies of protected DVDs on Mac and other systems. It's able to save an intact copy of DVD on Mac in MKV format, containing all the DVD data, tracks, subtitles, menus, etc. This speed to download DVD to Mac is also very fast. This Mac DVD copy software can process DVD encryptions, such as region codes and CSS.
However, it only supports common CSS DVDs. Some special DVD types, such as the "DVD Download" Warner Bros DVD-R discs encrypted by CSS-MR, are not supported. These kind of "burn on demand" disks use CSS-MR (Content Scramble System - Managed Recording), which is a completely different specification than the one for CSS. MakeMKV is unable to detect or recognize this kind of DVDs.
Pros:
- It supports lossless DVD copying on Mac with all DVD data and no quality loss.
- It's very easy to use.
- It can copy protected DVDs on Mac.
- It's free for 30 days without watermark.
Cons:
- You can only save DVD copies on Mac in MKV only.
- It doesn’t support all protections, particularly newer or proprietary encryption schemes.
Well, back to the point, let's learn how to make a digital copy of DVD and download a DVD to Mac with MakeMKV.
Step 1. Download and install MakeMKV on your Mac.
MakeMKV 1.17.8 for Mac OS X requires x64 or ARM64 Mac OS X 10.7 or later. If your Macintosh meets the requirements, just go to makemkv.com, click the Download option on the left navigation bar, and now you'll find the download link for MakeMKV. Please be noted that MakeMKV is not signed by Apple so you might need to adjust gatekeeper options in order to install the program.
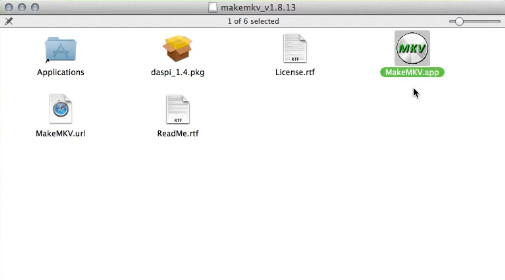
Step 2. Open the DVD you want to copy.
Insert the DVD into your Mac's optical drive. Then, open the MakeMKV app. It will show all available optical drives on the first screen. Under the Source section, you can select optical drive and check the drive and disc information. After selecting the right disc, click Open DVD disk button.
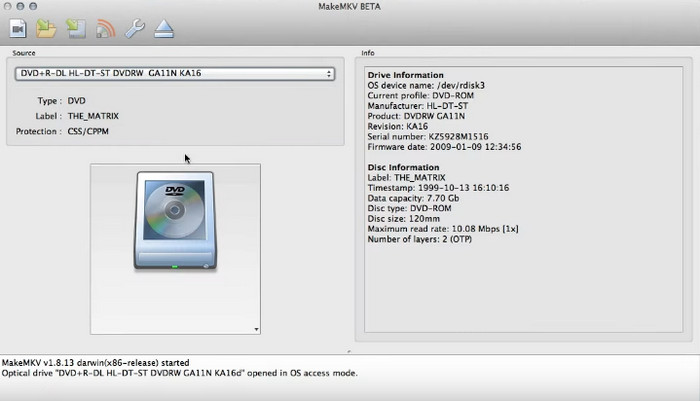
Then, MakeMKV will do a scan of your DVD.
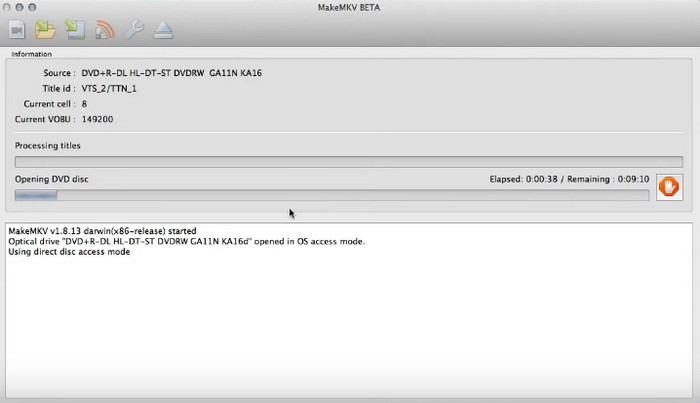
Step 3. Select DVD content to copy to Mac.
After finishing DVD scanning, it will display all content as a tree structure. Choose the title you want to save to Mac. Expand the title, you'll find audio and subtitle tracks. You can choose any one you like.
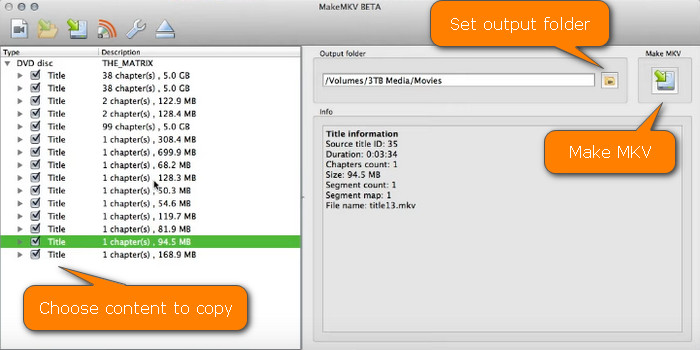
Generally, MakeMKV has no problem in selecting the DVD right title. However, there are some Hollywood DVD movies with tricky encrytion tech that MakeMKV can't select the right title. According to the feedbacks from makemkv forum, MakeMKV would encounter a Waterloo when it comes to rip DVDs Coco, Venom, Mission: Impossible Fallout, Black Panther, The Death Of Stalin, Car 2, etc. If you have the same issue, go back to the professional DVD decrypter WinX DVD Ripper for Mac to kick aways these troubles.
Step 4. Specify destination for the DVD copy file.
Just click the Set output folder button and now you can choose a desired directory to save the resulting file.
Step 5. Begin copying DVD to Mac.
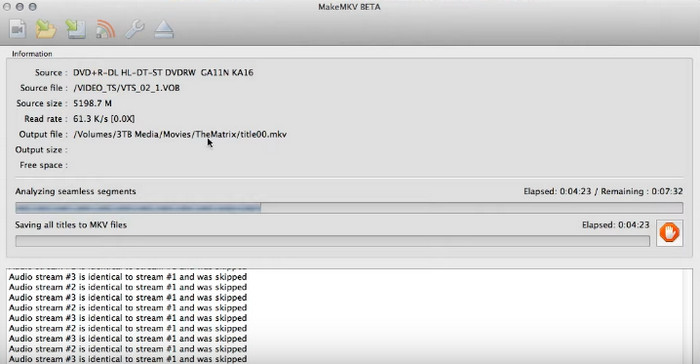
After you click the button under MakeMKV, it will start copying DVD to your Macintosh. On the conversion screen, you can see the source information, output information, and copying progress.
Which Is the Best DVD Copy Software for Mac?
In this article, we've shared 4 ways with you to copy DVDs to Mac. Well, which is the best way? The following table indicates a comparison of several aspects of these Mac DVD copying programs.
|
Disk Utility |
WinX DVD Ripper for Mac |
HandBrake |
MakeMKV |
Copy protected DVDs? |
No, unprotected DVDs only. |
Yes, both unprotected and copy-protected DVDs are supported. |
Limited, with libdvdcss for DRM DVDs. |
Limited, for CSS, region-locked DVDs. |
DVD copy formats supprted |
.cdr or .dmg * No mainstreaming formats. |
350+ output formats & devices:
|
Copy DVD to MP4, MKV, and WebM only. * No 1:1 DVD copy options. |
MKV format (lossless copy, retains all audio tracks, subtitles, etc.) |
File Size |
Large |
Medium |
Small |
Large |
Free/Paid? |
Free |
Free trial ($39.95/lifetime) |
Free |
Free trial ($60) |
Any edit features? |
Not supported |
Cut, crop, merge, deinterlace, subtitle |
Cut, crop, deinterlace, etc. |
Not supported |
Any customization features? |
Not supported |
Yes |
Yes |
Not supported |
Testing Mac DVD Copy Methods
While each DVD copy software for Mac has its strengths, only WinX DVD Ripper for Mac offers the full capability to bypass copy protections such as region codes, CSS, RCE, and other common encryption schemes used by commercial DVDs. Therefore, we'll use WinX DVD Ripper for Mac to bypass encryption first, ensuring unprotected DVD content for our copying test.
Additionally, considering the supported output formats of the 4 programs are non-identical, we can't choose the same output format. Instead, we just pick up the output format with high parameters to guarantee the "copy-like" quality.
Test Environment |
DVD Movie |
|
NCIS (7.75GB) Main Title: Titile 7 (1.6GB) |
The Mac internal Disk Utility only features DVD copy function while MakeMKV and handbrake only come loaded with DVD to digital conversion function. Thus, we have to select their specific resulting formats. The final output video quality, file size and copy speed are not so much for comparison as for reference grounded on the different output format. In most cases, take the test data for reference to see if the below ways (DVD ripping and DVD copy) fits your bill.
DVD Copy Tools |
Disk Utility |
WinX DVD Ripper for Mac |
HandBrake |
MakeMKV |
Output Format |
CDR file |
MP4 (H264) |
MP4 (H264) |
MKV (VP8) |
Quality |
720x480(16:9) |
1920x1200 |
720x480(16:9) |
720x480 (16:9) |
Size |
1581.23MB |
469.2MB |
307MB |
476.1MB |
Copy/rip Time |
27.32 minutes |
16 minutes |
15 minutes |
18.06 minutes |
Disk Utility delivers a 1:1 original quality DVD copy, preserving everything without codec conversion. However, this results in the largest file size and the longest copying time. Close behind in quality is WinX DVD Ripper, which upscales to a sharp 1920x1200. That being said, it still delivers a perfect balance between file size and ripping time thanks to its Virable Bitrate application in DVD to MP4 H264 ripping. The fast speed is driven by the Intel/AMD/Nvida GPU hardware acceleration tech.
Note: why WinX didn't reach its promise of 5-6 minutes for a DVD ripping at GPU accelerated speed? Theoretically, WinX indeed can make it with 5 minutes. The pre-condition is a highly-configurated Mac computer. It's wonky to talk about an application speed without the hardware configurations. You see, the 2011 iMac computer is unqualified. You're suggested to have a test on your decent Mac.
Handbrake is the fastest in DVD to MP4 ripping speed, only 15 minutes. 480p quality, H264 codec and its support for Apple VideoToolbox hardware encoding jointly make handbrake rip DVD to MP4 H264 at fastest speed and comparatively smaller file size.
Notwithstanding MakeMKV doesn't make itself an impressive showing in file size and ripping time, it does a decent job in DVD quality, with MKV format, virtually no quality loss. Certainly, the resulting MKV file is more suitable for saving DVD to Mac hard drive or USB flash drive instead of direct playing back on Mac with QuickTime player.
Conclusion
Which is the best way to download DVDs to your Mac's hard drive? It depends on the DVD and what you're going to do with the copied video. If your DVD is burned without DRM, use Disk Utility, a built-in app on Macs. Handbrake is another good free option.However, if you need to copy your entire DVD collection to Mac, which almost certainly includes copy-protected purchased DVD movies, WinX DVD Ripper for Mac and MakeMKV are the most user-friendly options. Handbrake can't handle protected DVDs, but if you're willing to deal with the libdvdcss library, you can also use Handbrake as protected DVD copy software for Mac.
All the software mentioned in the article allows you to save DVD copies on Mac with original quality in MKV format, ISO image, or Video_ts folder. If you need to copy a DVD to another disc, you need to use WinX DVD Ripper for Mac to copy DVDs in ISO image or Video_TS folder. WinX DVD Ripper for Mac allows you to create digital DVD copies in MP4, HEVC, MOV, M4V, WMV, FLV, and other formats if you need to copy DVDs on Mac hard drive for later playback on iPhone, iPad, Apple TV, Mac, or other players.
MakeMKV is superfast as it won't do any transcoding. The speed depends on how fast your drive can read data. WinX DVD Ripper for Mac and Handbrake are able to use GPU acceleration to speed up the process. In practice, WinX DVD Ripper for Mac is about 5x faster than Handbrake to copy a DVD to MP4 on Mac.
Still can't decide? Download and try them to find the one that fits you the most.
FAQs about Copying DVD on Mac?
1. How to copy DVD to MP4 on Mac?
WinX DVD Ripper for Mac and HandBrake allow you to copy DVD to MP4 on Mac. Here, we choose WinX DVD Ripper for Mac as an example.
- Step 1. Download, install, and open WinX DVD Ripper for Mac.
- Step 2. Insert target DVD into DVD drive and click the DVD Disc button on the ripper to open the DVD.
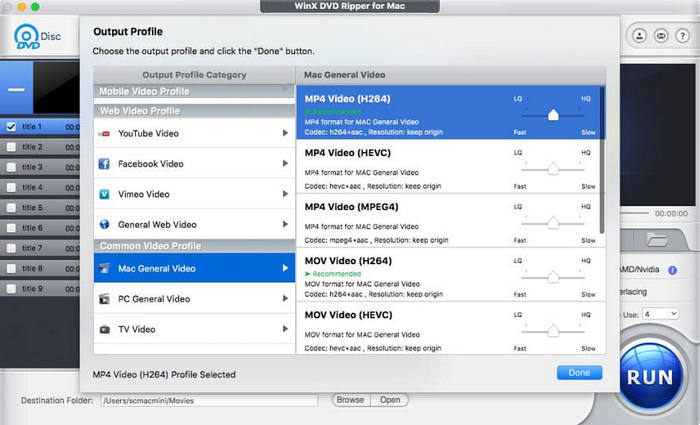
- Step 3. On the Output Profile screen, scroll down to Mac General Video and choose an MP4 profile: MP4 Video (H.264), MP4 Video (HEVC), or MP4 Video (MPEG4). Once selected, click OK to confirm.
- Step 4. click Browse to choose destination folder and click the RUN button to begin copying DVD to MP4 on your Mac computer.
2. How to copy DVD to ISO image on Mac?
To 1:1 copy DVD to ISO image on Mac, you should use WinX DVD Ripper for Mac. Let's show you how to do this.
- Step 1. Download, install, and launch WinX DVD Ripper for Mac.
- Step 2. Insert target DVD into DVD drive and click the DVD Disc button on the ripper to open the DVD.
- Step 3. On the Output Profile screen, scroll down to DVD Backup and choose Clone DVD to ISO Image. Once selected, click OK to confirm.
- Step 4. click Browse to specify destination folder and click the RUN button to begin copying DVD to ISO on your Macintosh.
3. How to copy DVD to USB stick or hard drive on Mac?
You can choose any one of the DVD copying programs in this article to copy DVD to hard drive or USB stick.
You can connect the USB stick or hard drive to your Mac and then select them as the destination folder. Then, the DVD digital copy will be directly saved to your USB stick or hard drive.
4. Can you just copy and paste a DVD to your Mac?
It's possible to copy the DVD content directly to your Mac's hard drive if the disc doesn't contain any DRM. You can try to right click on the DVD drive, copy, and paste the Video_TS folder to a new folder on your Mac computer. If it works, you should be able to find the VOB videos in the Video_TS folder. Because standard DVDs include a VIDEO_TS folder containing VOB/MPEG2 files and all of the other files associated with DVD Video, MP4 files cannot be included. The copied DVD video can't be played by Mac's default video players. If you are unable to directly copy the DVD files to your Mac, this indicates that the DVD is copy-protected.
5. How to copy DVD to computer without software on Mac?
With Disk Utility, you can copy a DVD to Mac without downloading additional software. However, you can only use Disk Utility to download DVDs to Mac if they are not protected.
Disclaimer: Digiarty Software does not advocate ripping copy-protected DVDs for any commercial purpose and suggests referring to the DVD copyright laws in your countries before doing so.


 Free Download

