


HandBrake for Mac - How to Convert DVD/Video with HandBrake
Summary: This HandBrake Mac tutorial covers downloading and installing HandBrake, setting source and output destinations, adjusting video and picture settings, and converting videos and DVDs on Mac efficiently. It helps users compress, encode, or convert video files/DVDs while maintaining quality and compatibility.
HandBrake[1] is an open-source DVD ripping and video converting software, wildly used by macOS users. It's especially useful if you want to rip movies and TV shows from your DVDs and watch them on your iMac, MacBook, Mac Pro, etc.
Newest version HandBrake comes with piles of new and updated presets, so that you can easily transcode videos specifically to watch on your Apple products, as well as Android/Windows mobile, Web, Chromecast, Roku, PS, Xbox etc. Following with this specific HandBrake Mac Tutorial, you will learn how to rip DVD and convert video with HandBrake on macOS (up to macOS Monterey/Big Sur) easily.
Try WinX DVD Ripper for Mac, the best HandBrake Mac alternative to rip movie DVDs to a page long list output formats; DVDs with the latest copyright protections supported, too! |
Free Download for macOS 15 Sequoia or earlier |
Try Winxvideo AI for Mac, the HandBrake alternative in converting any SD/HD/4K UHD Videos in 47x faster speed! |
Free Download for macOS 15 Sequoia or earlier |
HandBrake Mac Tutorial Navigation:
HandBrake Requirements
Operating System: HandBrake is compatible with macOS 10.11 (El Capitan) and later versions.
Processor: A 64-bit Intel processor is required. HandBrake does not support PowerPC-based Macs.
Memory (RAM): A minimum of 4GB of RAM is recommended for smooth operation, although more RAM can improve performance, especially when handling large video files.
Disk Space: Ensure that you have sufficient free disk space to accommodate the HandBrake application and the video files you plan to convert. The actual space required will vary depending on the size and number of video files you work with.
Graphics Card: HandBrake does not require a dedicated graphics card, as it primarily relies on the CPU for video encoding and decoding tasks.
Step 1 - Download HandBrake macOS Version and Get It Installed on macOS
Download open-source HandBrake offcially, where you can select different version of your computer, like Download HandBrake for Mac OS X 10.6-10.15 for 64 bit Intel, Windows Vista-10 for both 64 bit and 32 bit etc. Check to see if your Mac has the system requirements; click on the Apple icon in the top left corner and About this Mac. Then install HandBrake.

Note: If you are trying to rip Disney encrypted DVDs with Mac HandBrake, then you need to installed both HandBrake 64 bit and VLC 64 bit. If you come across error message says: "This version of HandBrake is 64 bit, VLC found but not 64 bit!" Then you can move on to solve HandBrake 64 VLC Error.
Click to learn more about how to rip DVD to MP4 on macOS >>
Step 2 - Change the HandBrake Source, Destination and Output Settings
The way your picture and sound quality will turn out in the resulting file depends on the settings you choose in this step. You could always go with the default settings, but if you'd like more control over the output, here's how to do it.
1. You can right click Source button you import your DVD or video file. And the loaded file information can be checked at HandBrake Mac version Source section.
2. In the Destination section you can set the output folder by clicking Browse button.
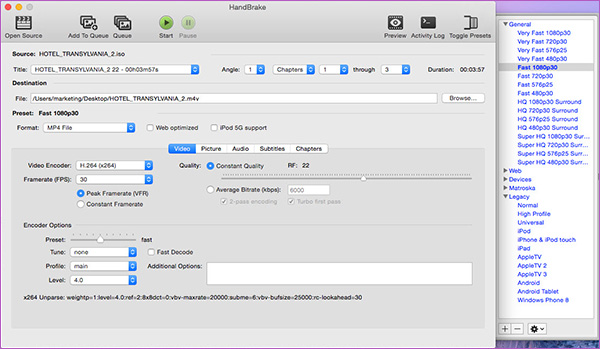
3. One of the first things you need to decide is what format (MP4, MKV,AVI, OGM) Output setting section also has 3 options you can choose: Large File Size, Web optimized and iPod 5G support.
How to Rip Copy Protected Movie DVDs on macOS Monterey/Big Sur?
WinX DVD Ripper for Mac - Best DVD Ripper for macOS, which can help you rip any movie DVDs at NO.1 fast speed, even with the new copy protections, to mainstream videos, such as MP4, H.264, MPEG, WMV, MOV, FLV. To bring users more convenience, this ripper has preloaded with 350+ portable gadgets, including iPhone, iPad Pro, Samsung Galaxy, Xbox One, PSP/PS5.
Step 3 - HandBrake Video Settings for Mac Version
Framerate(FPS): Select a frame rate that you prefer. If you want to maintain the original framerate of the source video, select the "Same as source" or "Variable Framerate (VFR)" option in HandBrake. This ensures that the converted video retains the same smoothness and timing as the original. If you prefer a consistent framerate throughout the converted video, choose the "Constant Framerate (CFR)" option in HandBrake. This is useful when compatibility or playback issues may arise with variable framerates, especially on certain devices or video players.
Quality: There are three options available: Specify an output size and the quality will depend on the specified output size; Select a birate. The higher bitrate you choose, the bigger size the output file will be, and the better quality you will get; Directly select a quality.
Encoder: Select the encoder you prefer. X264 is the default video encoder in HandBrake and is widely considered to be one of the best H.264 encoders available. It offers a good balance between video quality and file size. x264 is suitable for most situations and provides excellent compression efficiency.
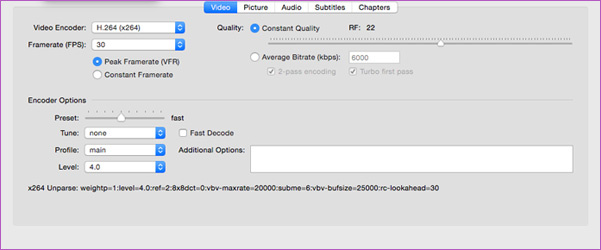
2-pass encoding (optional): This takes twice as long to encode, but it improves the video quality and doesn't make the file any larger. Read on to find how to calculate HandBrake video quality settings >>
Step 4 - HandBrake Mac Picture Setting
Click on Mac version HandBrake Picture Settings button to launch a separate window. The only thing you really want to do here is to compensate for interlaced or grainy, compressed looking video. HandBrake will have adjusted everything here for you based on the preset you selected.
Picture Settings: Here you can set video resolution and crop video. HandBrake highest resolution for the output video depends on the original video resolution and optimized output video for player such as iPod touch/iPhone, iPad, QuickTime, Apple TV, PlayStation, Xbox. If the source video has black borders or unwanted parts that you want to remove, you can use the cropping feature. HandBrake allows you to manually set the cropping values or use the "Auto Crop" option to automatically detect and remove black borders.
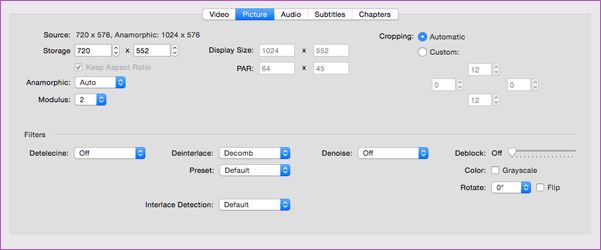
For example, the highest resolution optimized supported by iPhone and iPod Touch is 960*540, you can set up to 960*640 resolution for the output if the resolution of the original video is higher or set up to the same resolution with the original if the resolution of the original is lower. HandBrake crop function of HandBrake for Mac is kind of like a decoration here, because it is not powerful or practical.
Step 5 - Use HandBrake to Convert Videos on Mac Computer
Finally! Click on the Start button on the left top of Mac version HandBrake. The encoding time will depend on several variables including: the duration of the video file, the speed of your Mac computer. What other activity your computer is currently doing, the codec you selected (H264 Intel QSV or others) and if you decided to do a 2-pass encoding or not.
Conclusion of this HandBrake Tutorial for Mac
Since this is basic HandBrake tutorial for macOS users, to find the details explanation, you still need to cast an eye on HandBrake official site. And at times, you may come across with unexpected issues with HandBrake, so it is better to find some HandBrake alternatives in case.
Video Tutorial - How to Use Handbrake on Mac
You can certainly learn the process of using Handbrake on a Mac using video-based instructions. The Handbrake video tutorial allows you to see each step of the process being performed in real-time, making it easier to understand and follow along. You can visually observe Handbrake interface, buttons, and settings being used.
FAQs about How to Use Handbrake on Mac Computers
1. Does Handbrake still work on Mac?
Handbrake is still fully compatible with Mac systems. The software can be easily downloaded and installed on macOS, allowing you to convert video files to various formats. Handbrake is actively maintained and regularly updated, ensuring its seamless functionality on Mac operating systems.
2. How do I get Handbrake to work on my Mac?
To get Handbrake working on your Mac, download the Mac version of Handbrake and follow the on-screen instructions for installation. Once installed, launch Handbrake from your "Applications" folder. Use the "Source" button to select the video file you want to convert. Choose a preset or customize the output settings according to your preferences. Set the output destination folder by clicking "Browse" and then click "Start" to initiate the conversion process.
3. What does Handbrake for Mac do?
Handbrake for Mac is a versatile video conversion tool that enables you to convert videos from one format to another. It provides pre-configured presets for different devices and platforms, while also offering customization options for video settings such as codec, resolution, and bit rate. With features like batch conversion, subtitle and audio track selection, video filters and effects, and chapter markers, Handbrake is a powerful tool for converting and optimizing videos on your Mac.
4. How do I compress a video using Handbrake on a Mac?
To compress a video using Handbrake on a Mac, launch the Handbrake application. Select the source video by using the "Source" button and choosing the desired video file. Choose a compression preset or customize the settings under the "Presets," "Video," and "Audio" tabs. Adjust video settings like codec, frame rate, resolution, and quality if desired. Click "Start" to begin the compression process. Once completed, locate the compressed video in the designated output destination folder.


